


 本文介绍了如何使用Vue和Firebase构建一个Google Keep克隆应用,包括创建独立的数据层以管理Firebase交互,以及实现笔记的创建、更新和删除功能。文章详细讲解了如何重构组件以利用数据层,减少了代码重复,提高了可重用性。此外,还介绍了如何处理笔记的更新和删除事件,以及创建更新笔记的模态组件。
firebase vue
In the previous part we created a simple Google Keep Clone where the notes are layed out nicely by the Masonry library.
在上一部分中,我们创建了一个简单的Google Keep Clone,其中的注释由Masonry库很好地布置了。

Though this is a great start, we are still missing a few parts of a typical CRUD application. We still need to write the Update and Delete functionality. Another issue is that our Firebase code is scattered around the different components in our project. We should get rid of duplication and move all our Firebase related code to a single module. As a result we will have an app that is more DRY (Don't Repeat Yourself).
尽管这是一个很好的开始,但是我们仍然缺少典型CRUD应用程序的一些部分。 我们仍然需要编写更新和删除功能。 另一个问题是,我们的Firebase代码分散在项目中的不同组件中。 我们应该摆脱重复,并将所有与Firebase相关的代码移到单个模块中。 因此,我们将提供一个更加干燥(不要重复自己)的应用。
创建一个独立的数据层 ( Creating an independent data layer )
Instead of putting all the data logic directly in our components, it's a better idea to put it in an independent module.
与其将所有数据逻辑直接放置在我们的组件中,不如将其放置在一个独立的模块中是一个更好的主意。
Putting the shared data logic into a module has multiple benefits: better abstraction, easier refactoring, less duplication or DRY'er, and ensures reusability.
将共享数据逻辑放入模块有多个好处:更好的抽象,更容易的重构,更少的重复或DRY'er,并确保了可重用性。
Create a new file in a new folder: src/data/NoteRepository.js. This file will hold all the Firebase code to manage the notes.
Create a class called NoteRepository. This class will contain all the logic to create, update, and delete the notes.
在新文件夹src/data/NoteRepository.js创建一个新文件。 该文件将保存所有Firebase代码以管理注释。
创建一个名为NoteRepository的类。 此类将包含创建 , 更新和删除注释的所有逻辑。
The class will also be responsible for listening to all the Firebase-events inside the class. But the components need to be able to listen to those events too. You can achieve this by inheriting from the EventEmitter class that Node provides (see docs). Once the class extends the EventEmitter, the components can attach listeners to the NoteRepository via the on-method. Within the class you can fire events via the emit-method. Combined with the inherited EventEmitter functionality, the NoteRepository can listen to the Firebase-events, process the data, and propagate the events outwards so the components will receive the processed data.
该类还将负责侦听该类中的所有Firebase事件。 但是组件也必须能够侦听那些事件。 您可以通过继承Node提供的EventEmitter类来实现此EventEmitter ( 请参阅docs )。 一旦类扩展了EventEmitter ,组件就可以通过on-method将侦听器附加到NoteRepository 。 在该类中,您可以通过发出方法触发事件。 结合继承的EventEmitter功能, NoteRepository可以侦听Firebase事件,处理数据并向外传播事件,以便组件可以接收处理后的数据。
src/data/NoteRepository.js
src/data/NoteRepository.js
import EventEmitter from 'events'

// extend EventEmitter so user of NoteRepository can react to our own defined events (ex: noteRepository.on('added'))
class NoteRepository extends EventEmitter {
  constructor () {
    super()
  }
}
export default new NoteRepository() // this instance will be shared across imports
In the constructor add a property to hold the Firebase reference to our notes. Next attach listeners to the Firebase events. These listeners should create a note-object and propagate the event + note outwards via the emit-method.
在构造函数中添加一个属性,以保存Firebase对我们的注释的引用。 接下来,将侦听器附加到Firebase事件。 这些侦听器应该创建一个note对象,并通过发出方法向外传播event + note。
Previously, you only needed the title, and content to display the notes. But to update and delete a note, you will need a unique identifier. In Firebase each item has a unique key, which is either set programmatically, or automatically generated by Firebase. You can get the key by issuing the key-function. Before emitting the event, add the key to the note.
以前,您只需要标题和内容即可显示注释。 但是要更新和删除注释,您将需要一个唯一的标识符。 在Firebase中,每个项目都有一个唯一的密钥,该密钥可以通过编程设置,也可以由Firebase自动生成。 您可以通过发布key-function获得密钥。 在发出事件之前,将密钥添加到注释中。
src/data/NoteRepository.js
src/data/NoteRepository.js
import Firebase from 'firebase'
import EventEmitter from 'events'

// extend EventEmitter so user of NoteRepository can react to our own defined events (ex: noteRepository.on('added'))
class NoteRepository extends EventEmitter {
  constructor () {
    super()
    // firebase reference to the notes
    this.ref = new Firebase('https://<YOUR-FIREBASE-APP>.firebaseio.com/notes') // will have same result as new Firebase('https://<YOUR-FIREBASE-APP>.firebaseio.com/').child('notes')
    this.attachFirebaseListeners()
  }
  // attach listeners to Firebase
  attachFirebaseListeners () {
    this.ref.on('child_added', this.onAdded, this)
    this.ref.on('child_removed', this.onRemoved, this)
    this.ref.on('child_changed', this.onChanged, this)
  }
  onAdded (snapshot) {
    // process data
    let note = this.snapshotToNote(snapshot)
    // propagate event outwards with note
    this.emit('added', note)
  }
  onRemoved (oldSnapshot) {
    let note = this.snapshotToNote(oldSnapshot)
    this.emit('removed', note)
  }
  onChanged (snapshot) {
    let note = this.snapshotToNote(snapshot)
    this.emit('changed', note)
  }
  // processes the snapshots to consistent note with key
  snapshotToNote (snapshot) {
    // we will need the key often, so we always want to have the key included in the note
    let key = snapshot.key()
    let note = snapshot.val()
    note.key = key
    return note
  }
}
export default new NoteRepository() // this instance will be shared across imports
Now the components can listen to the repository, but the create, update, and delete functionality is still missing.
Create: Write a create-method that has a matching signature with the Firebase push-method, and pass the parameters to the push-method. It should accept a note, and an onComplete-callback which is optional.
现在,这些组件可以侦听存储库,但是仍然缺少create , update和delete功能。
创建 :编写一个具有与Firebase推送方法匹配的签名的创建方法,然后将参数传递给推送方法。 它应该接受一个注释,以及一个可选的onComplete回调。
create ({title = '', content = ''}, onComplete) {
    this.ref.push({title, content}, onComplete)
}Update: Write an update-method that accepts a note object (including key), and an onComplete-callback. To update the note in Firebase you need to get a reference to the specific object. You can create a reference by passing the unique key to the child-function of the notes reference. This will create a new Firebase reference by appending the key to the url of the parent-reference. You can then call the update method on the new child-reference passing in a note object (make sure you don't pass in the key).
Update :编写一个接受笔记对象(包括键)和onComplete回调的更新方法。 要在Firebase中更新注释,您需要获取对特定对象的引用。 您可以通过将唯一键传递到注释参考的子功能来创建参考。 通过将密钥附加到父引用的url,将创建一个新的Firebase引用。 然后,您可以在传递注释对象的新子引用上调用update方法(确保您没有传递密钥)。
update ({key, title = '', content = ''}, onComplete) {
    this.ref.child(key).update({title, content}, onComplete) // key is used to find the child, a new note object is made without the key, to prevent key being inserted in Firebase
    // this.ref.child(key) will create new reference like this new Firebase(`https://<YOUR-FIREBASE-APP>.firebaseio.com/notes/${key}`)
}Delete: Write a remove-method that accepts a note object (including key), and an onComplete-callback. You will only need the key of the note to remove the note in Firebase, but for ease of use and consistency you can just accept object and only take the key. Get the reference to the note via the child-method and call the remove-method.
Delete :编写一个接受笔记对象(包括键)和onComplete回调的移除方法。 您只需要注释的键即可在Firebase中删除该注释,但是为了易于使用和保持一致,您可以只接受对象而仅需使用该键。 通过子方法获取注释的引用,然后调用remove-method。
// removes a note
  remove ({key}, onComplete) {
    this.ref.child(key).remove(onComplete)
  }
You just created an independent class that manages the access and manipulation of the notes. When you put all the code together, the class should look like this. (Note that there are some extra helper methods that you'll use down the line of this part).
您刚刚创建了一个独立的类,用于管理笔记的访问和操作。 当您将所有代码放在一起时,该类应如下所示。 (请注意,您将在本部分的下面使用一些额外的帮助程序方法)。
src/data/NoteRepository.js
src/data/NoteRepository.js
import Firebase from 'firebase'
import EventEmitter from 'events'

// extend EventEmitter so user of NoteRepository can react to our own defined events (ex: noteRepository.on('added'))
class NoteRepository extends EventEmitter {
  constructor () {
    super()
    // firebase reference to the notes
    this.ref = new Firebase('https://<YOUR-FIREBASE-APP>.firebaseio.com/notes') // will have same result as new Firebase('https://<YOUR-FIREBASE-APP>.firebaseio.com/').child('notes')
    this.attachFirebaseListeners()
  }
  // creates a note
  create ({title = '', content = ''}, onComplete) {
    this.ref.push({title, content}, onComplete)
  }
  // updates a note
  update ({key, title = '', content = ''}, onComplete) {
    this.ref.child(key).update({title, content}, onComplete) // key is used to find the child, a new note object is made without the key, to prevent key being inserted in Firebase
    // this.ref.child(key) will create new reference like this new Firebase(`https://<YOUR-FIREBASE-APP>.firebaseio.com/notes/${key}`)
  }
  // removes a note
  remove ({key}, onComplete) {
    this.ref.child(key).remove(onComplete)
  }
  // attach listeners to Firebase
  attachFirebaseListeners () {
    this.ref.on('child_added', this.onAdded, this)
    this.ref.on('child_removed', this.onRemoved, this)
    this.ref.on('child_changed', this.onChanged, this)
  }
  // dettach listeners from Firebase
  detachFirebaseListeners () {
    this.ref.off('child_added', this.onAdded, this)
    this.ref.off('child_removed', this.onRemoved, this)
    this.ref.off('child_changed', this.onChanged, this)
  }
  onAdded (snapshot) {
    // process data
    let note = this.snapshotToNote(snapshot)
    // propagate event outwards with note
    this.emit('added', note)
  }
  onRemoved (oldSnapshot) {
    let note = this.snapshotToNote(oldSnapshot)
    this.emit('removed', note)
  }
  onChanged (snapshot) {
    let note = this.snapshotToNote(snapshot)
    this.emit('changed', note)
  }
  // processes the snapshots to consistent note with key
  snapshotToNote (snapshot) {
    // we will need the key often, so we always want to have the key included in the note
    let key = snapshot.key()
    let note = snapshot.val()
    note.key = key
    return note
  }
  // Finds the index of the note inside the array by looking for its key
  findIndex (notes, key) {
    return notes.findIndex(note => note.key === key)
  }
  // Finds the note inside the array by looking for its key
  find (notes, key) {
    return notes.find(note => note.key === key)
  }
}
export default new NoteRepository() // this instance will be shared across imports
Note that you are not using any vue related code. You can drop in our file into another framework without any problems. You have taken a great step to make the code more reusable!
请注意,您没有使用任何与vue相关的代码。 您可以毫无问题地将文件放入另一个框架。 您已迈出了重要的一步,以使代码更可重用!
重构组件以使用数据层 ( Refactoring the components to use the data layer )
Now that you have created a data layer, you can replace all the Firebase code with methods from the NoteRepository.
现在,您已经创建了数据层,您可以使用NoteRepository中的方法替换所有Firebase代码。
笔记组件 (Notes component)
Import the NoteRepository instance in the Notes-component and implement the events of the NoteRepository in the ready-method.
在Notes组件中导入NoteRepository实例,并在ready方法中实现NoteRepository的事件。
Added: Add the newly created note at the start of the notes array.
已添加 :将新创建的注释添加到notes数组的开始。
src/components/notes/Index.vue
src/components/notes/Index.vue
...
import noteRepository from '../../data/NoteRepository'
export default {
  ...
  ready () {
    ...
    noteRepository.on('added', (note) => {
      this.notes.unshift(note) // add the note to the beginning of the array
    })
    ...
  }
}Changed: Find the note that in the notes-array that is outdated. You can use the find helper method provided by NoteRepository for this. Once you found the outdated note, update its title and content.
已更改 :在便笺数组中找到已过时的便笺。 您可以为此使用NoteRepository提供的find helper方法。 找到过时的便笺后,请更新其标题和内容。
src/components/notes/Index.vue
src/components/notes/Index.vue
....
    noteRepository.on('changed', ({key, title, content}) => {
      let outdatedNote = noteRepository.find(this.notes, key) // get specific note from the notes in our VM by key
      outdatedNote.title = title
      outdatedNote.content = content
    })
...Removed: Find the note that needs to be removed and use the $remove-method on the notes-array passing in the note that needs to be removed. The $remove-method is a convenience method added by Vue (docs).
已删除 :找到需要删除的笔记,并使用notes-array上的$ remove方法传递需要删除的笔记。 $ remove方法是Vue( docs )添加的一种便捷方法。
src/components/notes/Index.vue
src/components/notes/Index.vue
...
    noteRepository.on('removed', ({key}) => {
      let noteToRemove = noteRepository.find(this.notes, key) // get specific note from the notes in our VM by key
      this.notes.$remove(noteToRemove) // remove note from notes array
    })
    ...
When a user adds, updates, or removes a note, everyone using the application will see the changes automatically!
当用户添加,更新或删除便笺时,使用该应用程序的每个人都会自动看到所做的更改!
Though masonry isn't laying out the notes anymore. You could encapsulate the masonry code in a method, and call it at the end of every callback. But let's use another Vue feature instead. In Vue you can listen to any changes to an array or object via the watch-property (docs) or via the $watch-method (docs).
尽管砌筑不再布置笔记。 您可以将砌体代码封装在一个方法中,并在每个回调的末尾调用它。 但是,让我们改用另一个Vue功能。 在Vue中,您可以通过监视属性( docs )或通过$ watch-method( docs )监听对数组或对象的任何更改。
Let's listen to all changes in the notes-array and tell masonry to layout the notes when something changes. By default Vue will only watch for changes to the array and not the changes inside the individual items contained in the array. To let Vue watch for changes inside those items you can pass in the deep: true option. Also note that you have to initialize the masonry-property in the ready-method so you can reference it from anywhere in the component.
让我们听听notes数组中的所有更改,并告诉砖石匠在某些更改时布局注释。 默认情况下,Vue将仅监视对阵列的更改,而不监视阵列中包含的各个项目内部的更改。 为了让Vue监视这些项目中的更改,您可以传入deep: true选项。 还要注意,您必须在就绪方法中初始化砌体属性,以便可以在组件中的任何位置引用它。
src/components/notes/Index.vue
src/components/notes/Index.vue
export default {
  ...
  watch: {
    'notes': { // watch the notes array for changes
      handler () {
        this.masonry.reloadItems()
        this.masonry.layout()
      },
      deep: true // we also want to watch changed inside individual notes
    }
  },
  ready () {
    this.masonry = new Masonry(this.$els.notes, {
      itemSelector: '.note',
      columnWidth: 240,
      gutter: 16,
      fitWidth: true
    })
    ...
  }
}
Putting it all together your code should look like this.
将所有内容放在一起,您的代码应如下所示。
src/components/notes/Index.vue
src/components/notes/Index.vue
import Masonry from 'masonry-layout'
import Note from './Note'
import noteRepository from '../../data/NoteRepository'
export default {
  components: {
    Note
  },
  data () {
    return {
      notes: []
    }
  },
  watch: {
    'notes': { // watch the notes array for changes
      handler () {
        this.masonry.reloadItems()
        this.masonry.layout()
      },
      deep: true // we also want to watch changed inside individual notes
    }
  },
  ready () {
    this.masonry = new Masonry(this.$els.notes, {
      itemSelector: '.note',
      columnWidth: 240,
      gutter: 16,
      fitWidth: true
    })
    noteRepository.on('added', (note) => {
      this.notes.unshift(note) // add the note to the beginning of the array
    })
    noteRepository.on('changed', ({key, title, content}) => {
      let outdatedNote = noteRepository.find(this.notes, key) // get specific note from the notes in our VM by key
      outdatedNote.title = title
      outdatedNote.content = content
    })
    noteRepository.on('removed', ({key}) => {
      let noteToRemove = noteRepository.find(this.notes, key) // get specific note from the notes in our VM by key
      this.notes.$remove(noteToRemove) // remove note from notes array
    })
  }
}
Now the Notes-component is working as before again, and responding to the changed/removed event! Another step closer to a full CRUD application. You can test this out by changing and removing notes with the Vulcan chrome extension or in the Firebase interface.
现在,Notes组件将再次像以前一样工作,并对已更改/已删除的事件做出响应! 向完整的CRUD应用程序又迈进了一步。 您可以通过使用Vulcan chrome扩展名或在Firebase界面中更改和删除注释来进行测试。
创建笔记组件 (Create note component)
Simply import the NoteRepository and remove the Firebase line with the NoteRepository's create-method.
只需导入NoteRepository并使用NoteRepository的create-method删除Firebase行。
src/components/notes/Create.vue
src/components/notes/Create.vue
import noteRepository from '../../data/NoteRepository'

export default {
  data () {
    return {
      title: '',
      content: ''
    }
  },
  methods: {
    createNote () {
      if (this.title.trim() || this.content.trim()) {
        noteRepository.create({title: this.title, content: this.content}, (err) => {
          if (err) throw err // TODO: inform the user
          this.title = ''
          this.content = ''
        })
      }
    }
  }
}
Although there is no visible change in the application, you just removed all the duplicate Firebase code! Great job!
尽管应用程序中没有可见的更改,但您只是删除了所有重复的Firebase代码! 很好!
删除笔记 ( Deleting notes )
Let's write the delete functionality first, because it is just so few lines of code. First add the font-awesome icon-font to your index.html.
让我们先编写删除功能,因为它只有几行代码。 首先将font-awesome icon-font添加到index.html 。
index.html
index.html
<!DOCTYPE html>
<html>
  <head>
    <meta charset="utf-8">
    <meta name="viewport" content="width=device-width">
    <title>Google Keep clone built with Vue and Firebase</title>
    <link rel="stylesheet" href="https://maxcdn.bootstrapcdn.com/font-awesome/4.6.1/css/font-awesome.min.css">
  </head>
  <body>
    <app></app>
    <!-- built files will be auto injected -->
  </body>
</html>
Then in the Note-component add a button with the trash-icon. Use the v-on:click.stop directive and bind it to the remove-method. In the remove method pass the note to the remove-method of the NoteRepository. Also add an edit button with a pencil-icon for later.
然后在“注释”组件中添加带有垃圾桶图标的按钮。 使用v-on:click.stop指令并将其绑定到remove-method。 在remove方法中,将注释传递到NoteRepository的remove-method。 还要添加带有铅笔图标的编辑按钮,以备后用。
src/components/notes/Note.vue
src/components/notes/Note.vue
<template>
  <div class="note">
    <h1>{{note.title}}</h1>
    <pre>{{note.content}}</pre>
    <button type="button" v-on:click.stop="remove">
      <i class="fa fa-trash-o" aria-hidden="true"></i>
    </button>
    <button class="edit" type="button">
      <i class="fa fa-pencil" aria-hidden="true"></i>
    </button>
  </div>
</template>
<script>
import noteRepository from '../../data/NoteRepository'
export default {
  props: ['note'],
  methods: {
    remove () {
      noteRepository.remove(this.note, (err) => {
        if (err) throw err // TODO: inform the user
      })
    }
  }
}
</script>
<style>
  .note{
    background: #fff;
    border-radius: 2px;
    box-shadow: 0 2px 5px #ccc;
    padding: 10px;
    margin: 8px 0;
    width: 240px; /* collumn size */
    transition: box-shadow .5s;
    cursor: default;
  }
  .note h1{
    font-size: 1.1em;
    margin-bottom: 6px;
    word-wrap: break-word;
  }
  .note pre {
    font-size: 1.1em;
    margin-bottom: 10px;
    white-space: pre-wrap;
    word-wrap: break-word;
    font-family: inherit;
  }
  .note button{
    background: none;
    border: none;
    font-size: 20px;
    opacity: 0;
    cursor: pointer;
    transition: opacity .5s;
    margin: 0 4px 0 0;
  }
  .note button.edit{
    float: right;
  }
  .note:hover, .note:focus{
    box-shadow: 0 2px 10px #999;
  }
  .note:hover button, .note:focus button{
    opacity: 0.6;
  }
  .note button:hover, .note button:focus{
    opacity: 1;
  }
</style>
And you're done! When you hover over a note, it should look like this.
 On click of the trash button, the note will be removed from Firebase, and when it is being removed, Firebase will fire the removed event, which the Notes-component is listening to and will remove the note from the array.
大功告成! 将鼠标悬停在便笺上时,它应该看起来像这样。
更新笔记 ( Updating notes )
Create a new file src/components/notes/UpdateModal.vue. This component will be a modal containing a form to update a specific note. Similarly to the Note-component, define a property on the Update-component to pass through the note to be updated. In the template, create a form similar to the form in the Create-component and bind the input and textarea to the title and content. Now bind the submit-event of the form to a new method called 'update'. Inside this method, pass through the note to the update method of the NoteRepository and dismiss the modal in the callback.
创建一个新文件src/components/notes/UpdateModal.vue 。 该组件将是一个模态,包含用于更新特定注释的表单。 与“注释”组件类似,在“更新”组件上定义一个属性以传递要更新的注释。 在模板中,创建一个类似于“创建”组件中的表单的表单,并将输入和文本区域绑定到标题和内容。 现在,将表单的提交事件绑定到一个名为“ update”的新方法。 在此方法内部,将注释传递到NoteRepository的update方法,并在回调中关闭模式。
Use v-if="note" on the root element so that the modal will only be shown when a note is bound to it. To dismiss the modal, simply set the note to null. Also add another trash-button and bind the click event to a remove method which calls the remove method of the NoteRepository.
在根元素上使用v-if="note" ,以便仅在将音符绑定到其上时才显示模式。 要消除模态,只需将音符设置为null。 还添加另一个垃圾桶按钮,并将click事件绑定到调用NoteRepository的remove方法的remove方法。
src/components/notes/UpdateModal.vue
src/components/notes/UpdateModal.vue
<template>
  <div v-if="note" transition="modal" class="backdrop" v-on:click="dismissModal">
    <form class="edit-note" v-on:submit.prevent="update" v-on:click.stop="">
      <input name="title" v-model="note.title" placeholder="Title"/>
      <textarea name="content" v-model="note.content" placeholder="Text goes here..." rows="8">
      </textarea>
      <button type="button" v-on:click="remove">
        <i class="fa fa-trash-o" aria-hidden="true"></i>
      </button>
      <button type="submit">Done</button>
    </form>
  </div>
</template>
<script>
  import noteRepository from '../../data/NoteRepository'
  export default {
    props: ['note'],
    methods: {
      remove () {
        noteRepository.remove(this.note, (err) => {
          if (err) throw err // TODO: inform the user
          this.dismissModal()
        })
      },
      update () {
        noteRepository.update(this.note, (err) => {
          if (err) throw err // TODO: inform the user
          this.dismissModal()
        })
      },
      dismissModal () {
        this.note = null
      }
    }
  }
</script>
<style>
  .backdrop{
    position: fixed;
    left: 0;
    top: 0;
    right: 0;
    bottom: 0;
    background: rgba(50,50,50,0.8);
  }
  form.edit-note{
    position: relative;
    width: 480px;
    max-width: 100%;
    margin: 25vh auto 0;
    background: #fff;
    padding: 15px;
    border-radius: 2px;
    box-shadow: 0 1px 50px #555;
  }
  form.edit-note input, form.edit-note textarea{
    width: 100%;
    max-width: 100%;
    border: none;
    padding: 4px;
    outline: none;
    font-size: 1.2em;
  }
  form.edit-note button[type=submit]{
    font-size: 18px;
    float: right;
    background: #41b883;
    color: #fff;
    border: none;
    border-radius: 3px;
    opacity: 1;
    cursor: pointer;
    padding: 4px 6px;
    margin: 0;
  }
  form.edit-note button{
    background: none;
    border: none;
    font-size: 20px;
    opacity: 0.6;
    cursor: pointer;
    transition: opacity .5s;
    margin: 0 4px 0 0;
  }
  form.edit-note button:hover, form.edit-note button:focus{
    opacity: 1;
  }

  /* modal transition */
  .modal-transition{
    transition: opacity .3s ease;
    opacity: 1;
  }
  .modal-transition form{
    transition: transform .3s ease;
  }
  .modal-enter, .modal-leave {
    opacity: 0;
  }

  .modal-enter form,
  .modal-leave form {
    -webkit-transform: scale(1.1);
    transform: scale(1.1);
  }
</style>
Instead of using a library for this modal, you can simply rely on CSS in combination with the transition feature of Vue to create a good looking modal. Transition in Vue is similar to how Angular Animate works. When you apply directives like v-if, v-show, v-for, etc. it will apply classes to the element so you can hook up your own CSS transitions.
When you set transition="modal", Vue will set the class .modal-transition for you to setup the default state. When the state of v-if="note" changes to truthy, Vue will add the .modal-enter class and remove it when your animation has finished. When the state becomes falsy, it will add the .modal-leave class instead.
您可以仅将CSS与Vue的过渡功能结合使用,而无需使用用于该模式的库来创建美观的模式。 Vue中的过渡类似于Angular Animate的工作方式。 当您应用v-if,v-show,v-for等指令时,它将对元素应用类,以便您可以连接自己CSS过渡。
当您设置transition="modal" ,Vue将为您设置类.modal-transition来设置默认状态。 当v-if="note"更改为true时,Vue将添加.modal-enter类,并在动画完成后将其删除。 当状态变为虚假时,它将添加.modal-leave类。
The div.backdrop is the dark overlay above all the other content. On the click of the backdrop, you should also dismiss the modal. To make sure the click-event isn't fired when clicking inside the form, you should add v-on:click.stop="" which will stop the event from bubbling up. Using a transition you can fade in the backdrop, and apply a scale transformation to the form for that nice modal effect.
div.backdrop是所有其他内容之上的深色覆盖。 单击背景,还应该关闭模态。 为了确保在单击表单内部时不会触发click-event,您应该添加v-on:click.stop="" ,这将阻止事件冒泡。 使用过渡,您可以在背景中淡入淡出,并为该表格应用比例转换以获得该模态效果。
/* modal transition */
.modal-transition{
  transition: opacity .3s ease;
  opacity: 1;
}
.modal-transition form{
  transition: transform .3s ease;
}
.modal-enter, .modal-leave {
  opacity: 0;
}

.modal-enter form,
.modal-leave form {
  -webkit-transform: scale(1.1);
  transform: scale(1.1);
}
Now that the update-modal is finished you can check out how it looks by adding the Update-component to the App-component and temporarily hardcoding the note-attribute.
现在,更新模式已完成,您可以通过将更新组件添加到App组件并临时对笔记属性进行硬编码来查看其外观。
<template>
  <div>
    <create-note-form></create-note-form>
    <notes></notes>
    <update-modal :note="{title: 'test', content: 'lorem ipsum'}"></update-modal>
  </div>
</template>
<script>
  import Notes from './components/notes/Index'
  import CreateNoteForm from './components/notes/Create'
  import UpdateModal from './components/notes/UpdateModal'
  export default {
    components: {
      Notes,
      CreateNoteForm,
      UpdateModal
    }
  }
</script>
The modal should appear and look like the picture below. When you click on the backdrop, the modal should disappear with a smooth animation. (The update and delete button are not working because they expect the note has a key)
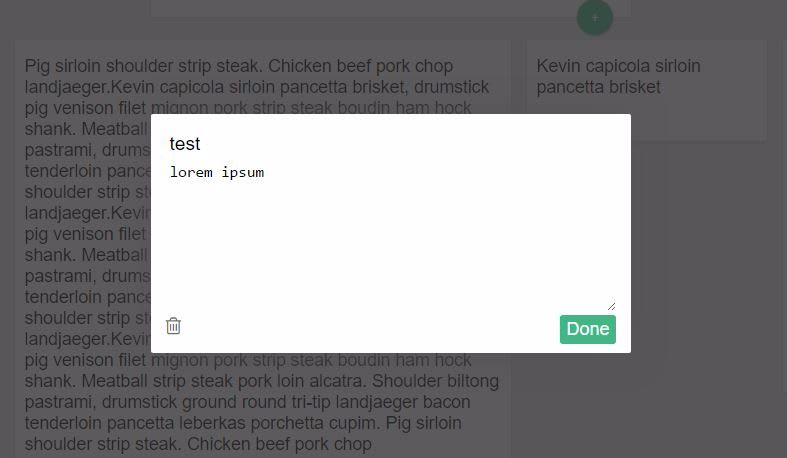
模态应该出现并看起来像下面的图片。 当您单击背景时,模态应该消失,并带有平滑的动画。 (“更新和删除”按钮不起作用,因为他们期望注释具有密钥)
Now that the component is ready, let's integrate it with the rest of the app.
When a user clicks on a note, the update-modal should appear. So the Notes-component should be able to tell its parent that a note has been selected. In the previous part, you already communicated from a parent component (notes) to a child component (note) through the attributes of the child. Another way to communicate between parent and child component is in the form of events. In a Vue component, there are three different ways to fire an event.
现在组件已准备就绪,让我们将其与应用程序的其余部分集成。
当用户单击注释时,将出现更新模式。 因此,Notes组件应该能够告诉其父级已选择了一个便笺。 在上一部分中,您已经通过子级的属性从父级组件(注释)传递到子级组件(注释)。 父组件和子组件之间进行通信的另一种方法是事件形式。 在Vue组件中,有三种触发事件的不同方法。
$emitwill fire an event on itself. This means you can listen to the event within the component, but parents and descendants/children will not receive the event.$emit将自身触发一个事件。 这意味着您可以在组件中收听事件,但是父母和后代/孩子将不会收到事件。$dispatchwill send the event to the parent components$dispatch会将事件发送到父组件$broadcastwill send the event to the descendants/children of the component$broadcast会将事件发送给组件的子代/子代
Since the Notes-component needs to communicate with its parent, you will need to use $dispatch. In the Notes-component, add a new method 'selectNote' accepting a note. In this method, fire an event 'note.selected' and pass in the note as the second argument. This method needs to be fired on the click of a note. Bind the 'selectNote' method on the notes using v-on:click="(note)".
由于Notes组件需要与其父组件进行通信,因此需要使用$dispatch 。 在Notes组件中,添加一个接受注释的新方法“ selectNote”。 在此方法中,触发事件“ note.selected”,并将注释作为第二个参数传递。 单击注释便需要触发此方法。 使用v-on:click="(note)"将'selectNote'方法绑定到笔记v-on:click="(note)" 。
src/components/notes/Index.vue
src/components/notes/Index.vue
<template>
  <div class="notes" v-el:notes>
    <note
      v-for="note in notes"
      :note="note"
      v-on:click="selectNote(note)"
      >
    </note>
  </div>
</template>
<script>
  ...
  export default {
    ...
    methods: {
      selectNote ({key, title, content}) {
        // notify listeners that user selected a note
        // pass in a copy of the note to prevent edits on the original note in the array
        this.$dispatch('note.selected', {key, title, content})
      }
    },
    ...
  }
</script>
Now in the App-component you can listen to the event and pass the note to the modal via selectedNote.
现在,在App组件中,您可以收听事件并将注释通过selectedNote传递给模式。
src/App.vue
src/App.vue
<template>
  <div>
    <create-note-form></create-note-form>
    <notes></notes>
    <update-modal :note.sync="selectedNote"></update-modal>
  </div>
</template>
<script>
  import Notes from './components/notes/Index'
  import CreateNoteForm from './components/notes/Create'
  import UpdateModal from './components/notes/UpdateModal'
  export default {
    components: {
      Notes,
      CreateNoteForm,
      UpdateModal
    },
    data () {
      return {
        selectedNote: null
      }
    },
    events: {
      'note.selected': function (note) {
        this.selectedNote = note
      }
    }
  }
</script>
When the user clicks on a note, the Notes-component will fire the 'note.selected'-event. The App-component will listen to the event and set the selectedNote. Because of the binding the update-modal will appear instantly. To dismiss the modal, the note will be set to null in the modal's viewmodel.
Although the note inside the modal is null, the selectedNote still contains the note-object. That's because by default Vue uses one-way binding. When the App-component adjusts the selectedNote, the note inside the modal will also be updated, but not the other way around. To adjust the type of binding, you can pick between two modifiers: :note.sync="selectedNote" for two-way binding and :note.once="selectedNote" for one-time binding.
当用户单击便笺时,便笺组件将触发“ note.selected”事件。 App组件将监听事件并设置selectedNote 。 由于绑定,更新模式将立即出现。 要消除模态,注释将在模态的视图模型中设置为null。
尽管模态内的note为空,但selectedNote仍包含注释对象。 这是因为默认情况下,Vue使用单向绑定。 当应用程序组件调整selectedNote ,模态内的note也会更新,但不会更新。 要调整绑定类型,可以在两个修饰符之间进行选择:note.sync="selectedNote"用于双向绑定 , :note.once="selectedNote"用于一次性绑定 。
- Two-way binding: will make make sure the changes in the
selectedNotewill update thenoteinside the modal, and the changes to thenotein the modal will also sync back to theselectedNote. 双向绑定 :将确保这变化selectedNote将更新note模态内部,更改note的模式也将同步回selectedNote。 - One-time binding: will bind the value one time, and won’t sync from then on. 一次性绑定 :将绑定一次值,此后将不再同步。
To make sure that the selectedNote in the App-component and the note in the update-modal are in sync, you should use the .sync modifier.
为了确保App组件中的selectedNote和update-modal中的note同步,应使用.sync修饰符。
Now you have a fully functional CRUD application! Great job!
现在您有了功能齐全的CRUD应用程序! 很好!
结语 ( Wrapping up )
We finally have our fully functional CRUD application. Note that we could have used the Vue-router to bind a URL to our update modal, but for the size of this app our approach is an appropriate solution.
我们终于有了功能齐全的CRUD应用程序。 请注意,我们可以使用Vue-router将URL绑定到我们的更新模式,但是对于此应用程序的大小,我们的方法是一种合适的解决方案。
Although, this part might seem like a big chunk, we were still able to maintain a clean architecture and keep our code short (~450 lines including HTML/CSS) and readable.
尽管这部分看起来似乎很大,但是我们仍然能够保持干净的体系结构并使代码简短(包括HTML / CSS约450行)并易于阅读。
- We refactored all our Firebase code to an independent data-layer 我们将所有Firebase代码重构为一个独立的数据层
- We added Update and Delete functionality 我们添加了更新和删除功能
- With relatively little code we created a fully functional CRUD application 用相对较少的代码,我们创建了功能齐全的CRUD应用程序
Now there is only one part left to tackle: authentication and authorization. In the last part we will create a login/register form and use the built-in authentication and authorization mechanisms of Firebase.
现在只剩下一部分要解决: 身份验证和授权 。 在最后一部分中,我们将创建一个登录/注册表单,并使用Firebase的内置身份验证和授权机制。
Don't hesitate to ping me if you have any issues!
如果您有任何问题,请随时与我联系!
翻译自: https://scotch.io/tutorials/building-a-google-keep-clone-with-vue-and-firebase-pt-2
firebase vue


 295
295

 被折叠的 条评论
为什么被折叠?
被折叠的 条评论
为什么被折叠?
 到【灌水乐园】发言


