In the previous article we setup an Electron project, discussed the basic concepts of React and created a useless example to get us started. Now we will start making something - a music app.
在上一篇文章中,我们设置了一个Electron项目,讨论了React的基本概念,并创建了一个无用的示例来使我们入门。 现在,我们将开始制作音乐应用程序。
We also discussed about the types of components which are presentation and container components. In this tutorial we will focus on our presentation component and talk about container in the next.
我们还讨论了表示类型和容器组件的类型。 在本教程中,我们将重点介绍演示组件,并在接下来的内容中讨论容器。
重新访问应用目录结构 ( Revisit app Directory Structure )
| ---app #All React projects goes here
| ----components # Presentation Component Directory
| ------details.component.js
| ------footer.component.js
| ------player.component.js
| ------progress.component.js
| ------search.component.js
| ----containers # Container Component Directory
| ------app.container.js
| ----app.js
The app folder has two sub folders and an app.js at its root. Our only concern in this section of the series is app/components where our presentation component will live and app.js which will put the components together and tie them to the DOM.
app文件夹的根有两个子文件夹和一个app.js 在本系列的此部分中,我们唯一关心的是app/components (演示文稿组件将在其中运行)和app.js , app.js将这些组件放在一起并将它们绑定到DOM。
组件 ( Components )
We will build the presentation component one after the other. The idea of components makes it easier for designers to work with wireframes and transform the wire-frames into components. Below is a wireframe for Scotch Player:
我们将一个接一个地构建演示组件。 组件的概念使设计人员可以更轻松地使用线框并将线框转换为组件。 以下是Scotch Player的线框:
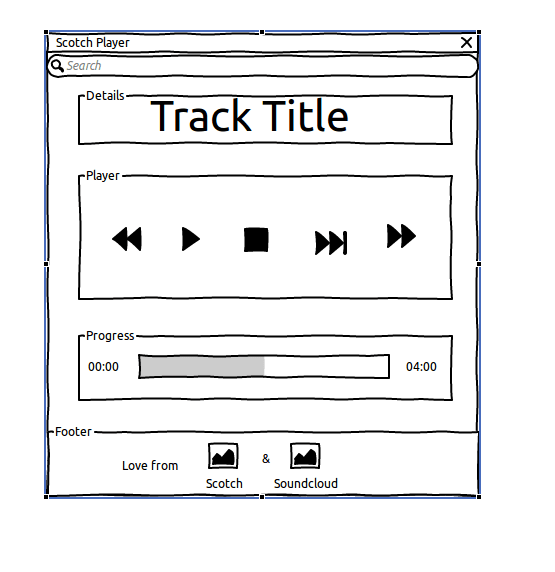
With the above wireframe, it becomes really simple to fish out the components and reason around them. We have 5 UI (presentation) components:
使用上面的线框,找出零件及其周围的原因变得非常简单。 我们有5个UI(演示)组件:
- Search 搜索
- Details 细节
- Player 播放器
- Progress 进展
- Footer 页脚
A presentation component can also be referred to as UI component
表示组件也可以称为UI组件
搜索(UI)组件 ( Search (UI) Component )
This component lives in app/components/search.component.js and has the same basic React component skeleton:
该组件位于app/components/search.component.js并具有相同的基本React组件框架:
// Import React
import React from 'react' ;

// Create Search component class
class Search extends React . Component {

  render ( ) {
    // Return JSX via render()
    return (
      < div className = "search" >

      < / div >
    ) ;
  }

}

// Export Search
export default Search
What will be cool is that instead of using the usual search form with a submit button, we could make use of an auto-complete component. The React team has an awesome auto-complete component which we aready included in the package.json; no need to re-invent the wheel:
很棒的是,我们可以使用自动完成组件来代替通常的带有提交按钮的搜索表单。 React团队有一个很棒的自动完成组件 ,我们将它包含在package.json ; 无需重新发明轮子:
// Import React
import React from 'react' ;

// Import React's Autocomplete component
import Autocomplete from 'react-autocomplete' ;

// Create Search component class
class Search extends React . Component {

  render ( ) {
    // Return JSX via render()
    return (
      < div className = "search" >
        { /*Autocomplete usage with value and behavior handled via this.props*/ }
        < Autocomplete
         ref = "autocomplete"
         inputProps = { { title : "Title" } }
         value = { this . props . autoCompleteValue }
         { /*Array of tracks is passed in to items*/ }
         items = { this . props . tracks }
         { /*Single value selected*/ }
         getItemValue = { ( item ) => item . title }
         { /*What happens when an item is selected*/ }
         onSelect = { this . props . handleSelect }
         { /*What happens when keystrokes are received*/ }
         onChange = { this . props . handleChange }
         { /*How items are redered.*/ }
         renderItem = { this . handleRenderItem . bind ( this ) }
       / >
      < / div >
    ) ;
  }

}

// Export Search
export default Search
Although
{/* */}is the proper way to comment in JSX, React will not allow those comments between properties, therefore, remove in your usage.尽管
{/* */}是在JSX中注释的正确方法,但是React不允许在属性之间添加这些注释,因此,请删除您的用法。
renderitem is the only property that does not receive props but value which is handleRenderitem and is created as a method in the Search class:
renderitem是唯一不接收属性但值为handleRenderitem并作为Search类中的方法创建的属性:
// ...
//class Search extends React.Component{
  handleRenderItem ( item , isHighlighted ) {
    // Some basic style
    const listStyles = {
      item : {
        padding : '2px 6px' ,
        cursor : 'default'
      } ,

      highlightedItem : {
        color : 'white' ,
        background : '#F38B72' ,
        padding : '2px 6px' ,
        cursor : 'default'
      }
    } ;

    // Render list items
    return (
      < div
        style = { isHighlighted ? listStyles . highlightedItem : listStyles . item }
        key = { item . id }
        id = { item . id }
      > { item . title } < / div >
    )
  }
//  render() {
// ...
Notice how styles are pased in too. In React there is room for global styles and inline dynamic styles as seen above.
注意样式也是如何粘贴的。 在React中,如上所述,可以使用全局样式和内联动态样式。
Note that the Search component has no constructor method. If all a component does is receive props (which is exactly what UI components do), then the constructor is not needed.
请注意,搜索组件没有构造函数方法。 如果所有组件所做的只是接收道具(这正是UI组件所做的事情),则不需要构造函数。
To see what we have done so far, update the app.js with the following:
要查看到目前为止我们所做的事情,请使用以下内容更新app.js :
// ES6 Component
// Import React and ReactDOM
import React from 'react' ;
import ReactDOM from 'react-dom' ;

// Import Search Component
import Search from './components/search.component' ;

// Component Class
class App extends React . Component {
    // render method is most important
    // render method returns JSX template
    render ( ) {
        return (
          < Search / >
        ) ;
    }
}

// Render to ID content in the DOM
ReactDOM . render (
    < App / > ,
    document . getElementById ( 'content' )
) ;
See how Search is imported and used inside App. No functionality attached yet, remember this section is just about UI
了解如何在App导入和使用Search 。 尚未附加任何功能,请记住本节仅关于UI
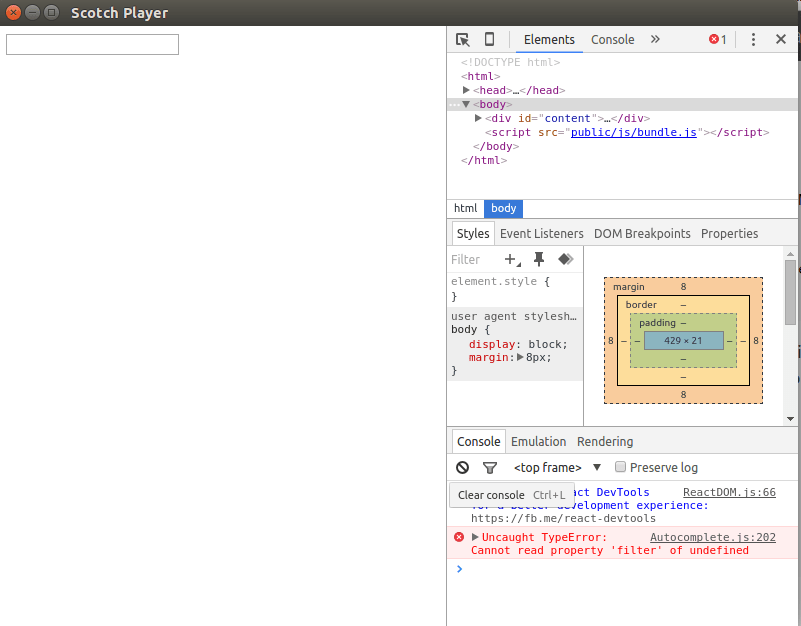
Yeah! So darn ugly! We will fix that later.
是的 真丑! 我们稍后会修复。
详细信息(UI)组件 ( Details (UI) Component )
This is the simplest component we will create as it just has a h3 tag with the track title:
这是我们将创建的最简单的组件,因为它只有带有轨道标题的h3标签:
// Import React
import React from 'react' ;

class Details extends React . Component {
  // Render
  render ( ) {
    return (
      < div className = "details" >
        < h3 > { this . props . title } < / h3 >
      < / div >
    )
  }

}
// Export
export default Details
We update app.js with Details:
我们使用Details更新app.js :
// ES6 Component
// Import React and ReactDOM
import React from 'react' ;
import ReactDOM from 'react-dom' ;

// Import Search Component
import Search from './components/search.component' ;

// Import Details Component
import Details from './components/details.component' ;

// Component Class
class App extends React . Component {
    // render method is most important
    // render method returns JSX template
    render ( ) {
        return (
          < div >
            < Search / >
            { /* Added Details Component */ }
            < Details title = { 'Track title' } / >
          < / div >
        ) ;
    }
}

// Render to ID content in the DOM
ReactDOM . render (
    < App / > ,
    document . getElementById ( 'content' )
) ;
We import the Details component and add it to the App.
我们导入Details组件并将其添加到App 。
JSX will fail to compile if we do not wrap and expose the content using only one tag. That's why we wrapped
SearchandDetailswithdiv如果我们不仅使用一个标签来包装和公开内容,JSX将无法编译。 这就是为什么我们用
div包装“Search和“Details

播放器(UI)组件 ( Player (UI) Component )
The player component is made of the controls for our music player:
播放器组件由音乐播放器的控件组成:
// Import React
import React from 'react' ;

// Import ClassNames
import ClassNames from 'classnames' ;

// Player component class
class Player extends React . Component {

  render ( ) {
    // Dynamic class names with ClassNames
    const playPauseClass = ClassNames ( {
      'fa fa-play' : this . props . playStatus == 'PLAYING' ? false : true ,
      'fa fa-pause' : this . props . playStatus == 'PLAYING' ? true : false
    } ) ;

    // Return JSX
    return (
      < div className = "player" >
        { /*Rewind Button*/ }
        < div className = "player__backward" >
          < button onClick = { this . props . backward } > < i className = "fa fa-backward" > < / i > < / button >
        < / div >
        < div className = "player__main" >
          { /*Play/Pause Button*/ }
          < button onClick = { this . props . togglePlay } > < i className = { playPauseClass } > < / i > < / button >
          { /*Stop Button*/ }
          < button onClick = { this . props . stop } > < i className = "fa fa-stop" > < / i > < / button >
          { /*Random Track Button*/ }
          < button onClick = { this . props . random } > < i className = "fa fa-random" > < / i > < / button >
        < / div >
        { /*Forward Button*/ }
        < div className = "player__forward" >
          < button onClick = { this . props . forward } > < i className = "fa fa-forward" > < / i > < / button >
        < / div >
      < / div >
    )
  }

}

// Export Player
export default Player
The new stuff to observe in this component is that we imported a classnames utility library which helps us dynamically set classes. It is useful here to swith the play/pause button to pause or play depending on the current state of the track.
在该组件中要观察的新内容是,我们导入了一个classnames实用程序库,该库可帮助我们动态设置类。 在这里,根据轨道的当前状态,使用play/pause按钮pause或play非常有用。
The events callbacks will be handled in the container component which we will discuss in the next section. Next, include Player component in app.js:
events回调将在容器组件中处理,我们将在下一部分中进行讨论。 接下来,在app.js包含Player组件:
// ES6 Component
// Import React and ReactDOM
import React from 'react' ;
import ReactDOM from 'react-dom' ;

// Import Search Component
import Search from './components/search.component' ;

// Import Details Component
import Details from './components/details.component' ;

// Import Player Component
import Player from './components/player.component' ;

// Import Progress Component
// Component Class
class App extends React . Component {

    // render method is most important
    // render method returns JSX template
    render ( ) {
        return (
          < div >
            < Search / >
            < Details title = { 'Track title' } / >
            { /* Added Player component*/ }
            < Player  / >
          < / div >
        ) ;
    }

}

// Render to ID content in the DOM
ReactDOM . render (
    < App / > ,
    document . getElementById ( 'content' )
) ;
We need to add font-awesome to index.html for the control icons to look as expected:
我们需要将font-awesome添加到index.html以使控件图标看起来像预期的那样:
<!-- ... -->
  < title > Scotch Player </ title >
    < link rel = " stylesheet " href = " https://maxcdn.bootstrapcdn.com/font-awesome/4.6.1/css/font-awesome.min.css " >
<!-- ... -->
You will end up dissapointed if you try clicking them - no behavior or state yet. Relax!
如果您尝试单击它们,最终将感到失望-尚无任何行为或状态。 放松!
进度(UI)组件 ( Progress (UI) Component )
This guy is a simple one also - just a:
这个家伙也很简单-只是:
- progress bar 进度条
- total play time 总上场时间
- elapsed time: 经过时间:
// Import React
import React from 'react' ;

// Create Progress component class
class Progress extends React . Component {

  // Render method
  render ( ) {

    return (
      < div className = "progress" >
        { /* Elapsed time */ }
        < span className = "player__time-elapsed" > { this . props . elapsed } < / span >
        { /* Progress Bar */ }
        < progress
           value = { this . props . position }
           max = "1" > < / progress >
         { /* Total time */ }
         < span className = "player__time-total" > { this . props . total } < / span >
      < / div >
    )
  }

}

//Export Progress
export default Progress
And now to include this component in app.js like we did for the others:
现在像我们对其他组件所做的那样将其包含在app.js :
// ES6 Component
// Import React and ReactDOM
import React from 'react' ;
import ReactDOM from 'react-dom' ;

// Import Search Component
import Search from './components/search.component' ;

// Import Details Component
import Details from './components/details.component' ;

// Import Player Component
import Player from './components/player.component' ;

// Import Progress Component
import Progress from './components/progress.component' ;

// Component Class
class App extends React . Component {

    // render method is most important
    // render method returns JSX template
    render ( ) {
        return (
          < div >
            < Search / >
            < Details title = { 'Track title' } / >
            < Player  / >
            { /* Added Progress component*/ }
            < Progress
              position = { '0.3' }
              elapsed = { '00:00' }
              total = { '0:40' } / >
          < / div >
        ) ;
    }

}

// Render to ID content in the DOM
ReactDOM . render (
    < App / > ,
    document . getElementById ( 'content' )
) ;
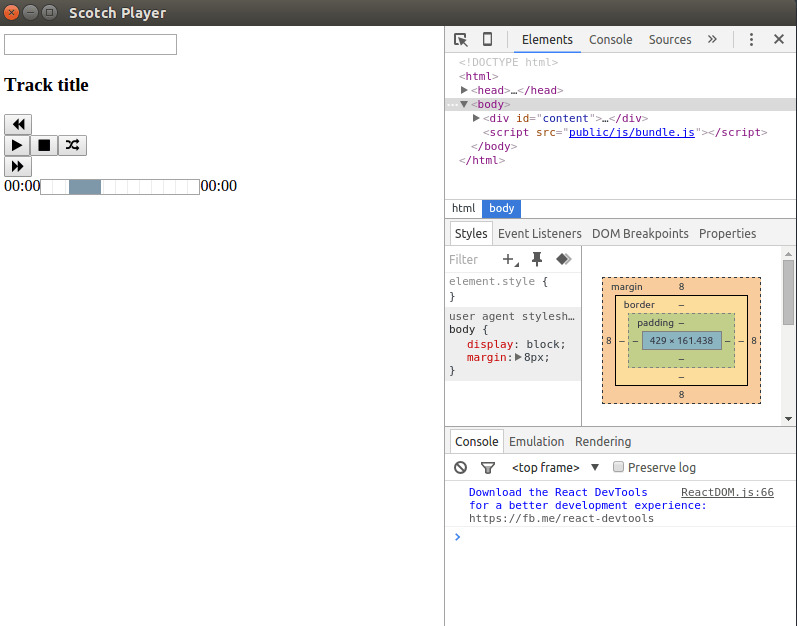
After updating the app.js as we have been doing, you should have something like the image below:
像我们一直在更新app.js之后,您应该具有下图所示的内容:
页脚(UI)组件 ( Footer (UI) Component )
The last is the footer component. This is a completely dumb static component:
最后是footer组件。 这是一个完全愚蠢的静态组件:
import React from 'react' ;

class Footer extends React . Component {
  render ( ) {
    return (
      < div className = "footer" >
        < p > Love from < img src = "public/img/logo.png" className = "logo" / >
            & < img src = "public/img/soundcloud.png" className = "soundcloud" / > < / p >
      < / div >
    )
  }

}

export default Footer
Include in app.js, add the images in the public/img directory and the app should be looking like the image below:
包含在app.js ,将图像添加到public/img目录中,该应用程序应如下图所示:
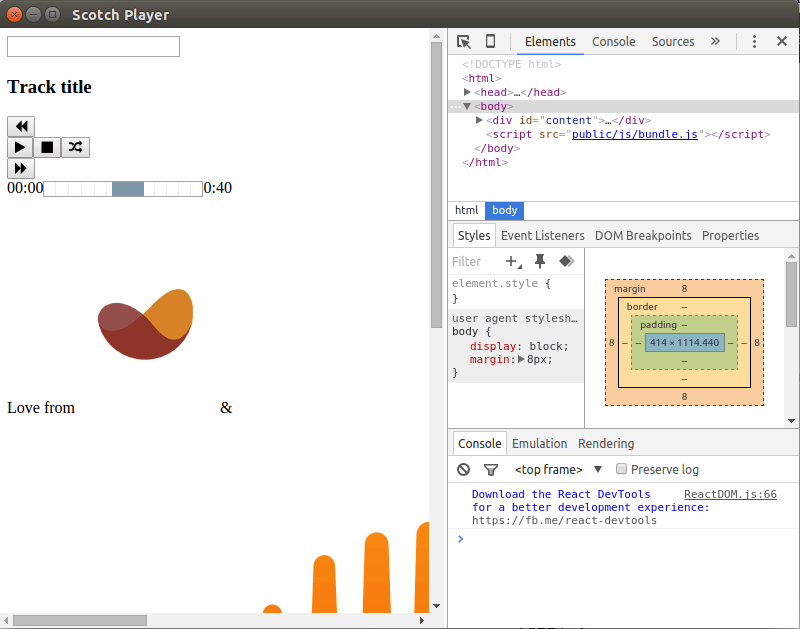
Awful look, right? Let's fix that.
糟透了,对吧? 让我们修复它。
整体风格 ( Global Styles )
React supports inline styles which we have seen. Inline styles are handy for dynamic functionality and to compose reusable components. This does not mean that we cannot use our global style and at the time of this writing, React has no rigid recommendation for how styles are added.
React支持我们已经看到的内联样式 。 内联样式对于动态功能和组成可重用组件很方便。 这并不意味着我们不能使用全局样式,在撰写本文时,React还没有关于如何添加样式的严格建议。
We won't spend much time talking about the styles as it is out of scope. Just dump the following in public/css/globals.css and wait for the magic:
我们不会花太多时间谈论这些样式,因为它们超出了范围。 只需将以下内容转储到public/css/globals.css然后等待魔术 :
/* Box sizing resets*/
*, * :before , * :after  {
  box-sizing : border-box ;
}

/* Body resets and fancy font*/
body {
  margin : 0 ;
  font-family : 'Exo 2' , sans-serif ;
}

.scotch_music {
  position : relative ;
}

.search div, .search input  {
  width : 100% ;
}

.search input  {
  border : none ;
  border-bottom : 2 px solid rgb ( 243 , 139 , 114 ) ;
  outline : none ;
  background : rgba ( 255 , 255 , 255 , 0.8 ) ;
  padding : 5 px ;
}

.details h3 {
  text-align : center ;
  padding : 50 px 10 px ;
  margin : 0 ;
  color : white ;
}

.player {
  text-align : center ;
  margin-top : 60 px ;
}

.player div {
  display : inline-block ;
  margin-left : 10 px ;
  margin-right : 10 px ;
}


.player .player__backward button,
.player .player__forward button {
  background : transparent ;
  border : 1 px solid rgb ( 243 , 139 , 114 ) ;
  color : rgb ( 243 , 139 , 114 ) ;
  width : 75 px ;
  height : 75 px ;
  border-radius : 100% ;
  font-size : 35 px ;
  outline : none ;
}

.player .player__backward button {
  border-left : none ;
}

.player .player__forward button {
  border-right : none ;
}

.player .player__main button :hover ,
.player .player__backward button :hover ,
.player .player__forward button :hover {
  color : rgba ( 243 , 139 , 114 , 0.7 ) ;
  border : 1 px solid rgba ( 243 , 139 , 114 , 0.7 ) ;
}

.player .player__main  {
  border : 1 px solid rgb ( 243 , 139 , 114 ) ;
}

.player .player__main button  {
  color : rgb ( 243 , 139 , 114 ) ;
  background : transparent ;
  width : 75 px ;
  height : 75 px ;
  border : none ;
  font-size : 35 px ;
  outline : none ;
}

.progress {
  text-align : center ;
  margin-top : 100 px ;
    color : white ;
}

.progress progress [value]  {
  /* Reset the default appearance */
  -webkit-appearance : none ;
   appearance : none ;

  width : 390 px ;
  height : 20 px ;
  margin-left : 4 px ;
  margin-right : 4 px ;
}

.progress progress [value] ::-webkit-progress-bar  {
  background-color : #eee ;
  border-radius : 2 px ;
  box-shadow : 0 2 px 5 px rgba ( 0 , 0 , 0 , 0.25 ) inset ;
}

.progress progress [value] ::-webkit-progress-value  {
    background-color : rgb ( 243 , 139 , 114 ) ;
    border-radius : 2 px ;
    background-size : 35 px 20 px, 100% 100% , 100% 100% ;
}

.footer {
  color : white ;
  position : absolute ;
  bottom : 0 px ;
  width : 100% ;
  background : #524C4C ;
}

.footer p {
  text-align : center ;
}

.footer .logo {
  height : 25 px ;
  width : auto ;
}
.footer .soundcloud {
  height : 25 px ;
  width : auto ;
}
We need to import the global.css and Exo 2 font in the index.html:
我们需要在index.html导入global.css和Exo 2字体:
< link rel = " stylesheet " href = " public/css/global.css " >
    < link rel = " stylesheet " href = " https://maxcdn.bootstrapcdn.com/font-awesome/4.6.1/css/font-awesome.min.css " >
    < link href = ' https://fonts.googleapis.com/css?family=Exo+2:500 ' rel = ' stylesheet ' type = ' text/css ' >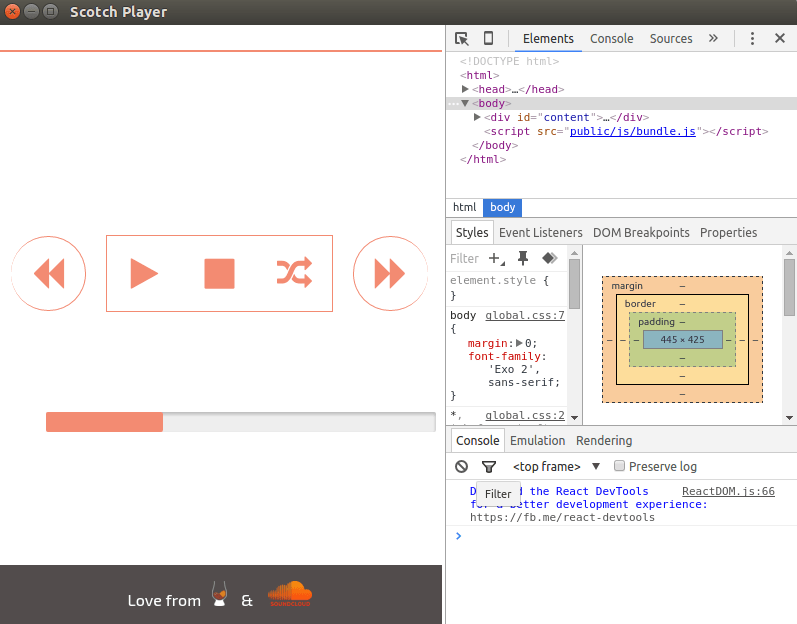
Looks better, right? We're another big step closer to achieving our fully functional React and Electron music player!
看起来更好吧? 我们距离实现功能齐全的React和Electron音乐播放器又迈出了一大步!
下一个... ( Up Next... )
Our presentation components are ready and styled (though needs some more touches). In the next section we will create our container component. See you soon...
我们的演示文稿组件已经准备就绪并具有样式(尽管还需要一些修饰)。 在下一节中,我们将创建容器组件。 再见...
- Part I: Setup & Basic Concepts 第一部分:设置和基本概念
- Part 2: Making the UI (this article) 第2部分:制作UI (本文)
- Part 3: Bringing it All Together 第3部分:将所有内容放在一起
翻译自: https://scotch.io/tutorials/build-a-music-player-with-react-electron-ii-making-the-ui


 394
394

 被折叠的 条评论
为什么被折叠?


