


 本文详细介绍了如何使用Electron开发一个音乐播放器,包括设置项目结构、创建主窗体、编写preload脚本以处理Node.js和ElectronAPI的交互,以及前端HTML和JavaScript实现音乐文件加载、播放控制和界面显示。
本文将介绍如何使用 Electron 实现音乐播放器的基本功能,包括音乐文件的加载、播放控制和界面展示等。
一、准备工作
首先确保你已经安装了 Node.js 和 npm。
1.1 创建项目目录
创建一个新的项目目录名为“music-player”
1.2 初始化项目
使用vscode打开项目(可以使用其他开发工具),在当前目录的终端命令行输入:
npm init -y
来进行项目的初始化。
1.3 安装Electron
通过以下命令安装 Electron:
npm install electron如果上面命令不好使可以用这个:
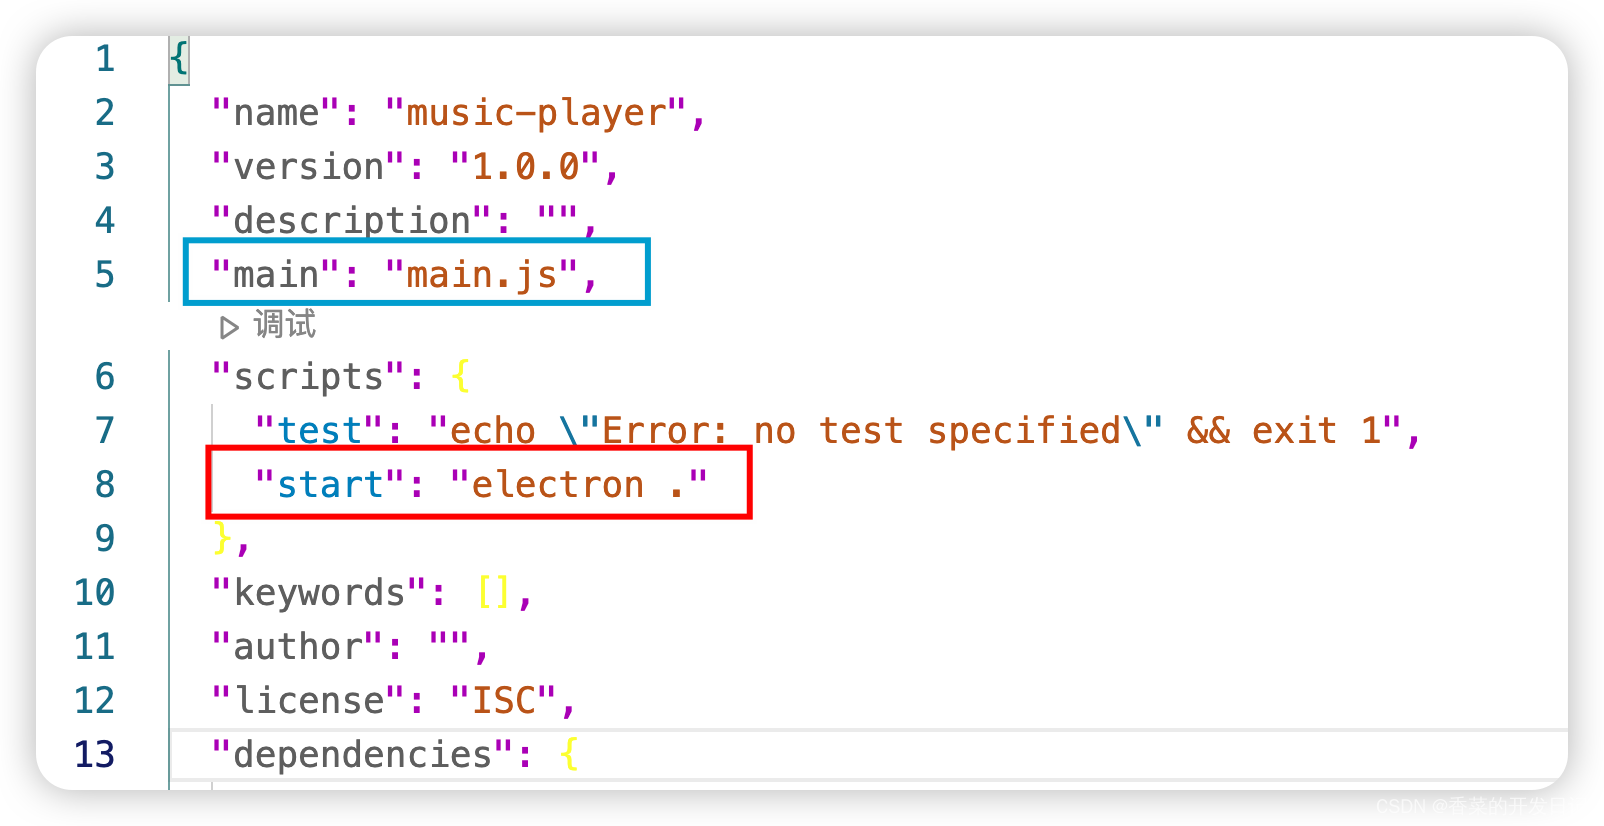
cnpm instal electron1.4 修改package.json文件
将package.json文件中修改两处。
首先是把main的值修改为main.js。
然后是在scripts里添加一个"start":"electron ." 用来启动项目。
二、编写加载音乐文件
2.1 创建主窗体
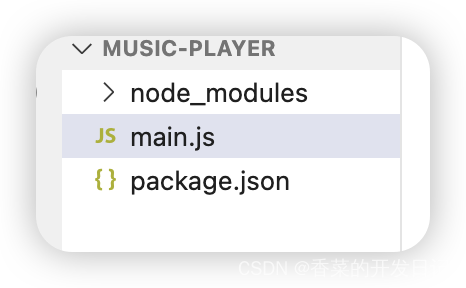
在根目录下创建一个main.js文件。
main.js整体代码
const { app, BrowserWindow, ipcMain } = require('electron');
const path = require('path');

let mainWindow;

function createWindow() {
  // 创建浏览器窗口
  mainWindow = new BrowserWindow({
    width: 800,
    height: 600,
    webPreferences: {
      nodeIntegration: true, // 允许在渲染进程中使用 Node.js API
      preload: path.join(__dirname, 'preload.js') // 使用 preload 脚本
    },
  });

  // 加载应用的 index.html 文件
  mainWindow.loadFile('app/index.html');

  // 监听窗口关闭事件
  mainWindow.on('closed', () => {
    mainWindow = null;
  });
}

// 当 Electron 完成初始化并准备创建浏览器窗口时调用 createWindow 函数
app.whenReady().then(createWindow);

// 监听所有窗口关闭事件
app.on('window-all-closed', () => {
  if (process.platform !== 'darwin') {
    app.quit(); // 关闭应用
  }
});

// 在激活应用时创建一个新窗口
app.on('activate', () => {
  if (BrowserWindow.getAllWindows().length === 0) {
    createWindow();
  }
});

// 监听渲染进程发送的消息
ipcMain.on('selected-file', (event, filePath) => {
  console.log('Selected file:', filePath);
});
2.2 创建 preload脚本
因为无法再自定义js中使用require所以,通过使用 preload 脚本,可以在渲染进程中直接访问 Node.js 的模块和 Electron 的 API。
在根目录下创建一个名为 preload.js的脚本文件:
const { contextBridge, ipcRenderer } = require('electron');

// 向渲染进程暴露的 API
const api = {
  sendSelectedFilePath: (filePath) => {
    ipcRenderer.send('selected-file', filePath);
  },
};

// 将 API 注入到 window 对象中,使其在渲染进程中可用
contextBridge.exposeInMainWorld('api', api);
三、编写前端代码
3.1 创建index.html
在根目录下创建一个app目录,在目录中创建一个index.html文件
<!DOCTYPE html>
<html>
  <head>
    <meta charset="UTF-8" />
    <title>香菜的开发日记-播放器</title>
    <style>
      /* 样式表 */
      body {
        font-family: Arial, sans-serif;
        background-color: #000000;
        text-align: center;
      }

      .player-container {
        background-color: #1d1d1d;
        border-radius: 8px;
        padding: 20px;
        box-shadow: 0 2px 6px rgba(0, 0, 0, 0.1);
        width: 400px;
        margin: 0 auto;
      }

      .nav-bar {
        display: flex;
        justify-content: space-between;
      }

      #music-name {
        color: #ffffff;
        font-size: 24px;
        text-align: left;
      }

      label {
        background-color: #848494;
        color: #fff;
        padding: 5px;
        border-radius: 4px;
        cursor: pointer;
        display: inline-block;
        margin-bottom: 20px;
        transition: background-color 0.3s ease;
      }

      label:hover {
        background-color: #1565c0;
      }

      /* 音乐开始时间和结束时间代码块 */
      .time {
        display: flex;
        justify-content: space-between;
        margin-top: 10px;
      }

      .time span {
        color: #8c8b9c;
        font-size: 14px;
      }

      .option span {
        font-size: 35px;
        margin-right: 15px;
      }

      .option span:hover {
        cursor: pointer;
      }

      .audio-player {
        width: 100%;
        margin-top: 20px;
        display: none; /* 初始不显示 */
      }

      .progress-bar {
        position: relative;
        width: 100%;
        height: 10px;
        background-color: #4b4b5a;
        border-radius: 5px;
        margin-top: 20px;
      }

      .progress-bar .progress {
        position: absolute;
        top: 0;
        left: 0;
        height: 100%;
        background-color: #ffffff;
        border-radius: 5px;
      }

    </style>
  </head>
  <body>
    <!-- 音乐播放器界面 -->
    <div class="player-container">
      <div class="nav-bar">
        <div id="music-name"></div> <!-- 音乐名字 -->
        <div class="music-option">
          <label for="file-input">选择音乐</label> <!-- 文件选择器标签 -->
          <input
            type="file"
            id="file-input"
            accept=".mp3"
            style="display: none" <!-- 不显示选择器 -->
          />
        </div>
      </div>
      <div class="progress-bar">
        <div class="progress"></div>
      </div>
      <div class="time">
        <span class="current-time">00:00</span> <!-- 当前时间 -->
        <span class="duration">00:00</span> <!-- 总时长 -->
      </div>
      <div class="option">
        <span id="play-button">▶️</span> <!-- 播放按钮 -->
      </div>
      <audio
        id="audio-player"
        class="audio-player"
        preload="auto"
        controls
      ></audio>
    </div>

    <script src="render.js"></script> <!-- 引入渲染脚本 -->
  </body>
</html>
3.2 创建render.js
在app目录下创建一个render.js文件。
这js文件主要是对打开mp3音乐文件操作,播放、暂停按钮的时间监听功能。
// 监听页面加载完成事件
window.addEventListener("DOMContentLoaded", () => {
  // 获取页面上的元素
  const fileInput = document.getElementById("file-input"); // 文件选择器
  const playButton = document.getElementById("play-button"); // 播放按钮
  const audioPlayer = document.getElementById("audio-player"); // 音频播放器
  const musicName = document.getElementById("music-name"); // 音乐名字元素
  const currentTimeElement = document.querySelector(".current-time"); // 当前时间元素
  const durationElement = document.querySelector(".duration"); // 总时长元素
  const progressElement = document.querySelector(".progress"); // 进度条元素

  var play = false; // 播放状态,默认为暂停

  // 监听选择文件事件
  fileInput.addEventListener("change", (event) => {
    const file = event.target.files[0];
    const filePath = URL.createObjectURL(file); // 获取文件路径
    const fileName = file.name.split(".")[0]; // 获取文件名(不包含扩展名)

    musicName.innerText = fileName; // 设置音乐名字
    audioPlayer.src = filePath; // 设置音频播放器的源
    audioPlayer.load(); // 加载音频
    play = true; // 设置播放状态为播放

    // 调用预加载脚本中的方法,发送文件路径给主进程
    window.api.sendSelectedFilePath(filePath);
  });

  // 监听播放按钮点击事件
  playButton.addEventListener("click", () => {
    if (play) {
      audioPlayer.play(); // 播放音乐
      playButton.innerText = "⏸"; // 修改播放按钮文本为暂停符号
      play = false; // 设置播放状态为暂停
    } else {
      audioPlayer.pause(); // 暂停音乐
      playButton.innerText = "▶️"; // 修改播放按钮文本为播放符号
      play = true; // 设置播放状态为播放
    }
  });

  // 监听音频元数据加载完成事件
  audioPlayer.addEventListener("loadedmetadata", () => {
    const duration = formatTime(audioPlayer.duration); // 格式化总时长
    durationElement.textContent = duration; // 更新总时长元素的文本
  });

  // 监听音频播放时间更新事件
  audioPlayer.addEventListener("timeupdate", () => {
    const currentTime = formatTime(audioPlayer.currentTime); // 格式化当前时间
    currentTimeElement.textContent = currentTime; // 更新当前时间元素的文本

    const progress = (audioPlayer.currentTime / audioPlayer.duration) * 100; // 计算进度百分比
    progressElement.style.width = `${progress}%`; // 更新进度条的宽度
  });
});

/**
 * 格式化时间函数
 * @param {number} time - 时间,以秒为单位
 * @returns {string} 格式化后的时间,格式为:mm:ss
 */
function formatTime(time) {
  const minutes = Math.floor(time / 60); // 分钟数
  const seconds = Math.floor(time % 60); // 秒数
  return `${padZero(minutes)}:${padZero(seconds)}`; // 返回格式化后的时间字符串
}

/**
 * 在数字前面补零函数
 * @param {number} number - 数字
 * @returns {string} 补零后的字符串
 */
function padZero(number) {
  return number.toString().padStart(2, "0"); // 将数字转换为字符串,并在前面补零
}
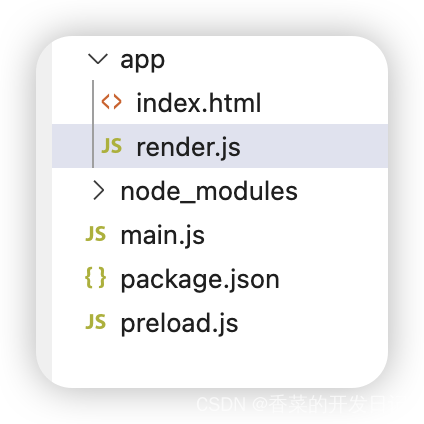
3.3 目录结构
具体的目录结构如下:
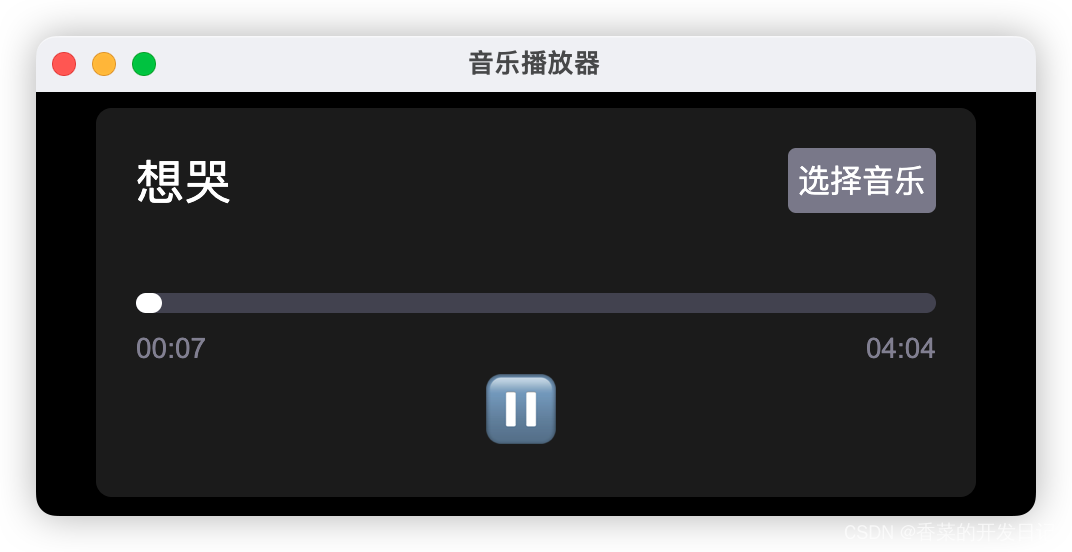
四、运行代码
4.1 运行代码
在终端命令行中输入
npm start 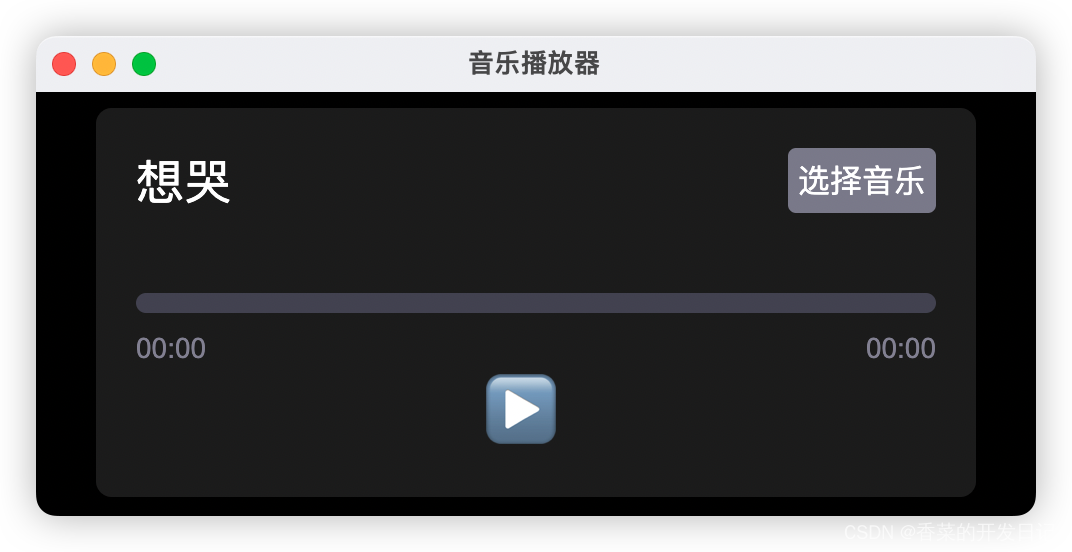


 1026
1026

 被折叠的 条评论
为什么被折叠?
被折叠的 条评论
为什么被折叠?
 到【灌水乐园】发言


