


票务小程序源码
Update (August 15, 2016): Add link to part 2 of the tutorial and add the flash view file. Update (August 08, 2016): User needs to be logged in to create a ticket Update (August 08, 2016): Corrected some errors pointed out on the comments. Update (August 06, 2016): Add Use App\CategoryLaravel is currently the most starred PHP framework on GitHub and also the most popular PHP framework. Thanks to Taylor Otwell and the Laravel community, many companies and people are building awesome applications with this framework. In this two part tutorial, I'll show you how to build a robust application using the Laravel framework.
更新(2016年8月15日) :将链接添加到本教程的第2部分,并添加Flash视图文件。 更新(2016年8月8日) :用户需要登录才能创建票证更新(2016年8月8日) :更正了注释中指出的一些错误。 更新(2016年8月6日) :添加Use App \ CategoryLaravel是GitHub上最受欢迎PHP框架,也是最受欢迎PHP框架。 感谢Taylor Otwell和Laravel社区,许多公司和人员正在使用此框架构建出色的应用程序。 在这个由两部分组成的教程中,我将向您展示如何使用Laravel框架构建健壮的应用程序。
我们将要建设的 ( What We Will Be Building )
We're going to be building a support ticket application. A support ticket application provides a medium for customers to lodge issues they face using a particular organization's service/product by opening a support ticket which the organization's help desk.
我们将构建支持票证应用程序。 支持票证应用程序通过打开组织帮助台的支持票证,为客户提供了一种使用特定组织的服务/产品来解决他们所面对的问题的媒介。
What we will be building will be minimal, but it will have the major features of support ticket application.
我们将要构建的内容很少,但是它将具有支持票证应用程序的主要功能。
申请要求和流程 (Application Requirements and Flow)
- And authenticated user can open support tickets 并且经过身份验证的用户可以打开支持凭单
- Upon opening the tickets, an email will be sent to the user along with the details of the support ticket opened 打开票证后,将向用户发送一封电子邮件以及所打开的支持票证的详细信息
- Subsequently, mails will be sent to the user as the customer support staff or admin response to the ticket 随后,邮件将作为客户支持人员或管理员对故障单的响应发送给用户
- The user can also respond to the ticket he/she opened by commenting on the ticket 用户还可以通过评论票证来回复他/她打开的票证
- The admin or the customer support staff can also mark a ticket as resolved 管理员或客户支持人员还可以将故障单标记为已解决
- Once a ticket is marked as closed, the user who opened the ticket will be notified by email on the status of the ticket. 一旦将票证标记为已关闭,打开票证的用户将收到有关票证状态的电子邮件通知。
Below is an image of the final output of what we will be building.

下面是我们将要构建的最终输出的图像。
让我们开始吧 ( Let's Get Started )
First let's install Laravel, we will be using the latest version of Laravel which is 5.2.39 at the time of this tutorial. I'll make use of the Laravel installer, but you can use your preferred method.
首先,让我们安装Laravel,我们将使用最新版本的Laravel的是39年2月5日在本教程的时间。 我将使用Laravel安装程序,但是您可以使用首选方法。
laravel new support-ticketThis will install Laravel in a directory named support-ticket. You can test to make sure the installation was successful by running:
这会将Laravel安装在名为support-ticket的目录中。 您可以通过运行以下命令进行测试,以确保安装成功:
cd support-ticket

php artisan serve
You should see the default Laravel welcome page with the text Laravel 5.
您应该看到带有文本Laravel 5的默认Laravel欢迎页面。
The rest of this tutorial assumes you are already in the project directory which is support-ticket.
本教程的其余部分假定您已经在project support-ticket的项目目录中。
Next, we need to setup the ability for users to register and login to the application. Lucky for us, Laravel provides authentication out of the box. To make use of this authentication, run:
接下来,我们需要设置用户注册和登录应用程序的能力。 对我们来说幸运的是,Laravel提供了开箱即用的身份验证。 要使用此身份验证,请运行:
php artisan make:authThis will create all of the routes and views you need for authentication. Now there is a register and login page with which to authenticate the users.
这将创建身份验证所需的所有路由和视图。 现在有一个用于验证用户身份的注册和登录页面。
数据库设置 ( Database Setup )
Now we need a database to hold our data. Open the .env file and fill it with your database details.
现在我们需要一个数据库来保存我们的数据。 打开.env文件,并用数据库详细信息填充它。
DB_DATABASE=support-ticket
DB_USERNAME=homestead
DB_PASSWORD=secret
Next we need a users table. When you install Laravel, it will create for you a User model and some migration files to create the users and password resets tables respectively. But before we run the migrations, let's modify the users migration file a bit to suit our application.
接下来,我们需要一个users表。 当您安装Laravel时,它将为您创建一个User模型和一些迁移文件以分别创建users表和password resets表。 但是在运行迁移之前,让我们稍微修改一下用户迁移文件以适合我们的应用程序。
// users table migration showing only the up() schemas with our modifications
Schema::create('users', function (Blueprint $table) {
    $table->increments('id');
    $table->string('name');
    $table->string('email')->unique();
    $table->string('password');
    $table->integer('is_admin')->unsigned()->default(0);
    $table->rememberToken();
    $table->timestamps();
});
I have added an is_admin column which will help us track if a particular user is an admin or not. Go ahead and run the migrations:
我添加了一个is_admin列,该列将帮助我们跟踪特定用户是否为管理员。 继续并运行迁移:
php artisan migrateNow users can register and login to the application.
现在,用户可以注册并登录到该应用程序。
创建一个用户帐号 ( Creating A User Account )
Only registered users can make use of our Support Ticket Application . Having said that, register as a new user and login to create a ticket.
仅注册用户可以使用我们的支持票申请表。 话虽如此,注册为新用户并登录以创建票证。
开票 ( Opening A Ticket )
Having taken care of users authentication, we move on to allow users create new tickets. First we need a tickets table to hold the tickets that users will be creating and also a model for them.
完成用户身份验证后,我们继续允许用户创建新票证。 首先,我们需要一个tickets表来保存用户将要创建的票证,并为其建立模型。
php artisan make:model Ticket -mThe above command will create a Ticket model and also a migration to create tickets table. Open the create tickets table migration file and update it with:
上面的命令将创建一个Ticket模型,并进行迁移以创建票证表。 打开创建票证表迁移文件,并使用以下命令对其进行更新:
// tickets table migration showing only the up() schemas with our modifications
Schema::create('tickets', function (Blueprint $table) {
    $table->increments('id');
    $table->integer('user_id')->unsigned();
    $table->integer('category_id')->unsigned();
    $table->string('ticket_id')->unique();
    $table->string('title');
    $table->string('priority');
    $table->text('message');
    $table->string('status');
    $table->timestamps();
});
The migration file is pretty straightforward, we have a user_id column that will hold the id of the user that created the ticket, a category_id column to indicate the category the ticket belongs, ticket_id column which hold a unique random string that will be used to refer to the ticket, a title column, a priority column, a message column and a status column which indicate whether a ticket is open or closed.
迁移文件非常简单,我们有一个user_id列,该列将保存创建票证的用户的ID;一个category_id列,指示票证所属的类别; ticket_id列,其包含一个唯一的随机字符串,该字符串将用于引用在票证上, title栏, priority栏, message栏和status栏指示票证是打开还是关闭。
We also need a categories table to hold our various categories:
我们还需要一个类别表来保存我们的各种类别:
php artisan make:model Category -mAs above, this will create a Category model and migration to create categories table. Open the create categories table migration file and update it with:
如上所述,这将创建一个Category模型并迁移以创建Categories表。 打开创建类别表迁移文件,并使用以下命令进行更新:
Schema::create('categories', function (Blueprint $table) {
    $table->increments('id');
       $table->string('name');
    $table->timestamps();
});
Now run the migrations.
现在运行迁移。
php artisan migrateOpen the Ticket model and update it with:
打开Ticket模型并使用以下命令进行更新:
protected $fillable = [
    'user_id', 'category_id', 'ticket_id', 'title', 'priority', 'message', 'status'
];
This tells Laravel that the columns specified can be mass assigned. We also need to do this with our Category model.
这告诉Laravel,可以对指定的列进行批量分配。 我们还需要使用我们的类别模型来执行此操作。
Open the Category model and update it with:
打开“ Category模型,并使用以下内容进行更新:
protected $fillable = ['name'];票证与类别的关系 ( Ticket To Category Relationship )
Let's set the relationship between the Ticket model and the Category model. A ticket can belong to a category, while a category can have many tickets. This is a one to many relationship and we will use Eloquent to setup the relationship.
让我们设置票证模型和类别模型之间的关系。 票证可以属于一个类别,而一个类别可以有许多票证。 这是一对多的关系,我们将使用Eloquent来建立关系。
Open the Ticket model and add the following code to it:
打开Ticket模型并向其中添加以下代码:
// Ticket.php file

public function category()
{
    return $this->belongsTo(Category::class);
}
Now let's edit the Category model in the same manner:
现在,让我们以相同的方式编辑Category模型:
// Category.php file

public function tickets()
{
    return $this->hasMany(Ticket::class);
}
添加类别 ( Adding Categories )
For now we need to manually populate the categories table with some data. I'll be using Laravel artisan's tinker.
现在,我们需要用一些数据手动填充类别表。 我将使用Laravel工匠的修补匠 。
If you are new to Laravel artisan's Tinker, you check out this tutorial an Tinker with the Data in Your Laravel Apps with Php Artisan Tinker. To start Tinker run:
如果您是Laravel artisan的Tinker的新手,请使用Php Artisan Tinker来查看使用Laravel应用中的数据的Tinker 。 要启动Tinker运行:
php artisan tinkerOnce in the Tinker environment, enter the following:
进入Tinker环境后,输入以下内容:
$category = new App\Category
$category->name = "Technical"
$category->save()
This will create a Technical category inside the categories table. You can repeat the process above to add more categories.
这将在类别表中创建一个技术类别。 您可以重复上述过程以添加更多类别。
Next we need a controller that will contain the logic for opening a ticket.
接下来,我们需要一个控制器,其中包含用于打开票证的逻辑。
php artisan make:controller TicketsControllerThis will create a TicketsController. Open it and add:
这将创建一个TicketsController 。 打开它并添加:
// TicketsController.php file

// Remember to add this line
use App\Category;

public function create()
{
    $categories = Category::all();

    return view('tickets.create', compact('categories'));
}
The TicketsController now has a create() function which will get all the categories created and pass them along to a view file. Before we move further, lets create the routes that will handle opening a new ticket.
TicketsController现在具有create()函数,该函数将获取所有已创建的类别并将其传递到视图文件。 在继续之前,让我们创建将处理打开新票证的路线。
// routes.php file

Route::get('new_ticket', 'TicketsController@create');
Route::post('new_ticket', 'TicketsController@store');
The first route /new_ticket will show the form to open a new ticket while the second route will call the store() on TicketsController which will do the actual storing of the ticket in the database.
第一条路线/new_ticket将显示打开新票证的表单,而第二条路线将在TicketsController上调用store() ,这将在数据库中实际存储票证。
The create() from above return a view file tickets.create which we have yet to create. Let's go on and create the file.
上面的create()返回一个我们尚未创建的视图文件tickets.create 。 让我们继续创建文件。
Create a new folder named tickets in the views directory and inside the tickets folder, create a new file named create.blade.php. Open the view file and update it with:
创建一个名为新文件夹tickets在views目录和里面tickets文件夹中创建一个新的文件名为create.blade.php 。 打开视图文件,并使用以下命令进行更新:
// create.blade.php file

@extends('layouts.app')

@section('title', 'Open Ticket')

@section('content')
    <div class="row">
        <div class="col-md-10 col-md-offset-1">
            <div class="panel panel-default">
                <div class="panel-heading">Open New Ticket</div>

                <div class="panel-body">
                    @include('includes.flash')

                    <form class="form-horizontal" role="form" method="POST" action="{{ url('/new_ticket') }}">
                        {!! csrf_field() !!}

                        <div class="form-group{{ $errors->has('title') ? ' has-error' : '' }}">
                            <label for="title" class="col-md-4 control-label">Title</label>

                            <div class="col-md-6">
                                <input id="title" type="text" class="form-control" name="title" value="{{ old('title') }}">

                                @if ($errors->has('title'))
                                    <span class="help-block">
                                        <strong>{{ $errors->first('title') }}</strong>
                                    </span>
                                @endif
                            </div>
                        </div>

                        <div class="form-group{{ $errors->has('category') ? ' has-error' : '' }}">
                            <label for="category" class="col-md-4 control-label">Category</label>

                            <div class="col-md-6">
                                <select id="category" type="category" class="form-control" name="category">
                                    <option value="">Select Category</option>
                                    @foreach ($categories as $category)
                        <option value="{{ $category->id }}">{{ $category->name }}</option>
                                    @endforeach
                                </select>

                                @if ($errors->has('category'))
                                    <span class="help-block">
                                        <strong>{{ $errors->first('category') }}</strong>
                                    </span>
                                @endif
                            </div>
                        </div>

                        <div class="form-group{{ $errors->has('priority') ? ' has-error' : '' }}">
                            <label for="priority" class="col-md-4 control-label">Priority</label>

                            <div class="col-md-6">
                                <select id="priority" type="" class="form-control" name="priority">
                                    <option value="">Select Priority</option>
                                    <option value="low">Low</option>
                                    <option value="medium">Medium</option>
                                    <option value="high">High</option>
                                </select>

                                @if ($errors->has('priority'))
                                    <span class="help-block">
                                        <strong>{{ $errors->first('priority') }}</strong>
                                    </span>
                                @endif
                            </div>
                        </div>

                        <div class="form-group{{ $errors->has('message') ? ' has-error' : '' }}">
                            <label for="message" class="col-md-4 control-label">Message</label>

                            <div class="col-md-6">
                                <textarea rows="10" id="message" class="form-control" name="message"></textarea>

                                @if ($errors->has('message'))
                                    <span class="help-block">
                                        <strong>{{ $errors->first('message') }}</strong>
                                    </span>
                                @endif
                            </div>
                        </div>

                        <div class="form-group">
                            <div class="col-md-6 col-md-offset-4">
                                <button type="submit" class="btn btn-primary">
                                    <i class="fa fa-btn fa-ticket"></i> Open Ticket
                                </button>
                            </div>
                        </div>
                    </form>
                </div>
            </div>
        </div>
    </div>
@endsection
Flash查看文件 ( Flash View File )
Create a file named flash.blade.php in the includes folder inside the views folder. Paste the code snippets below into it:
在views文件夹内的includes文件夹中创建一个名为flash.blade.php的文件。 将以下代码片段粘贴到其中:
// flash.blade.php

@if (session('status'))
    <div class="alert alert-success">
        {{ session('status') }}
    </div>
@endif
We will be making use of the default app layout provided by Laravel with some modifications. Now visit the route /new_ticket and you should see a page like the image below:
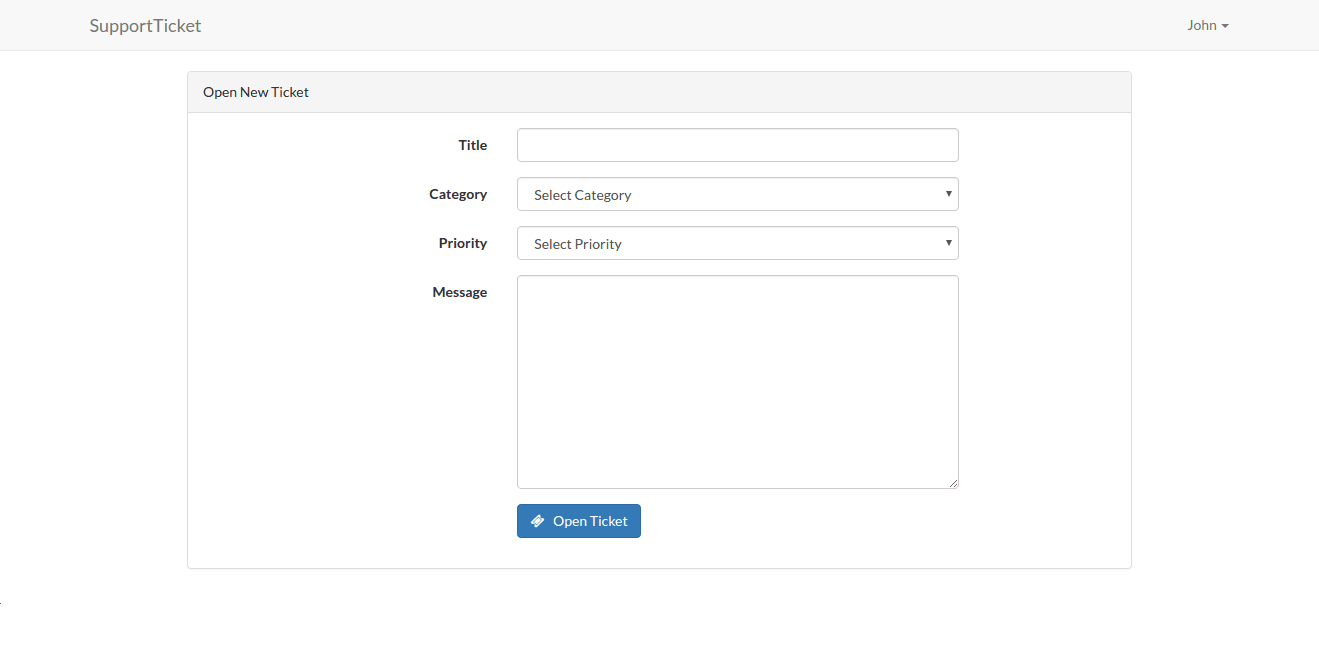
我们将利用Laravel提供的默认app布局进行一些修改。 现在访问路线/new_ticket ,您应该看到类似下图的页面:
To handle the actual saving of the ticket to the database, open TicketsController and add the store() to it.
要处理票证的实际保存,请打开TicketsController并将store()添加到其中。
// TicketsController.php
// Remember to add the lines below
// use App/Ticket;
// use App/Mailers/AppMailer;
// use Illuminate\Support\Facades\Auth;

public function store(Request $request, AppMailer $mailer)
{
    $this->validate($request, [
            'title'     => 'required',
            'category'  => 'required',
            'priority'  => 'required',
            'message'   => 'required'
        ]);

        $ticket = new Ticket([
            'title'     => $request->input('title'),
            'user_id'   => Auth::user()->id,
            'ticket_id' => strtoupper(str_random(10)),
            'category_id'  => $request->input('category'),
            'priority'  => $request->input('priority'),
            'message'   => $request->input('message'),
            'status'    => "Open",
        ]);

        $ticket->save();

        $mailer->sendTicketInformation(Auth::user(), $ticket);

        return redirect()->back()->with("status", "A ticket with ID: #$ticket->ticket_id has been opened.");
}
The store() accepts two arguments, $request variable of type Request and $mailer variable of type AppMailer which we have yet to create. The method first sets some form validations rules that must be met before moving forward. Upon successful form validation, a new the ticket is created and an email containing the ticket details is sent to the user (more on this below) and finally the user is redirected back with a success message.
store()接受两个参数,即尚未创建的Request类型的$request变量和AppMailer类型的$mailer变量。 该方法首先设置一些表单验证规则,然后继续前进。 在成功进行表单验证后,将创建一个新的票证,并向用户发送一封包含票证详细信息的电子邮件(下面将对此进行详细介绍),最后,用户将收到一条成功消息,被重定向回。
发送票务信息邮件 ( Sending Ticket Information Mail )
I decided to create a separate class that will handle sending of mails since we might be sending some a couple of emails. Under the app directory, create a new folder named mailers and inside the mailer folder create a new file named AppMailer.php. Open and update the file with:
我决定创建一个单独的类来处理邮件的发送,因为我们可能会发送一些电子邮件。 在app目录下,创建一个名为mailers的新文件夹,并在mailer文件夹内创建一个名为AppMailer.php的新文件。 使用以下命令打开并更新文件:
// AppMailer.php file<?php
namespace App\Mailers;

use App\Ticket;
use Illuminate\Contracts\Mail\Mailer;

class AppMailer {
    protected $mailer;
    protected $fromAddress = 'support@supportticket.dev';
    protected $fromName = 'Support Ticket';
    protected $to;
    protected $subject;
    protected $view;
    protected $data = [];

    public function __construct(Mailer $mailer)
    {
        $this->mailer = $mailer;
    }

    public function sendTicketInformation($user, Ticket $ticket)
    {
        $this->to = $user->email;
        $this->subject = "[Ticket ID: $ticket->ticket_id] $ticket->title";
        $this->view = 'emails.ticket_info';
        $this->data = compact('user', 'ticket');

        return $this->deliver();
    }

    public function deliver()
    {
        $this->mailer->send($this->view, $this->data, function($message) {
            $message->from($this->fromAddress, $this->fromName)
                    ->to($this->to)->subject($this->subject);
        });
    }
You can see the sendTicketInformation() that store() from above called. It basically just prepares the email to be sent to the user that opened the ticket. The deliver() function does the actual sending of the email.
你可以看到sendTicketInformation()是store()从上面传来叫。 它基本上只是准备要发送给打开票证的用户的电子邮件。 deliver()函数执行电子邮件的实际发送。
We need one more view file. This view file will be inside the emails folder (which does not exist yet) in the view directory. Go on and create ticket_info.blade.php and add:
我们还需要一个视图文件。 该视图文件将位于view目录中的emails文件夹(尚不存在)内。 继续并创建ticket_info.blade.php并添加:
// ticket_info.blade.php file

<!DOCTYPE html>
<html lang="en">
<head>
    <meta charset="UTF-8">
    <title>Suppor Ticket Information</title>
</head>
<body>
    <p>
        Thank you {{ ucfirst($user->name) }} for contacting our support team. A support ticket has been opened for you. You will be notified when a response is made by email. The details of your ticket are shown below:
    </p>

    <p>Title: {{ $ticket->title }}</p>
    <p>Priority: {{ $ticket->priority }}</p>
    <p>Status: {{ $ticket->status }}</p>

    <p>
        You can view the ticket at any time at {{ url('tickets/'. $ticket->ticket_id) }}
    </p>

</body>
</html>
This is the email that will be sent to the user once a ticket is created.
这是在创建票证后将发送给用户的电子邮件。
Before testing this out in the browser, remember to configure your mail settings. For the purpose of this tutorial, we won't be sending actual emails. Instead we will just log them. So open .env file and update it as below:
在浏览器中进行测试之前,请记住配置您的邮件设置。 就本教程而言,我们将不会发送实际的电子邮件。 相反,我们将只记录它们。 因此,打开.env文件并进行如下更新:
MAIL_DRIVER=logNow hit the browser and try opening a new ticket, you should see the mail content logged in the laravel.log file once the ticket is created.
现在,单击浏览器并尝试打开新票证,一旦创建票证,您应该会在laravel.log文件中看到记录的邮件内容。
结论 ( Conclusion )
So far, we have been able to setup our application and created our first ticket. In the next post I will cover commenting on ticket and marking ticket as closed. If you have any questions about the tutorial, let me know in the comments below. And be sure to check out part two here.
到目前为止,我们已经能够设置我们的应用程序并创建了第一张票证。 在下一篇文章中,我将介绍对票证进行评论并将票证标记为已关闭。 如果您对本教程有任何疑问,请在下面的评论中告诉我。 并确保在此处检查第二部分 。
翻译自: https://scotch.io/tutorials/build-a-support-ticket-application-with-laravel-part-1
票务小程序源码


 313
313

 被折叠的 条评论
为什么被折叠?
被折叠的 条评论
为什么被折叠?
 到【灌水乐园】发言


