


 本文介绍了如何在Word 2003中利用邮件合并功能,为包含客户信息的数据库创建邮寄标签。首先,选择‘标签’作为文档类型,然后设置所需的标签样式。接着,选择数据源,如Excel电子表格,并调整信息顺序。最后,预览并打印标签。

word邮件合并
You can use Mail Merge in Word 2003 to create mailing labels for a database full of customers.
您可以在Word 2003中使用“邮件合并”为满载客户的数据库创建邮件标签。
Open Word 2003 and click on Tools \ Letters and Mailings \ Mail Merge…
打开Word 2003,然后单击工具\信件和邮件\邮件合并…

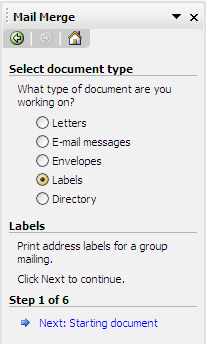
In the Mail Merge menu on the right under Select document type, select Labels. Then click Next: Starting document.
在右侧的“邮件合并”菜单中的“选择文档类型”下,选择“标签”。 然后单击“下一步:启动文档”。
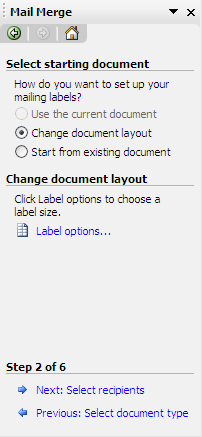
From step 2 Click on Label options…
在第2步中,点击标签选项...
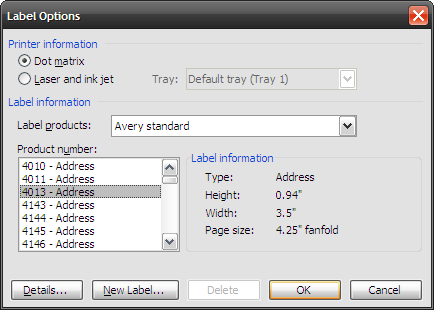
This will bring up a menu allowing you to select the brand and style of the labels you want to print. Here I am using Avery 4013 on a Dot Matrix printer. Of course you will want to select what you have, Avery is the most popular in business from my experience. If you have oddball labels you can always choose custom settings as well. When your done with the label options click OK.
这将弹出一个菜单,使您可以选择要打印的标签的品牌和样式。 在这里,我在点矩阵打印机上使用Avery 4013。 当然,您会想要选择您所拥有的,根据我的经验,Avery在业务中最受欢迎。 如果您有奇数球标签,也可以随时选择自定义设置。 完成标签选项后,单击“确定”。
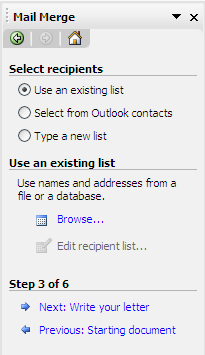
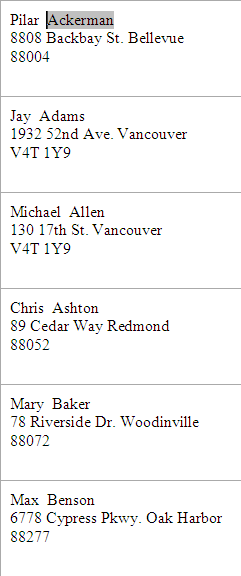
Now you are going to want to choose your data source. Under Use an Existing List; click on Browse… Use Explorer to find the data source you want to use and double click it. (Creating a data source will be covered in another how to).
现在,您将要选择数据源。 在“使用现有列表”下; 单击浏览...使用资源管理器找到要使用的数据源,然后双击它。 (创建数据源将在另一方法中介绍)。
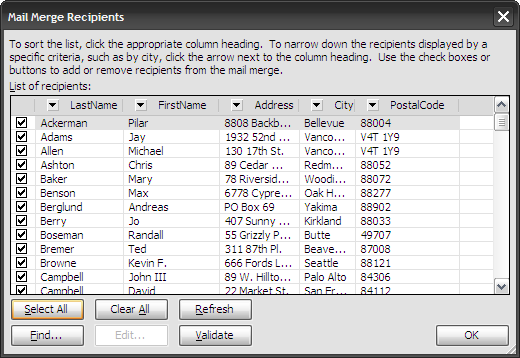
You will click on a confirmation screen verifying your data source (I used an Excel spread sheet that I had imported from Access) and get to Mail Merge Recipients window. Here you can change the order of your information, delete certain users, and validate information. Since I know the data source is what I want I chose Select All. Now hit OK.
您将单击一个确认屏幕,以验证您的数据源(我使用了从Access导入的Excel电子表格),然后转到“邮件合并收件人”窗口。 您可以在此处更改信息的顺序,删除某些用户并验证信息。 因为我知道数据源就是我想要的,所以我选择了“全选”。 现在点击确定。
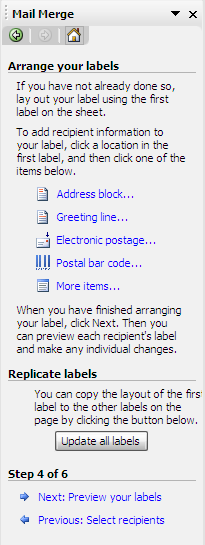
Ok, we’re almost complete, just a couple more steps. Click on Next: Arrange your labels.
好的,我们几乎完成了,仅需几个步骤。 单击下一步:排列标签。

Here Click on More items…
在这里点击更多项目…
Now we can choose the order of the data we want presented on the labels we are creating. Just double click on each field you want to include.
现在,我们可以选择要在创建的标签上显示的数据的顺序。 只需双击要包括的每个字段。

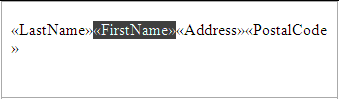
Now if you look over at your document you will notice these fields are being added to your labels. You can edit them by highlighting the field and moving it to where you want. For instance on this label I would want the First Name before the Last Name.
现在,如果您查看文档,您会发现这些字段已添加到标签中。 您可以通过突出显示该字段并将其移至所需位置来对其进行编辑。 例如,在此标签上,我想要姓氏之前的名字。
Now over on the Mail Merge menu bar you will want to select the “update all labels” button. This will populate each label with the fields from the fist label. Then click on Next: Preview your labels.
现在,在“邮件合并”菜单栏上,您将要选择“更新所有标签”按钮。 这将使用拳头标签中的字段填充每个标签。 然后单击“ 下一步:预览标签”。
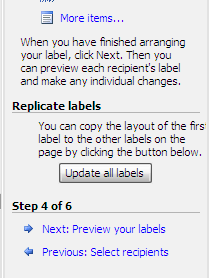
Your document screen will look similar to this.
您的文档屏幕将与此类似。
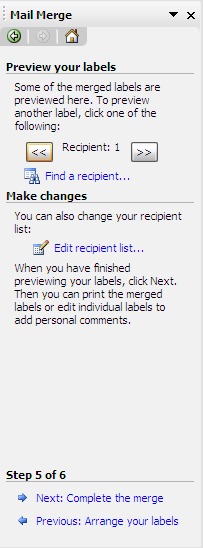
Now, on the mail merge menu you can click through the Recipients by clicking the back or forward arrows. If you doing hundreds of labels … I would just spot check them. If you’re satisfied with how they look let’s move to step 6 and complete the merge.
现在,在邮件合并菜单上,您可以通过单击后退或前进箭头在收件人中单击。 如果您要做数百个标签……我将对它们进行抽查。 如果您对它们的外观感到满意,让我们进入第6步并完成合并。
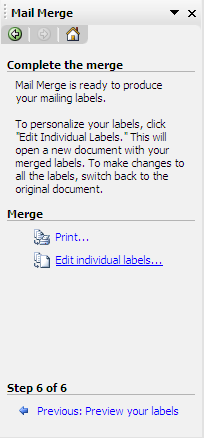
The Merge is complete! Make sure your labels are set up in the printer and hit Print…
合并完成! 确保在打印机中设置了标签,然后单击“ 打印”。
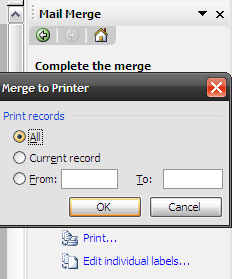
You will be presented with the print select screen. Choose all, or a specific number to print. You will get a different record for each contact from your data source on each label.
您将看到打印选择屏幕。 选择全部或特定号码进行打印。 您将从每个标签上的数据源获得每个联系人的不同记录。
翻译自: https://www.howtogeek.com/howto/microsoft-office/create-mailing-labels-in-word-2003-with-mail-merge/
word邮件合并


 被折叠的 条评论
为什么被折叠?
被折叠的 条评论
为什么被折叠?
 到【灌水乐园】发言


