


Want to run a Minecraft server from home without revealing your IP address? You can! Just set up a free proxy with Amazon Web Services to protect your server from denial-of-service attacks. We’ll show you how.
是否想在不显示IP地址的情况下在家运行Minecraft服务器? 您可以! 只需使用Amazon Web Services设置免费代理即可保护您的服务器免受拒绝服务攻击。 我们将向您展示如何。
This guide will work for any game server, not just Minecraft. All it does is proxy traffic on a specific port. You just have to change Minecraft’s port 25565 to whichever port your game server runs on.
本指南适用于任何游戏服务器,而不仅仅是Minecraft。 它所做的只是在特定端口上的代理流量。 您只需要将Minecraft的端口25565更改为运行游戏服务器的端口即可。
这是如何运作的? (How Does This Work?)
Let’s say you want to host a Minecraft server and have it open to the internet. It’s not that hard to run one. They’re easy to install, only use one processing thread, and even the heavily modded servers don’t take more than 2 to 3 GB of RAM with a few players online. You could easily run a server on an old laptop or in the background on your desktop computer rather than paying someone else to host it for you.
假设您要托管一个Minecraft服务器,并将其开放给互联网。 运行一个并不难。 它们易于安装,仅使用一个处理线程,即使是经过大量改装的服务器也不会占用超过2到3 GB的RAM,并且只有几个播放器在线。 您可以轻松地在旧笔记本电脑上或台式计算机的后台运行服务器,而不用付钱给其他人托管。
But for people to connect to it, you have to give out your IP address. This presents a few problems. It’s a major security risk, especially if your router still has the default admin password. It also leaves you open to distributed denial-of-service (DDOS) attacks, which would not only stop your Minecraft server but could shut off your internet, as well, until the attack subsides.
但是,要让人们连接到它,您必须提供IP地址。 这带来了一些问题。 这是一个重大的安全风险 ,尤其是如果您的路由器仍具有默认的管理员密码时。 它还使您容易受到分布式拒绝服务(DDOS)攻击的影响 ,这不仅会停止Minecraft服务器,而且还可能关闭Internet,直到攻击消退。
You don’t have to allow people to connect directly to your router. Instead, you can rent a small Linux box from Amazon Web Services, Google Cloud Platform, or Microsoft Azure—all of which have free tiers. This server doesn’t have to be strong enough to host the Minecraft server—it just forwards the connection for you. This allows you to give out the IP address of the proxy server instead of your own.
您不必允许人们直接连接到路由器。 取而代之的是,您可以从Amazon Web Services, Google Cloud Platform或Microsoft Azure租用一个小的Linux盒子,所有这些盒子都有免费套餐。 该服务器不必足够强大以托管Minecraft服务器,它只是为您转发连接。 这使您可以提供代理服务器的IP地址而不是您自己的IP地址。
Say someone wants to connect to your server, so she types the IP address of your AWS proxy into her Minecraft client. A packet is sent to the proxy on port 25565 (Minecraft’s default port). The proxy is configured to match port 25565 traffic and forward it to your home router. This happens behind the scenes—the person connecting doesn’t even know.
假设有人要连接到您的服务器,因此她在她的Minecraft客户端中键入了您的AWS代理的IP地址。 数据包通过端口25565(Minecraft的默认端口)发送到代理。 代理配置为匹配端口25565流量并将其转发到您的家庭路由器。 这是在幕后发生的,甚至连人都不知道。
Your home router must then be port-forwarded to forward the connection further to your actual PC. Your PC runs the server and responds to the client’s packet. It forwards it back to the proxy, and then the proxy rewrites the packet to make it look like the proxy is the one responding. The client has no idea this is happening and simply thinks the proxy is the system running the server.
然后必须将家庭路由器转发端口,以将连接进一步转发到您的实际PC。 您的PC运行服务器并响应客户端的数据包。 它将其转发回代理,然后代理重写该数据包,以使其看起来像代理是响应的那个。 客户端不知道这种情况正在发生,只是认为代理是运行服务器的系统。
It’s like adding another router in front of the server the same way your home router protects your computer. This new router, though, runs on Amazon Web Services and gets the full transport-layer DDOS mitigation that comes free with every AWS service (called AWS Shield). If an attack is detected, it’s mitigated automatically without bothering your server. If it isn’t stopped for some reason, you can always turn off the instance and cut the connection to your house.
这就像在服务器前面添加另一台路由器一样,就像家用路由器保护您的计算机一样。 但是,此新路由器在Amazon Web Services上运行,并获得了每个AWS服务( 称为AWS Shield )免费提供的完整的传输层DDOS缓解措施。 如果检测到攻击,则会自动缓解攻击,而不会打扰您的服务器。 如果由于某种原因未停止运行,则始终可以关闭实例并断开与房屋的连接。
To handle the proxying, you use a utility called sslh. It’s intended for protocol multiplexing; if you wanted to run SSH (usually port 22) and HTTPS (port 443) on the same port, you’d run into issues. sslh sits in front and redirects ports to the intended applications, solving this problem. But it does this at the transport layer level, just like a router. This means we can match Minecraft traffic and forward it to your home server. sslh is, by default, nontransparent, which means it rewrites packets to hide your home IP address. This makes it impossible for anyone to sniff it out with something like Wireshark.
要处理代理,请使用名为sslh的实用程序。 它用于协议多路复用; 如果要在同一端口上运行SSH(通常是端口22)和HTTPS(端口443),则会遇到问题。 sslh位于前面,将端口重定向到预期的应用程序,从而解决了此问题。 但是,它像路由器一样在传输层级别执行此操作。 这意味着我们可以匹配Minecraft流量并将其转发到您的家庭服务器。 sslh默认情况下sslh ,这意味着它会重写数据包以隐藏您的家庭IP地址。 这使得任何人都不可能使用Wireshark嗅出它。
创建并连接到新的VPS (Create and Connect to a New VPS)
To get started, you have set up the proxy server. This is definitely easier to do if you have some Linux experience, but it isn’t required.
首先,您已经设置了代理服务器。 如果您有一些Linux经验,那么这样做绝对容易,但是不是必需的。
Head to Amazon Web Services and create an account. You have to provide your debit or credit card info, but this is only to prevent people from making duplicate accounts; you aren’t charged for the instance you’re creating. The free tier does expire after a year, so make sure you turn it off after you’re finished with it. Google Cloud Platform has an f1-micro instance available for free all the time if you’d rather use that. Google also offers a $300 credit for a year, which you could actually use to run a proper cloud server.
转到Amazon Web Services并创建一个帐户。 您必须提供借记卡或信用卡信息,但这只是为了防止人们制作重复的帐户; 您无需为要创建的实例付费。 免费套餐会在一年后过期,因此请确保在使用完毕后将其关闭。 如果您愿意使用Google Cloud Platform的f1-micro实例,则可以一直免费使用。 Google还会提供$ 300的信用额度(一年),您可以实际用来运行一台合适的云服务器。
AWS does charge a bit for bandwidth. You get 1 GB free, but you’re taxed $0.09 per GB for anything over that. Realistically, you probably won’t go over this, but keep an eye on it if you see a 20-cent charge on your bill.
AWS确实会收取一定的带宽费用。 您可以获得1 GB的免费空间,但超出此部分的价格为每GB $ 0.09。 实际上,您可能不会理会这件事,但是如果您看到帐单上有20美分的费用,请密切注意。
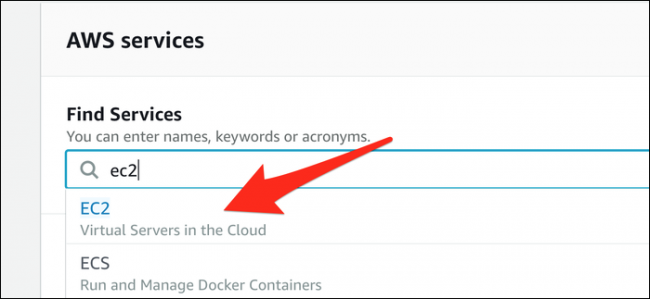
After you create your account, search for “EC2.” This is AWS’s virtual server platform. You might have to wait a bit for AWS to enable EC2 for your new account.
创建帐户后,搜索“ EC2”。 这是AWS的虚拟服务器平台。 您可能需要稍等片刻,AWS才能为新帐户启用EC2。
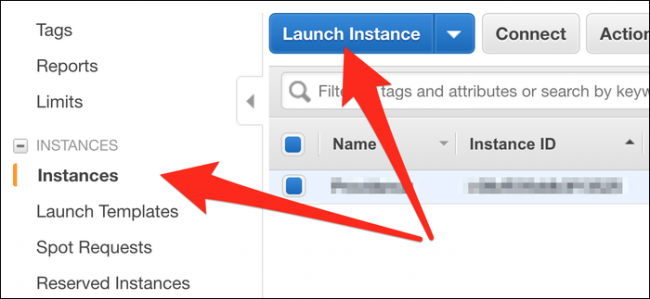
From the “Instances” tab, select “Launch Instance” to bring up the launch wizard.
从“实例”选项卡中,选择“启动实例”以启动启动向导。
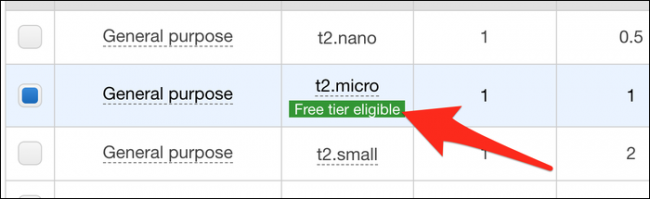
You can select the default “Amazon Linux 2 AMI” or “Ubuntu Server 18.04 LTS” as the OS. Click next, and you’re asked to select the instance type. Select t2.micro, which is the free tier instance. You can run this instance 24/7 under AWS’s free tier.
您可以选择默认的“ Amazon Linux 2 AMI”或“ Ubuntu Server 18.04 LTS”作为操作系统。 单击下一步,然后要求您选择实例类型。 选择t2.micro ,这是免费实例。 您可以在AWS的免费层下24/7运行此实例。
Select “Review and Launch.” On the next page, select “Launch,” and you see the dialog box below. Click “Create a New Key Pair,” and then click “Download Key Pair.” This is your access key to the instance, so don’t lose it—place it in your Documents folder for safekeeping. After it downloads, click “Launch Instances.”
选择“查看并启动”。 在下一页上,选择“启动”,然后您会看到下面的对话框。 单击“创建新的密钥对”,然后单击“下载密钥对”。 这是您对实例的访问密钥,因此请不要丢失它-将其放在“文档”文件夹中以进行保管。 下载完成后,单击“启动实例”。

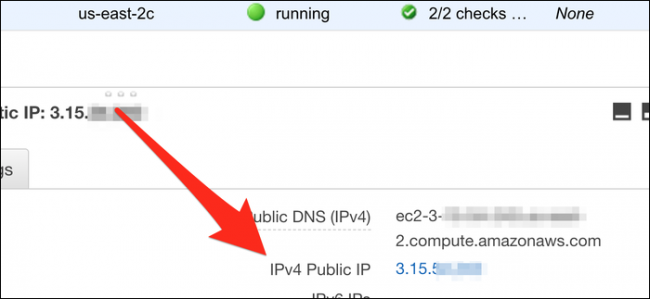
You’re brought back to the instances page. Look for your instance’s IPv4 Public IP, which is the address of the server. If you’d like, you can set up an AWS Elastic IP (which won’t change across reboots), or even a free domain name with dot.tk, if you don’t want to keep coming back to this page to find the address.
您将返回到实例页面。 查找实例的IPv4公用IP,即服务器的地址。 如果您愿意,可以设置一个AWS Elastic IP(在重启后不会更改),或者甚至可以使用dot.tk设置一个免费域名(如果您不想继续返回此页面进行查找)地址。
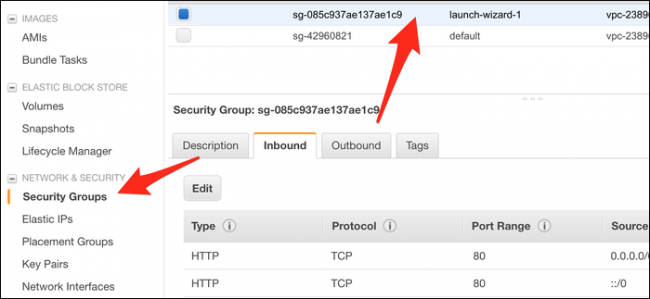
Save the address for later. First, you need to edit the instance’s firewall to open port 25565. From the Security Groups tab, select the group your instance is using (probably launch-wizard-1), and then click “Edit.”
保存地址以备后用。 首先,您需要编辑实例的防火墙以打开端口25565。从“安全组”选项卡中,选择您的实例正在使用的组(可能是launch-wizard-1),然后单击“编辑”。
Add a new Custom TCP rule and set the port range to 25565. The source should be set to “Anywhere,” or 0.0.0.0/0.
添加新的自定义TCP规则,并将端口范围设置为25565。源应设置为“ Anywhere”或0.0.0.0/0 。

Save the changes, and the firewall updates.
保存更改,然后防火墙更新。
We’re now going to SSH into the server to set up the proxy; if you’re on macOS/Linux, you can open up your terminal. If you’re on Windows, you have to use an SSH client, like PuTTY or install the Windows Subsystem for Linux. We recommend the latter, as it’s more consistent.
现在,我们将通过SSH进入服务器以设置代理。 如果您使用的是macOS / Linux,则可以打开终端。 如果您使用的是Windows,则必须使用SSH客户端(例如PuTTY)或安装适用于Linux的Windows子系统 。 我们建议使用后者,因为它更加一致。
The first thing you should do is cd to your documents folder where the keyfile is:
您应该做的第一件事是cd到您的文件文件夹,其中的密钥文件是:
cd ~/Documents/
If you’re using Windows Subsystem for Linux, your C drive is located at /mnt/c/, and you have to cd down to your documents folder:
如果您使用的是Windows Subsystem for Linux,则C驱动器位于/mnt/c/ ,并且必须cd到documents文件夹:
cd /mnt/c/Users/username/Documents/
Use the -i flag to tell SSH you want to use the keyfile to connect. The file has a .pem extension, so you should include that:
使用-i标志告诉SSH您要使用密钥文件进行连接。 该文件的扩展名为.pem ,因此您应该包括:
ssh -i keyfile.pem ec2-user@0.0.0.0
Replace “0.0.0.0” with your IP address. If you made an Ubuntu server rather than AWS Linux, connect as user “ubuntu.”
用您的IP地址替换“ 0.0.0.0 ”。 如果您制作的是Ubuntu服务器而不是AWS Linux,请以“ ubuntu”用户身份进行连接。
You should be granted access and see your command prompt change to the server’s prompt.
您应该被授予访问权限,并看到命令提示符更改为服务器的提示符。
配置SSLH (Configure SSLH)
You want to install sslh from the package manager. For AWS Linux, that would be yum, for Ubuntu, you use apt-get. You might have to add the EPEL repository on AWS Linux:
您要从软件包管理器安装sslh 。 对于AWS Linux,将是yum ;对于Ubuntu,则使用apt-get 。 您可能必须在AWS Linux上添加EPEL存储库:
sudo yum install epel-release
sudo yum install sslh
Once it’s installed, open the config file with nano:
安装完成后,使用nano打开配置文件:
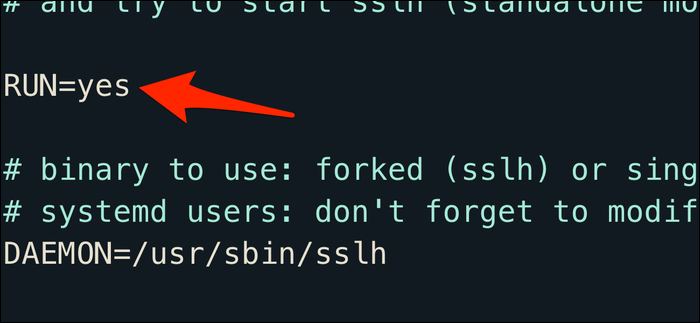
nano /etc/default/sslh
Change the RUN= parameter to “yes”:
将RUN=参数更改为“ yes”:
Below the final DAEMON line, type the following:
在最后的DAEMON行下面,键入以下内容:
DAEMON_OPTS="--user sslh --listen 0.0.0.0:25565 --anyprot your_ip_address:25565 --pidfile /var/run/sslh/sslh.pid
Replace “your_ip_address” with your home IP address. If you don’t know your IP, search “what is my IP address?” on Google—yes, seriously.
将“ your_ip_address ”替换为您的家庭IP地址。 如果您不知道自己的IP,请搜索“我的IP地址是什么?” 在Google上-是的,很认真。
This configuration makes the sslh proxy listen on all network devices on port 25565. Replace this with a different port number if your Minecraft client uses something different, or you play a different game. Usually, with sslh, you match different protocols and route them to different places. For our purposes, though, we simply want to match all possible traffic and forward it to your_ip_address:25565.
此配置使sslh代理在端口25565上的所有网络设备上进行侦听。如果您的Minecraft客户端使用其他端口,或者您玩其他游戏,则将其替换为其他端口号。 通常,使用sslh可以匹配不同的协议,并将它们路由到不同的地方。 但是,出于我们的目的,我们只想匹配所有可能的流量并将其转发到your_ip_address:25565 。
Press Control+X, and then Y to save the file. Type the following to enable sslh:
按Control + X,然后按Y保存文件。 输入以下内容以启用sslh :
sudo systemctl enable sslh
sudo systemctl start sslh
If systemctl isn’t available on your system, you might have to use the service command instead.
如果systemctl在您的系统上不可用,则可能必须使用service命令。
sslh should now be running. Make sure your home router is port forwarding and sending 25565 traffic to your computer. You might want to give your computer a static IP address so this doesn’t change.
sslh现在应该正在运行。 确保家用路由器正在端口转发并向计算机发送25565流量。 您可能要为计算机提供一个静态IP地址,这样就不会更改。
To see if people can access your server, type the proxy’s IP address into an online status checker. You can also type your proxy’s IP into your Minecraft client and try to join. If it doesn’t work, make sure the ports are open in your instance’s Security Groups.
要查看人们是否可以访问您的服务器,请在在线状态检查器中键入代理的IP地址。 您也可以在Minecraft客户端中键入代理的IP,然后尝试加入。 如果不起作用,请确保在实例的安全组中打开了端口。
翻译自: https://www.howtogeek.com/440752/protect-your-home-minecraft-server-from-ddos-attacks-with-aws/


 1万+
1万+


 被折叠的 条评论
为什么被折叠?
被折叠的 条评论
为什么被折叠?
 到【灌水乐园】发言


