


备份linux系统

Don’t risk data loss. Back up your valuable data from the Linux command line. We’ll be using the rsync command for this, and we’ve even found some nice optional graphical interfaces for it.
不要冒险丢失数据。 从Linux命令行备份您的宝贵数据。 我们将为此使用rsync命令,甚至为它找到了一些不错的可选图形界面。
There are many ways to accomplish making a backup copy of your files. We wanted to show you a robust, flexible, and reliable way to protect your data. We choose rsync because of its well-respected algorithms that calculate the differences between files in the source directory and the target directory. Only the differences between two versions of a file are transferred, not the whole file if that can be avoided.
有许多方法可以完成文件的备份副本。 我们想向您展示一种保护数据的健壮,灵活和可靠的方法。 我们之所以选择rsync是因为rsync是受人尊敬的算法 ,可以计算源目录和目标目录中文件之间的差异。 如果可以避免,则仅传输文件两个版本之间的差异,而不传输整个文件。
When this efficiency is paired with its solid track record in performing file copies and directory synchronizations since the mid-1990’s, rsync is a perfect candidate for creating backups from the Linux command line.
自1990年代中期以来,这种效率与执行文件副本和目录同步的可靠记录相结合, rsync是从Linux命令行创建备份的理想人选。
Additionally, there are independent software programs that act as a front-end for rsync. They provide graphical user interfaces (GUIs) to rsync which some people may find easier to use.
此外,还有一些独立的软件程序充当rsync的前端。 它们提供了用于rsync图形用户界面(GUI),有些人可能会发现它更易于使用。
The simpler and faster it is to make a backup, the more likely you are to do so.
进行备份越简单,越快,您执行备份的可能性就越大。
将rsync与外部硬盘驱动器一起使用 (Using rsync With an External Hard Drive)
To make a backup copy of your data to an external hard drive, the hard drive must be mounted and accessible to you. If you can write to it, then so can rsync. In this example, an external USB hard drive called SILVERXHD (for “Silver eXternal Hard Drive”) is plugged into the Linux computer. It has been auto-mounted by the operating system.
要将数据备份备份到外部硬盘驱动器,必须将该硬盘驱动器装入并可以访问。 如果可以写, rsync也可以。 在此示例中,将名为SILVERXHD的外部USB硬盘驱动器(用于“ Silver eXternal Hard Drive”)插入Linux计算机。 它已由操作系统自动挂载。
You will need to know the path to the drive. In GNOME, open the Nautilus file browser and locate the name of the drive in the sidebar.
您将需要知道驱动器的路径。 在GNOME中,打开Nautilus文件浏览器,然后在侧栏中找到驱动器的名称。
Hover the mouse pointer over the name of the external drive and a tooltip will show you the path to the drive.
将鼠标指针悬停在外部驱动器的名称上,工具提示将为您显示驱动器的路径。
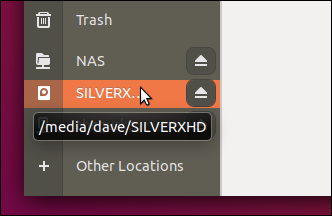
In this example, the tooltip informs us that the mount point for the filesystem on the external drive is “/media/dave/SILVERXHD.”
在此示例中,工具提示告知我们外部驱动器上文件系统的安装点为“ / media / dave / SILVERXHD”。
If your file browser does not do this, browse to the external drive and open a terminal window in that location. Use the pwd command to print the path to the terminal window.
如果您的文件浏览器没有执行此操作,请浏览到外部驱动器并在该位置打开一个终端窗口。 使用pwd命令将路径打印到终端窗口。
从源目录复制内容 (Copying the Contents From the Source Directory)
To use rsync to copy the contents of a directory to your backup destination, use the following command.
要使用rsync将目录的内容复制到备份目标位置,请使用以下命令。
The -r (recursive) option causes rsync to copy all nested subdirectories and their contents. Note that there is forward slash “/” at the end of the word “SILVERXHD,” but it has wrapped round to the next line in the screenshot.
-r (递归)选项使rsync复制所有嵌套的子目录及其内容。 请注意,单词“ SILVERXHD”的末尾有一个斜杠“ /”,但它已绕到屏幕快照的下一行。
rsync -r /home/dave/Documents/ /media/dave/SILVERXHD/

The file copy takes place, and you are returned to the command line prompt.
将进行文件复制,然后您将返回命令行提示符。
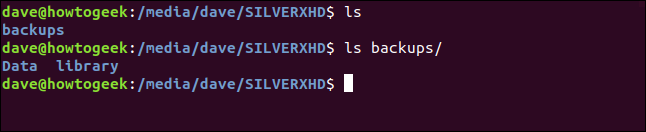
If we look at the external USB drive, we see the directories that are in the Documents directory have been copied to the root of the external drive.
如果查看外部USB驱动器,则会看到Documents目录中的目录已复制到外部驱动器的根目录。
ls

复制源目录及其内容 (Copying the Source Directory and Its Contents)
If you had wanted to have the Documents directory and its contents copied to the external drive, remove the “/” from the end of “/home/dave/Documents” in the command line, like this:
如果你曾经想有复制到外部驱动器的文件目录及其内容,删除“/”从在命令行“/家/戴维/文档”,这样的结尾:
rsync -r /home/dave/Documents /media/dave/SILVERXHD/

To avoid confusion, I removed the two previously copied directories from the external drive before this second command was executed.
为避免混淆,在执行第二条命令之前,我已从外部驱动器中删除了先前复制的两个目录。
If we let the second copy complete and take another look at the external drive, we see the Documents directory has been copied over. Its contents are within that directory. They are not in the root of the external drive.
如果我们完成第二个副本并再次查看外部驱动器,我们将看到Documents目录已被复制。 它的内容在该目录中。 它们不在外部驱动器的根目录中。

复制到特定的目标目录 (Copying to a Specific Target Directory)
To copy to a specific directory on the target hard drive, add the name of the directory to the target path. Let’s suppose we want to copy the contents of the “/home/dave/Documents” directory to a directory called “backups” on the external drive.
要复制到目标硬盘驱动器上的特定目录,请将目录名称添加到目标路径。 假设我们要将“ / home / dave / Documents”目录的内容复制到外部驱动器上名为“ backups”的目录中。
We’d do this with the following command.
我们将使用以下命令执行此操作。
rsync -r /home/dave/Documents/ /media/dave/SILVERXHD/backups/

Checking on the external drive we can see the backups directory has been created, and within that directory are the contents of the “/home/dave/Documents” directory.
检查外部驱动器,我们可以看到备份目录已创建,并且该目录中包含“ / home / dave / Documents”目录的内容。
ls
ls backups
保留文件所有权和权限 (Preserving File Ownership and Permissions)
Use the -a (archive) option to preserve file attributes such as modification dates, file ownership, access permissions, and more, for copied files, symlinks, and special block files.
使用-a (归档)选项可为复制的文件,符号链接和特殊阻止文件保留文件属性,例如修改日期,文件所有权,访问权限等。
rsync -ra /home/dave/Documents/ /media/dave/SILVERXHD/backups/

使用详细模式 (Using Verbose Mode)
The -v (verbose) option forces rsync to list the files as they are being copied.
-v (详细)选项强制rsync在复制文件时列出它们。
rsync -rav /home/dave/Documents/ /media/dave/SILVERXHD/backups/

A summary of the backup is presented when the copying is complete.
复制完成后,将显示备份摘要。
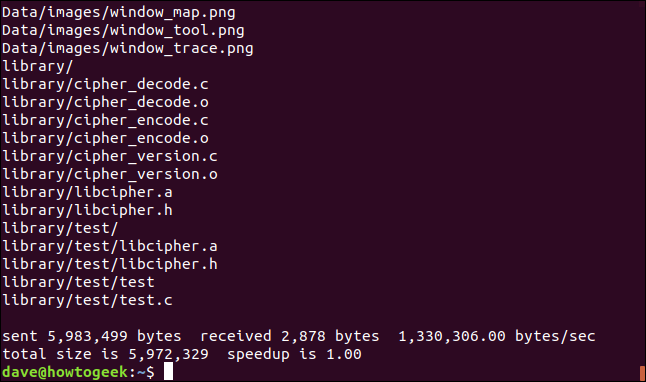
Sent: The bytes transferred to the target.
已发送 :传输到目标的字节。
Received: The bytes received at the host.
已接收 :主机接收到的字节。
Bytes/sec: is the effective transfer rate.
字节/秒 :是有效传输速率。
Total size: Represents the size of the data that would have been sent if you were not using
rsync. On subsequent runs ofrsyncit will only transfer the file differences. This figure will represent the data that did not have to be transferred.总大小 :表示如果不使用
rsync,将发送的数据大小。 在随后的rsync运行中,它将仅传输文件差异。 该图将表示不必传输的数据。Speedup: This is the ratio between the amount of data that had to be sent and the total amount of data that there is. If
rsyncneeds to copy all of the files in their entirety (the first time it is run, for example) the speedup will be 1.0. Whenrsyncis next used, it will optimize the transfers. It will only send the differences between the files, not the entire files. FIles with no changes will be ignored. The speedup figure will represent the ratio between the small amount of data that was required to be transferred versus the total size of the files.加速 :这是必须发送的数据量与存在的数据总量之间的比率。 如果
rsync需要完整地复制所有文件(例如,第一次运行),则加速将为1.0。 下次使用rsync,它将优化传输。 它只会发送文件之间的差异,而不发送整个文件。 没有更改的文件将被忽略。 加速数字将表示需要传输的少量数据与文件总大小之间的比率。
使用进度选项 (Using The Progress Option)
The -P (progress) option causes rsync to generate a small progress report after each file is copied.
-P (进度)选项使rsync在复制每个文件后生成一个小的进度报告。
rsync -raP /home/dave/Documents/ /media/dave/SILVERXHD/backups/

The information provided can be seen between each copied file.
可以在每个复制的文件之间看到提供的信息。
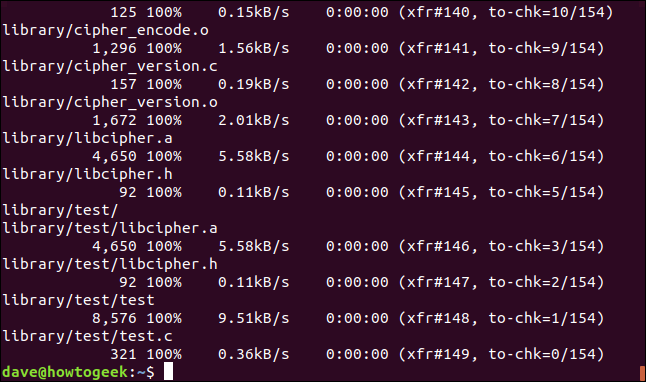
The information provided is:
提供的信息是:
Byte size: Data transferred for this file.
字节大小 :为此文件传输的数据。
Percentage: Percentage of the file transferred.
百分比 :已传输文件的百分比。
B/s: Data transfer rate.
B / s :数据传输速率。
Time remaining: Estimated time left to transfer this file.
剩余时间 :传输此文件的剩余时间。
xfr#: The number of files transferred so far.
xfr# :到目前为止已传输的文件数。
to-chk: The number of files left to be checked and verified by the optimization algorithms.
to-chk :优化算法需要检查和验证的文件数。
增加速度 (Adding More Speed)
To speed up transfers, use the -z (compression) option. This compresses the file in transfer, but the file is stored uncompressed in the target directory.
要加快传输速度,请使用-z (压缩)选项。 这将压缩传输中的文件,但是文件未压缩地存储在目标目录中。
The compression option will not yield significant benefits for transfers involving many small files. For collections of larger files, it can reduce the transfer time in a meaningful way.
对于涉及许多小文件的传输,压缩选项不会产生明显的好处。 对于较大文件的集合,它可以以有意义的方式减少传输时间。
We’re also using the --partial option here. rsync will delete partially transferred files caused by network glitches or other interruptions. The --partial option forces rsync to leave the partially transferred files on the target. The net time rsync runs it will not have to re-transfer the portions of the partially transferred files.
我们还在这里使用--partial选项。 rsync将删除由于网络故障或其他中断引起的部分传输的文件。 --partial选项强制rsync将部分传输的文件保留在目标上。 净时间rsync运行时,将不必重新传输部分传输的文件的各个部分。
Note that you might not want to use this option if there is a risk that someone will mistake the partially transferred files for completely transferred files.
请注意,如果有人将部分传输的文件误认为完全传输的文件,则可能不希望使用此选项。
rsync -ravz --partial /home/dave/Documents/ /media/dave/SILVERXHD/backups/

In our example, the benefits are marginal.
在我们的示例中,收益是微不足道的。
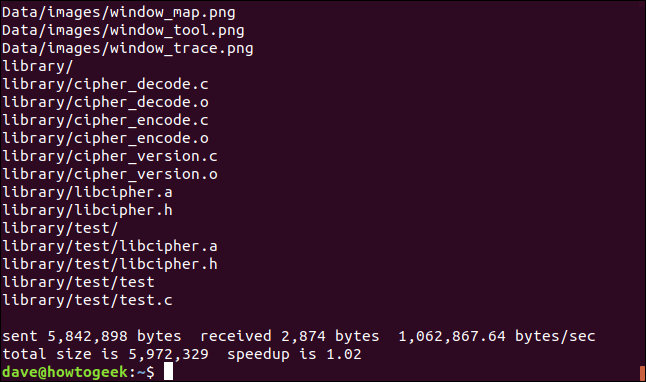
The speedup ratio has improved but by two-hundredths of a percent! In a real-world scenario, your speed improvements will be more impressive.
加速比提高了,但提高了百分之二十分! 在实际情况下,您的速度改进将更加令人印象深刻。
在网络上使用rsync (Using rsync Over A Network)
So far we’ve been targetting an external USB drive. To use a network location as the target for the backup, use the path to that location on the command line. There is a network attached storage device (NAS) on the network that this article was researched on.
到目前为止,我们一直以外部USB驱动器为目标。 要将网络位置用作备份目标,请在命令行上使用该位置的路径。 本文研究的网络上有一个网络附加存储设备 (NAS)。
We can use the same trick we used earlier to identify the path to the NAS, by hovering the mouse over the connection to that device in Nautilus.
通过将鼠标悬停在Nautilus上与该设备的连接上,我们可以使用与之前用于标识NAS路径相同的技巧。
There are no special options to backup across a network; these are all options we have already used.
在网络上没有特殊的备份选项。 这些都是我们已经使用的选项。
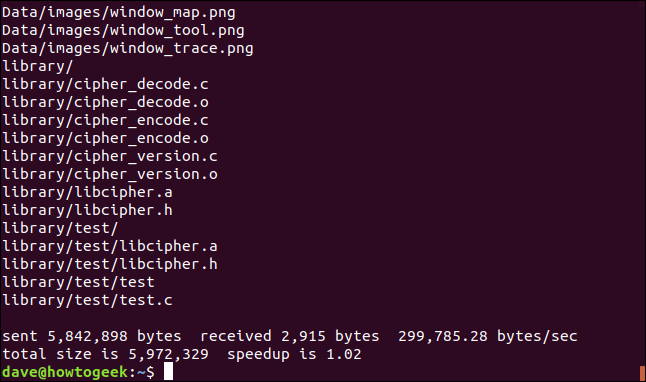
rsync -ravz --partial /home/dave/Documents/ /media/dave/NAS/dave/backups/

There is no difference in the format of the output.
输出格式没有差异。

Not surprisingly, there is a significant improvement in the Bytes/sec figure.
毫不奇怪,字节/秒的数字有了很大的提高。
If we run rsync once again, we can see that there are no files to transfer because there have been no changes, but there are still some bytes transferred back and forth. This is the amount of data that needs to be transferred to compare the file list on the target with the file list on the source.
如果再次运行rsync ,则可以看到没有文件要传输,因为没有更改,但是仍然有一些字节来回传输。 这是将目标上的文件列表与源上的文件列表进行比较所需传输的数据量。

The speedup ratio is an order of magnitude better in this instance. In practice, your performance ratios will be somewhere between our two pseudo-artificial readings.
在这种情况下,加速比要好一个数量级。 实际上,您的性能比将介于我们的两个伪人工读数之间。
在SSH上使用rsync (Using rsync Over SSH)
rsync supports backing up across an SSH connection. We need to provide the user account name and the SSH location on the command line. We’re using a network name here, but you can also use an IP address.
rsync支持通过SSH连接进行备份。 我们需要在命令行上提供用户帐户名和SSH位置。 我们在这里使用网络名称,但您也可以使用IP地址。
Note the “:” between the SSH connection details and the start of the network path on the remote target.
注意SSH连接详细信息和远程目标上网络路径的开始之间的“:”。
rsync -ravz --partial /home/dave/Documents/ dave@sulaco.local:/home/dave/Backups/

You will be asked for the password of the user account on the remote machine. This isn’t your password on the source machine.
系统将要求您提供远程计算机上用户帐户的密码。 这不是您在源计算机上的密码。
The backup will complete as usual. The throughput isn’t as fast as a regular network connection, because of the encryption and decryption that takes place in the secure shell connection.
备份将照常完成。 由于安全外壳连接中发生了加密和解密,因此吞吐量不如常规网络连接快。
自动化备份 (Automating Your Backups)
We can easily create automated backups by adding entries to your crontab file.
通过将条目添加到您的crontab文件中,我们可以轻松创建自动备份。
crontab -e

We’ll set up an automated backup to run each day at 04:30 (if the computer is on at that time, of course). The syntax for the rsync command doesn’t change at all.
我们将设置一个自动备份,每天04:30运行(当然,如果当时计算机处于开机状态)。 rsync命令的语法完全不变。
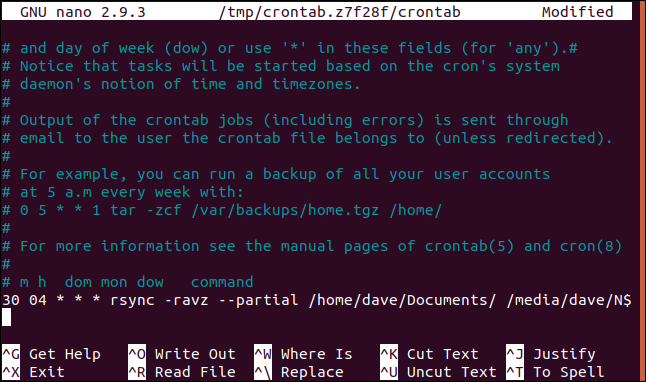
Ctrl+O will write your changes to the file, and Ctrl+X will close the nano editor.
Ctrl + O将您的更改写入文件,而Ctrl + X将关闭nano编辑器。
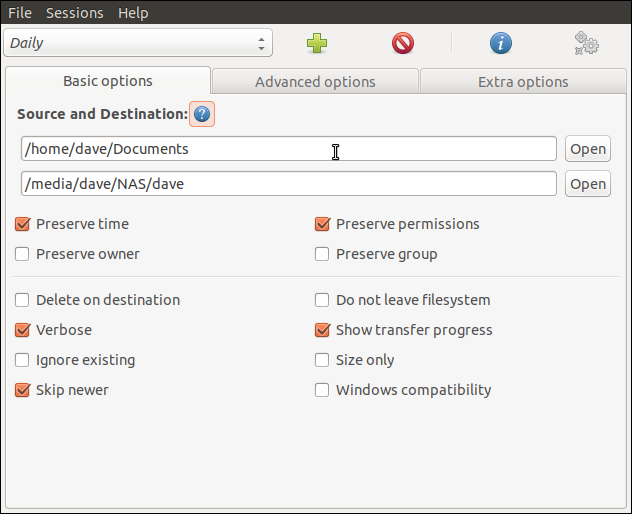
将友好的面Kong放在Rsync上 (Putting a Friendly Face on Rsync)
People who are less comfortable with the command line can use one of a number of programs that put a graphical user interface (GUI) on rsync. Two good examples are luckyBackup and Grsync. Both of these programs allow many of the rsync options to be selected through the user interface.
不太熟悉命令行的人可以使用将图形用户界面(GUI)放在rsync上的众多程序之一。 两个很好的例子是luckyBackup和Grsync 。 这两个程序都允许通过用户界面选择许多rsync选项。
The Grsync program concentrates on being a visual wrapper for rync. It provides easy access to the rsync options and adds only a limited set of new functionality.
Grsync程序专注于成为rync的可视包装器。 它提供了对rsync选项的轻松访问,并且仅添加了一组有限的新功能。
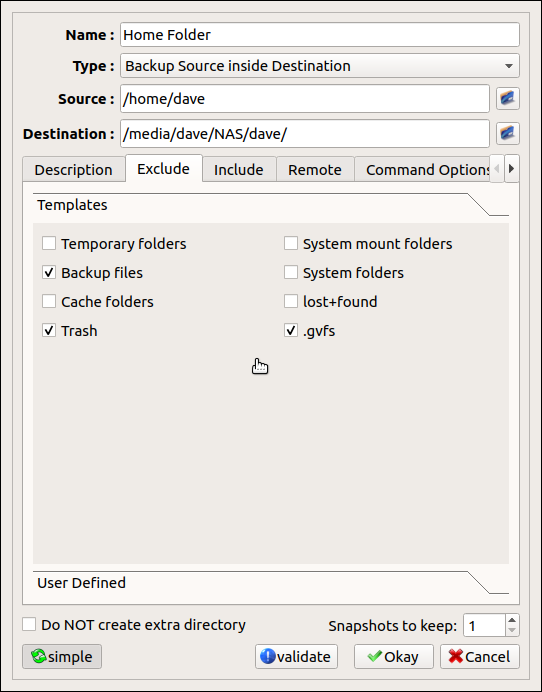
The luckyBackup program is much more than a simple wrapper for rsync. It is a backup program that uses rsync behind the scenes. For example, luckyBackup can make multiple “snapshots” of your backup. You can then “roll back” to the versions of the files in any of the snapshots.
luckyBackup程序不仅仅是rsync的简单包装。 它是一个在后台使用rsync的备份程序。 例如, luckyBackup可以为您的备份制作多个“快照”。 然后,您可以“回滚”到任何快照中的文件版本。
安装Grsync (To install Grsync)
To install Grsync in Ubuntu, use this command:
要在Ubuntu中安装Grsync ,请使用以下命令:
sudo apt-get install grsync

To install Grsync in Fedora, use this command:
要在Fedora中安装Grsync ,请使用以下命令:
sudo dnf install grsync

To install Grsync in Manaro use this command:
要在Grsync中安装Grsync ,请使用以下命令:
sudo pacman -Syu grsync

要安装luckyBackup (To Install luckyBackup)
To install luckyBackup in Ubuntu, use the following command:
要在Ubuntu中安装luckyBackup ,请使用以下命令:
sudo apt-get install luckybackup

To install luckyBackup in Fedora use the following command:
要在Fedora中安装luckyBackup ,请使用以下命令:
sudo dnf install luckybackup

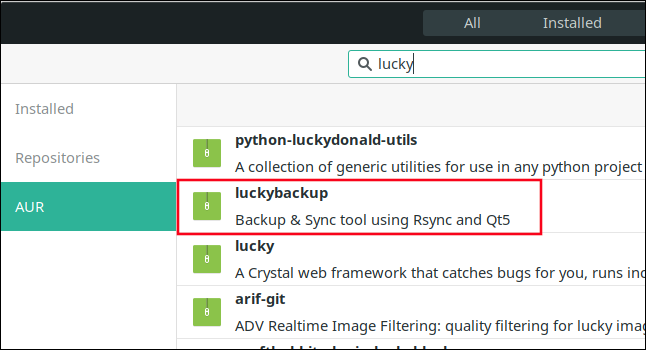
In Manjaro you must install luckyBackup from the Arch User Repository (AUR). You can do this with the pamac package manager.
在Manjaro中,您必须从Arch用户存储库 (AUR)安装luckyBackup 。 您可以使用pamac软件包管理器执行此操作。
不要冒险,经常备份您的数据 (Don’t Risk It, Back Up Your Data Often)
Backups are absolutely vital. Back up frequently, back up to many locations, and back up to different media. Once it is set up, rsync can do all of that for you.
备份绝对至关重要。 经常备份,备份到许多位置以及备份到不同的介质。 设置完成后, rsync可以为您完成所有这些工作。
翻译自: https://www.howtogeek.com/427480/how-to-back-up-your-linux-system/
备份linux系统


 406
406


 被折叠的 条评论
为什么被折叠?
被折叠的 条评论
为什么被折叠?
 到【灌水乐园】发言


