


macos快捷键

Do you like the idea of Mail, the default email client in macOS, but find yourself unable to actually use it because of how much you love Gmail’s keyboard shortcuts? Me too. I’ve used Macs for years, but I’ve never given the default email program a chance, even though it’s lightweight, speedy, and nicely integrated into the OS. I want to press “e” to archive an email, or “#” to delete one, and j or k to browse emails.
您是否喜欢Mail的想法 ,它是macOS中的默认电子邮件客户端,但是由于您对Gmail的键盘快捷键的喜爱程度而发现自己无法实际使用它? 我也是。 我已经使用Mac多年了,但是我从来没有给默认电子邮件程序一个机会,即使它轻巧,快速并且可以很好地集成到OS中。 我想按“ e”来存档电子邮件,或者按“#”来删除一封电子邮件,然后按j或k浏览电子邮件。
It turns out I’m not alone, because there’s a bundle called Gmailinator that adds exactly this functionality to Mail (sometimes called “Mac Mail” or “Mail.app” by users.) The problem: that bundle is four years old, and doesn’t work with macOS Sierra. Even worse: Apple also doesn’t really go out of its way to make installing bundles easy. Happily, there’s a version that is working, but to set it up, you’ll have to compile it using XCode. Don’t panic: it’s not hard, and the result is worth it.
事实证明,我并不孤单,因为有一个名为Gmailinator的捆绑软件 ,它确实向Mail添加了此功能(有时被用户称为“ Mac Mail”或“ Mail.app”。)问题:该捆绑已有 4年了,并且不适用于macOS Sierra。 更糟糕的是:Apple并没有真正使安装捆绑包变得容易。 幸运的是,有一个正在运行的版本 ,但是要进行设置,您必须使用XCode进行编译。 不要惊慌:这并不难,结果值得。
第一步:在Mac Mail中启用捆绑软件 (Step One: Enable Bundles in Mac Mail)
Before we can do anything, we need to open the Terminal and enable Mail bundles with this command:
在执行任何操作之前,我们需要打开终端并使用以下命令启用邮件捆绑包:
defaults write com.apple.mail EnableBundles -bool true
defaults write com.apple.mail EnableBundles -bool true
All we’re doing with this command is changing the “Enablebundles” toggle from “false” to “true.” Mail will not even check for bundles if this isn’t enabled, so make sure you do this.
我们使用此命令所做的一切只是将“ Enablebundles”开关从“ false”更改为“ true”。 如果未启用此功能,邮件甚至不会检查包,因此请确保执行此操作。
第二步:下载Gmailinator和XCode (Step Two: Download Gmailinator and XCode)
Next we need to head to the working version of Gmailinator, generously forked by Github user jgavris. Click the green “Clone or Download” button, then click the “Download ZIP” button.
接下来,我们需要转到Github用户jgavris慷慨分叉的Gmailinator的工作版本 。 单击绿色的“克隆或下载”按钮,然后单击“下载ZIP”按钮。

Open the ZIP file to unarchive it.
打开ZIP文件以取消存档。
If you haven’t already done so, install XCode from the Mac App Store. It’s a 4GB download, so this may take a while. Sorry: there’s no way around this, at least not until someone provides a working binary—the only binaries we could find aren’t working (if this changes please get in touch with us and we’ll update the article.)
如果尚未安装 , 请从Mac App Store 安装XCode 。 这是4GB的下载,因此可能需要一段时间。 抱歉:没有办法解决,至少要等到有人提供有效的二进制文件后,我们才能找到-唯一的二进制文件无法正常工作(如果更改,请与我们联系 ,我们将更新本文。)
第三步:编译并安装Gmailinator (Step Three: Compile and Install Gmailinator)
Next, close Mail, then open the file called GMailinator.xcodeproj by double-clicking it.
接下来,关闭Mail,然后通过双击打开名为GMailinator.xcodeproj的文件。
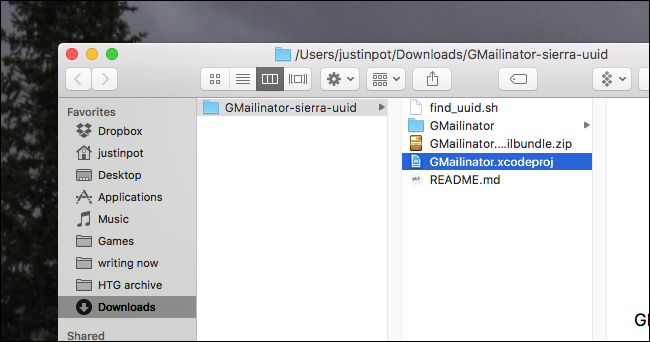
From here you can explore the code, if you like, or you can click Play button at top-left to build and install the bundle.
如果愿意,您可以从此处浏览代码,也可以单击左上方的“播放”按钮来构建和安装捆绑软件。

Launch Mail: if the build didn’t work, you’ll see an error message. Otherwise you should be able to use the Gmail keyboard shortcuts.
启动邮件:如果构建失败,您将看到错误消息。 否则,您应该可以使用Gmail键盘快捷键。
You’ll find the bundle you installed in ~Library/Mail/Bundles/, but you’ll need to know how to access the hidden Library folder to get there. To remove the bundle simply delete this folder.
您将在~Library/Mail/Bundles/找到安装的~Library/Mail/Bundles/ ,但是您需要知道如何访问隐藏的Library文件夹才能到达那里。 要删除捆绑包,只需删除此文件夹。
支持的键盘快捷键 (Supported Keyboard Shortcuts)
Wondering which of Gmail’s keyboard shortcuts are supported by this bundle? Here’s a list from the GitHub site for the project.
想知道此捆绑包支持哪些Gmail的键盘快捷键吗? 这是该项目的GitHub站点上的列表。
| Key | Action |
|---|---|
| # | Delete |
| / | Mailbox search |
| ! | Toggle message as Junk |
| a | Reply All |
| c | Compose new message |
| e, y | Archive |
| f | Forward message |
| G | Go to the last message |
| g | Go to the first message |
| j | Go to next message/thread |
| k | Go to previous message/thread |
| l | Move to folder (opens dialog) |
| o | Open selected message |
| R | Get new mail (Refresh) |
| r | Reply |
| s | Flag |
| u | Mark message as read |
| U | Mark message as unread |
| v | View raw message dialog |
| z | Undo |
| 键 | 行动 |
|---|---|
| # | 删除 |
| / | 邮箱搜索 |
| ! | 将邮件切换为垃圾邮件 |
| 一种 | 全部回复 |
| C | 撰写新讯息 |
| , | 封存 |
| F | 转发信息 |
| G | 转到最后一条消息 |
| G | 转到第一个消息 |
| Ĵ | 转到下一条消息/线程 |
| ķ | 转到上一条消息/线程 |
| 升 | 移至文件夹(打开对话框) |
| Ø | 打开选定的消息 |
| [R | 获取新邮件(刷新) |
| [R | 回复 |
| s | 旗 |
| ü | 将邮件标记为已读 |
| ü | 将邮件标记为未读 |
| v | 查看原始消息对话框 |
| ž | 撤消 |
I tested them on the latest version of Mail as of this writing, 10.3, and all of these shortcuts were working for me.
在撰写本文时,我在最新版本的Mail 10.3上对它们进行了测试,所有这些快捷方式都对我有用。
Enjoy your new Mac Mail setup. If you want to keep configuring Mail to your liking, consider stopping it from wasting gigabytes of space or organizing your email with smart mailboxes.
享受新的Mac Mail安装程序。 如果您希望按自己的喜好配置Mail,请考虑停止浪费GB的空间或使用智能邮箱来组织电子邮件 。
翻译自: https://www.howtogeek.com/307860/how-to-use-gmails-keyboard-shortcuts-in-macos-mail/
macos快捷键


 1160
1160

 被折叠的 条评论
为什么被折叠?
被折叠的 条评论
为什么被折叠?
 到【灌水乐园】发言


