


华为电子邮件显示未读邮件1
A common function of many programs is the ability to send email. When working on development projects or doing product demos which utilize email, having an environment you know will work can be critical. For these situations, having a completely self contained email system, that is all emails “sent” never leave the local machine, is the answer.
许多程序的共同功能是能够发送电子邮件。 在进行开发项目或使用电子邮件进行产品演示时,拥有一个您知道可以工作的环境至关重要。 对于这些情况,答案是完全独立的电子邮件系统,即所有“发送”的电子邮件都永远不会离开本地计算机。
To set up this environment, we are going to use MailEnable Standard which is a fully functional SMTP and POP mail server. We will configure select domains to “route” all messages so that they are sent and received locally. This allows you to test/demonstrate the full email cycle entirely on the local machine.
要设置此环境,我们将使用MailEnable Standard,它是功能齐全的SMTP和POP邮件服务器。 我们将配置选择域以“路由”所有邮件,以便在本地发送和接收它们。 这使您可以完全在本地计算机上测试/演示整个电子邮件周期。
准备环境 (Preparing Your Environment)
Prior to setting up the self contained MailEnable installation, a few changes will have to be made on your system.
在设置独立的MailEnable安装之前,必须在系统上进行一些更改。
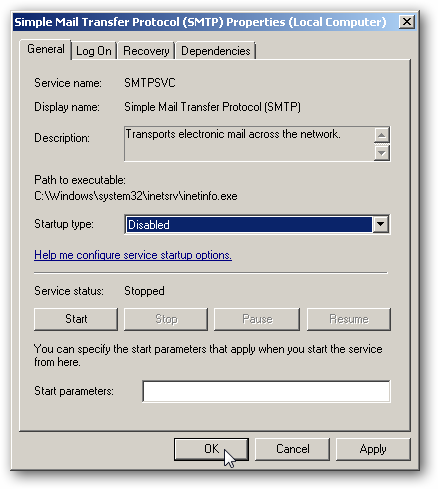
The first would be to stop and disable any existing mail services you have running. If you have any, it would most likely be the Microsoft ‘Simple Mail Transfer Protocol’ service which is installed with IIS.
第一种是停止并禁用您正在运行的任何现有邮件服务。 如果有的话,很可能是与IIS一起安装的Microsoft“简单邮件传输协议”服务。
Next we have to configure the hosts file on the machine to route all traffic to our “contained” domains so that it never leaves the machine.
接下来,我们必须在计算机上配置hosts文件,以将所有流量路由到我们的“包含”域,以使其永远不会离开计算机。
Open the file “C:Windowssystem32driversetchosts” in Notepad.
在记事本中打开文件“ C:Windowssystem32driversetchosts”。
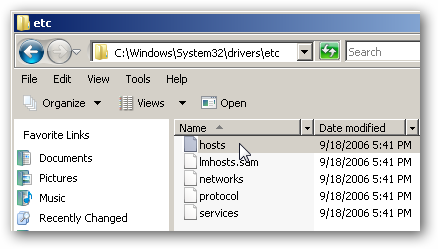
For all domains which you want contained, enter a line like so:
对于要包含的所有域,输入如下一行:
127.0.0.1 domain.com
127.0.0.1 domain.com
127.0.0.1 localmail.com
127.0.0.1 localmail.com
In our example, we are using the domain “localmail.com”. Once you are done, save your changes.
在我们的示例中,我们使用域“ localmail.com”。 完成后,保存更改。

安装MailEnable (Installing MailEnable)
Launch the MailEnable Standard installation program. During the installation, there will be several informational screens as well as some generic data entry screens, so we are going to show you the screens which require some special configuration.
启动MailEnable Standard安装程序。 在安装过程中,将有几个信息屏幕以及一些通用的数据输入屏幕,因此我们将向您展示需要一些特殊配置的屏幕。
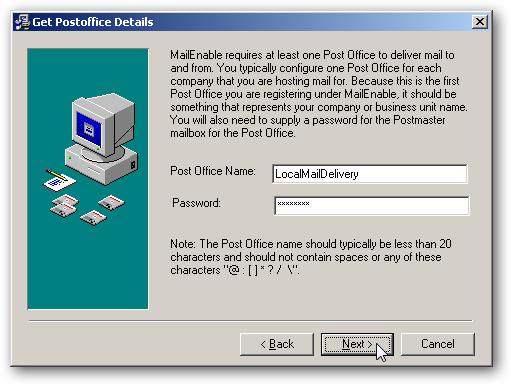
In the Get Postoffice Details screen, enter “LocalMailDelivery” for Post Office Name along with a password.
在“获取邮局详细信息”屏幕中,为“邮局名称”输入“ LocalMailDelivery”以及密码。
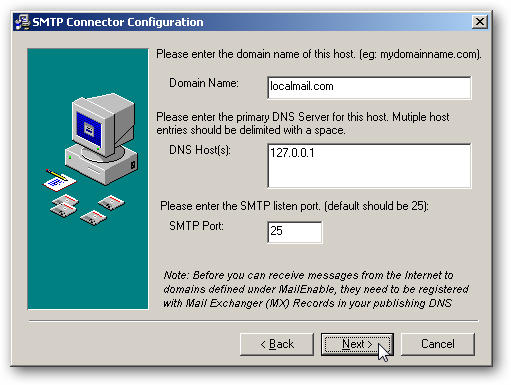
In the SMTP Connector Configuration, enter the domain you want to contain the email for (in our example, “localmail.com”) and for the DNS Host, enter “127.0.0.1”.
在“ SMTP连接器配置”中,输入要包含电子邮件的域(在我们的示例中为“ localmail.com”),对于DNS主机,输入“ 127.0.0.1”。
You do not need to install the WebMail portions as we will be checking the mail through a POP client. These are time limited in the Standard edition of MailEnable.
您不需要安装WebMail部分,因为我们将通过POP客户端检查邮件。 在MailEnable的标准版中,这些时间是受时间限制的。

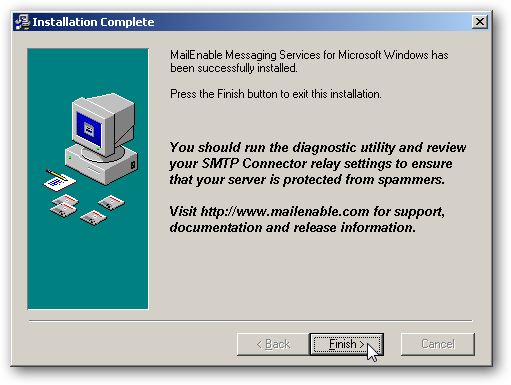
When setup is complete a reboot is not required, but it is generally a good idea.
安装完成后,不需要重新启动,但这通常是个好主意。
配置MailEnable (Configuring MailEnable)
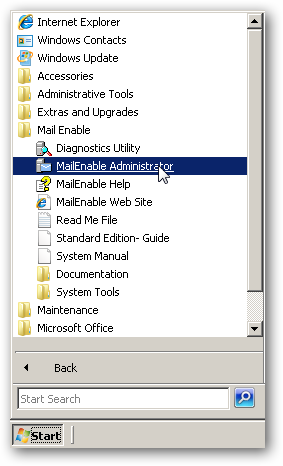
Once installed, open the MailEnable Administrator which is available under Start > Programs > Mail Enable.
安装完成后,打开MailEnable Administrator(可在“开始”>“程序”>“邮件启用”下使用)。
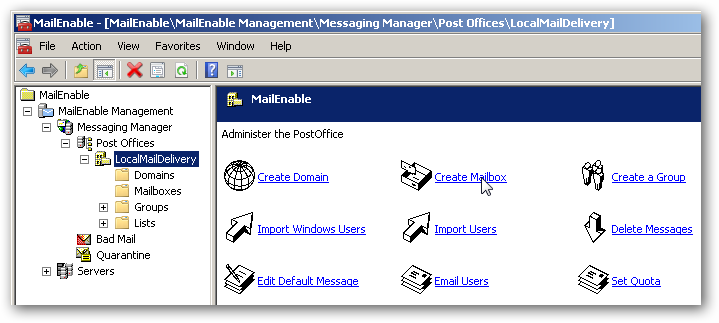
Under the Servers > localhost > System > Services option, make sure that all services are started (List Connector is not required to be running).
在“服务器”>“本地主机”>“系统”>“服务”选项下,确保所有服务都已启动(不需要运行列表连接器)。

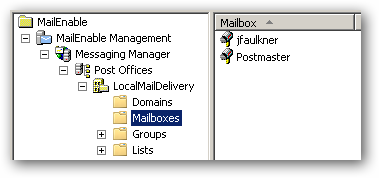
Under Messaging Manager > Post Offices > LocalMailDelivery, select the Create Mailbox function.
在“邮件管理器”>“邮局”>“ LocalMailDelivery”下,选择“创建邮箱”功能。
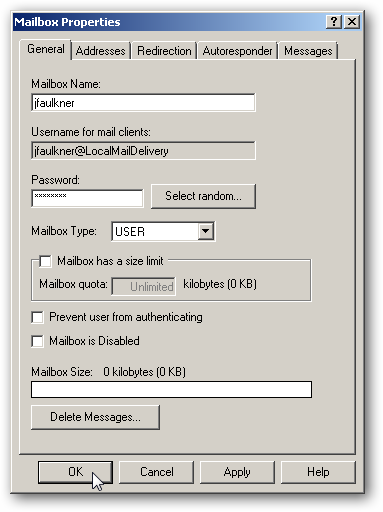
In the Mailbox Properties, enter the name of the recipient in the Mailbox Name box without the domain name added to the end. By default, the recipient will have an email address for all the domains listed in the Domains folder of LocalMailDelivery. In our example, we configured “localmail.com” as our domain so in this example the full email would be ‘jfaulkner@localmail.com’.
在“邮箱属性”中,在“邮箱名称”框中输入收件人的名称, 但不要将域名添加到末尾 。 默认情况下,收件人将具有LocalMailDelivery的Domains文件夹中列出的所有域的电子邮件地址。 在我们的示例中,我们将“ localmail.com”配置为我们的域,因此在此示例中,完整的电子邮件为“ jfaulkner@localmail.com”。
Also make note of the ‘Username for mail clients’ and ‘Password’ boxes. These are the respective credentials which we will configure in our POP client to downloading the mail.
还要记下“邮件客户端的用户名”和“密码”框。 这些是我们将在POP客户端中配置的用于下载邮件的相应凭据。
Once created, you should see the newly created recipient in the list of mail boxes.
创建后,您应该在邮箱列表中看到新创建的收件人。
配置POP客户端 (Configuring the POP Client)
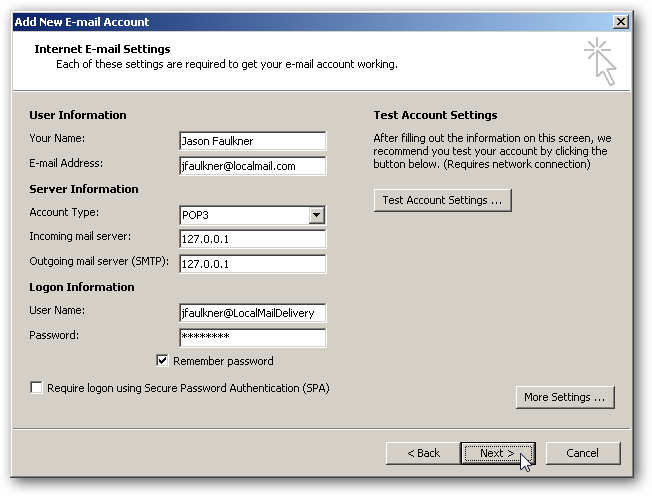
Once the local mail server is configured, you can use any POP client you want. In our screenshots, we are using Outlook 2007, but any client will do.
一旦配置了本地邮件服务器,就可以使用所需的任何POP客户端。 在屏幕截图中,我们使用的是Outlook 2007,但任何客户端都可以使用。
The key items for setup are:
设置的关键项目是:
- Email Address: recipient@localdomain.com (from our example, jfaulkner@localmail.com) 电子邮件地址:收件人@ localdomain.com(来自我们的示例,jfaulkner @ localmail.com)
- Account Type: POP3 帐户类型:POP3
- Incoming Server: 127.0.0.1 传入服务器:127.0.0.1
- Outgoing/SMTP Server: 127.0.0.1 传出/ SMTP服务器:127.0.0.1
- User Name / Password: from the “Create Mailbox” screen in MailEnable (from our example: jfaulkner@LocalMailDelivery / password) 用户名/密码:在MailEnable的“创建邮箱”屏幕中(来自我们的示例:jfaulkner @ LocalMailDelivery /密码)
Testing your settings should show everything is working successfully.
测试您的设置应显示一切正常。
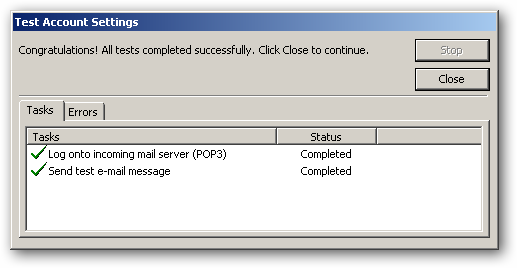
If everything is working, you should get a welcome message from MailEnable.
如果一切正常,您应该从MailEnable收到欢迎消息。
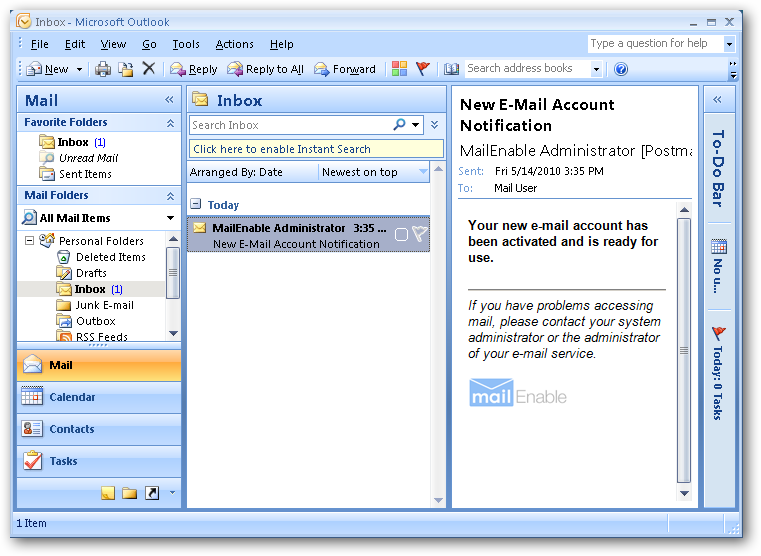
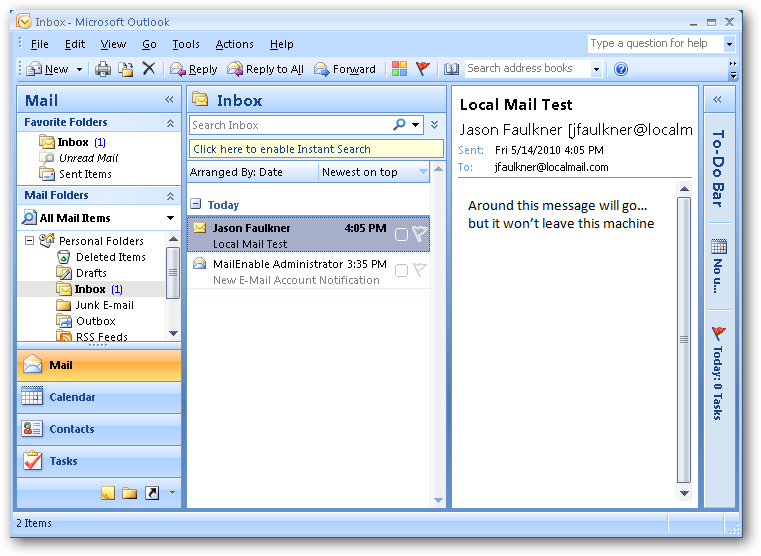
To test the flow of mail, send a message to your locally configured email address.
要测试邮件流,请向本地配置的电子邮件地址发送一条消息。
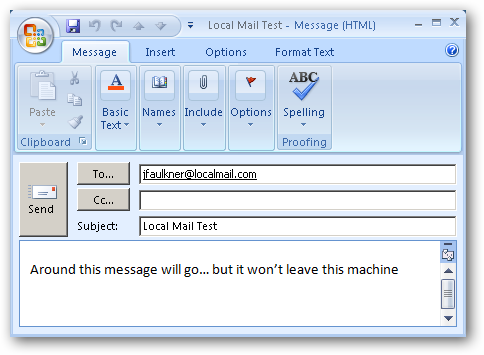
Hopefully it is no surprise that the test message gets delivered a few moments after sending.
希望测试消息在发送后不久传递就不足为奇了。
结论 (Conclusion)
Again, having a completely local mail environment is ideal for demonstrations or development projects where you may not have reliable connections. Since the message never leaves your machine, nothing is left to chance.
同样,对于可能没有可靠连接的演示或开发项目,拥有完全本地的邮件环境是理想的选择。 由于该消息永远不会离开您的计算机,因此没有任何机会。
链接 (Links)
Download MailEnable Standard Edition
翻译自: https://www.howtogeek.com/50605/how-to-build-a-self-contained-email-environment/
华为电子邮件显示未读邮件1


 3012
3012

 被折叠的 条评论
为什么被折叠?
被折叠的 条评论
为什么被折叠?
 到【灌水乐园】发言


