


极客时间 资源

In this installation of Geek School, we take a look at Folder Virtualization, SIDs and Permission, as well as the Encrypting File System.
在此Geek School安装中,我们研究了文件夹虚拟化,SID和权限以及加密文件系统。
Be sure to check out the previous articles in this Geek School series on Windows 7:
请务必查看Windows 7上此Geek School系列中的先前文章:
And stay tuned for the rest of the series all this week.
并继续关注本周剩余的系列节目。
文件夹虚拟化 (Folder Virtualization)
Windows 7 introduced the notion of libraries which allowed you to have a centralized location from which you could view resources located elsewhere on your computer. More specifically, the libraries feature allowed you to add folders from anywhere on your computer to one of four default libraries, Documents, Music, Videos and Pictures, which are easily accessible from the navigation pane of Windows Explorer.
Windows 7引入了库的概念,该概念使您可以拥有一个集中的位置,从中可以查看位于计算机其他位置的资源。 更具体地说,库功能使您可以将计算机上任何位置的文件夹添加到四个默认库之一(文档,音乐,视频和图片),可以从Windows资源管理器的导航窗格轻松访问这些库。

There are two important things to note about the library feature:
关于库功能,有两点需要注意:
- When you add a folder to a library the folder itself does not move, rather a link is created to the location of the folder. 当您将文件夹添加到库中时,文件夹本身不会移动,而是会创建指向该文件夹位置的链接。
- In order to add a network share to your libraries it must be available offline, though you could also use a work around using symbolic links. 为了将网络共享添加到库中,它必须可以脱机使用,尽管您也可以使用符号链接来解决。
To add a folder to a library, simply head into the library and click on the locations link.
要将文件夹添加到库中,只需进入库并单击位置链接。

Then click the add button.
然后单击添加按钮。

Now locate the folder you want to include in the library and click the Include folder button.
现在,找到要包含在库中的文件夹,然后单击“包含文件夹”按钮。

That’s all there is to it.
这里的所有都是它的。

安全标识符 (The Security Identifier)
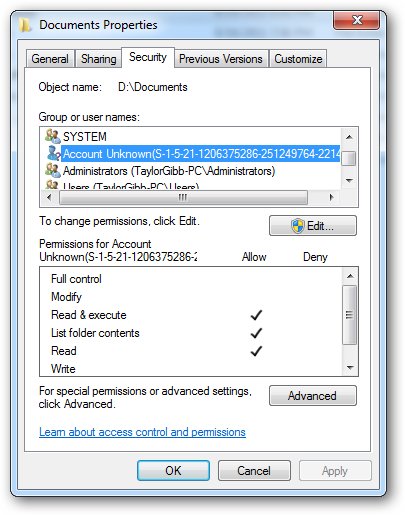
The Windows Operating system use SIDs to represent all security principles. SIDs are just variable length strings of alphanumeric characters that represent machines, users and groups. SIDs are added to ACLs(Access Control Lists) every time you grant a user or group permission to a file or folder. Behind the scenes, SIDs are stored the same way all other data objects are: in binary. However, when you see a SID in Windows, it will be displayed using a more readable syntax. It is not often that you will see any form of SID in Windows; the most common scenario is when you grant someone permission to a resource, then delete their user account. The SID will then show up in the ACL. So lets take a look at the typical format in which you will see SIDs in Windows.
Windows操作系统使用SID代表所有安全性原则。 SID只是表示机器,用户和组的字母数字字符的可变长度字符串。 每次向用户或组授予文件或文件夹权限时,SID就会添加到ACL(访问控制列表)中。 在幕后,SID的存储方式与所有其他数据对象的存储方式相同:二进制。 但是,当您在Windows中看到SID时,将使用更具可读性的语法来显示它。 在Windows中,您很少会看到任何形式的SID。 最常见的情况是,您授予某人对资源的权限,然后删除其用户帐户。 然后,SID将显示在ACL中。 因此,让我们看一下在Windows中将看到SID的典型格式。
The notation that you will see takes a certain syntax. Below are the different parts of a SID.
您将看到的表示法采用某种语法。 以下是SID的不同部分。
- An ‘S’ prefix 'S'前缀
- Structure revision number 结构修订号
- A 48-bit identifier authority value 48位标识符授权值
- A variable number of 32-bit sub-authority or relative identifier (RID) values 可变数量的32位子授权或相对标识符(RID)值
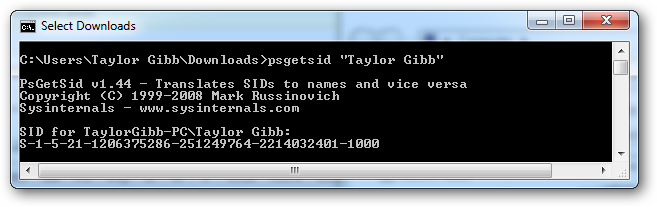
Using my SID in the image below we will break up the different sections to get a better understanding.
在下图中使用我的SID,我们将分解不同的部分以获得更好的理解。
The SID Structure:
SID结构:
‘S’ – The first component of a SID is always an ‘S’. This is prefixed to all SIDs and is there to inform Windows that what follows is a SID. ’1′ – The second component of a SID is the revision number of the SID specification. If the SID specification was to change it would provide backwards compatibility. As of Windows 7 and Server 2008 R2, the SID specification is still in the first revision. ’5′ – The third section of a SID is called the Identifier Authority. This defines in what scope the SID was generated. Possible values for this sections of the SID can be:
' S'– SID的第一部分始终是'S'。 这是所有SID的前缀,可以通知Windows,其后是SID。 “ 1” – SID的第二个组成部分是SID规范的修订号。 如果要更改SID规范,它将提供向后兼容性。 从Windows 7和Server 2008 R2开始,SID规范仍处于第一版中。 '5'– SID的第三部分称为标识符授权机构。 这定义了生成SID的范围。 SID的此部分的可能值为:
- 0 – Null Authority 0 –空权限
- 1 – World Authority 1 –世界权威
- 2 – Local Authority 2 –地方政府
- 3 – Creator Authority 3 –创作者授权
- 4 – Non-unique Authority 4 –非唯一机构
- 5 – NT Authority 5 –新台币管理局
’21′ – The fourth component is sub-authority 1. The value ’21′ is used in the fourth field to specify that the sub-authorities that follow identify the Local Machine or the Domain. ’1206375286-251249764-2214032401′ – These are called sub-authority 2,3 and 4 respectively. In our example this is used to identify the local machine, but could also be the the identifier for a Domain. ’1000′ – Sub-authority 5 is the last component in our SID and is called the RID (Relative Identifier). The RID is relative to each security principle: please note that any user defined objects, the ones that are not shipped by Microsoft, will have a RID of 1000 or greater.
'21'-第四个组成部分是子权限1。在第四个字段中使用值'21'来指定后面的子权限标识本地计算机或域。 '1206375286-251249764-2214032401'-分别称为子权限2,3和4。 在我们的示例中,这用于标识本地计算机,但也可以是域的标识符。 “ 1000” –子权限5是我们SID中的最后一个组件,称为RID(相对标识符)。 RID与每个安全原则有关:请注意,任何用户定义的对象(Microsoft尚未提供的对象)的RID都将为1000或更大。
安全原则 (Security Principles)
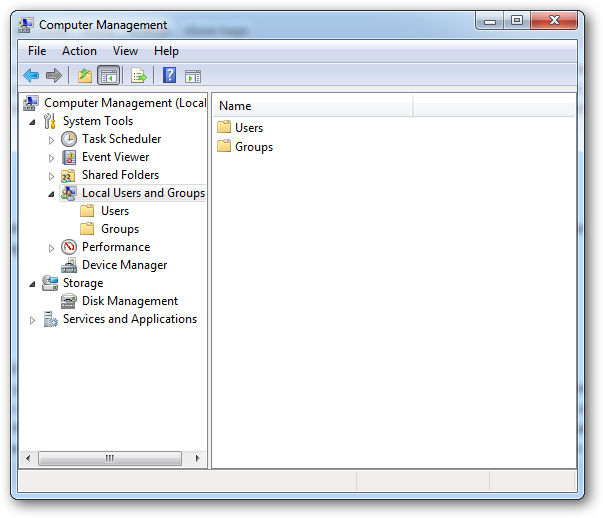
A security principle is anything that has a SID attached to it. These can be users, computers and even groups. Security principles can be local or be in the domain context. You manage local security principles through the Local Users and Groups snap-in, under computer management. To get there, right click on the computer shortcut in the start menu and choose manage.
安全原则是任何附加了SID的东西。 这些可以是用户,计算机甚至组。 安全原则可以是本地的,也可以在域上下文中。 您可以通过计算机管理下的“本地用户和组”管理单元来管理本地安全性原则。 要到达那里,请右键单击开始菜单中的计算机快捷方式,然后选择管理。
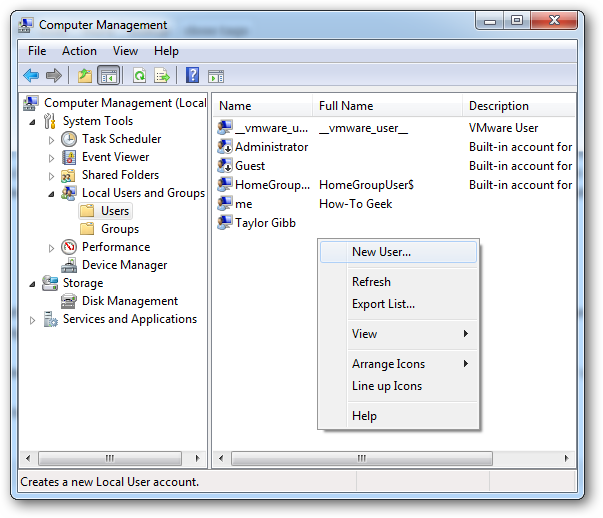
To add a new user security principle, you can go to the Users folder and right click and choose New User.
要添加新的用户安全性原则,可以转到“用户”文件夹,然后右键单击并选择“新用户”。
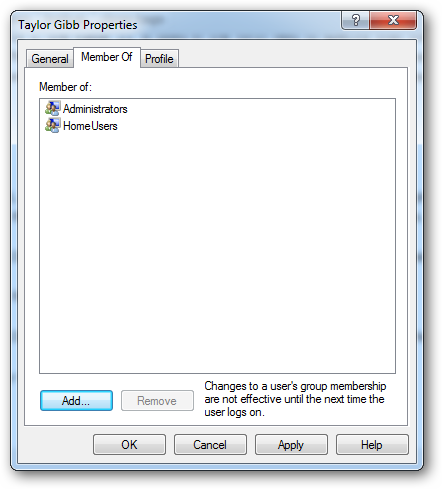
If you double click on a user you can add them to a Security Group on the Member Of tab.
如果双击用户,可以将其添加到“成员”选项卡上的“安全组”中。
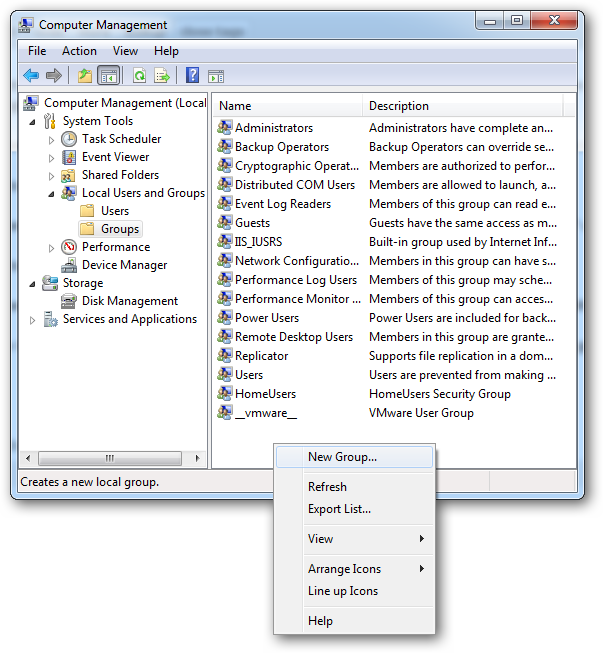
To create a new security group, navigate to the Groups folder on the right hand side. Right click on the white space and select New Group.
要创建一个新的安全组,请导航到右侧的Groups文件夹。 右键单击空白处,然后选择新建组。
共享权限和NTFS权限 (Share Permissions and NTFS Permission)
In Windows there are two types of file and folder permissions. Firstly, there are the Share Permissions. Secondly, there are NTFS Permissions, which are also called Security Permissions. Securing shared folders is usually done with a combination of Share and NTFS Permissions. Since this is the case, it is essential to remember that the most restrictive permission always applies. For example, if the share permission gives the Everyone security principle read permission, but the NTFS permission allow users to make a change to the file, the share permission will take precedence, and the users will not be allowed to make changes. When you set the permissions, the LSASS(Local Security Authority) controls access to the resource. When you log on, you are given an access token with your SID on it. When you go to access the resource, the LSASS compares the SID that you added to the ACL (Access Control List). If the SID is on the ACL, it determines whether to allow or deny access. No matter what permissions you use, there are differences, so let’s take a look to get a better understanding of when we should use what.
在Windows中,文件和文件夹权限有两种。 首先,有共享权限。 其次,还有NTFS权限,也称为安全权限。 通常,结合使用共享和NTFS权限来保护共享文件夹的安全。 既然是这种情况,请务必记住最严格的许可始终适用。 例如,如果共享权限授予了Everyone安全性原则读取权限,但是NTFS权限允许用户对文件进行更改,则共享权限将具有优先权,并且不允许用户进行更改。 设置权限时,LSASS(本地安全机构)控制对资源的访问。 登录时,将为您提供一个带有其SID的访问令牌。 当您访问资源时,LSASS将比较您添加到ACL(访问控制列表)的SID。 如果SID在ACL上,则它确定是允许还是拒绝访问。 不管您使用什么权限,都存在差异,因此让我们看一下以更好地了解何时应该使用什么。
Share Permissions:
共享权限:
- Only apply to users who access the resource over the network. They don’t apply if you log on locally, for example through terminal services. 仅适用于通过网络访问资源的用户。 如果您在本地登录(例如通过终端服务),则它们不适用。
- It applies to all files and folders in the shared resource. If you want to provide a more granular sort of restriction scheme you should use NTFS Permission in addition to shared permissions 它适用于共享资源中的所有文件和文件夹。 如果要提供更精细的限制方案,除了共享权限外,还应该使用NTFS权限
- If you have any FAT or FAT32 formatted volumes, this will be the only form of restriction available to you, as NTFS Permissions are not available on those file systems. 如果您有任何FAT或FAT32格式的卷,这将是您可用的唯一限制形式,因为这些文件系统上没有NTFS权限。
NTFS Permissions:
NTFS权限:
- The only restriction on NTFS Permissions is that they can only be set on a volume that is formatted to the NTFS file system 对NTFS权限的唯一限制是只能在格式化为NTFS文件系统的卷上设置它们
- Remember that NTFS Permissions are cumulative. That means that a user’s effective permissions are the result of combining the user’s assigned permissions and the permissions of any groups the user belongs to. 请记住,NTFS权限是累积的。 这意味着用户的有效权限是将用户分配的权限与该用户所属的任何组的权限结合在一起的结果。
新共享权限 (The New Share Permissions)
Windows 7 bought along a new “easy” share technique. The options changed from Read, Change and Full Control to Read and Read/Write. The idea was part of the whole Homegroup mentality and makes it easy share a folder for non-computer literate people. This is done via the context menu and shares with your homegroup easily.
Windows 7采用了一种新的“轻松”共享技术。 选项从读取,更改和完全控制更改为读取和读取/写入。 这个想法是整个Homegroup心态的一部分,使非计算机知识者可以轻松共享文件夹。 通过上下文菜单完成此操作,并轻松与您的家庭组共享。
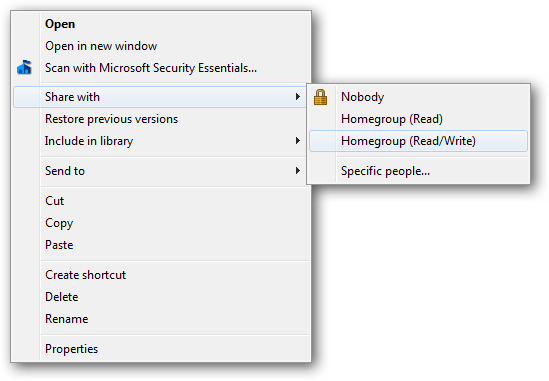
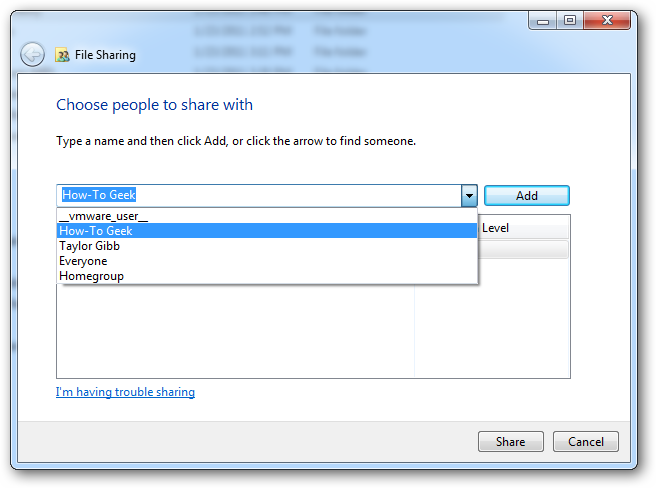
If you wanted to share with someone who is not in the home group, you could always choose the “Specific people…” option. Which would bring up a more “elaborate” dialog where you could specify a user or group.
如果您想与不在家庭组中的某人共享,则可以始终选择“特定人员……”选项。 这将弹出一个更“精致”的对话框,您可以在其中指定用户或组。
There are only two permissions, as previously mentioned. Together, they offer an all or nothing protection scheme for your folders and files.
如前所述,只有两个权限。 它们共同为您的文件夹和文件提供了全有或全无的保护方案。
Read permission is the “look, don’t touch” option. Recipients can open, but not modify or delete a file.
阅读权限是“外观,请勿触摸”选项。 收件人可以打开,但不能修改或删除文件。
Read/Write is the “do anything” option. Recipients can open, modify, or delete a file.
读/写是“执行任何操作”选项。 收件人可以打开,修改或删除文件。
旧学校许可 (The Old School Permission)
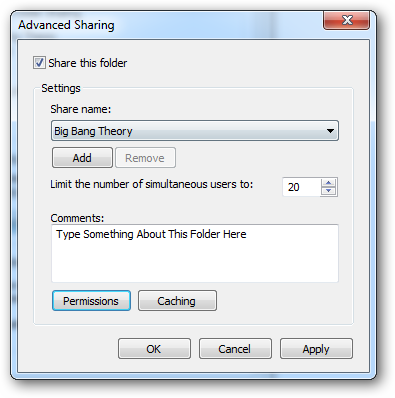
The old share dialog had more options, such as the option to share the folder under a different alias. It allowed us to limit the number of simultaneous connections as well as configure caching. None of this functionality is lost in Windows 7, but rather is hidden under an option called “Advanced Sharing”. If you right click on a folder and go to its properties you can find these “Advanced Sharing” settings under the sharing tab.
旧的共享对话框具有更多选项,例如,以其他别名共享文件夹的选项。 它允许我们限制同时连接的数量以及配置缓存。 Windows 7中不会丢失任何此功能,而是隐藏在名为“高级共享”的选项下。 如果右键单击文件夹并转到其属性,则可以在共享选项卡下找到这些“高级共享”设置。
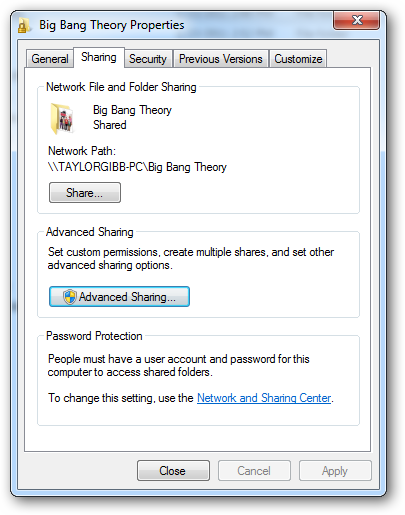
If you click on the “Advanced Sharing” button, which requires local administrator credentials, you can configure all the settings that you were familiar with in previous versions of Windows.
如果单击需要本地管理员凭据的“高级共享”按钮,则可以配置Windows早期版本中熟悉的所有设置。
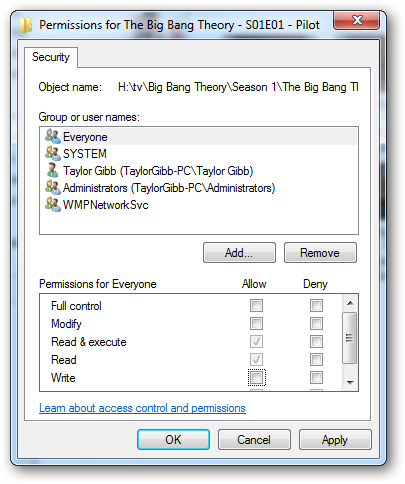
If you click on the permissions button, you’ll be presented with the 3 settings that we are all familiar with.
如果单击权限按钮,将为您提供我们都熟悉的3个设置。
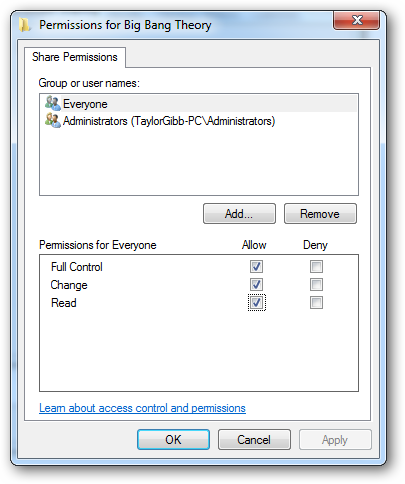
Read permission allows you to view and open files and subdirectories as well as execute applications. However it doesn’t allow any changes to be made.
读取权限使您可以查看和打开文件和子目录以及执行应用程序。 但是,它不允许进行任何更改。
Modify permission allows you to do anything that Read permission allows, and it also add the ability to add files and subdirectories, delete subfolders and change data in the files.
修改权限允许您执行读取权限允许的任何操作,还可以添加文件和子目录,删除子文件夹以及更改文件中的数据。
Full Control is the “do anything” of the classic permissions, as it allows for you to do any and all of the previous permissions. In addition, it gives you the advanced changing NTFS Permission, but this only applies on NTFS Folders
完全控制是传统权限的“任何操作”,因为它允许您执行任何和所有以前的权限。 此外,它还为您提供了高级更改NTFS权限,但这仅适用于NTFS文件夹
NTFS权限 (NTFS Permissions)
NTFS Permissions allow for very granular control over your files and folders. With that said, the amount of granularity can be daunting to a newcomer. You can also set NTFS permission on a per file basis as well as a per folder basis. To set NTFS Permission on a file, you should right click and go to the file’s properties, then go to the security tab.
NTFS权限允许对文件和文件夹进行非常精细的控制。 话虽如此,对于新手而言,粒度的数量可能令人望而生畏。 您还可以基于每个文件和每个文件夹设置NTFS权限。 要在文件上设置NTFS权限,应右键单击并转到文件的属性,然后转到“安全性”选项卡。
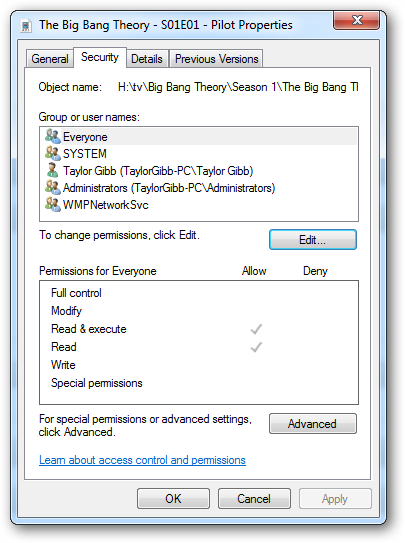
To edit the NTFS Permissions for a User or Group, click on the edit button.
要编辑用户或组的NTFS权限,请单击“编辑”按钮。
As you may see, there are quite a lot of NTFS Permissions, so let’s break them down. First, we will have a look at the NTFS Permissions that you can set on a file.
如您所见,有很多NTFS权限,因此让我们对其进行分解。 首先,我们来看看可以在文件上设置的NTFS权限。
Full Control allows you to read, write, modify, execute, change attributes, permissions, and take ownership of the file.
完全控制允许您读取,写入,修改,执行,更改属性,权限和获取文件所有权。
Modify allows you to read, write, modify, execute, and change the file’s attributes.
修改允许您读取,写入,修改,执行和更改文件的属性。
Read & Execute will allow you to display the file’s data, attributes, owner, and permissions, and run the file if it’s a program.
读取和执行将允许您显示文件的数据,属性,所有者和权限,并在运行程序的情况下运行该文件。
Read will allow you to open the file, view its attributes, owner, and permissions.
读取将允许您打开文件,查看其属性,所有者和权限。
Write will allow you to write data to the file, append to the file, and read or change its attributes.
写入允许您将数据写入文件,追加到文件以及读取或更改其属性。
NTFS Permissions for folders have slightly different options, so lets take a look at them.
文件夹的NTFS权限具有稍微不同的选项,因此让我们来看看它们。
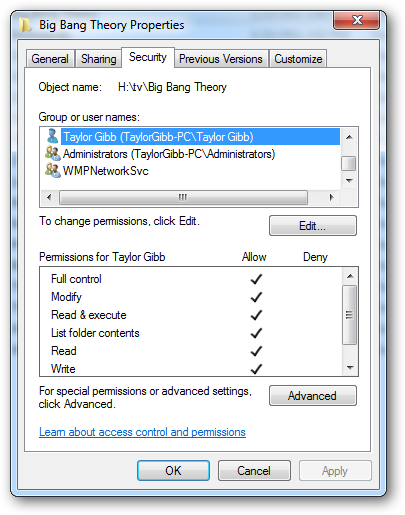
Full Control will allow you to read, write, modify, and execute files in the folder, change attributes, permissions, and take ownership of the folder or files within.
完全控制将允许您读取,写入,修改和执行文件夹中的文件,更改属性,权限以及获取该文件夹或其中文件的所有权。
Modify will allow you to read, write, modify, and execute files in the folder, and change attributes of the folder or files within.
修改将允许您读取,写入,修改和执行文件夹中的文件,以及更改文件夹或其中的文件的属性。
Read & Execute will allow you to display the folder’s contents and display the data, attributes, owner, and permissions for files within the folder, and run files within the folder.
读取和执行将允许您显示文件夹的内容,并显示文件夹中文件的数据,属性,所有者和权限,以及运行文件夹中的文件。
List Folder Contents will allow you to display the folder’s contents and display the data, attributes, owner, and permissions for files within the folder, and run files within the folder
列出文件夹内容将允许您显示文件夹的内容,并显示文件夹中文件的数据,属性,所有者和权限,以及运行文件夹中的文件
Read will allow you to display the file’s data, attributes, owner, and permissions.
读取将允许您显示文件的数据,属性,所有者和权限。
Write will allow you to write data to the file, append to the file, and read or change its attributes.
写入允许您将数据写入文件,追加到文件以及读取或更改其属性。
概要 (Summary)
In summary, user names and groups are representations of an alphanumeric string called a SID (Security Identifier). Share and NTFS Permissions are tied to these SIDs. Share Permissions are checked by the LSSAS only when being accessed over the network, while NTFS Permissions are combined with Share Permissions to allow a more granular level of security for resources being accessed over the network as well as locally.
总之,用户名和组是字母数字字符串的表示,称为SID(安全标识符)。 共享和NTFS权限与这些SID绑定在一起。 仅当通过网络访问时,LSSAS才检查共享权限,而NTFS权限与共享权限结合使用,可以为通过网络以及本地访问的资源提供更细粒度的安全性。
访问共享资源 (Accessing a Shared Resource)
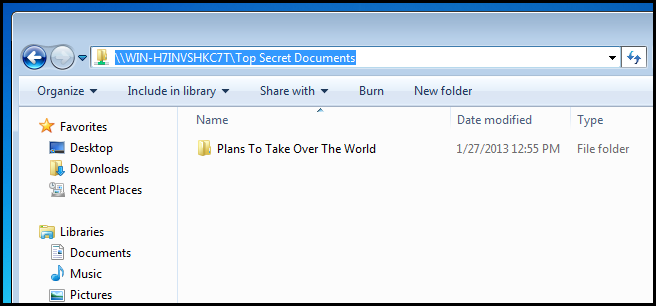
So now that we have learned about the two methods we can use to share content on our PCs, how do you actually go about accessing it over the network? It is very simple. Just type the following into the navigation bar.
因此,既然我们已经了解了可用于在PC上共享内容的两种方法,那么您实际上如何通过网络访问它呢? 这很简单。 只需在导航栏中输入以下内容即可。
\\computername\sharename
\\计算机名\共享名
Note: Obviously you will need to substitute computername for the name of the PC hosting the share and sharename for the name of the share.
注意:显然,您将需要用computername代替托管共享的PC的名称,并用sharename代替共享的名称。
This is great for once off connections, but what about in a larger corporate environment? Surely you don’t have to teach your users how to connect to a network resource using this method. To get around this, you will want to map a network drive for each user, this way you can advise them to store their documents on the “H” drive, rather than trying to explain how to connect to a share. To map a drive, open Computer and click on the “Map network drive” button.
这对于一次断开连接很有用,但是在更大的公司环境中呢? 当然,您不必教您的用户如何使用此方法连接到网络资源。 要解决此问题,您将需要为每个用户映射一个网络驱动器,这样您可以建议他们将其文档存储在“ H”驱动器上,而不是试图解释如何连接到共享。 要映射驱动器,请打开计算机,然后单击“映射网络驱动器”按钮。

Then simply type in the UNC path of the share.
然后只需键入共享的UNC路径。

Your probably wondering if you have to do that on every PC, and luckily the answer is no. Rather, you can write a batch script to automatically map the drives for your users at logon and deploy it via Group Policy.
您可能想知道是否必须在每台PC上执行此操作,幸运的是,答案是否定的。 相反,您可以编写批处理脚本以在登录时自动为用户映射驱动器,并通过组策略进行部署。

If we dissect the command:
如果我们剖析命令:
We are using the net use command to map the drive.
我们正在使用net use命令来映射驱动器。
We use the * to denote that we want to use the next available drive letter.
我们使用*表示我们要使用下一个可用的驱动器号。
Finally we specify the share we want to map the drive to. Notice that we used quotes because the UNC path contains spaces.
最后,我们指定要将驱动器映射到的共享 。 注意,我们使用引号是因为UNC路径包含空格。

使用加密文件系统加密文件 (Encrypting Files Using the Encrypting File System)
Windows includes the ability to encrypt files on an NTFS volume. This means that only you will be able to decrypt the files and view them. In order to encrypt a file, simply right-click on it and select properties from the context menu.
Windows包括对NTFS卷上的文件进行加密的功能。 这意味着只有您才能解密文件并查看它们。 为了加密文件,只需右键单击它,然后从上下文菜单中选择属性。

Then click on advanced.
然后单击高级。

Now check the Encrypt contents to secure data checkbox, then click OK.
现在选中“加密内容以保护数据”复选框,然后单击“确定”。

Now go ahead and apply the settings.
现在继续并应用设置。

We only need to encrypt the file, but you do have the option of encrypting the parent folder as well.
我们只需要加密文件,但是您也可以选择加密父文件夹。

Take note that once the file is encrypted it turns green.
请注意,文件加密后即变为绿色。

You will now notice that only you will be able to to open the file and that other users on the same PC will not be able to. The encryption process uses public key encryption, so keep your encryption keys safe. If you lose them, your file is gone and there is no way of recovering it.
现在您会注意到,只有您可以打开文件,而同一台PC上的其他用户将无法打开该文件。 加密过程使用公共密钥加密 ,因此请确保您的加密密钥安全。 如果丢失它们,则文件将消失,无法恢复。
家庭作业 (Homework)
- Learn about permission inheritance and effective permissions. 了解权限继承和有效权限。
Read this Microsoft document.
阅读此 Microsoft文档。
- Learn why you would want to use BranchCache. 了解为什么要使用BranchCache。
- Learn how to share printers and why you would want to. 了解如何共享打印机以及为什么要共享。
翻译自: https://www.howtogeek.com/136058/geek-school-learning-windows-7-resource-access/
极客时间 资源


 1969
1969


 被折叠的 条评论
为什么被折叠?
被折叠的 条评论
为什么被折叠?
 到【灌水乐园】发言


