


获取outlook 约会

Microsoft thought they were being helpful when they set up notifications for new email. However, a constant barrage of notifications can also disrupt your train of thought. You can turn the notifications off completely, or–better yet–you can set up Outlook to only notify you about important emails.
微软认为他们在设置新电子邮件的通知时会有所帮助。 但是,持续不断的通知发送也会破坏您的思路。 您可以完全关闭通知 ,或者更好地将通知设置为仅将重要电子邮件通知给您。
如何创建一个简单的规则 (How to Create a Simple Rule)
If you need to be responsive to certain people, such as clients, your boss, or your family members, you can use Rules in Outlook to receive notifications about certain messages only. Here’s how to set up a rule that only shows email notifications from a certain sender.
如果您需要对某些人(例如客户,老板或家人)作出回应,则可以使用Outlook中的“规则”仅接收有关某些邮件的通知。 以下是设置仅显示来自特定发件人的电子邮件通知的规则的方法。
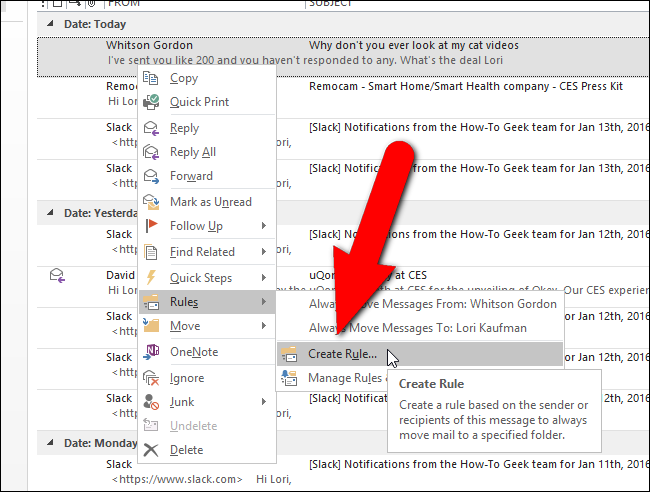
The easiest way to set up this rule is to find an email from that person. For this example, I’ll set up a rule to notify me when I receive an email from my boss, because emails from your boss are always important, right? So, I’d right-click on the email from How-To Geek’s editor-in-chief, Whitson Gordon, and select “Rules” and then “Create Rule” from the popup menu.
设置此规则的最简单方法是查找来自该人的电子邮件。 在此示例中,我将设置一条规则,以便在收到老板的电子邮件时通知我,因为老板的电子邮件始终很重要,对吗? 因此,我将右键单击How-To Geek的主编Whitson Gordon的电子邮件,然后从弹出菜单中选择“规则”,然后选择“创建规则”。
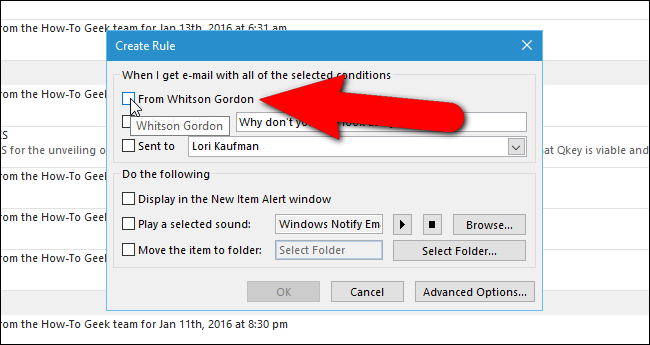
In the “Create Rule” dialog box, select the conditions on which you want to receive notifications about new email. I want to get immediate notifications about emails I receive from Whitson, so I select the first check box.
在“创建规则”对话框中,选择要接收有关新电子邮件的通知的条件。 我想立即收到有关从惠特森收到的电子邮件的通知,因此我选择了第一个复选框。
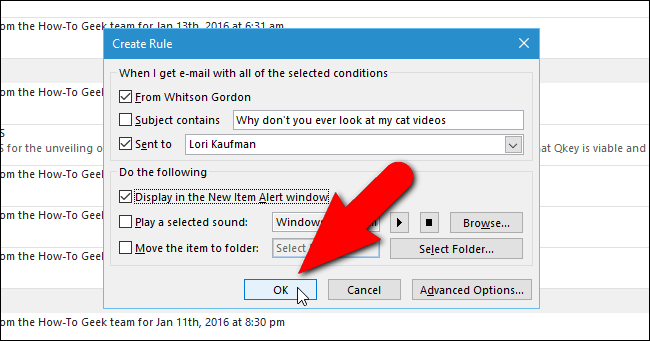
I also select the “Sent to” check box and make sure my name is selected from the drop-down list, so I’ll receive notifications for emails sent from Whitson directly to me. If you don’t want to be notified of emails where you’re CC’ed or one of several recipients, select “me only” from the “Sent to” drop-down list. Click “OK” once you’ve made your choices.
我还选择了“发送到”复选框,并确保从下拉列表中选择了我的名字,所以我将收到有关惠特森直接发送给我的电子邮件的通知。 如果您不希望收到抄送或多个收件人之一的电子邮件的通知,请从“发送至”下拉列表中选择“仅我”。 做出选择后,单击“确定”。
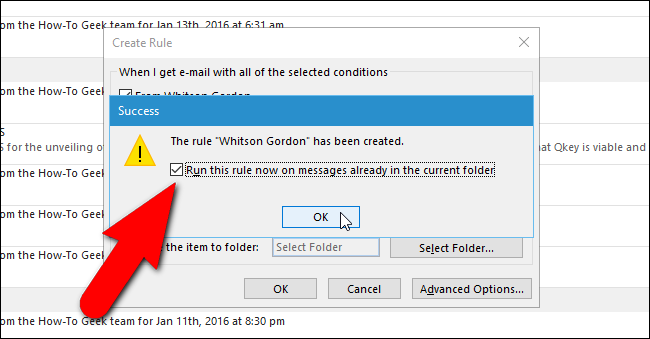
A “Success” dialog box displays with an option to “Run this rule now on messages already in the current folder”. Click “OK”. I want to find out what emails are in my inbox from Whitson, so I select the check box.
显示“成功”对话框,并带有“现在对当前文件夹中的邮件立即运行此规则”的选项。 点击“确定”。 我想找出来自Whitson的收件箱中的电子邮件,因此我选中了该复选框。
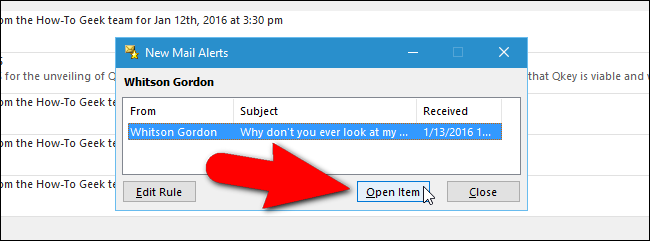
The “New Mail Alerts” dialog box will appear, demanding immediate action. I currently only have one email from Whitson in my inbox, so that’s the only one listed on this dialog box. However, if there were more emails from Whitson, they would all be listed here. If you want to view an email directly from this dialog box, select the email to view and click “Open Item”. Click “Close” to close the dialog box.
将出现“新邮件警报”对话框,要求立即采取措施。 目前,我的收件箱中只有一封来自Whitson的电子邮件,因此这是此对话框中列出的唯一一封电子邮件。 但是,如果有更多来自Whitson的电子邮件,则将全部列在此处。 如果要直接从此对话框查看电子邮件,请选择要查看的电子邮件,然后单击“打开项目”。 单击“关闭”以关闭对话框。
The “New Mail Alerts” dialog box stays open until you click “Close”, even when you open an email message from the dialog box and then close the message.
即使您从对话框中打开电子邮件,然后关闭该消息,“新邮件警报”对话框仍保持打开状态,直到您单击“关闭”为止。
如何创建更多高级规则 (How to Create More Advanced Rules)
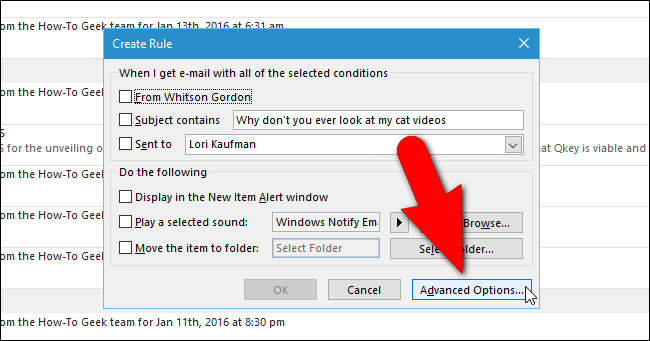
When creating rules, you can select from additional, more specific options than are available on the main “Create Rule” dialog box. To do so, open the “Create Rule” dialog box, as described earlier in this article. Then click “Advanced Options”.
创建规则时,您可以选择其他比“创建规则”主对话框中更多的特定选项。 为此,如本文前面所述,打开“创建规则”对话框。 然后单击“高级选项”。
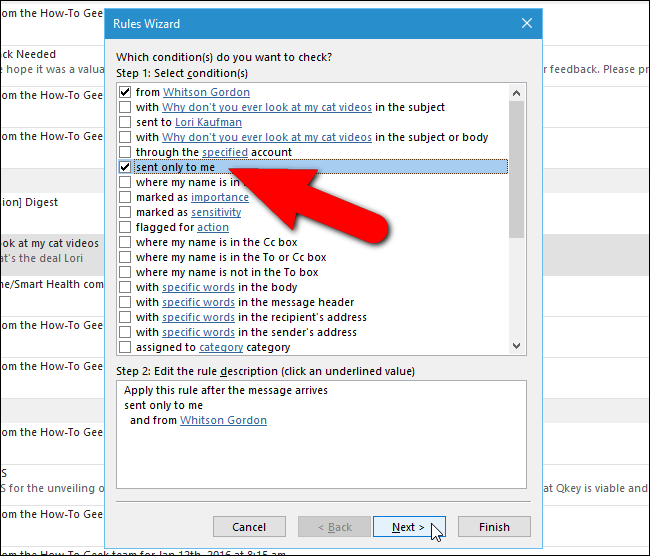
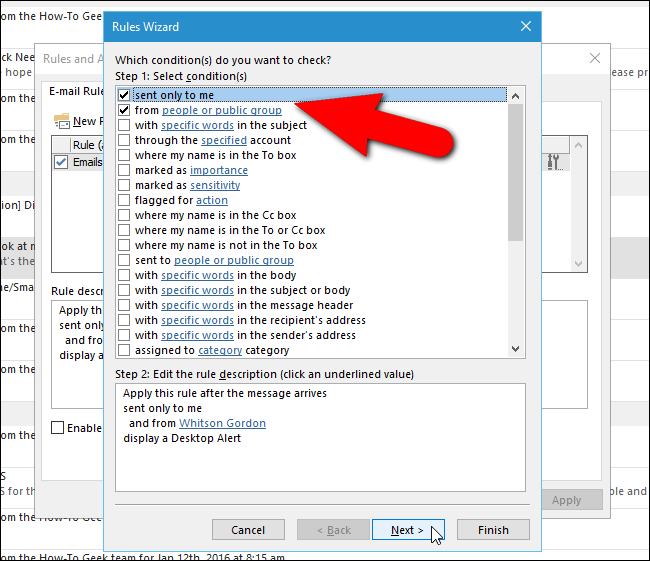
The first screen on the “Rules Wizard” dialog box displays a list of detailed conditions to check. Select the check boxes for the conditions you want to check for email notifications. I want to receive notifications when I receive emails from Whitson sent only to me, so I select those conditions.
“规则向导”对话框的第一个屏幕显示要检查的详细条件列表。 选择要检查电子邮件通知的条件的复选框。 当我收到惠特森发给我的电子邮件时,我想收到通知,因此我选择了这些条件。
The blue underlined text are links you click to specify the value(s) you want checked for in that condition. Once you select that condition, click the blue link on that condition in the “Step 2” box to edit the values.
带下划线的蓝色文本是单击的链接,以指定要在该条件下检查的值。 选择该条件后,在“步骤2”框中单击该条件上的蓝色链接以编辑值。
Once you’ve selected the conditions you want to check, click “Next”.
选择要检查的条件后,单击“下一步”。
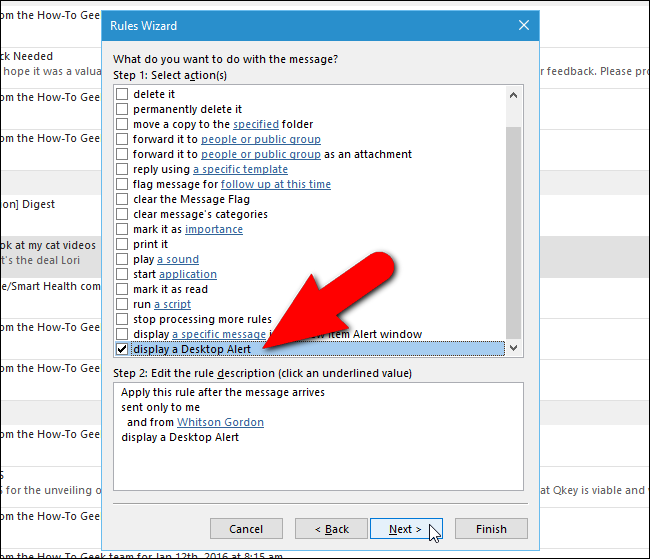
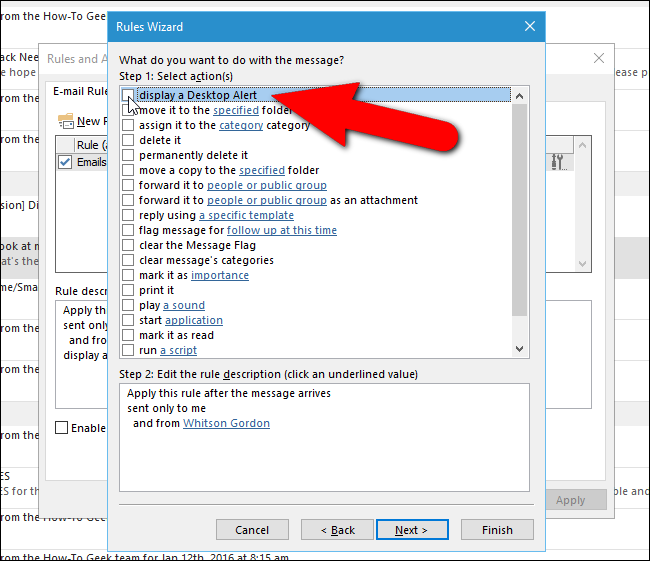
Now, select options to indicate what should be done with a message you receive that matches the selected conditions. You can do things like move the message to a specific folder, forward it to one or more people, reply using a template, or mark it as read. I want to receive a Desktop Alert when I get an email message from Whitson, so I select the last option on the list, “display a Desktop Alert”. Once you’ve selected what you want done with the message, click “Next”.
现在,选择选项来指示如何处理收到的符合所选条件的消息。 您可以执行以下操作,例如将邮件移至特定文件夹,转发给一个或多个人,使用模板进行回复或将其标记为已读。 当我收到来自Whitson的电子邮件时,我想收到桌面警报,因此我选择列表中的最后一个选项“显示桌面警报”。 选择了要处理的消息后,单击“下一步”。
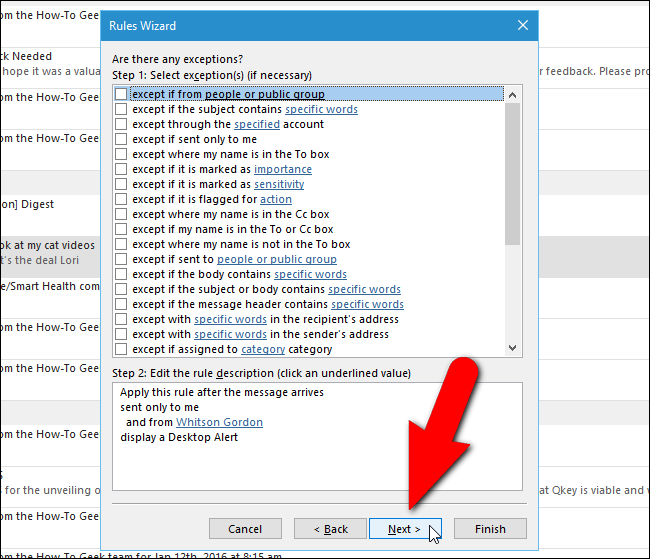
The next screen provides options for setting exceptions to the rule, such as if you don’t want to get a notification if the message is a meeting invitation or update. Choose any exceptions you want to apply to your rule and click “Next”. I don’t want any exceptions, so I just click “Next” to skip this screen.
下一个屏幕提供了用于设置规则例外的选项,例如,如果您不想收到消息是会议邀请或更新的通知,则可以选择该规则。 选择要应用于规则的任何例外,然后单击“下一步”。 我不需要任何例外,因此我只单击“下一步”即可跳过此屏幕。
The last screen allows you to specify a name for the rule, and set up some rule options, including one to “Turn on this rule” immediately. If you want to run the rule immediately on messages already in the inbox, select the “Run this rule now on messages already in ‘Inbox’”.
在最后一个屏幕中,您可以为规则指定名称,并设置一些规则选项,包括一个“立即启用此规则”选项。 如果要立即对收件箱中已有的邮件运行规则,请选择“立即对“收件箱”中已有的邮件运行此规则”。
Review the rule description under “Step 3” and click “Finish” when you’re done.
查看“步骤3”下的规则说明,完成后单击“完成”。

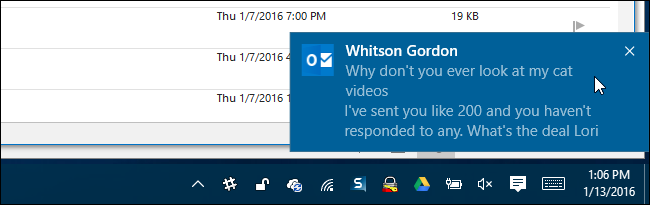
Now, when I receive an email from Whitson, a desktop alert displays on the Windows desktop. Note that this is different from the “New Mail Alerts” dialog box–instead, it’s a native Windows notification. If you prefer this style of notification, you’ll have to go through “Advanced Options” for every rule you create”.
现在,当我收到来自Whitson的电子邮件时,Windows桌面上会显示一个桌面警报。 请注意,这与“新邮件警报”对话框不同–相反,它是本机Windows通知。 如果您更喜欢这种通知方式,则必须为创建的每个规则都经过“高级选项”。
如何编辑规则 (How to Edit Your Rules)
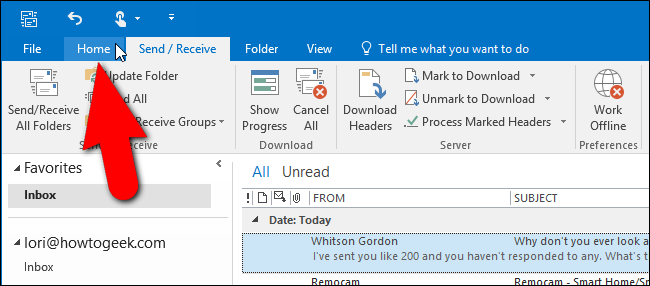
Modifying, deleting, or even temporarily turning off your rules is easy. I want to modify my rule to display the “New Mail Alerts” dialog box rather than a “Desktop Alert”. To do this, I click the “Home” tab.
修改,删除甚至暂时关闭规则很容易。 我想修改规则以显示“新邮件警报”对话框,而不是“桌面警报”。 为此,我单击“主页”选项卡。
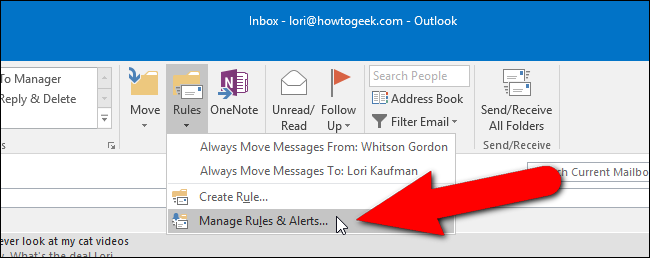
Click the “Rules” button in the “Move” section and select “Manage Rules & Alerts” from the drop-down menu.
单击“移动”部分中的“规则”按钮,然后从下拉菜单中选择“管理规则和警报”。
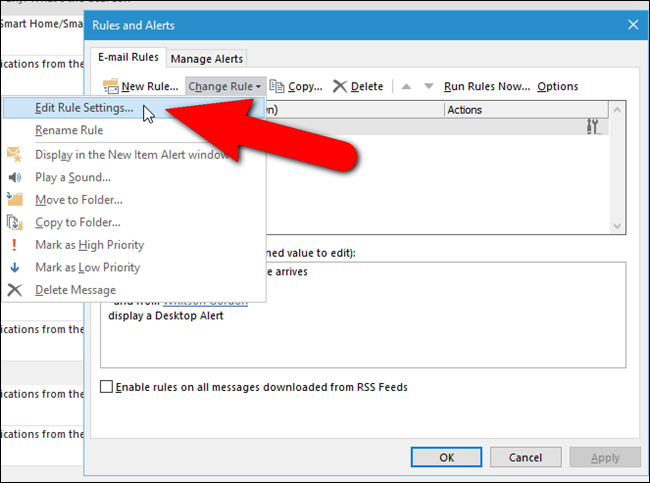
The “Rules and Alerts” dialog box displays. On the “E-mail Rules” tab, click “Change Rule” and select “Edit Rule Settings” from the drop-down menu.
显示“规则和警报”对话框。 在“电子邮件规则”选项卡上,单击“更改规则”,然后从下拉菜单中选择“编辑规则设置”。
As discussed earlier, the first screen of the “Rules Wizard” displays a list of conditions you can check for on incoming email messages. The selections I made when I first set up the rule display at the top of the list and the description with the current settings displays in the box under “Step 2”. I don’t want to change the conditions, so I click “Next”. If you want to change the conditions on your rule, make your changes and then click “Next”.
如前所述,“规则向导”的第一个屏幕显示了可以检查传入电子邮件的条件列表。 首次设置规则时所做的选择显示在列表的顶部,“当前设置”的说明显示在“步骤2”下的框中。 我不想更改条件,因此单击“下一步”。 如果要更改规则的条件,请进行更改,然后单击“下一步”。
On the screen listing the actions to take on incoming email messages (depending on the conditions), I disable the “display a Desktop Alert” option, which displays at the top of the list, and then click “Next”.
在列出要对传入电子邮件采取的操作的屏幕上(取决于条件),我禁用了“显示桌面警报”选项,该选项显示在列表的顶部,然后单击“下一步”。
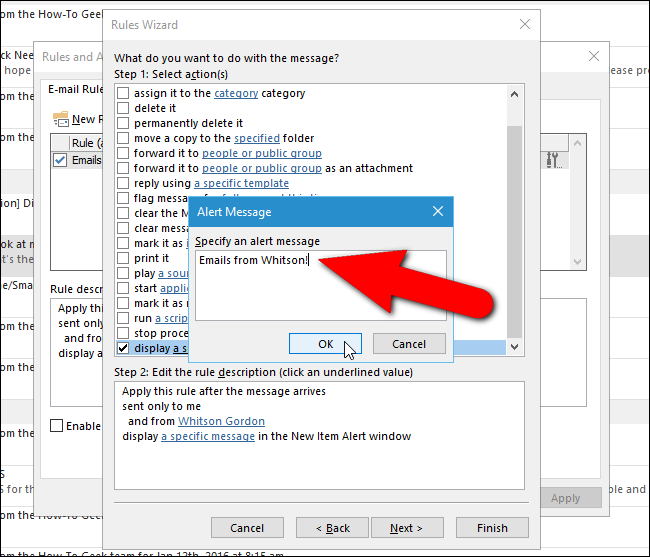
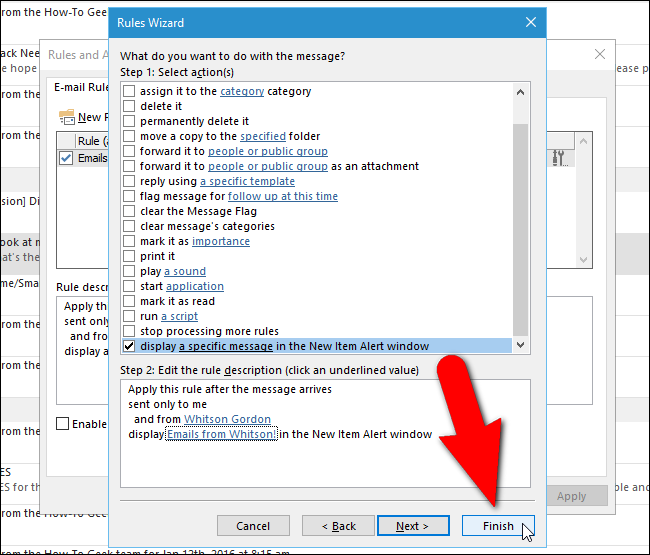
Let’s say you want to display the more in-your-face “New Mail Alerts” dialog box instead. Scroll down to the bottom of the list of actions and select “display a specific message in the New Item Alert window” check box. To customize the message that displays on the “New Mail Alerts” dialog box, click the “a specific message” link in the box under “Step 2”.
假设您要显示更多的“新邮件警报”对话框。 向下滚动到操作列表的底部,然后选中“在“新项目警报”窗口中显示特定消息”复选框。 要自定义显示在“新邮件警报”对话框中的消息,请单击“步骤2”下框中的“特定消息”链接。

On the “Alert Message” dialog box, enter a message to display on the “New Mail Alerts” dialog box and click “OK”.
在“警报消息”对话框中,输入要显示在“新邮件警报”对话框中的消息,然后单击“确定”。
If you want to add or remove any exceptions, click “Next” to access the list of exceptions and make your changes. To change the name of the rule or change other options on the last screen of the “Rules Wizard”, click “Next” again on the exceptions screen. I don’t want to change anything else, so I click “Finish” on the actions screen to accept my changes and close the “Rules Wizard”.
如果要添加或删除任何例外,请单击“下一步”以访问例外列表并进行更改。 要更改规则名称或在“规则向导”的最后一个屏幕上更改其他选项,请在例外屏幕上再次单击“下一步”。 我不想更改其他任何内容,因此在操作屏幕上单击“完成”以接受我的更改并关闭“规则向导”。
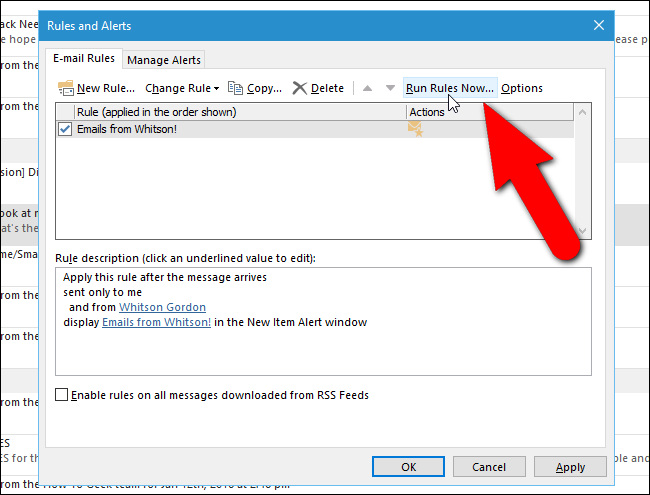
You’re returned to the “Rules and Alerts” dialog box. Click “OK” to close it. To run the rule immediately, click “Run Rules Now” at the top of the “E-mail Rules” tab.
您将返回到“规则和警报”对话框。 单击“确定”将其关闭。 要立即运行规则,请单击“电子邮件规则”选项卡顶部的“立即运行规则”。
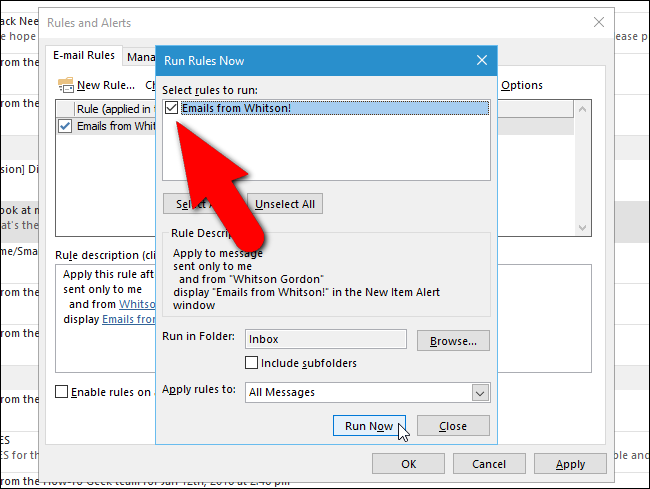
On the “Run Rules Now” dialog box, in the “Select rules to run” box, select the check box for the rule you want to run and click “Run Now”.
在“立即运行规则”对话框的“选择要运行的规则”框中,选中要运行的规则的复选框,然后单击“立即运行”。
NOTE: Once you’ve run the rule, the “Run Rules Now” dialog box does not close automatically. You must click “Close” to close it. The “Rules and Alerts” dialog box does not close automatically either, so click “OK” to close it.
注意:运行规则后,“立即运行规则”对话框不会自动关闭。 您必须单击“关闭”将其关闭。 “规则和警报”对话框也不会自动关闭,因此请单击“确定”将其关闭。
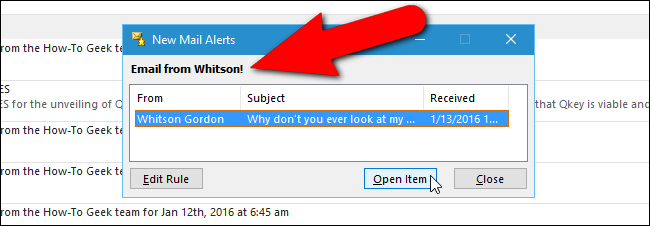
The “New Mail Alerts” dialog box displays with your custom message at the top.
显示“新邮件警报”对话框,顶部显示您的自定义消息。
The Rules feature in Outlook provides many options for automatically handling your email messages. You can have specific messages moved into specific folders, perform actions on email messages with certain text in the subject line, or even delete messages automatically based on certain conditions. Outlook Rules may seem overwhelming at first because of all the options available. However, if you know how you want to manage certain email messages, it’s not that hard to create and manage your own rules.
Outlook中的“规则”功能提供了许多自动处理电子邮件的选项。 您可以将特定的邮件移到特定的文件夹中,对主题行中包含特定文本的电子邮件执行操作,甚至可以根据特定条件自动删除邮件。 由于所有可用选项,乍一看Outlook规则似乎不胜枚举。 但是,如果您知道如何管理某些电子邮件,则创建和管理自己的规则并不难。
翻译自: https://www.howtogeek.com/239131/how-to-get-outlook-notifications-for-important-emails-only/
获取outlook 约会


 396
396

 被折叠的 条评论
为什么被折叠?
被折叠的 条评论
为什么被折叠?
 到【灌水乐园】发言


