


 本文介绍了如何在PowerPoint中调整项目符号后的文本对齐方式,包括使用‘主页’选项卡的对齐工具和通过调整缩进来实现水平对齐,以及使用‘对齐文本’按钮进行垂直对齐。这些技巧可以帮助你更精确地控制项目符号列表的呈现效果。

Bulleted lists are standard fare in PowerPoint presentations, and sometimes you want to tweak those bullets to look just right. PowerPoint gives you a fair amount of control by letting you align and adjust the text after a bullet point. Here’s how.
项目符号列表是PowerPoint演示文稿中的标准功能,有时您希望调整这些项目符号以使其看起来恰到好处。 通过让您在项目符号点后对齐和调整文本,PowerPoint提供了相当多的控制。 这是如何做。
在项目文本框中水平对齐项目符号文本 (Aligning the Bulleted Text Horizontally in Its Text Box)
First, open your PowerPoint presentation and go to the slide that contains the bulleted text. Highlight the text on the bullet you want to adjust.
首先,打开PowerPoint演示文稿,然后转到包含项目符号文本的幻灯片。 突出显示要调整的项目符号上的文本。
On the “Home” tab, you’ll see four different alignment options—the same ones you use for aligning regular text.
在“主页”选项卡上,您将看到四个不同的对齐选项,即用于对齐常规文本的对齐选项。
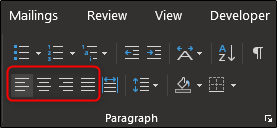
From left to right, these options are:
从左到右,这些选项是:
- Align Left (Ctrl+L) 左对齐(Ctrl + L)
- Center (Ctrl+E) 居中(Ctrl + E)
- Align Right (Ctrl+R) 右对齐(Ctrl + R)
- Justify (Ctrl+J) 对齐(Ctrl + J)
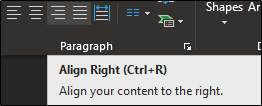
Hovering over each option with your mouse gives you the alignment type, respective shortcut key, and alignment description.
用鼠标悬停在每个选项上,可以为您提供路线类型,相应的快捷键和路线说明。
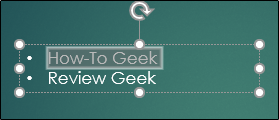
Select the alignment option you want. In this example, we’ll select “Center.”
选择所需的对齐选项。 在此示例中,我们将选择“居中”。
Now you’ll notice the highlighted text center itself within the text box.
现在,您会在文本框中注意到突出显示的文本中心本身。

If you need to align more than one bullet point at a time to the same alignment settings, you can select multiple bullet points at once and then select the alignment. If you want bullet points to have different alignments, you’ll have to set each one individually.
如果需要一次将多个项目符号点对齐到相同的对齐设置,则可以一次选择多个项目符号点,然后选择对齐方式。 如果希望项目符号点具有不同的对齐方式,则必须分别设置每个。
通过调整缩进来水平对齐项目符号文本 (Align Bulleted Text Horizontally by Adjusting the Indention)
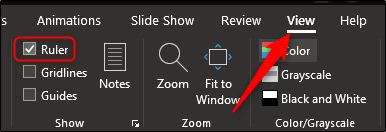
Another method for aligning bulleted text horizontally is to use the ruler feature to adjust both the bullet point and the text that follows. To use this feature, you must first enable the ruler by heading over to the “View” tab and turning on the “Ruler” checkbox.
水平对齐项目符号文本的另一种方法是使用标尺功能来调整项目符号点和随后的文本。 要使用此功能,必须首先通过转到“查看”选项卡并打开“标尺”复选框来启用标尺。
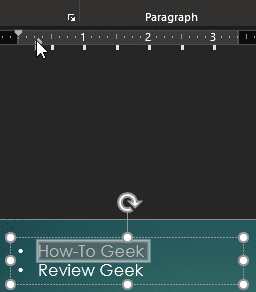
Now you’ll notice a ruler appear at the top and left side. Next, select the bulleted text with which you want to work. We’ll use the same text.
现在,您会注意到标尺出现在顶部和左侧。 接下来,选择要使用的项目符号文本。 我们将使用相同的文本。

Once you select the text, three line indent markers appear on the ruler:
选择文本后,标尺上会出现三行缩进标记:
- First Line Indent: This is the top marker (the downward pointing triangle), and you can use it to adjust the position of the bullet graphic itself. 第一行缩进:这是顶部标记(向下的三角形),您可以使用它来调整项目符号图形本身的位置。
- Hanging Indent: This is the middle marker (the upward pointing triangle), and you can use it to adjust the position of the text. 悬挂式缩进:这是中间的标记(向上的三角形),您可以使用它来调整文本的位置。
- Left Indent: This is the bottom marker (the rectangle), and you can use it to adjust the position of the bullet and text at the same time. 左缩进:这是底部标记(矩形),您可以使用它同时调整项目符号和文本的位置。
在项目文本框中垂直对齐项目符号文本 (Align Bulleted Text Vertically in Its Text Box)
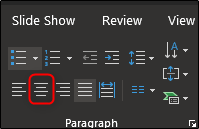
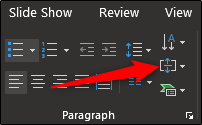
Just to the right of the regular alignment options, you’ll see an “Align Text” button that you can use to align text vertically. This one affects all the text in the box, so you won’t be able to set different bullet points individually.
在常规对齐方式选项的右侧,您会看到一个“对齐文本”按钮,可用于垂直对齐文本。 这会影响框中的所有文本,因此您将无法分别设置不同的项目符号点。
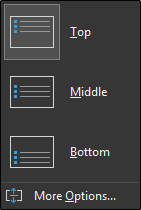
Clicking the “Align Text” button opens a menu with a few different options and, of course, you can also explore some of the additional options available, including alignment and text rotation, by selecting “More Options.”
单击“对齐文本”按钮将打开一个菜单,其中包含几个不同的选项,当然,您还可以通过选择“更多选项”来探索一些可用的其他选项,包括对齐和文本旋转。
Follow these simple rules, and you’ll be able to draw attention to specific points by using unique text and bullet placement.
遵循这些简单的规则,您将能够通过使用独特的文本和项目符号放置来吸引对特定点的注意。
翻译自: https://www.howtogeek.com/400920/how-to-align-text-after-a-bullet-in-powerpoint/


 2721
2721

 被折叠的 条评论
为什么被折叠?
被折叠的 条评论
为什么被折叠?
 到【灌水乐园】发言


