


 本文介绍了如何配置AWS Redshift集群以便通过本地IDE进行连接。内容包括介绍Redshift集群、IDE支持、集群端点配置、网络设置以及创建连接的详细步骤,旨在帮助开发者和管理员更方便地管理Redshift资源。
aws redshift
This article gives you an overview of configuring the AWS Redshift cluster to use it from a locally installed IDE or tools.
本文为您概述了如何配置AWS Redshift集群以通过本地安装的IDE或工具使用它。
介绍 (Introduction)
In my last article, Getting started with AWS Redshift, we saw how to create an AWS Redshift cluster. Though Redshift provides an in-console browser-based query editor interface, often it’s not sufficient for the regular day to day database development needs. The query editor interface is generally used for a quick preview style of checks or a sneak peek into the Redshift database. The standard practice is that developers and administrators use a locally installed tool or IDE (Integrated Development Environment) of choice installed on a local machine or a virtual machine on the cloud, from which they connect to the Redshift cluster endpoint. These IDEs generally are packed with a lot of features that support day to day needs of a developer or administrator to perform various actions on the Redshift cluster. In this article, we will explore the step-by-step process to configure a Redshift cluster in a way that we can connect to it using IDEs of choice. The following steps will assume that you have a working Redshift cluster and have the required administrative rights to operate on the cluster.
在上一篇文章“ AWS Redshift入门”中 ,我们了解了如何创建一个AWS Redshift集群。 尽管Redshift提供了基于控制台的基于浏览器的查询编辑器界面,但是对于常规的日常数据库开发需求而言,这通常是不够的。 查询编辑器界面通常用于检查的快速预览样式或对Redshift数据库的预览。 标准做法是,开发人员和管理员使用本地安装的工具或选择的IDE(集成开发环境)安装在本地计算机或云上的虚拟机上,并从中连接到Redshift集群端点。 这些IDE通常包含许多功能,这些功能可满足开发人员或管理员在Redshift集群上执行各种操作的日常需求。 在本文中,我们将逐步探索一种配置Redshift群集的分步过程,使我们可以使用所选的IDE将其连接。 以下步骤将假定您具有正常工作的Redshift集群,并且具有在该集群上运行所需的管理权限。
AWS Redshift IDE (AWS Redshift IDEs)
Several popular IDEs support working with Redshift like SQL Workbench, Aginity Pro for Redshift, Jetbrain’s DataGrip and many others. Redshift supports JDBC and ODBC interfaces as well as drivers using which one can connect to the redshift cluster. These drivers can be downloaded from here. If you are using an IDE that does not have out-of-box support for Redshift, you can install and configure these drivers in your IDE to work with Redshift. We would be using an IDE in this article that has out-of-box support for Redshift, so you would not need to perform this step of configuring the driver.
几种流行的IDE支持与Redshift一起使用,例如SQL Workbench,用于Redshift的Aginity Pro,Jetbrain的DataGrip等。 Redshift支持JDBC和ODBC接口以及驱动程序,通过该接口可以连接到redshift集群。 这些驱动程序可以从此处下载。 如果您使用的IDE不具有对Redshift的现成支持,则可以在IDE中安装和配置这些驱动程序以与Redshift一起使用。 我们将在本文中使用对Redshift具有开箱即用支持的IDE,因此您无需执行配置驱动程序的步骤。
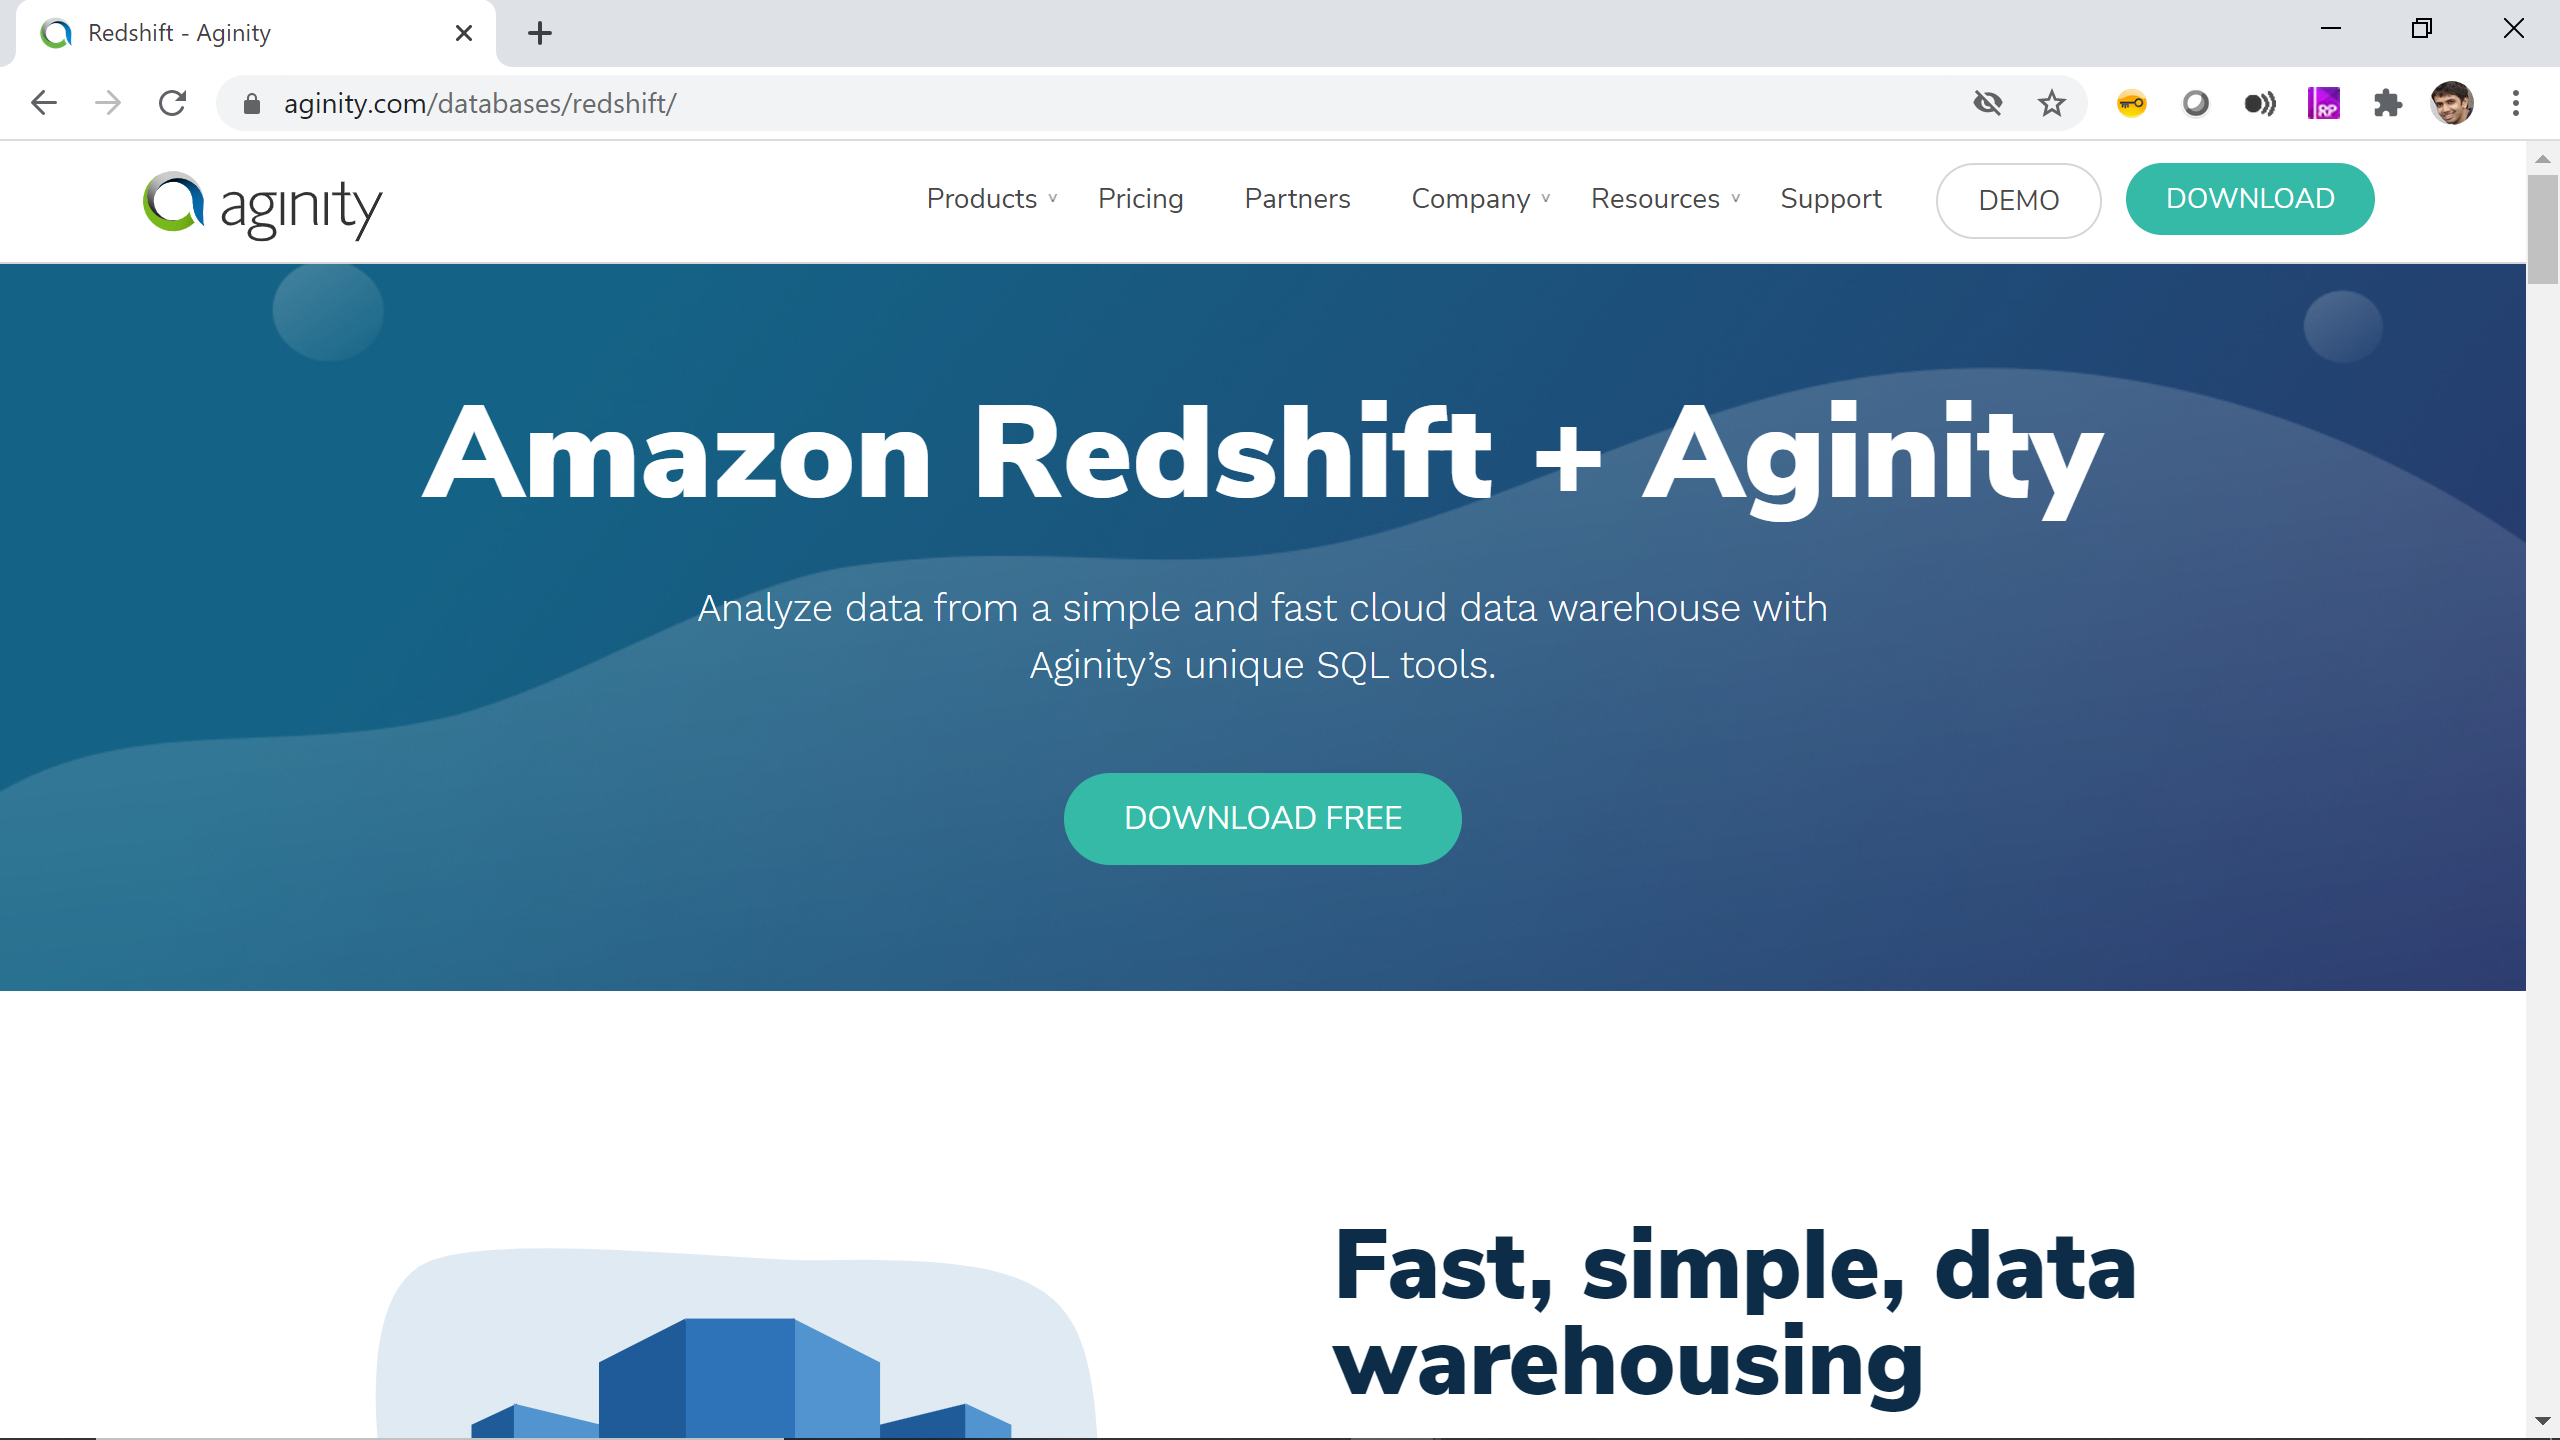
Aginity Pro for Redshift is one of the most popular IDEs that is used with Redshift, which can be downloaded and used freely for individual use from here. Download and install this IDE if you are using a Windows or Mac-based workstation, as it does not support Linux.
用于Redshift的Aginity Pro是与Redshift一起使用的最受欢迎的IDE之一,可以从此处免费下载和使用以供个人使用。 如果您使用的是基于Windows或Mac的工作站,请下载并安装此IDE,因为它不支持Linux。
For users who are using a Linux based workstation, they can use other alternate IDEs like SQL Workbench, which is also available for free individual use, and can be downloaded from here. Install the IDE of your choice, as we would be using this IDE to connect to the AWS Redshift cluster once we have configured the cluster endpoint.
对于使用基于Linux的工作站的用户,他们可以使用其他替代IDE(例如SQL Workbench),也可以免费使用,可以从此处下载。 安装您选择的IDE,因为一旦配置了集群终端节点,我们将使用此IDE连接到AWS Redshift集群。

AWS Redshift集群终端节点 (AWS Redshift Cluster Endpoint)
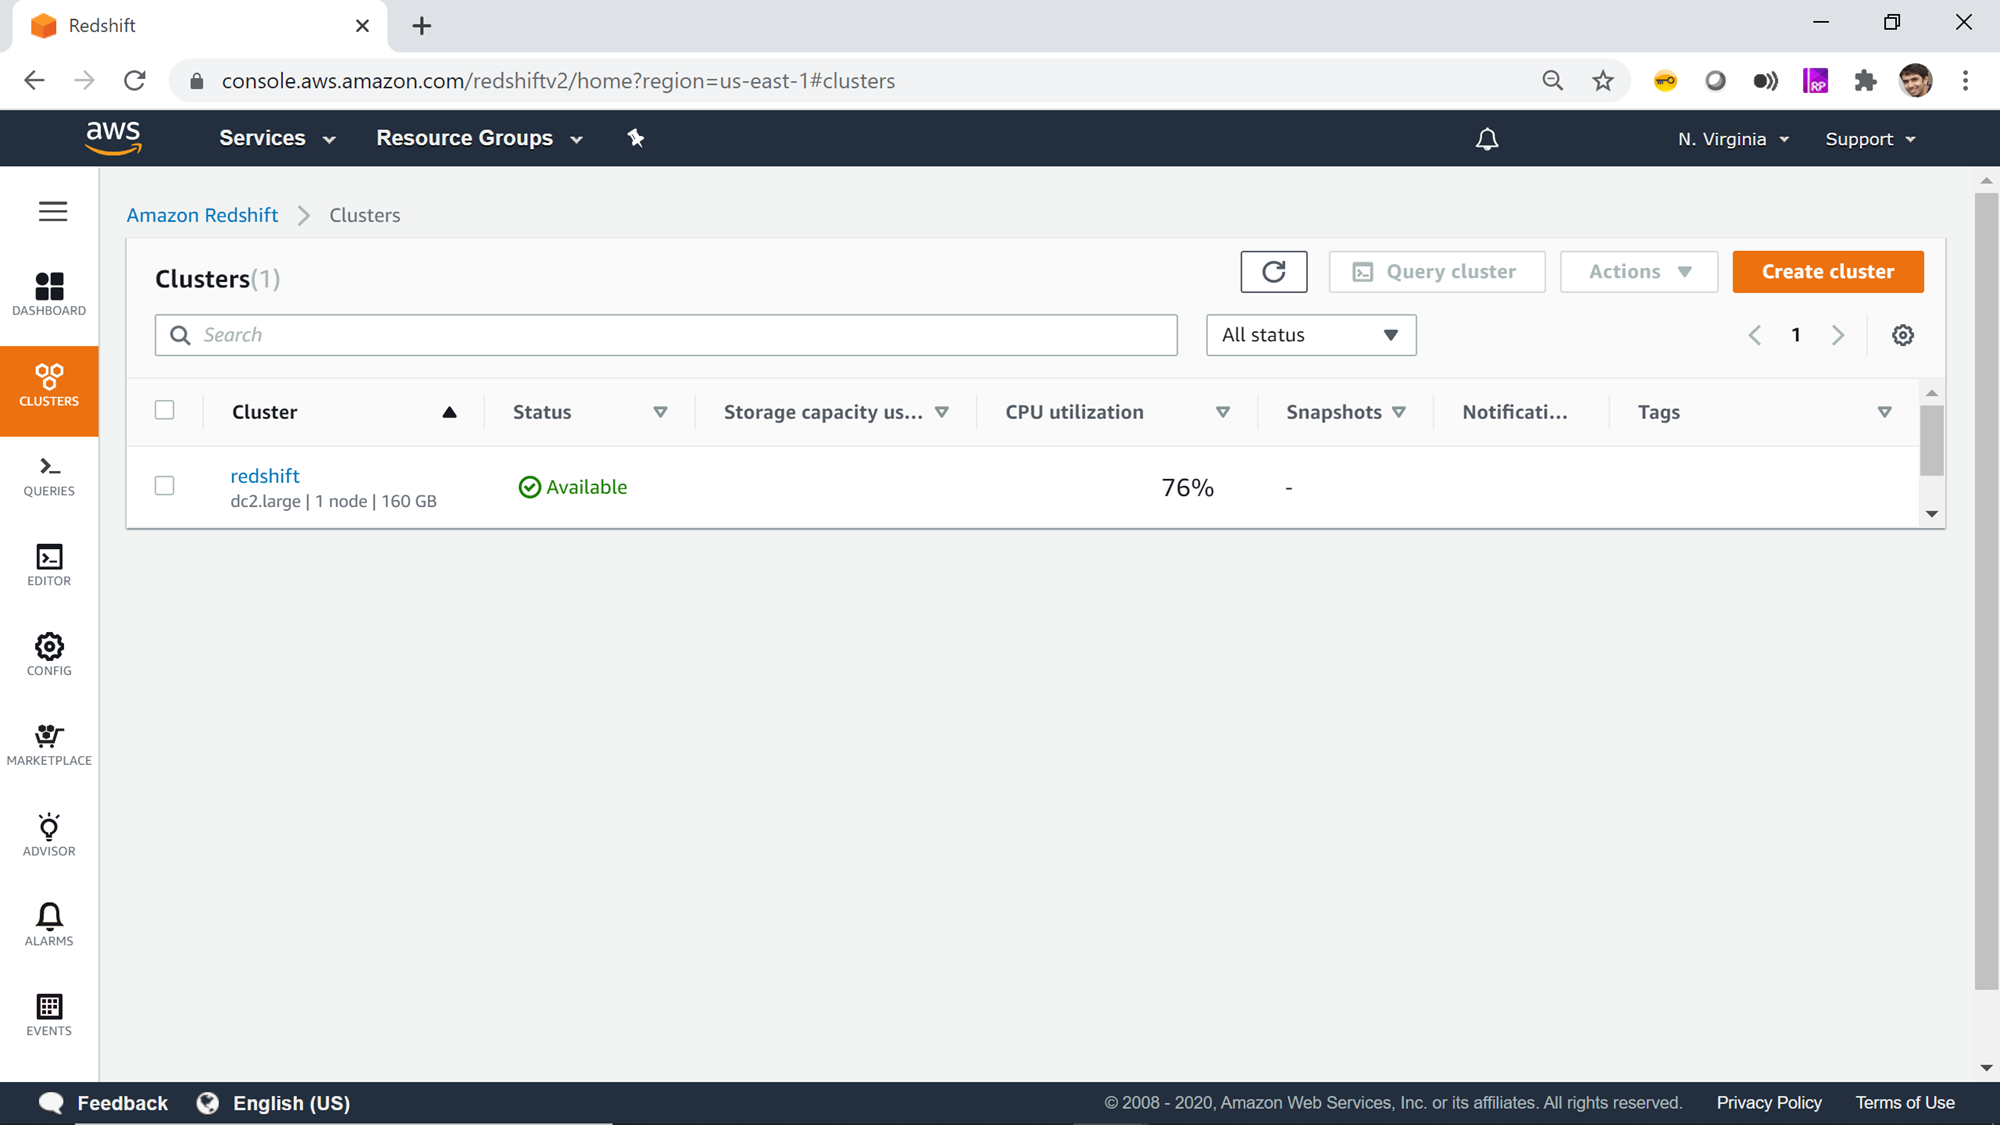
Once the IDE is installed on the local machine, its time to configure the redshift cluster endpoint. Navigate to the Redshift dashboard, where you would find your cluster listed as shown below.
将IDE安装在本地计算机上之后,就可以配置redshift集群端点了。 导航到Redshift仪表板,您将在其中找到列出的集群,如下所示。
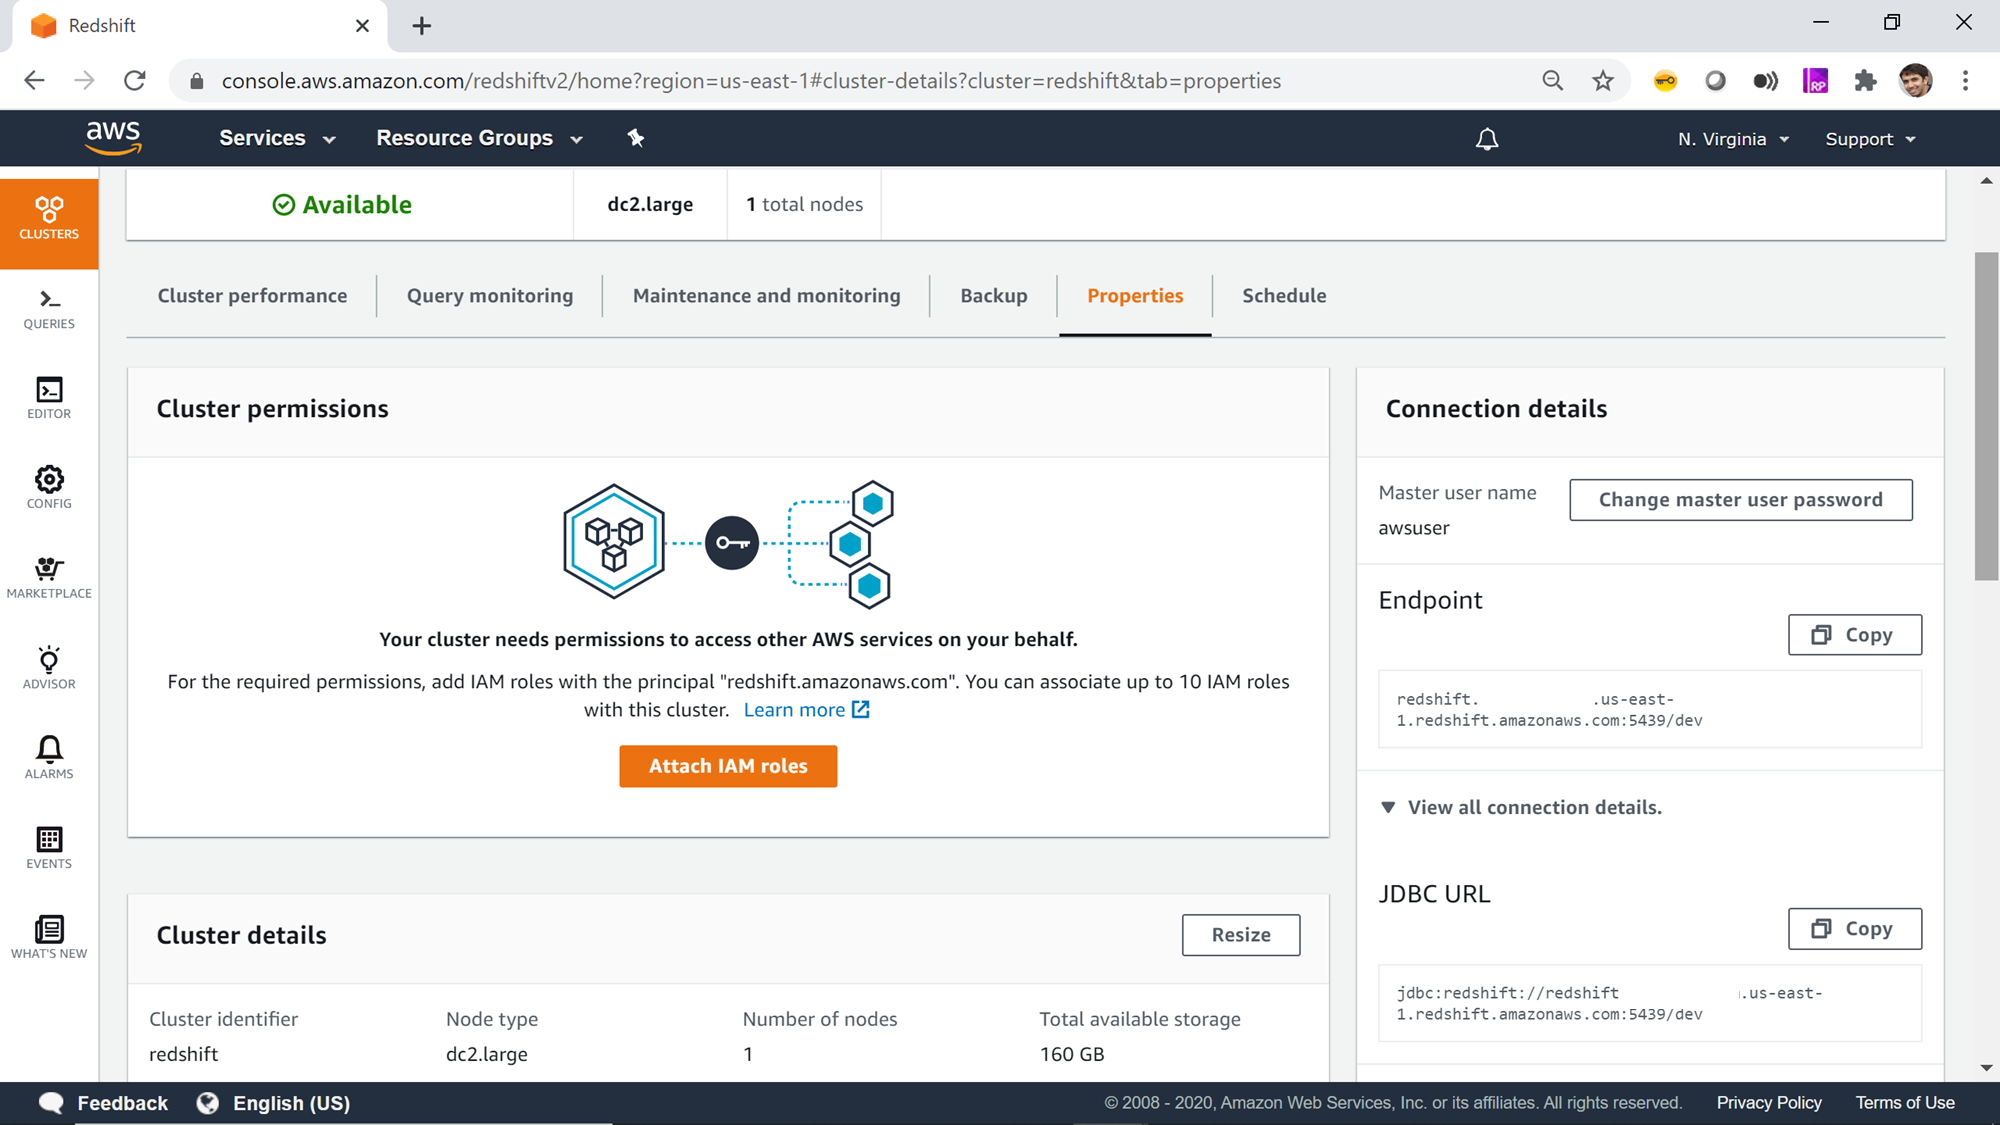
Open the Redshift cluster by clicking on the name of the cluster which will navigate you to the dashboard page of the selected cluster. Click on the Properties tab to explore the details of the cluster. On the left-hand side of the cluster, you would find the connection details like the cluster endpoint which is the address of the cluster and the JDBC connection string which you can use to connect to the cluster from the tools of your choice, as shown below.
通过单击集群名称来打开Redshift集群,该名称将导航到所选集群的仪表板页面。 单击属性选项卡以浏览集群的详细信息。 在集群的左侧,您会找到连接详细信息,例如集群端点(它是集群的地址)和JDBC连接字符串,您可以使用它们从所选工具连接到集群,如图所示下面。
AWS Redshift网络配置 (AWS Redshift Network Configuration)
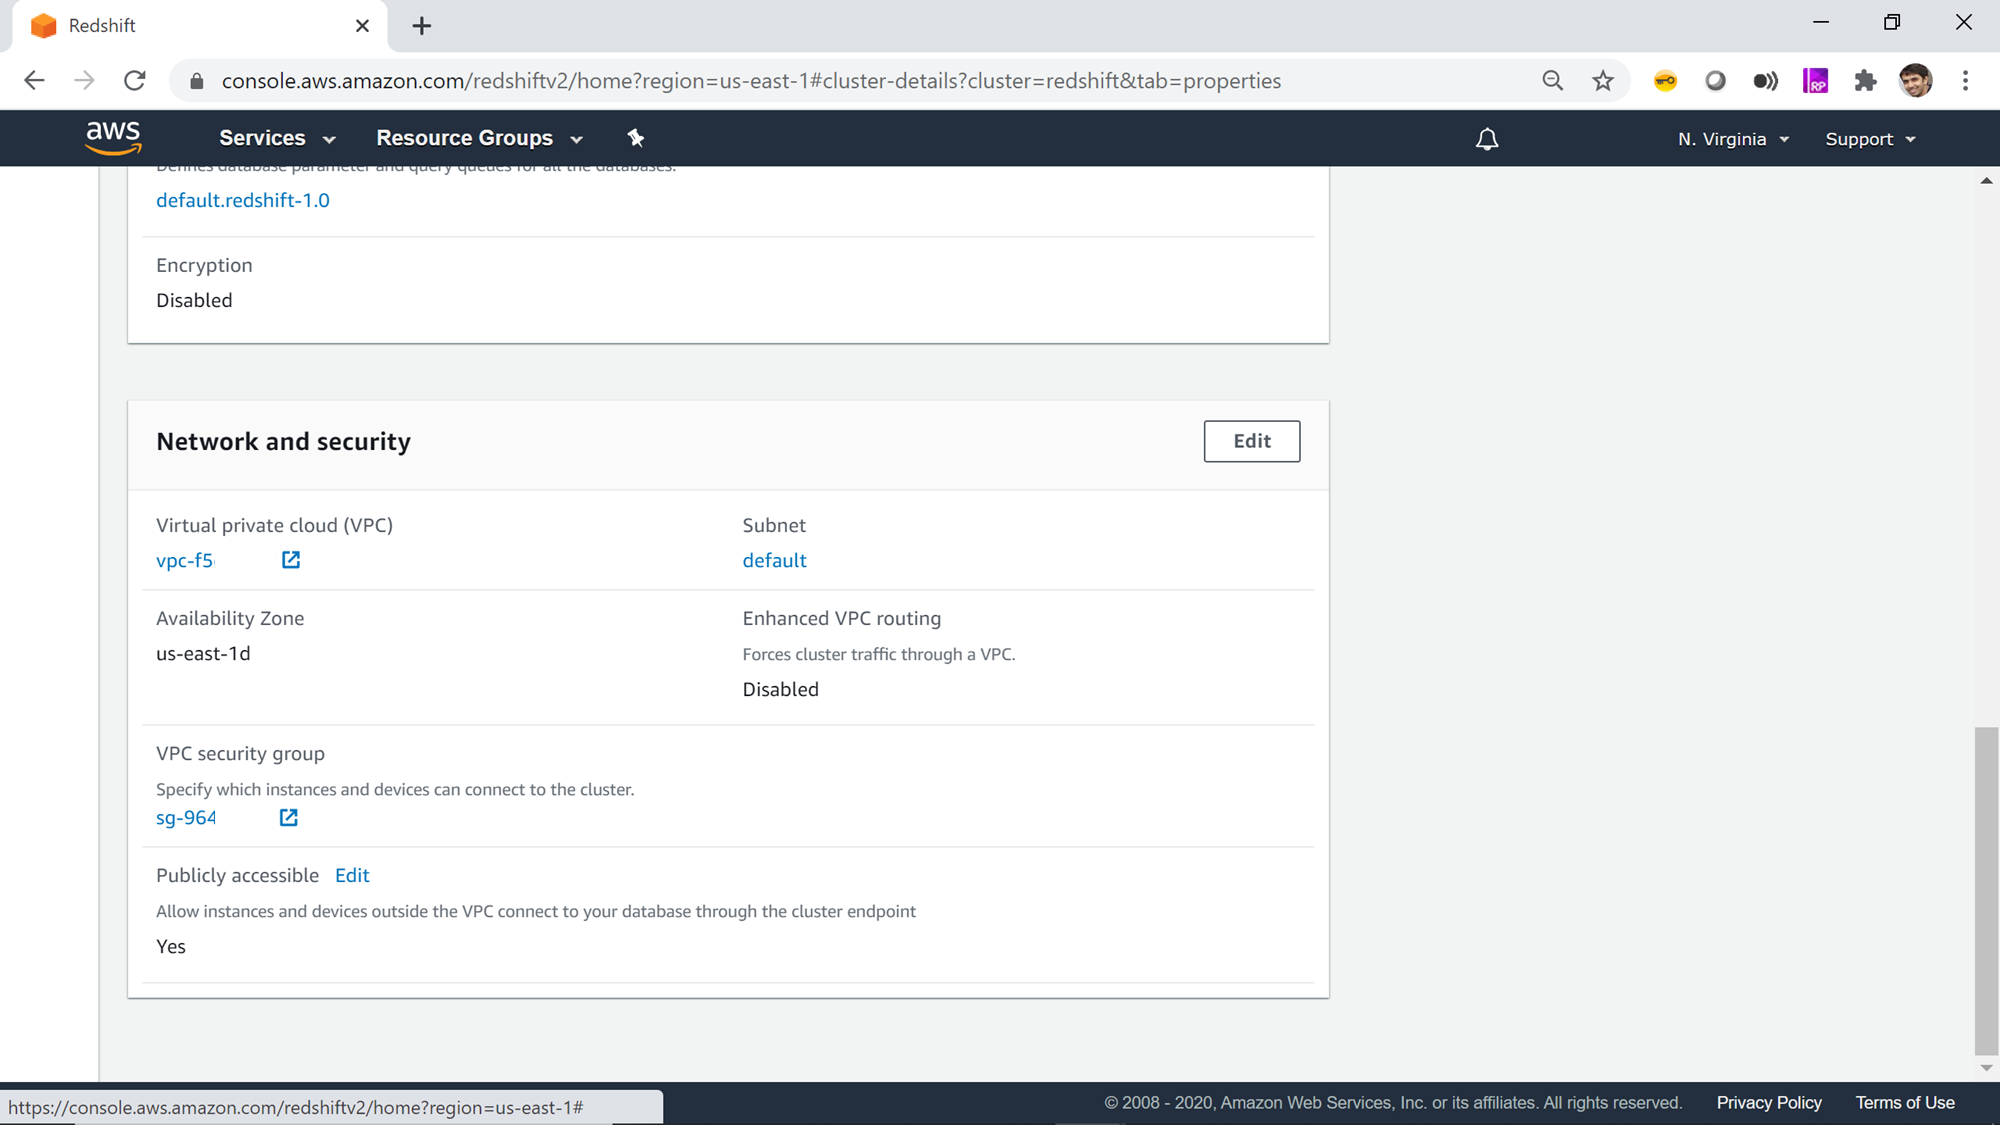
Scroll to the very bottom of the page and you would find a section titled Network and security. You would find the details like the VPC (Virtual Private Cloud) which is the network in which the redshift cluster is created, and the security group which contains the list of inbound and outbound rules to allow or deny traffic from and to the listed destinations. Click on the security group link, and that would navigate you to the security group page on the VPC service.
滚动到页面的最底部,您将找到标题为网络和安全性的部分。 您会发现详细信息,例如VPC(虚拟私有云)(在其中创建了redshift集群的网络)以及安全组,该安全组包含允许或拒绝来自或到达所列目的地的流量的入站和出站规则列表。 单击安全组链接,这会将您导航到VPC服务上的安全组页面。
Once you are on the security group page, you would be able to see the details regarding inbound rules and outbound rules. We need to ensure that the security group allows incoming and outgoing traffic on the network in which the AWS Redshift cluster is hosted. If you are using the default security group and default VPC, the security group allows all outbound traffic, but allows inbound traffic only from the security group. We need to modify the inbound rule and add the rule to allow traffic on the port 5439 which is generally the default Redshift port. If you are using a non-default port, we need to open inbound traffic on that port.
进入安全组页面后,您将能够查看有关入站规则和出站规则的详细信息。 我们需要确保安全组在托管AWS Redshift集群的网络上允许传入和传出流量。 如果使用默认安全组和默认VPC,则安全组允许所有出站流量,但仅允许来自安全组的入站流量。 我们需要修改入站规则并添加规则以允许端口5439上的流量通过,该端口通常是默认的Redshift端口。 如果您使用的是非默认端口,则需要在该端口上打开入站流量。
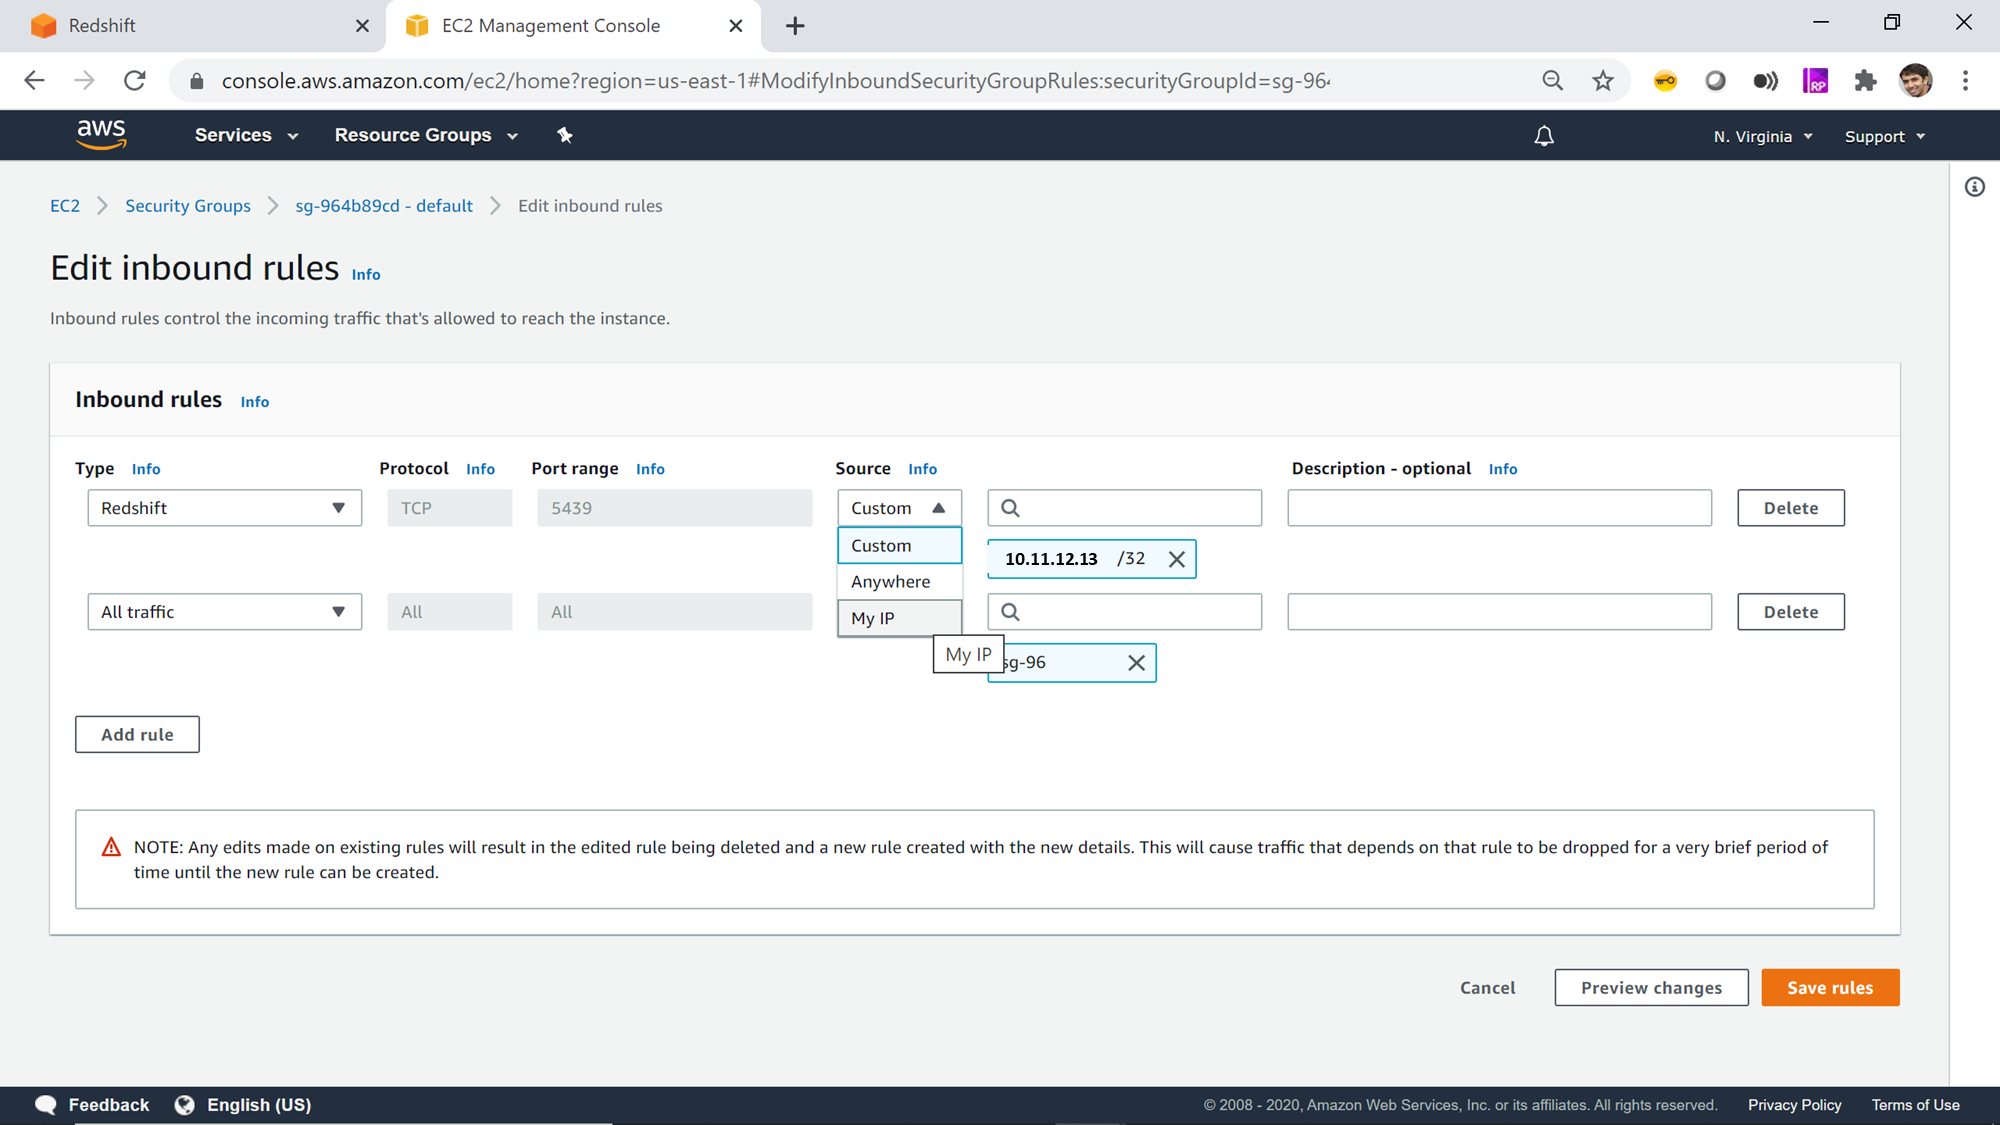
Click on the inbound rule, and you would be able to see the rules as shown below. Click on Add Rule button, select Redshift in the port type. This will auto-select the protocol and port range options. In the source section, to add your local machine IP, you can click on MyIP which will add your IP address. If you want to add a network range or multiple addresses, you can do the same as well by using the Custom option. After the required IP address on which the IDE is installed is added to the inbound security rule, save the rules by clicking on the Save button. This completes the network configuration required to allow traffic from the machine on which the IDE is installed to the AWS Redshift cluster.
单击入站规则,您将能够看到如下所示的规则。 单击添加规则按钮,在端口类型中选择Redshift。 这将自动选择协议和端口范围选项。 在源部分中,要添加本地计算机IP,可以单击MyIP,这将添加您的IP地址。 如果要添加网络范围或多个地址,也可以通过使用“自定义”选项执行相同的操作。 将安装了IDE的所需IP地址添加到入站安全规则后,单击“保存”按钮保存规则。 这完成了允许从安装IDE的计算机到AWS Redshift集群的流量所需的网络配置。
创建一个AWS Redshift连接 (Creating an AWS Redshift Connection)
Once the network configuration is completed, its time to make a connection to the Redshift cluster. It is assumed that Aginity Pro is installed, and this article will explain the steps to configure a connection using it. You can perform the same or similar steps on any other IDE as well that supports JDBC or Redshift in general.
网络配置完成后,就可以连接到Redshift集群了。 假定已安装Aginity Pro,本文将介绍使用它配置连接的步骤。 您也可以在任何其他通常支持JDBC或Redshift的IDE上执行相同或相似的步骤。
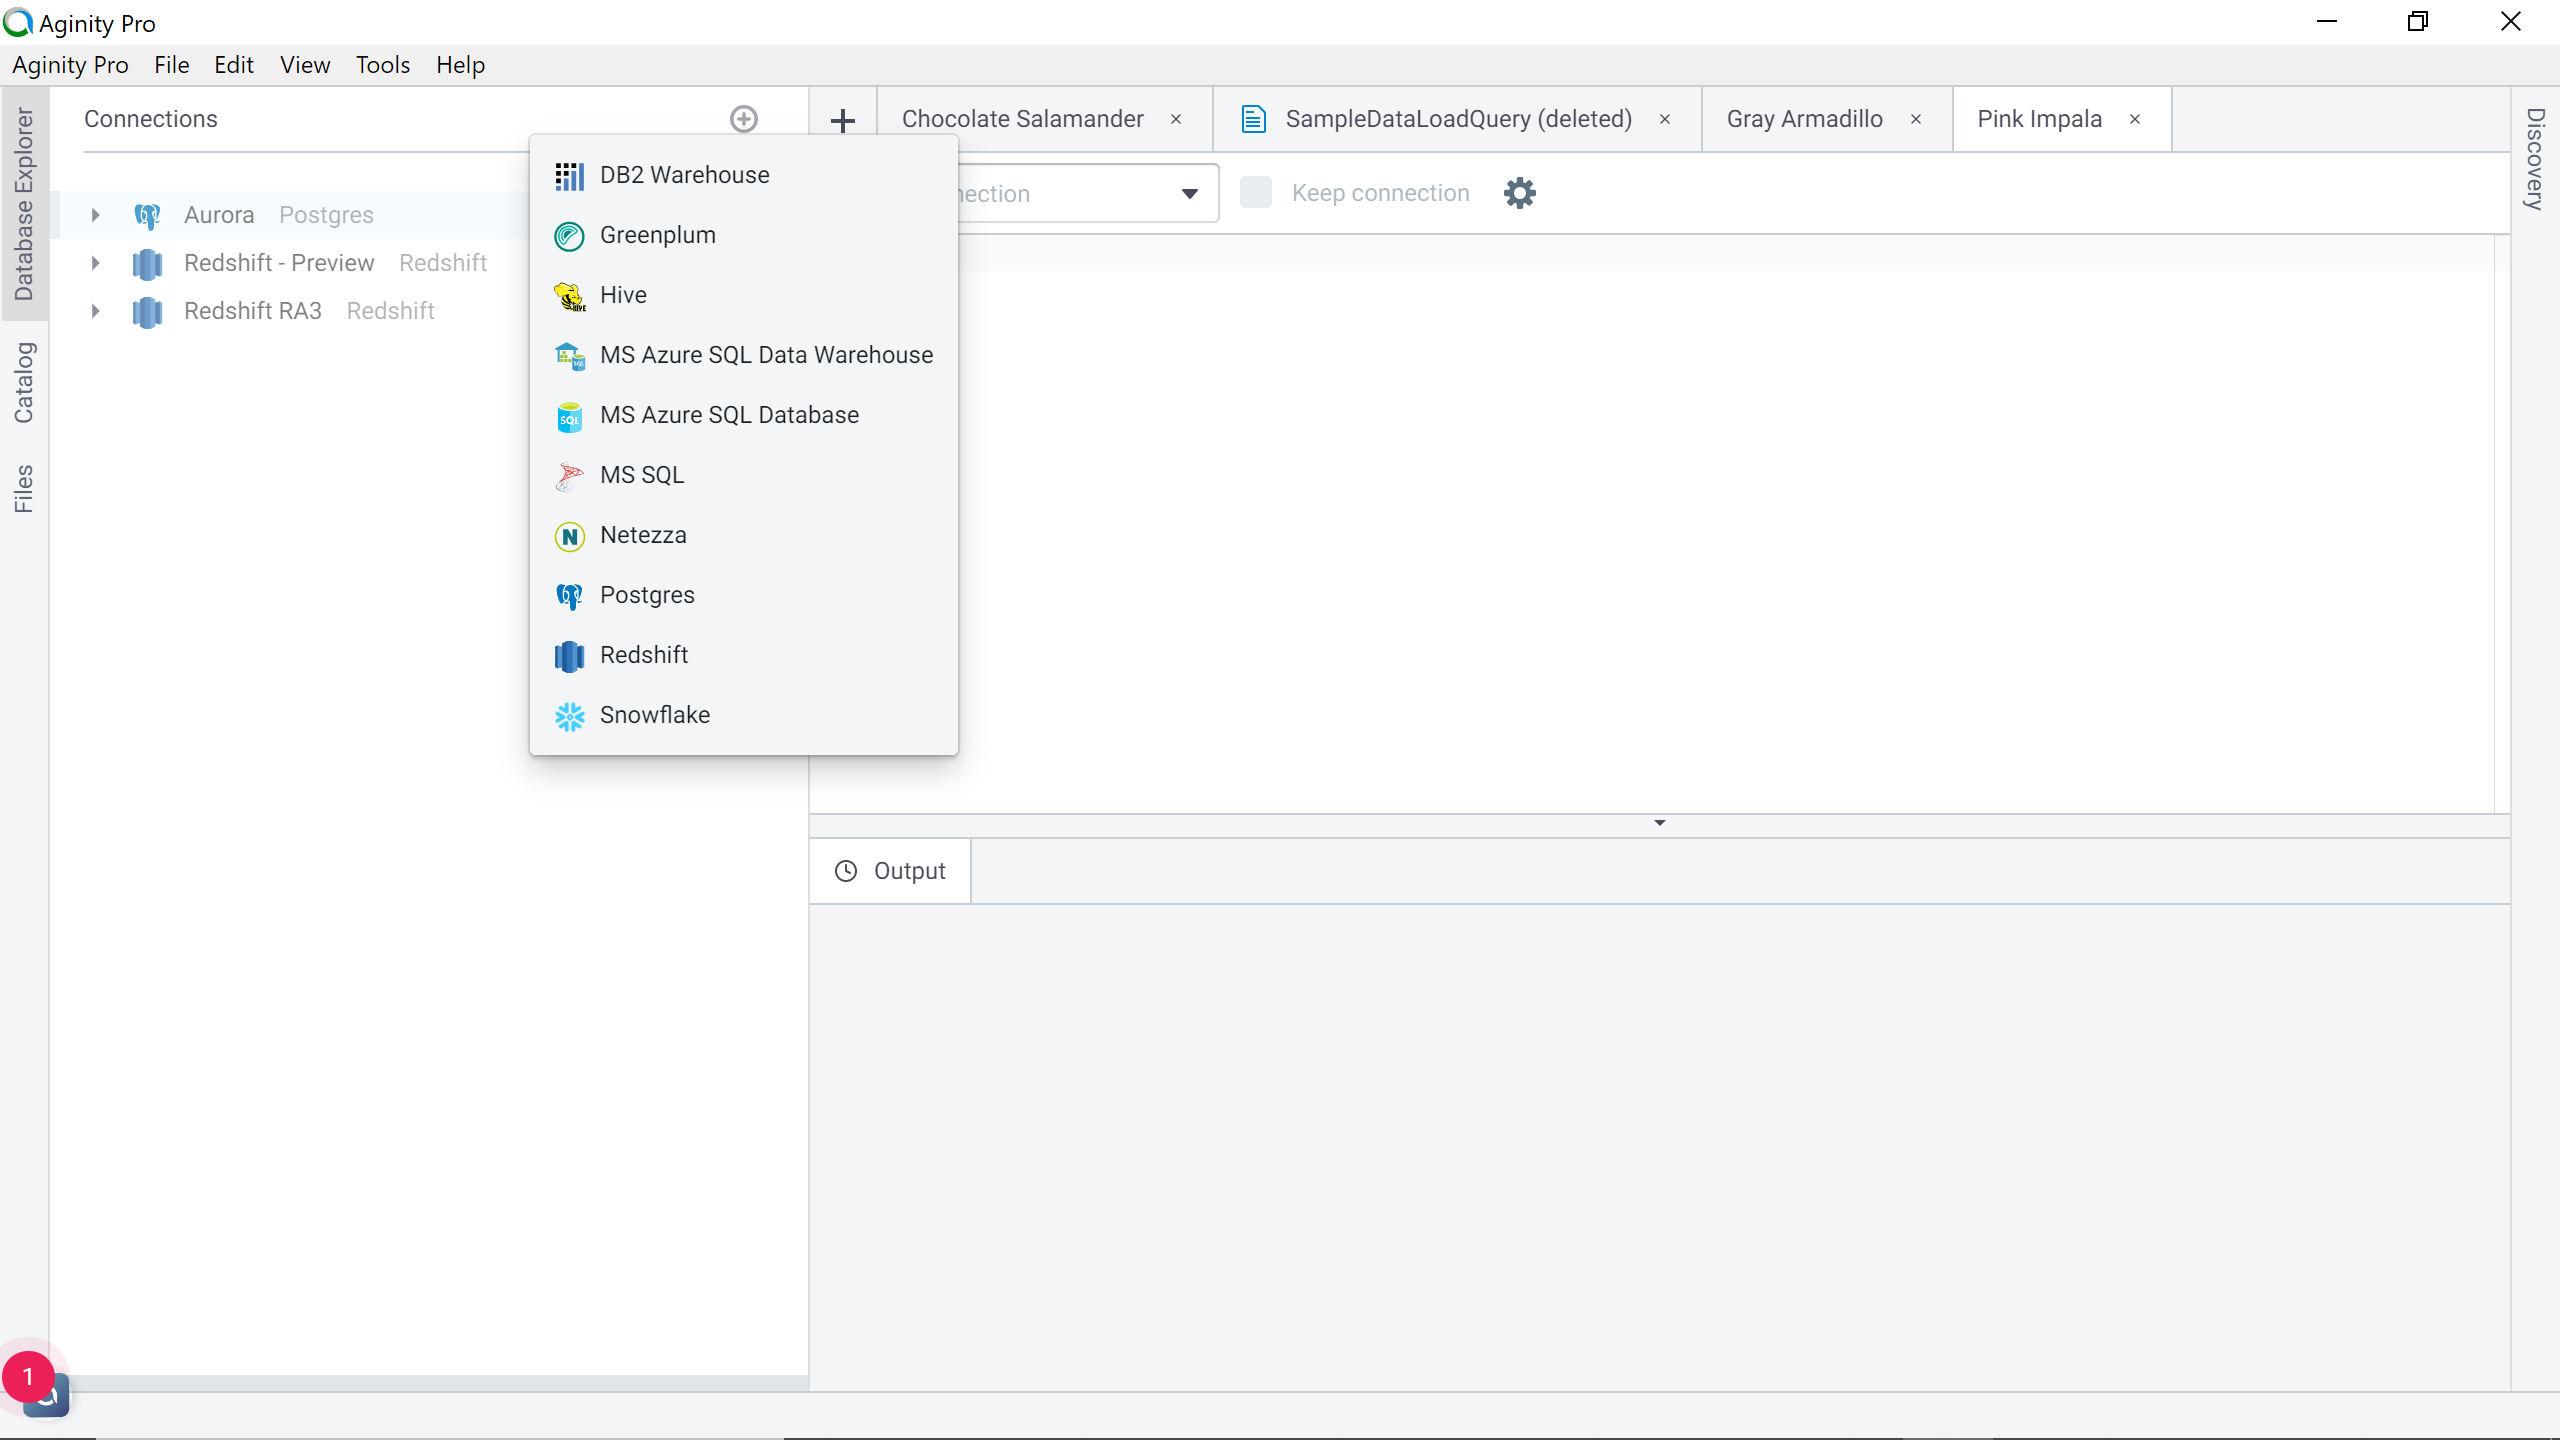
Open Aginity Pro and click on the plus icon in the Connections tab as shown below. It comes with a readily configured Redshift JDBC driver, so you do not need to configure it. You would find Redshift as one of the options in the supported data sources list. Once your connection is created, it would look as shown on the left-most side of the connections tab.
打开Aginity Pro,然后在“ 连接”选项卡中单击加号图标,如下所示。 它带有易于配置的Redshift JDBC驱动程序,因此您无需对其进行配置。 您会在支持的数据源列表中找到Redshift作为选项之一。 创建连接后,其外观将显示在“连接”选项卡的最左侧。
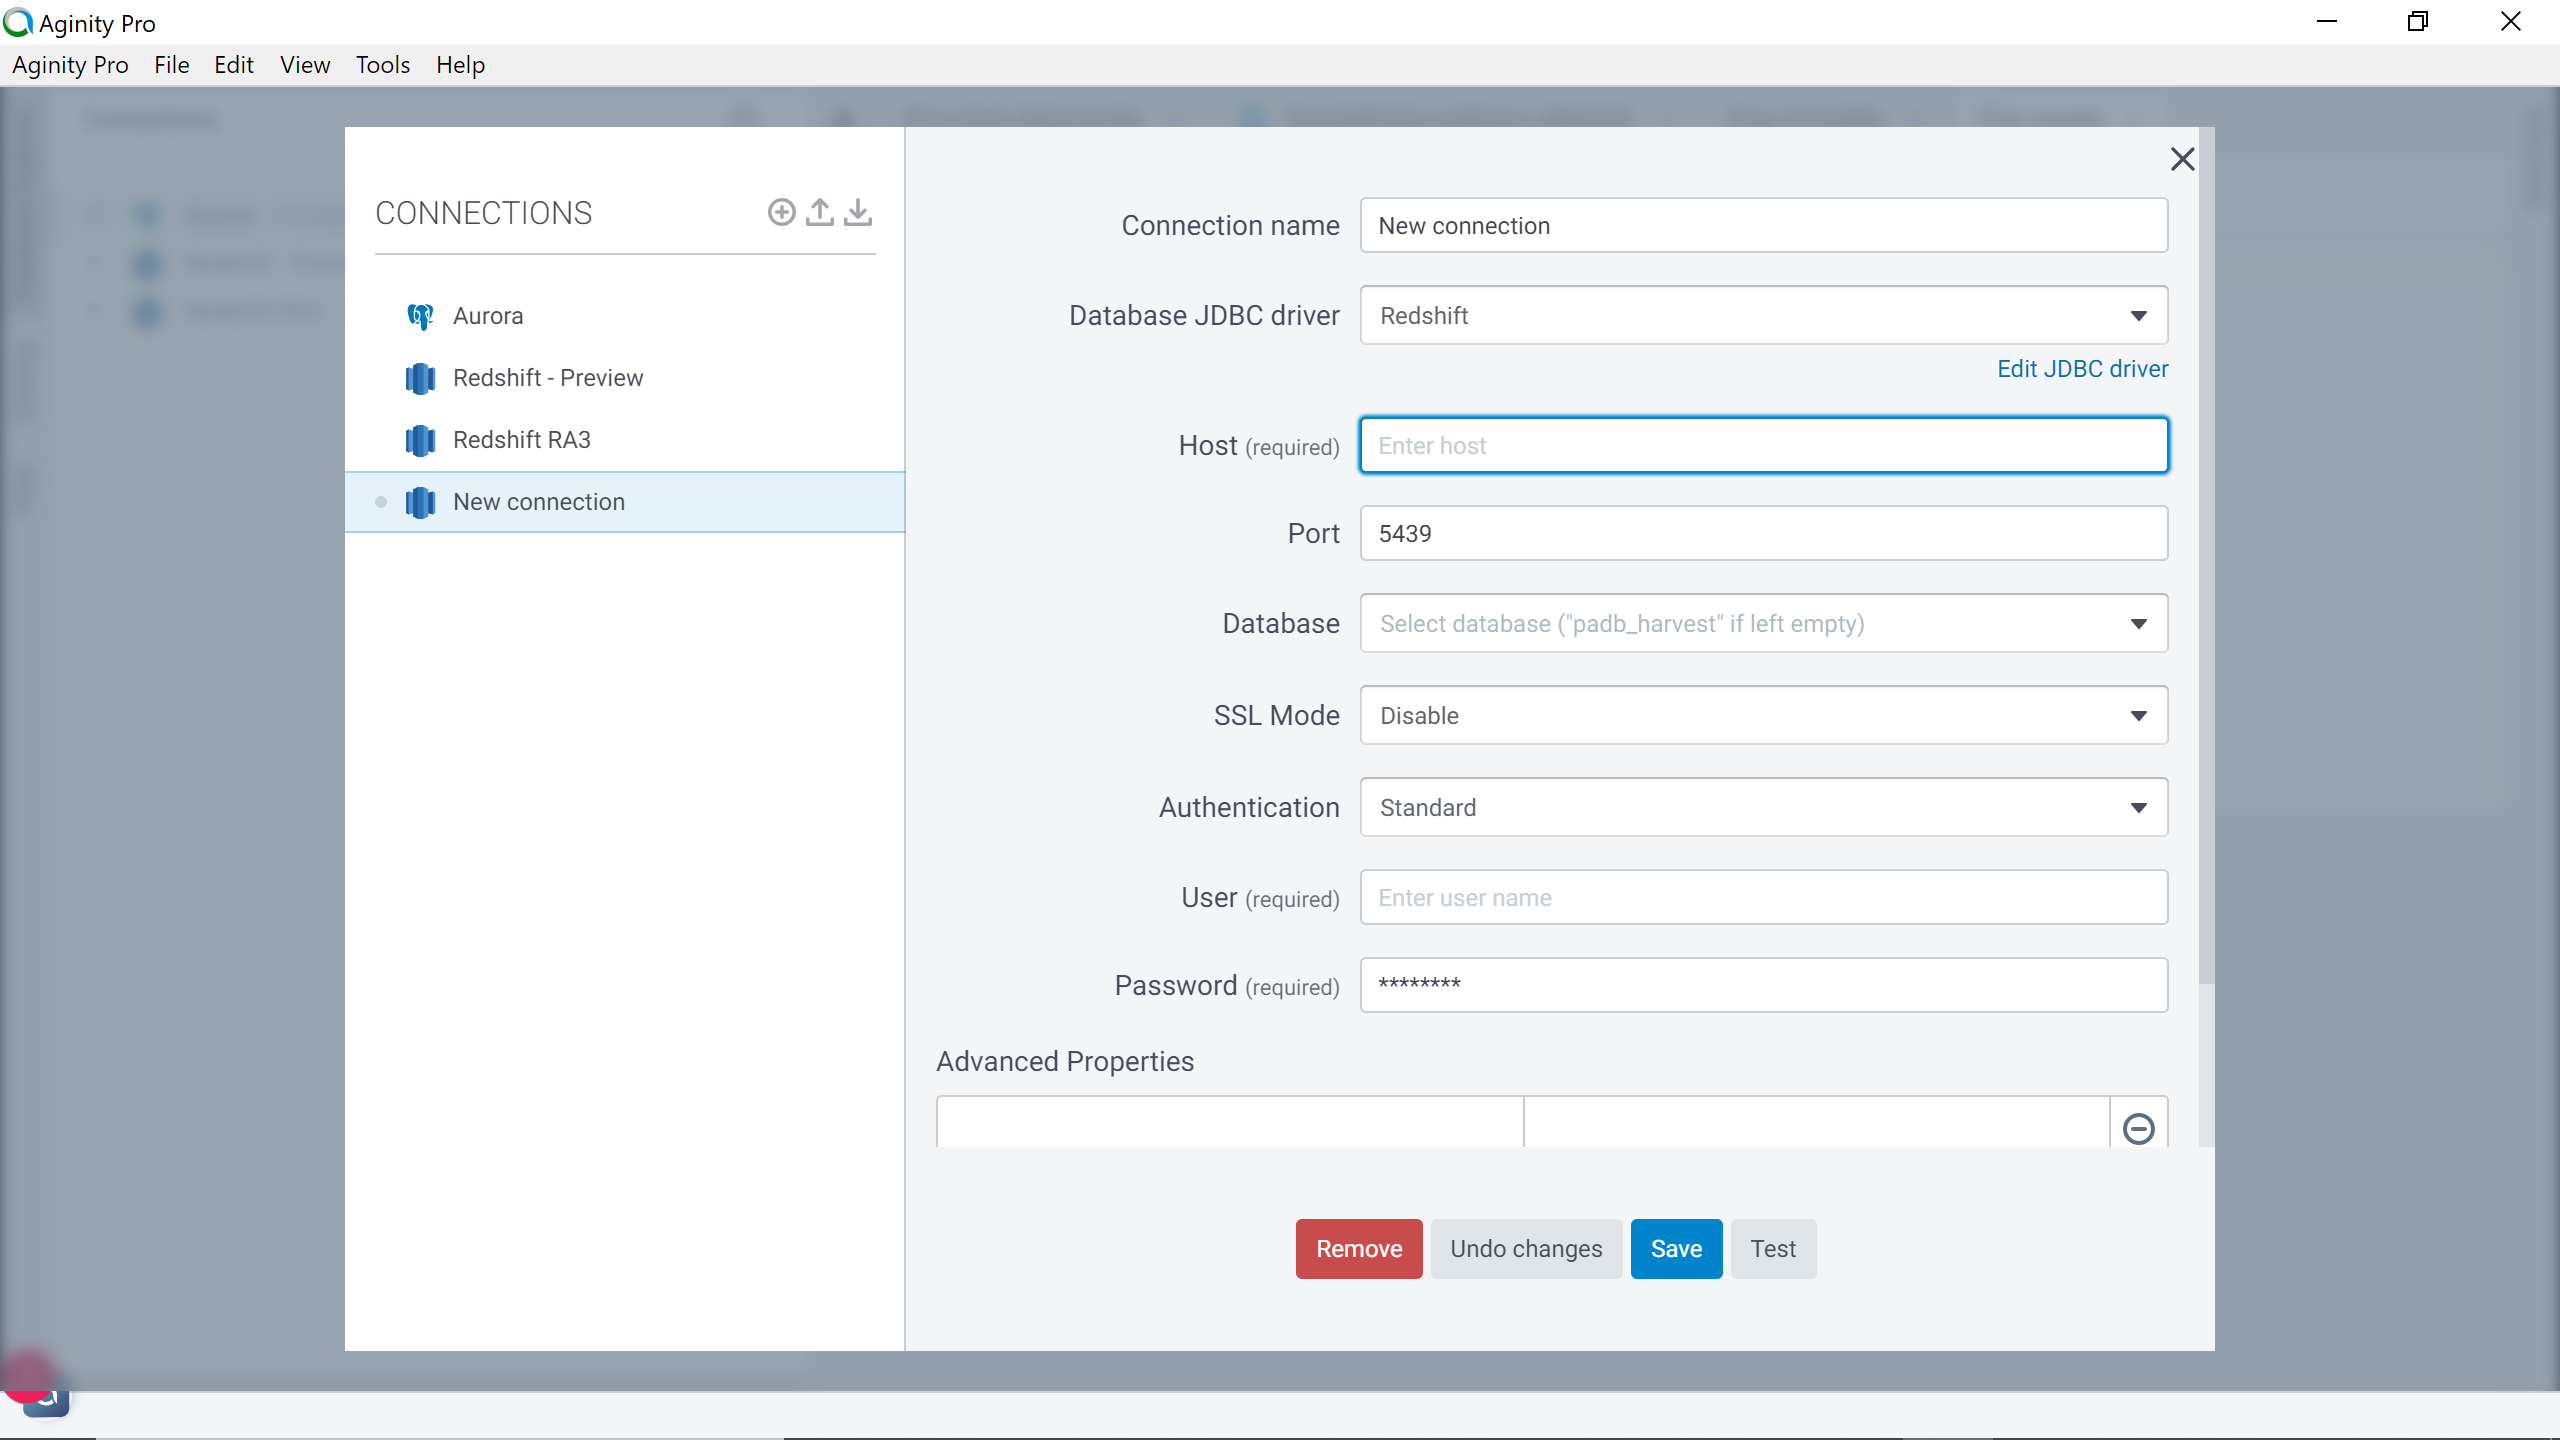
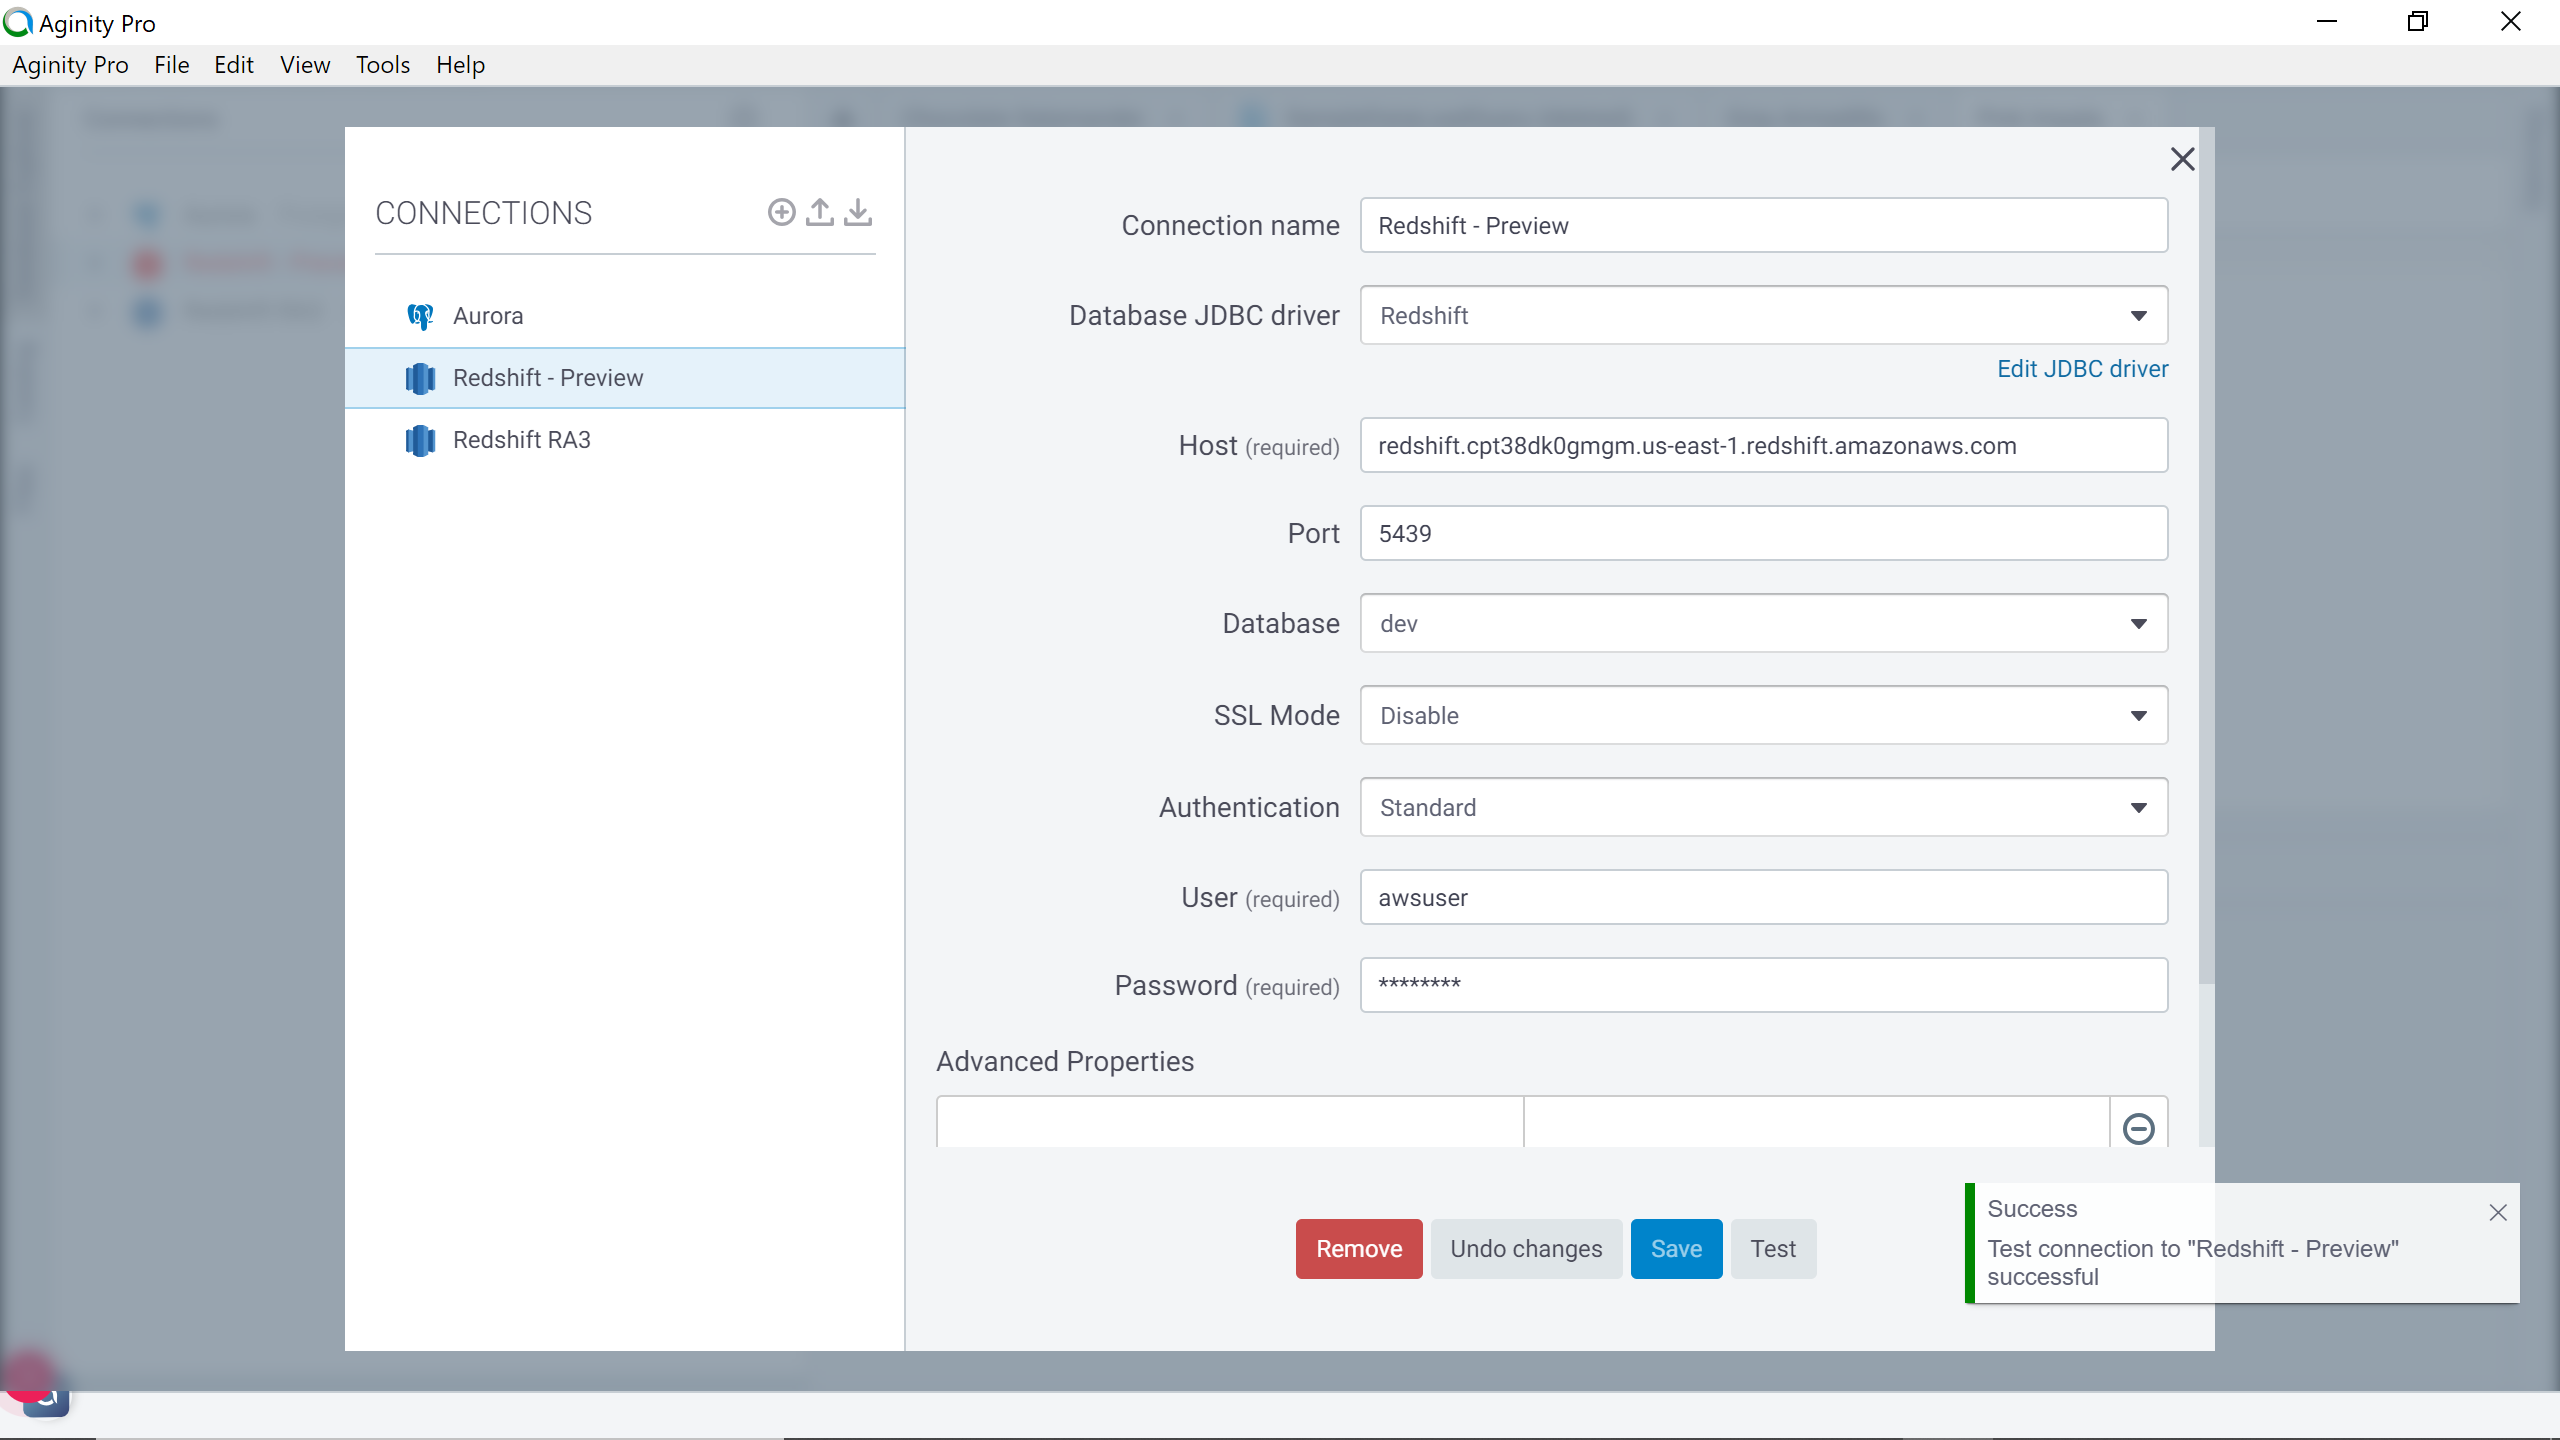
Click on Redshift and that would open the connection details tab as shown below. Provide a relevant connection name in the Connection Name box. In the host section, provide the AWS Redshift cluster endpoint from the properties tab of the cluster, which we saw earlier. Leave the port with the default value, unless you are using a non-default port, in which case you should change the value of the port being used. Select the database name as dev or whatever is the database that you intend to connect. Provide the user id and password using which you intend to connect to the cluster.
单击Redshift,这将打开连接详细信息选项卡,如下所示。 在“连接名称”框中提供相关的连接名称。 在主机部分中,从集群的属性选项卡中提供AWS Redshift集群终端节点,我们之前已经看到过。 除非使用非默认端口,否则将端口保留为默认值,在这种情况下,应更改所使用端口的值。 选择数据库名称为dev或要连接的数据库名称。 提供您打算用来连接集群的用户标识和密码。
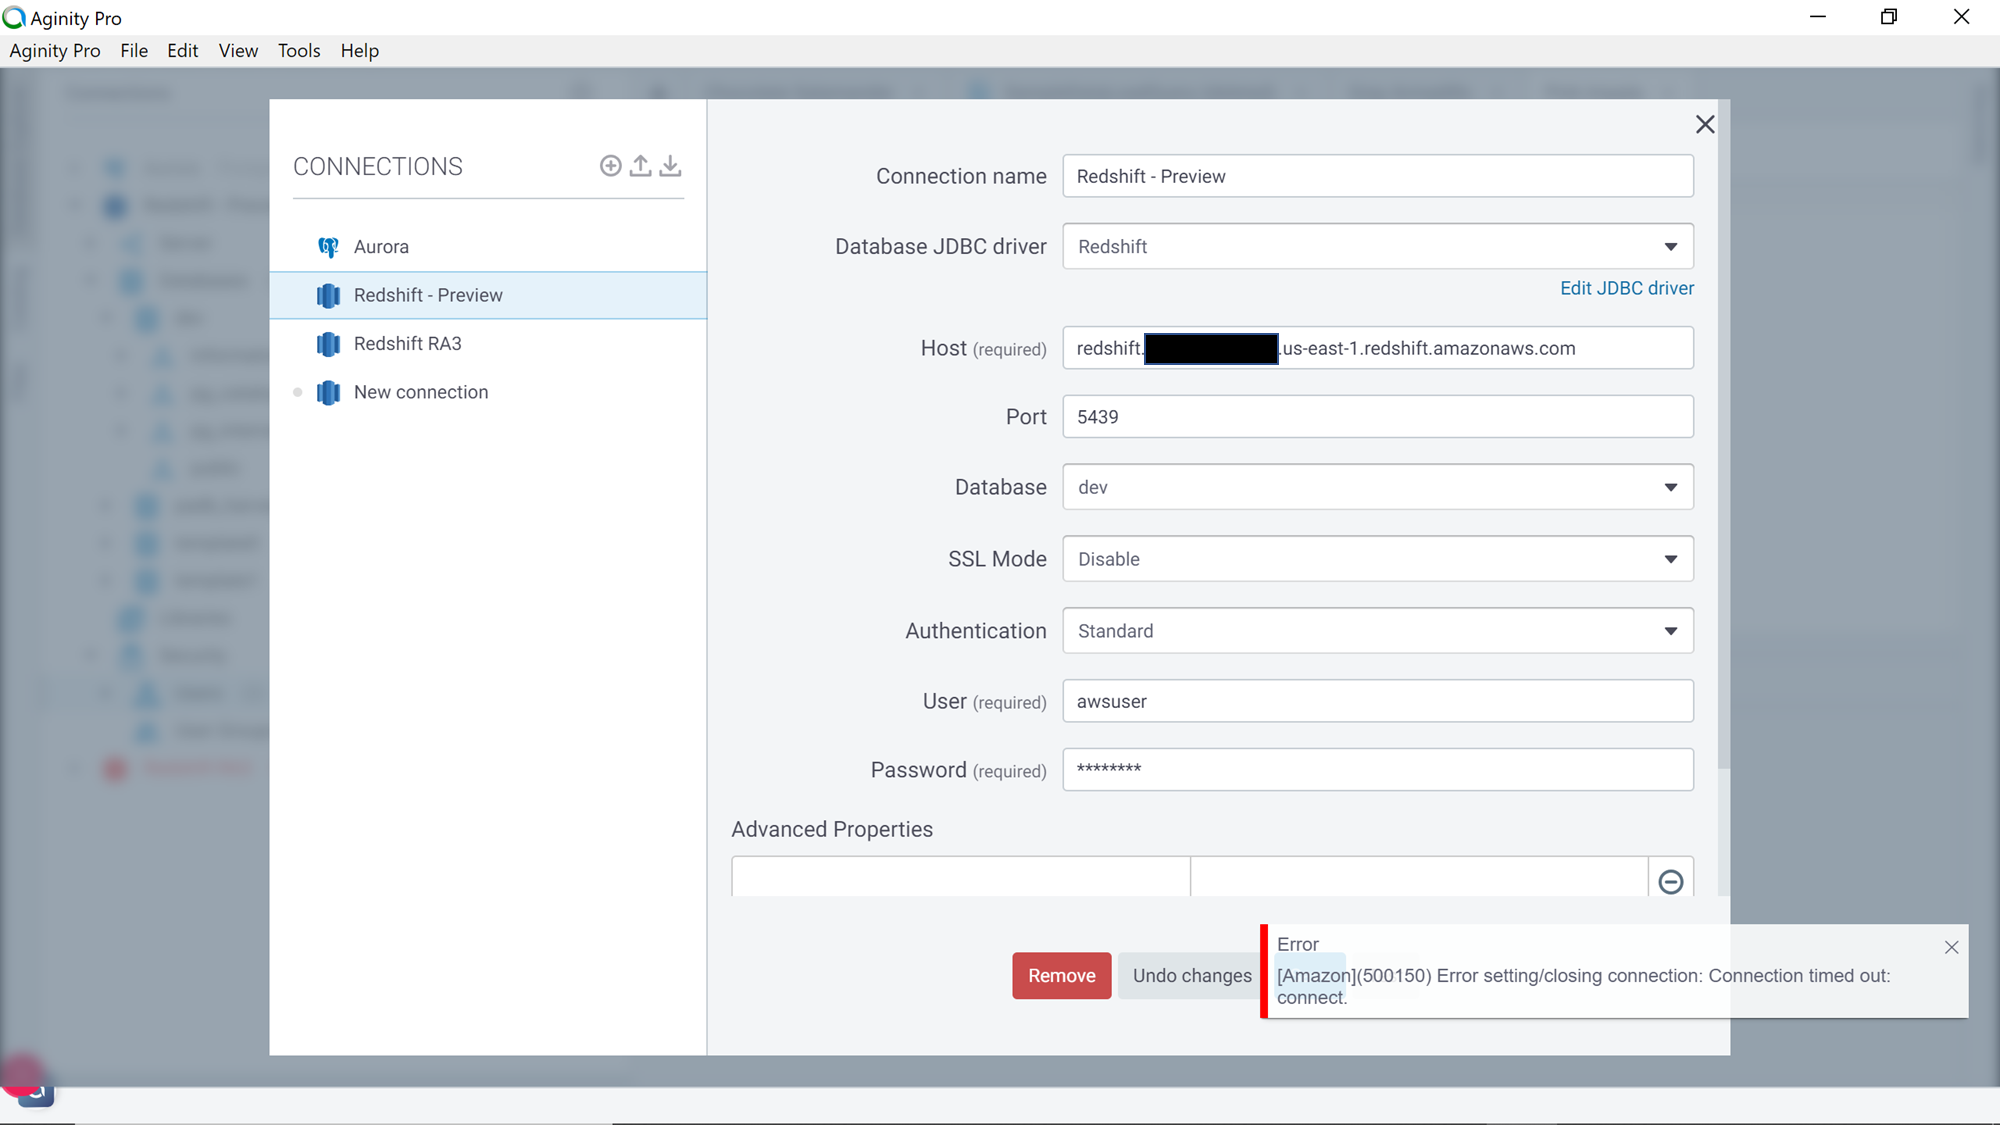
After filling up the connection details, click on the Test button to test the connectivity between the IDE and the cluster. If the network connectivity is not configured correctly, the connection initiated from IDE will not be able to reach or access the cluster. This would result in an error. If the network does not allow the traffic from your machine to reach the AWS Redshift cluster, the testing will result in an error as shown below.
填写完连接详细信息后,单击“测试”按钮以测试IDE和群集之间的连接。 如果未正确配置网络连接,则从IDE启动的连接将无法访问或访问群集。 这将导致错误。 如果网络不允许来自您计算机的流量到达AWS Redshift集群,则测试将导致错误,如下所示。
If the connectivity is successful, you would be shown a successful connection result as shown below. After the successful testing, you can be certain that the network connectivity between your machine and the cluster is working fine.
如果连接成功,将显示如下所示的成功连接结果。 成功测试之后,可以确定计算机与群集之间的网络连接正常。
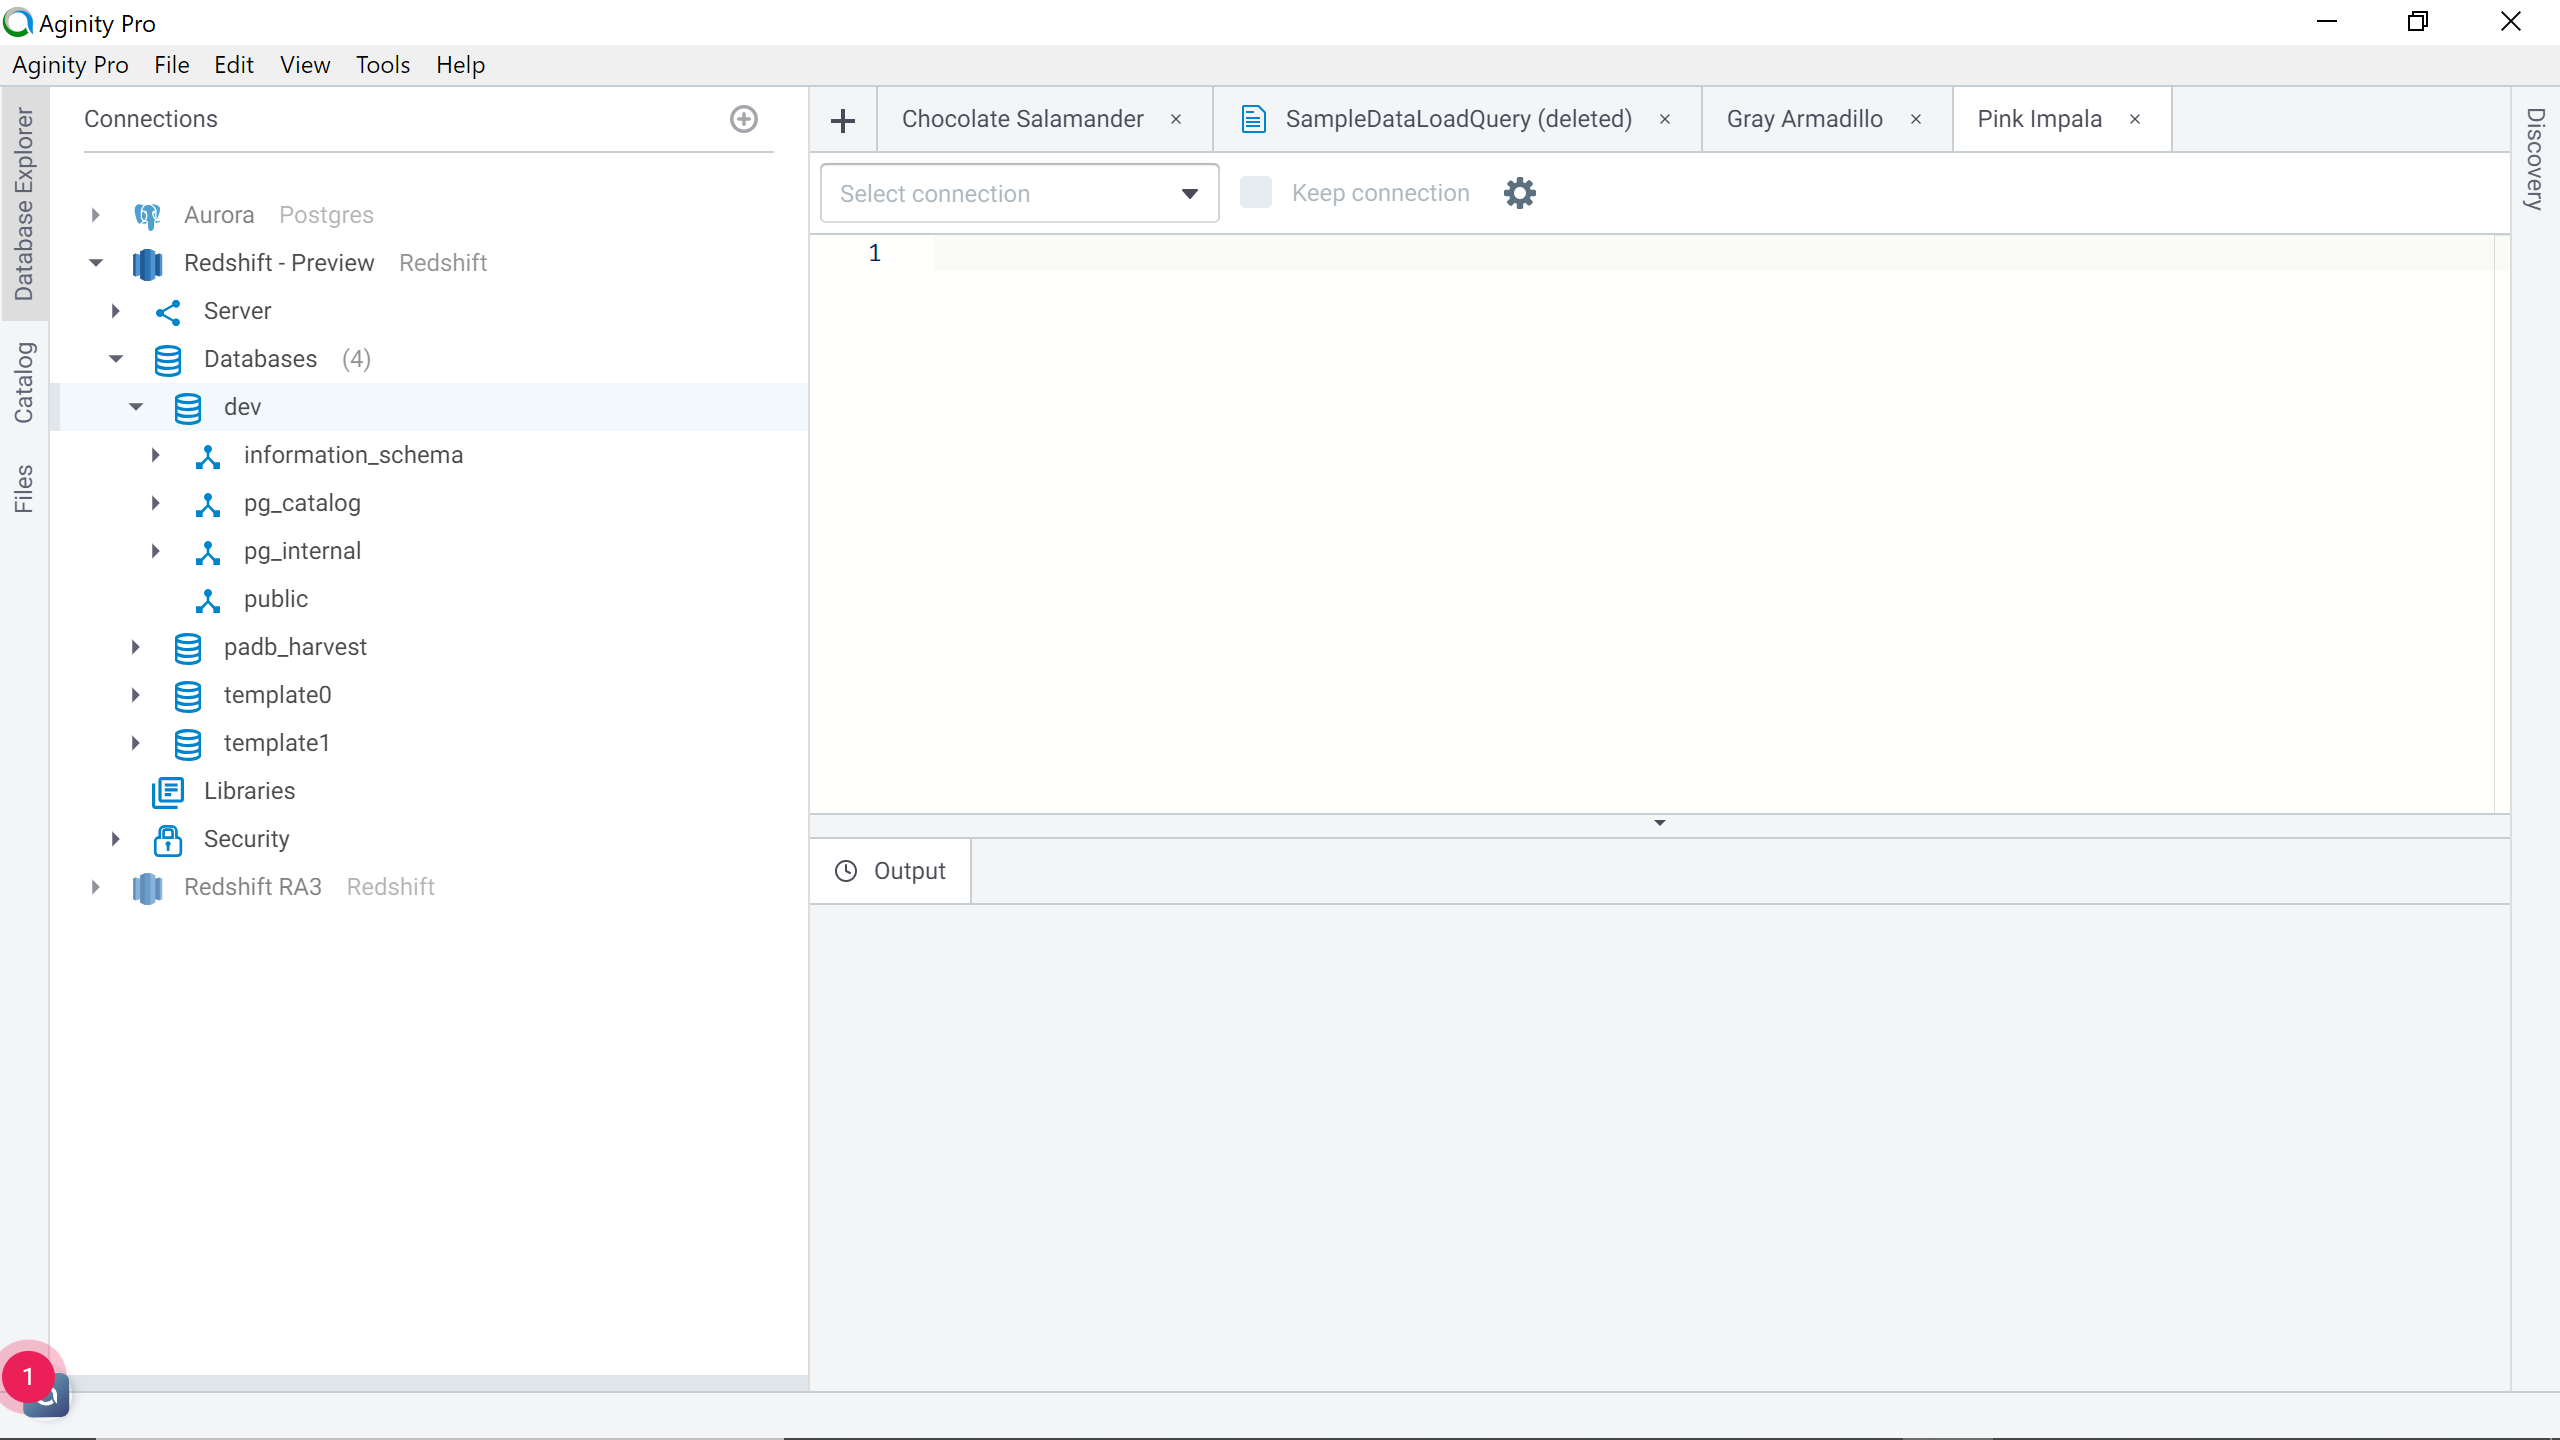
After a successful connection, you can save the connection and return to the main query interface window. You would find the connection listed in the connections pane window. Upon expanding this, you would find all the database objects listed under the selected database and schema as shown below. You can execute SQL queries from the query interface on the right side and the output results of the query execution would appear at the bottom of the query window.
成功连接后,您可以保存连接并返回主查询界面窗口。 您会在连接窗格窗口中找到列出的连接。 展开后,您将找到在所选数据库和模式下列出的所有数据库对象,如下所示。 您可以从右侧的查询界面执行SQL查询,查询执行的输出结果将显示在查询窗口的底部。
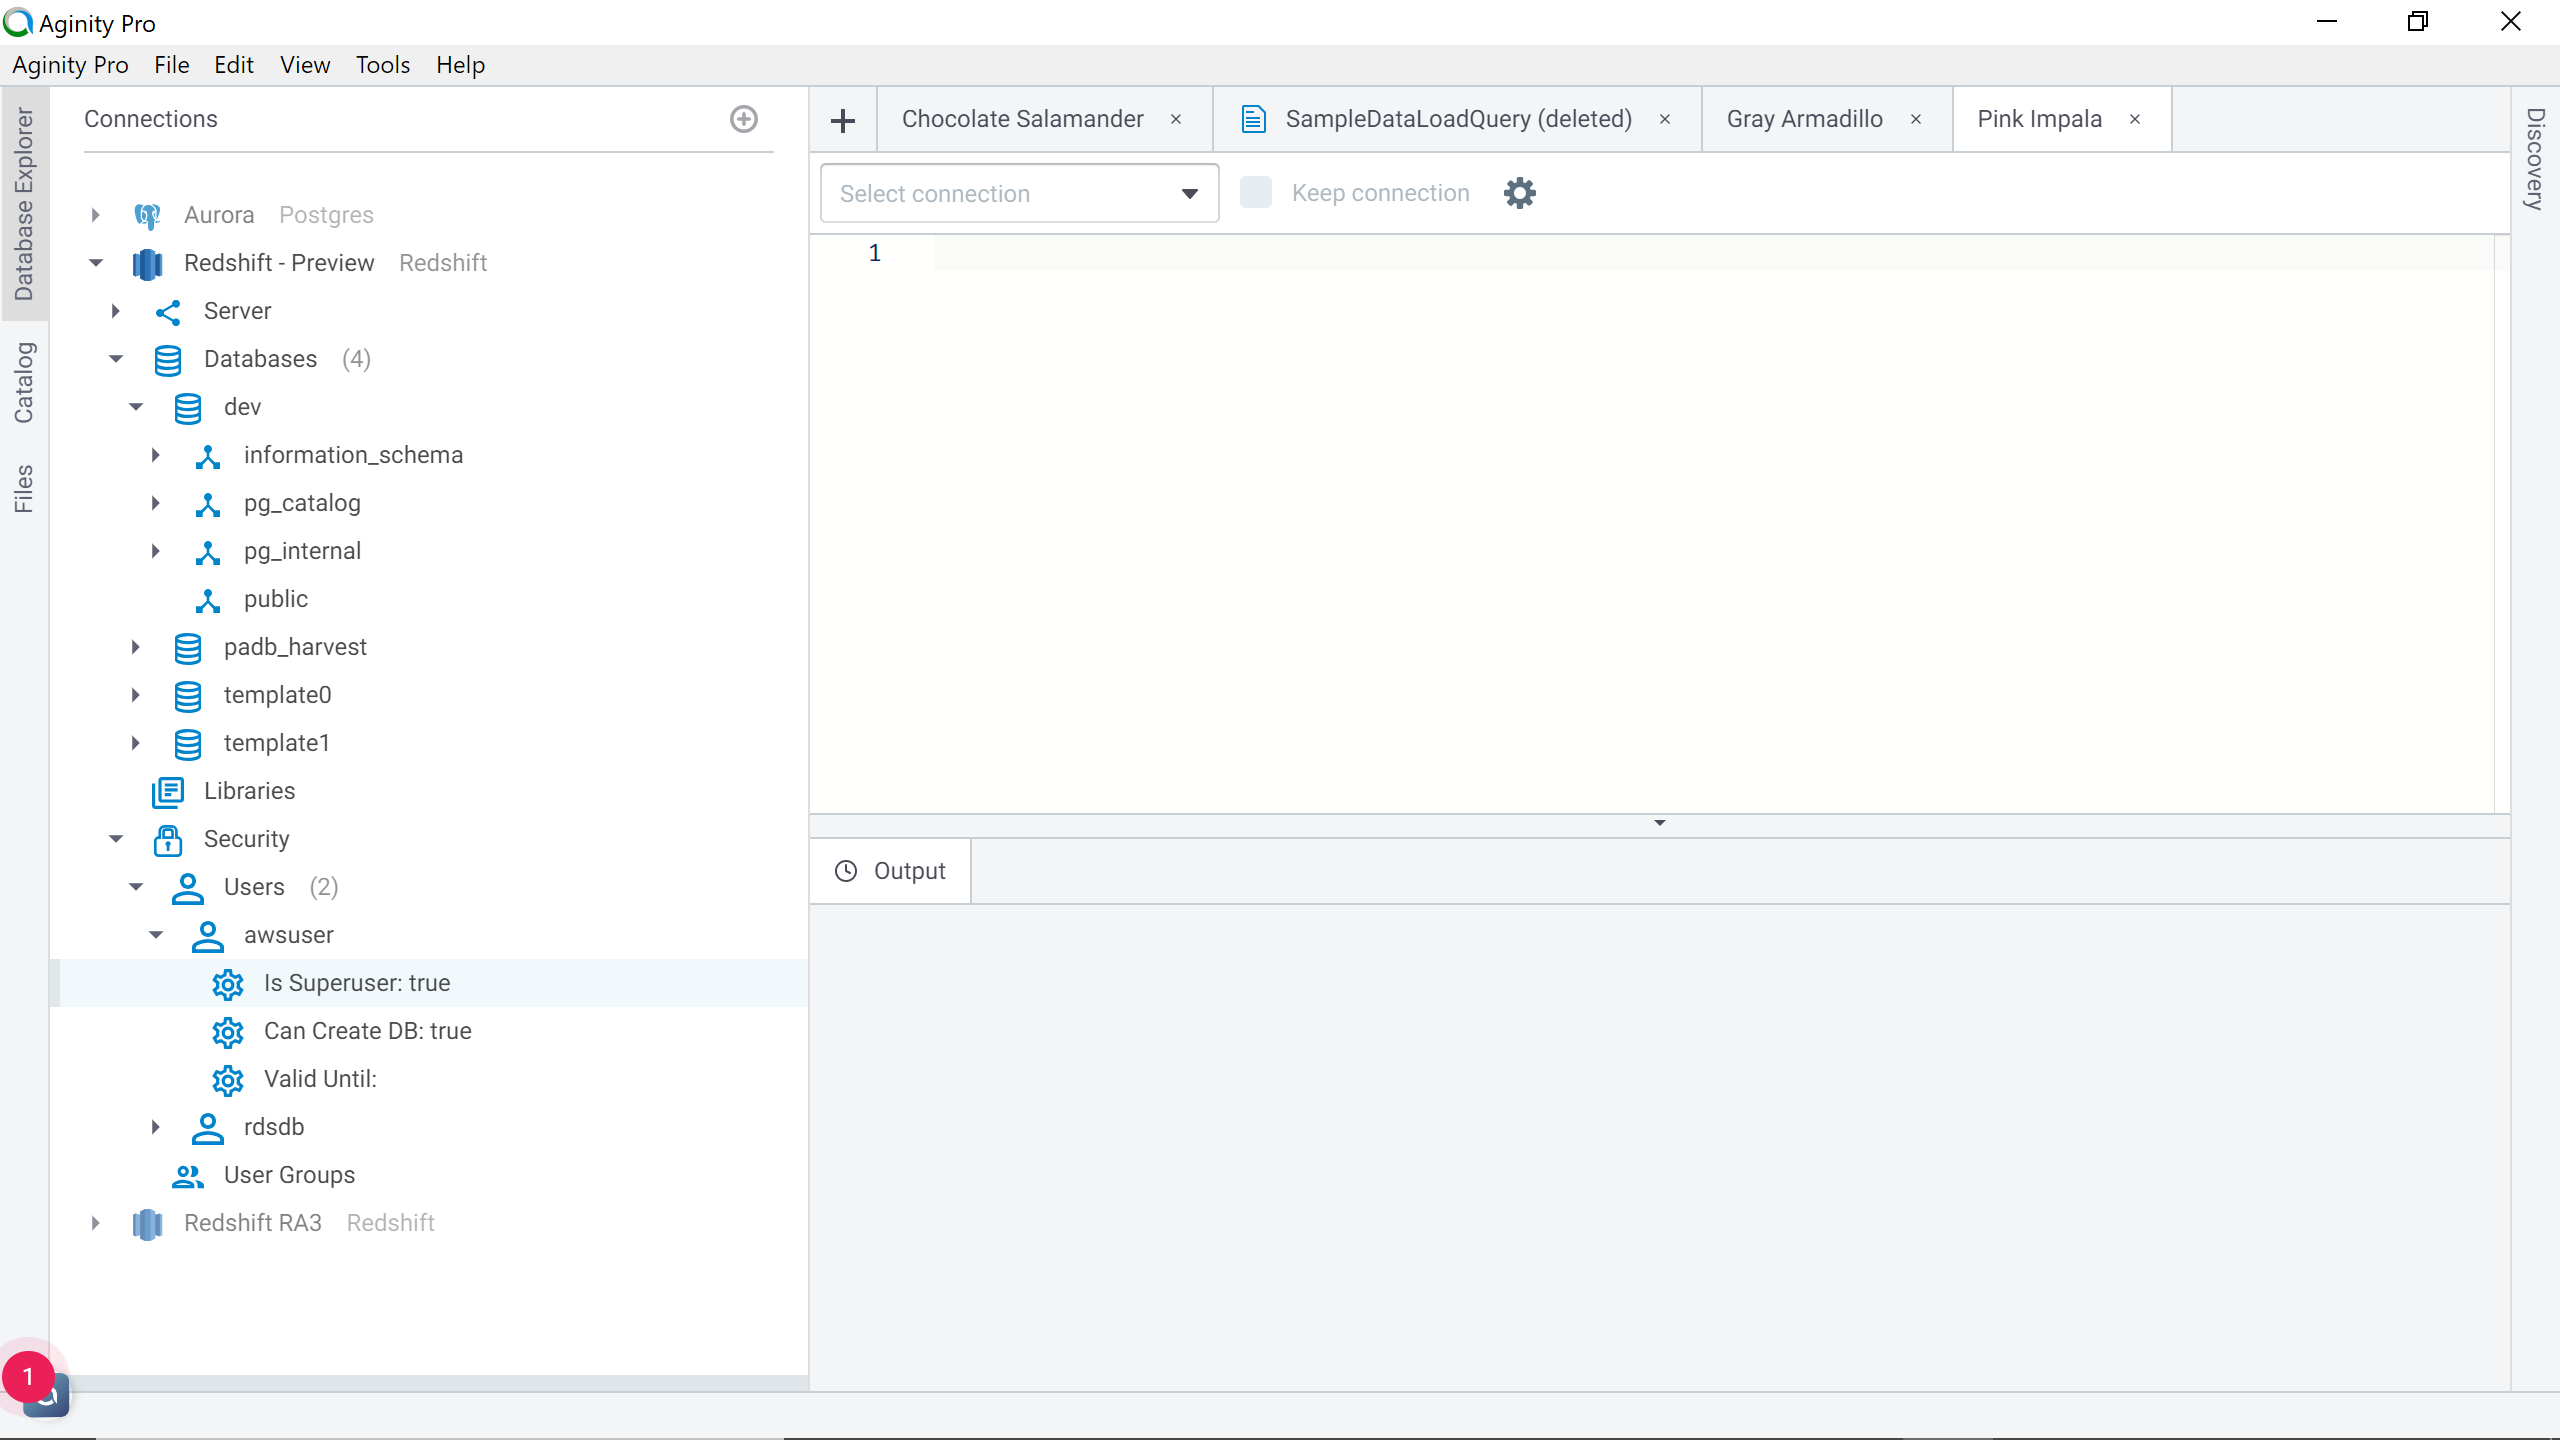
The user and user group related details and other database objects which can be used for administrative purposes can be found listed under the security node as shown below.
可以在安全性节点下找到与用户和用户组相关的详细信息以及可用于管理目的的其他数据库对象,如下所示。
Once the connection is successfully established from IDE to the AWS Redshift cluster endpoint, developers and administrators can conveniently access Redshift from their local machine without the need of logging on to AWS Console every time.
一旦成功建立了从IDE到AWS Redshift集群终端节点的连接,开发人员和管理员就可以方便地从本地计算机访问Redshift,而无需每次都登录到AWS Console。
结论 (Conclusion)
In this article, we understood the process of installing IDEs on the local machine to conveniently access an AWS Redshift cluster. We configured the AWS network to allow traffic from the local machine to the Redshift cluster. And finally, after establishing a successful connection, we learned to open connections to the cluster from the IDE.
在本文中,我们了解了在本地计算机上安装IDE以方便地访问AWS Redshift集群的过程。 我们将AWS网络配置为允许从本地计算机到Redshift集群的流量。 最后,在建立成功的连接之后,我们学会了从IDE打开与集群的连接。
翻译自: https://www.sqlshack.com/access-aws-redshift-from-a-locally-installed-ide/
aws redshift


 525
525

 被折叠的 条评论
为什么被折叠?
被折叠的 条评论
为什么被折叠?
 到【灌水乐园】发言


