azure备份存储层分类
With the evolution of the Cloud, specifically talking about Azure, SQL Server team started to take advantage of the new opened horizon. We already discussed pros and cons of send backups to Azure, now let’s check how to do this!
随着云的发展,特别是谈到Azure,SQL Server团队开始利用新的开放视野。 我们已经讨论了将备份发送到Azure的利弊,现在让我们来看看如何做!
Following the “Hybrid Scenarios series”, we already discussed about the connectivity options, and pros and cons of store our backup files in Azure.
在“混合方案系列”之后,我们已经讨论了连接选项以及在Azure中存储备份文件的优缺点。
In this article, we will specifically talk about the two options that we currently have, involving Azure: Blob Storage and Managed Backups.
在本文中,我们将专门讨论当前涉及Azure的两个选项:Blob存储和托管备份。
In the end of the day, you will have your SQL Server database’s backup safe, in Azure, but there are some differences that distinguish (a lot) both options.
最终,您将在Azure中获得SQL Server数据库的备份安全,但是有些区别可以(完全)区分这两种选择。
Let’s check it out!
让我们来看看!
备份到Azure存储 ( Backup to Azure Storage )
This is the first option that we have, and if your SQL Server version is >= 2012 SP1 CU2, you are covered and can take advantage of this!
这是我们的第一个选择,如果您SQL Server版本> = 2012 SP1 CU2,则可以满足您的要求,并可以利用此功能!
This solution is based on Azure Storage account, so the first step would be create an Azure Storage account. In order to perform this, just go to the Azure Portal and select New > Data Services > Storage > Quick Create
此解决方案基于Azure存储帐户,因此第一步是创建一个Azure存储帐户。 为了执行此操作,只需转到Azure门户并选择“新建”>“数据服务”>“存储”>“快速创建”
Fill all the details and click on ”Create Storage Account”:
填写所有详细信息,然后单击“创建存储帐户”:
Wait for its creation…
等待其创建…
After the creation, go to your Storage Account, and select “Containers” and the option “Create Container”:
创建后,转到您的存储帐户,然后选择“容器”和选项“创建容器”:
Fill the container’s name, and proceed:
填写容器的名称,然后继续:
The backup files will be stored in Azure Storage as a Binary Large Object (Blob). A file of any type and size.
备份文件将作为二进制大对象(Blob)存储在Azure存储中。 任何类型和大小的文件。
Now, go to this link and download your Publishing Profile.
现在,转到此链接并下载您的发布配置文件。
Save the file in your server, and create the Credential. One of the ways to perform this, is proceed as you would perform a backup, as follows:
将文件保存在服务器中,然后创建凭据。 执行此操作的方法之一是继续执行备份,如下所示:
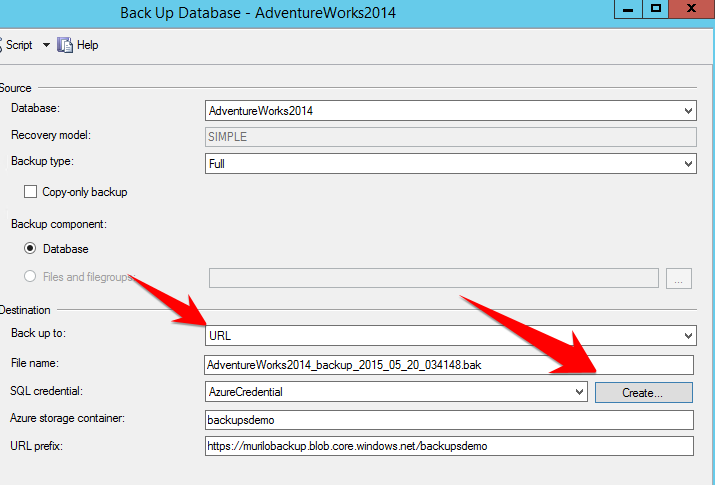
In the backup configuration panel, select the option to Backup to URL and click in the “Create” button (PS: In the image, I already have a credential created):
在备份配置面板中,选择“备份到URL”选项,然后单击“创建”按钮(PS:在图像中,我已经创建了凭据):
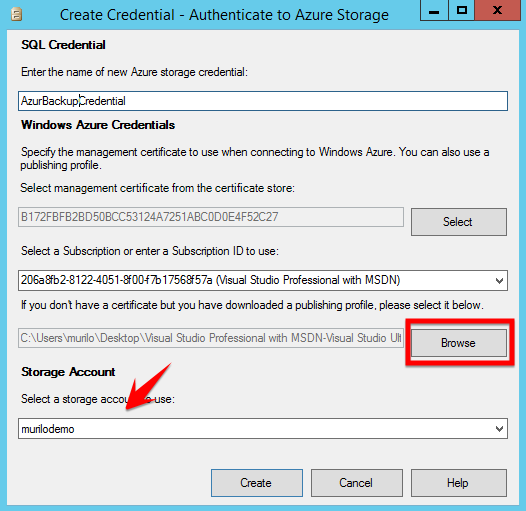
The following windows will be opened. Click in “Browse” and select the Publishing Profile that you just downloaded. Select the Storage account and click on create:
将打开以下窗口。 单击“浏览”,然后选择您刚刚下载的发布配置文件。 选择存储帐户,然后单击创建:

After that, you will notice that the credential will be created, if you check under Security -> Credentials, in SSMS.
此后,如果在SSMS中的“安全性”->“凭据”下进行检查,您将注意到将创建凭据。
Going back to the Backup window, you will notice that you already have a credential in the list-box labeled as “SQL Credential”. Jut select the created one and fill the “Azure storage container” field, with the one that you created in the beginning of this guide.
回到“备份”窗口,您会注意到列表框中已经有一个凭证,标为“ SQL凭证”。 突出选择已创建的容器,然后在“ Azure存储容器”字段中填写在本指南开头创建的容器。
After that step, you are ready to use Azure Blob Storage as your backup’s container!
完成该步骤之后,您就可以使用Azure Blob存储作为备份的容器了!
Let’s generate the backup script, from the UI:
让我们从用户界面生成备份脚本:
Notice that now we are referring to an URL as backup destination and also passing the created credential as the one holding the information to connect and write into that Azure container.
请注意,现在我们将URL称为备份目标,还将创建的凭据传递为包含要连接并写入该Azure容器的信息的凭据。
What about maintenance plans? I, personally, don’t like to use the native SSMS Maintenance Plans. I rather prefer the nice scripts from Ola Hallengren, SQL Server MVP.
维护计划如何? 我个人不喜欢使用本机SSMS维护计划。 我更喜欢SQL Server MVP Ola Hallengren的漂亮脚本 。
However, the maintenance plans are there, and a lot of people use this… And here’s a good news for the maintenance plan’s lovers: This is following SQL Server’s evolution. By adding a “Back Up Database Task” we can set, in the “General” tab, to backup to an URL.
但是,维护计划在那里,并且有很多人使用它……这对维护计划的爱好者来说是个好消息:这是SQL Server的发展之路。 通过添加“备份数据库任务”,我们可以在“常规”选项卡中设置为备份到URL。
By choosing the URL option, you will need to set the “Azure Storage Container” in the “Destination” tab.
通过选择URL选项,您将需要在“目标”选项卡中设置“ Azure存储容器”。
After that, just follow as normal and set the other options.
之后,只需照常操作并设置其他选项即可。
Well, this is pretty much it about backup to Azure Storage. So now we can go ahead and check the next option…
好吧,这几乎与备份到Azure存储有关。 现在我们可以继续检查下一个选项…
Managed Backups
托管备份
As the option that we just saw, the objective of Managed Backups is keep the backup files in the Azure Blob Storage. So what is the difference here?
作为我们刚刚看到的选项,托管备份的目的是将备份文件保留在Azure Blob存储中。 那么这里有什么区别?
To start, the Managed Backups are available from SQL Server 2014 only (not in SQL Server 2012) and there’s an additional gain here…In order to explain that gain, let’s see an example.
首先,托管备份仅在SQL Server 2014中可用(在SQL Server 2012中不可用),这里还有一个额外的好处……为了解释这一好处,让我们看一个示例。
I have the following database:
我有以下数据库:
That database is set in FULL Recovery Model. The used backup strategy is:
该数据库在“完全恢复模型”中设置。 使用的备份策略是:
- Daily FULL backups 每日完整备份
- Transaction log backups at every 15 minutes 每15分钟备份一次事务日志
- The backup retention policy is 2 months 备份保留政策为2个月
<Attention this is not a real scenario :)>
Is that strategy right? Nobody cares, this is just a company policy, and even if this database is not modified more than one time per week, we need to follow this rules.
<注意,这不是真实情况:)>
那策略正确吗? 没人在乎,这只是公司的政策,即使每周对这个数据库的修改不超过一次,我们也需要遵守此规则。
Here is the result of the constant backups:
这是不断备份的结果:
We have almost no activity in the database, but log backups at every 15 minutes, generate files of 1.15 Mb even if there’s nothing new.
我们数据库中几乎没有活动,但是每15分钟进行一次日志备份,即使没有新内容,也会生成1.15 Mb的文件。
In the end of the day we would have 96 transaction log backups, and even without activity, those files will be taking, at least, 110 Mb! And I’m not counting with the FULL backup here… With a 2 months retention policy, we will have 6.6 GB of useless backups.
最终,我们将有96个事务日志备份,即使没有活动,这些文件也将至少占用110 Mb! 而且我在这里还没有指望完整备份……通过2个月的保留政策,我们将拥有6.6 GB的无用备份。
The DBAs already alerted the management about this, but there’s a problem: nobody can predict when the database activity is going to happen…And normally when it happens, a lot of changes are made.
DBA已经就此事向管理部门发出了警报,但是存在一个问题:没有人能预测何时数据库活动将要发生……通常情况下,将进行许多更改。
So, to be safe, they decided to keep it this way.
</End of that fabulous scenario>
因此,为了安全起见,他们决定保持这种方式。
</精彩的场景结束>
Why all that story?? Just to show the utility of the new Managed Backup! Apart of all the advantages in send the backup files to Azure, this feature has also the capability of automate the backups, based in a retention period! This retention period can variate from 1 to 30 days.
为什么所有这些故事? 只是为了展示新的托管备份的实用程序! 除了将备份文件发送到Azure的所有优点之外,此功能还具有在保留期内自动执行备份的功能! 保留期限可以从1到30天不等。
The Managed Backup can be enabled from the SSMS, just going to Management, and clicking on “Configure” option.
可以从SSMS启用托管备份,只需转到“管理”,然后单击“配置”选项。
Just mark the “Enable managed backup” option, select the retention period, the credential, click ok, and we are done!
只需标记“启用托管备份”选项,选择保留期限,凭据,然后单击“确定”,我们就完成了!
How it works?
这个怎么运作?
We can split this in two parts:
我们可以将其分为两部分:
Basically, a full backup is made under one of the following situations:
基本上,在以下情况之一下进行完整备份:- When Managed backup is enabled 启用托管备份时
- The log grows more than 1Gb 日志增长超过1Gb
- The last FULL Backup is 1 week older 上次完整备份是1周大
When the log backup chain breaks
日志备份链中断时
There are also some conditions that trigger a t-log backup:
还有一些情况会触发t-log备份:- When a FULL Backup is performed 执行完全备份时
- When there are no log backups (ever) 没有日志备份时(永远)
- If the t-log grows more than 5Mb 如果t-log增长超过5Mb
As you can see, based on simple events, Microsoft automated the backup process, and if you think, this makes sense! I’d like to have it working for on-premises as well 🙂
如您所见,Microsoft根据简单事件自动执行了备份过程,如果您认为这很有意义! 我也想让它在本地工作
Something important, when we activate the feature, the already existing database won’t be added to the Managed Backups radar, we need to do this manually.
重要的是,当我们激活该功能时,不会将现有数据库添加到“托管备份”雷达中,我们需要手动执行此操作。
The following code is enabling the Managed Backups in the “DemoDB” database:
以下代码在“ DemoDB”数据库中启用托管备份:
USE msdb;
GO
EXEC smart_admin.sp_set_db_backup
                @database_name='DemoDB'
                ,@enable_backup=1
                ,@retention_days =30
                ,@credential_name ='AzureCredential'
                ,@encryption_algorithm ='AES_256'
                ,@encryptor_type= 'Certificate'
                ,@encryptor_name='MyBackupCert'
GO
For all newly created database, it will take care.
If you want to disable the backups in a specific database, just run the following:
对于所有新创建的数据库,它将非常小心。
如果要禁用特定数据库中的备份,只需运行以下命令:
Use msdb;
Go
EXEC smart_admin.sp_set_db_backup
                @database_name='<DATABASE_NAME>'
                ,@enable_backup=0;
GO
You can find more details in the official documentation, including some functions that help us manage this feature, as we do not have much options in the SSMS UI:
SQL Server Managed Backup to Microsoft Azure
您可以在官方文档中找到更多详细信息,包括一些有助于我们管理此功能的功能,因为我们在SSMS UI中没有太多选择:
SQL Server托管备份到Microsoft Azure
I hope this was useful! I’m going to publish more articles, showing how to integrate on-prem and Azure.
我希望这是有用的! 我将发布更多文章,展示如何集成本地和Azure。
Thank you!
谢谢!
翻译自: https://www.sqlshack.com/backups-to-azure-how-can-i-do-this/
azure备份存储层分类


 130
130

 被折叠的 条评论
为什么被折叠?


