


桌面应用程序 azure
Azure is a simple and cheap way to have a Database. You can rent your Azure Database of 2 GB per 5 USD per month. That is a very cheap price. You can also administer your Database from your Android or your iPhone, which is very interesting.
Azure是拥有数据库的一种简单且便宜的方法。 您可以每月每5 USD租用2 GB的Azure数据库。 那是非常便宜的价格。 您也可以从Android或iPhone管理数据库,这非常有趣。
It is also possible to create your Windows Application using Visual Studio and connect to SQL Azure. In this new chapter, we are going to create Windows application in C# and connect to a SQL Azure database. We are going to retrieve the information of a table stored in Azure in our Windows application.
也可以使用Visual Studio创建Windows应用程序并连接到SQL Azure。 在这一新的章节中,我们将使用C#创建Windows应用程序并连接到SQL Azure数据库。 我们将在Windows应用程序中检索存储在Azure中的表的信息。
要求 ( Requirements )
- An Azure subscription.Azure订阅 。
- An Azure Database Installed已安装Azure数据库
- The Visual Studio installed. In this example, the Visual Studio 2015 was used. 安装了Visual Studio。 在此示例中,使用了Visual Studio 2015。
入门 ( Getting started )
Open the Visual Studio, go to the Server Explorer pane and open the SQL Server Object Explorer for the database created (see the requirements if you do not have a SQL Azure installed):
打开Visual Studio,转到“服务器资源管理器”窗格,然后为创建的数据库打开“ SQL Server对象资源管理器”(如果未安装SQL Azure,请参阅要求):
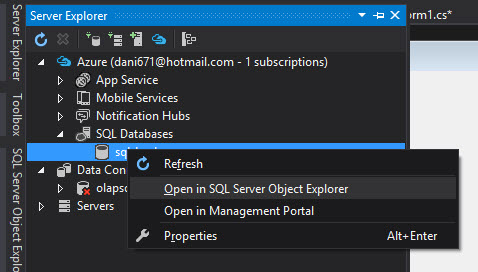
Figure 1. The Server Explorer 图1.服务器资源管理器 In the SQL Server Object explorer go to the Server>Databases>the database created>Tables and right click and select the Add New Table option:
在SQL Server对象资源管理器中,转到“ 服务器”>“数据库”>“创建的数据库”>“表”,然后右键单击并选择“ 添加新表”选项:
Figure 2. The SQL Server Object Explorer 图2. SQL Server对象资源管理器 Create a table and press the Update button. In this sample, we will create a table named Employees. There are few steps after pressing the update icon that were already explained in the previous chapter. Also, insert some data in the table:
创建一个表,然后按更新按钮。 在此示例中,我们将创建一个名为Employees的表。 按下更新图标后,只需执行上一章中介绍的几个步骤。 另外,在表中插入一些数据:
CREATE TABLE [dbo].[Employees] (
    [Id]        INT        NOT NULL,
    [Firstname] NCHAR (20) NULL,
    [Lastname]  NCHAR (20) NULL,
    [Phone]     NCHAR (15) NULL,
    PRIMARY KEY CLUSTERED ([Id] ASC)
);
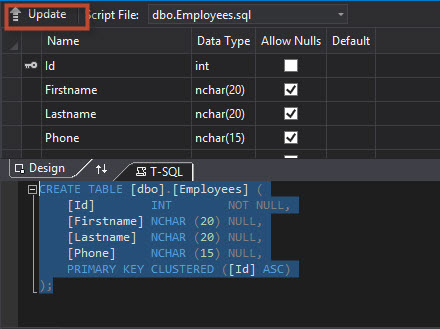
Figure 3. Creating a new table in SQL Azure 图3.在SQL Azure中创建一个新表 To create the Project go to File>New>Project and select Windows Forms Application. You can create Console applications, Web applications, WPF applications, etc. In this example, we will create a Windows Application:
要创建项目,请转到文件>新建>项目,然后选择Windows窗体应用程序 。 您可以创建控制台应用程序,Web应用程序,WPF应用程序等。在此示例中,我们将创建Windows应用程序:
Figure 4. Creating a New Project 图4.创建一个新项目 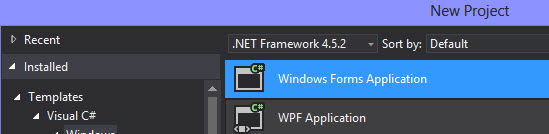
Figure 5 . The Windows Forms Application 图5 。 Windows窗体应用程序 In the Toolbox, drag and drop a Button and a Data Grid View:
在工具箱中,拖放一个按钮和一个数据网格视图 :
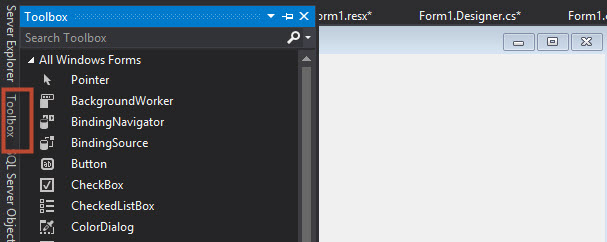
Figure 6 . The Toolbox 图6 。 工具箱 Your application will be similar to the following one:
您的应用程序将类似于以下应用程序:
Figure 7 . The Windows Form 图7 。 Windows表格 Now, change the text of the Form and the text and also change the DataGridView name:
现在,更改Form和文本的文本,还更改DataGridView名称:
Form1.Text= SQLSHACK SAMPLE WITH AZURE
Button1.Text= Fill with Azure Data
DataGridView.Name=dgvForm1.Text = 带有SQLURESQLSHACK示例
Button1.Text = 用Azure数据填充
DataGridView.Name = dgvThe form will now look like as follows:
现在,该表格将如下所示:
Figure 8 . The Windows Form changed 图8 。 Windows窗体已更改 Now, we are going to create the connection information in the App.config file. The App.config file is a XML file used to store configuration. In this example, we will store the connection string. Go to the App.config in the solution explorer and double click it.
现在,我们将在App.config文件中创建连接信息。 App.config文件是用于存储配置的XML文件。 在此示例中,我们将存储连接字符串。 在解决方案资源管理器中转到App.config,然后双击它。
Figure 9. The 图9. App.config App.config In the App.config, write this code in order to add the SQL Azure connection information:
在App.config中,编写以下代码以添加SQL Azure连接信息:
<?xml version="1.0" encoding="utf-8" ?>
<configuration>
  <startup>
    <supportedRuntime version="v4.0" sku=".NETFramework,Version=v4.5" />
  </startup>

  <connectionStrings>
    <clear />
    <add name="MyConnection"
    connectionString="Server=tcp:myservertested.database.windows.net,1433;Database=sqlshack;User ID=daniel@myservertested;Password=ThisIsmyPwd123;Encrypt=True;TrustServerCertificate=False;Connection Timeout=30;" />
  </connectionStrings>
</configuration>
The most important part of this code is the name specified (add name=”MyConnection”) because we will call this connection using that name.
此代码最重要的部分是指定的名称(添加名称=“ MyConnection”),因为我们将使用该名称来调用此连接。
The rest is the connection string. We are using a TCP connection to a server named myservertested.database.windows.net. The port used is the 1433 and the name of the database is sqlschack. The User used to connect is specified when the azure database was created. In this example, the user name is daniel@myservertested, the password is ThisIsmyPwed123 and the encryption is set to true and the Trust Server Certificate is set to false. The Timeout is 30 seconds.
其余的是连接字符串。 我们正在使用TCP连接到名为myservertested.database.windows.net的服务器。 使用的端口是1433,数据库的名称是sqlschack。 创建Azure数据库时指定用于连接的用户。 在此示例中,用户名是daniel @ myservertested,密码是ThisIsmyPwed123,加密设置为true,而信任服务器证书设置为false。 超时为30秒。
Now let’s add code to the button. Double click on the button to add some code:
现在让我们向按钮添加代码。 双击按钮以添加一些代码:
Figure 10. Adding code to the button 图10.将代码添加到按钮 Write this code in order to fill the datagridview with the SQL Azure information:
编写以下代码,以便用SQL Azure信息填充datagridview:
        private void button1_Click(object sender, EventArgs e)
        {
            //Create a connection calling the App.config
string conn = ConfigurationManager.ConnectionStrings["MyConnection"].ConnectionString;
            //The query to use
            SqlConnection connection = new SqlConnection(conn);
            //Create a Data Adapter
            SqlDataAdapter dadapter = new SqlDataAdapter(query, connection);
            //Create the dataset
            DataSet ds = new DataSet();
            //Open the connection
            connection.Open();
  //Fill the DatSet with the adapter information                  dadapter.Fill(ds, "employees");
            connection.Close();
            //Bind the datagridview with the data set
            dgv.DataSource = ds;
            dgv.DataMember = "employees";
      }
Let’s analyze the code:
让我们分析一下代码:
string conn =
ConfigurationManager.ConnectionStrings["MyConnection"].ConnectionString;
This line creates a string with the connection of the app.config file created on step 10. Note that the name MyConnection must match with the name of the app.config file.
此行创建一个与在步骤10中创建的app.config文件的连接的字符串。请注意,名称MyConnection必须与app.config文件的名称匹配。
string query = "SELECT * FROM employees";We are storing the query in a string variable.
我们将查询存储在字符串变量中。
SqlConnection connection = new SqlConnection(conn);This line is just creating a connection using the string created before.
该行仅使用之前创建的字符串创建连接。
SqlDataAdapter dadapter = new SqlDataAdapter(query, connection);The SqlDataAdapter is the bridge between SQL Server and a DataSet. We need to specify the query and connection for the SqlDataAdapter.
SqlDataAdapter是SQL Server和数据集之间的桥梁。 我们需要为SqlDataAdapter指定查询和连接。
DataSet ds = new DataSet();We are creating a DataSet here. The dataset is an in-memory cache of data retrieved from a data source
我们在这里创建一个数据集。 数据集是从数据源检索的数据的内存中缓存
connection.Open();
dadapter.Fill(ds, "employees");
connection.Close();
In these 3 lines we are opening the connection and filling the dataset with data of the employees table.
在这3行中,我们打开连接并用employee表的数据填充数据集。
dgv.DataSource = ds;
dgv.DataMember = "employees";
In these two last lines, we are assigning the dataset to the Data Grid view dgv and assigning the employees as the data members
在最后两行中,我们将数据集分配给“数据网格”视图dgv并将雇员作为数据成员
At the top of the code add these lines:
在代码顶部,添加以下行:
using System;
using System.Collections.Generic;
using System.ComponentModel;
using System.Data;
using System.Drawing;
using System.Linq;
using System.Text;
using System.Threading.Tasks;
using System.Windows.Forms;
using System.Data.SqlClient;
using System.Configuration;
By default, only these two lines should be missing:
默认情况下,仅以下两行应缺失:
using System.Data.SqlClient;
using System.Configuration;
These lines are used to connect to SQL Server (SQL Azure in this case) and the Configuration is used to retrieve information from the app.config file.
这些行用于连接到SQL Server(在这种情况下为SQL Azure),并且配置用于从app.config文件中检索信息。
The complete code should be like this:
完整的代码应如下所示:
using System;
using System.Collections.Generic;
using System.ComponentModel;
using System.Data;
using System.Drawing;
using System.Linq;
using System.Text;
using System.Threading.Tasks;
using System.Windows.Forms;
using System.Data.SqlClient;
using System.Configuration;

namespace WindowsFormsApplication1
{
    public partial class Form1 : Form
    {
        public Form1()
        {
            InitializeComponent();
        }

        private void button1_Click(object sender, EventArgs e)
        {
            //Create a connection calling the App.config
            string conn = ConfigurationManager.ConnectionStrings["MyConnection"].ConnectionString;
            //The query to use
            string query = "SELECT * FROM employees";
            SqlConnection connection = new SqlConnection(conn);
            //Create a Data Adapter
            SqlDataAdapter dadapter = new SqlDataAdapter(query, connection);
            //Create the dataset
            DataSet ds = new DataSet();
            //Open the connection
            connection.Open();
            //Fill the Data Adapter
            dadapter.Fill(ds, "employees");
            connection.Close();
            //Bind the datagridview with the data set
            dgv.DataSource = ds;
            dgv.DataMember = "employees";
        }

    }

}
Finally, if it was not added the System.Configuration. In the Solution Explorer, go to references:
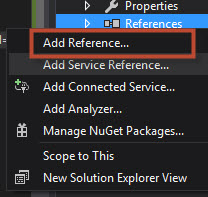
最后,如果未添加System.Configuration。 在解决方案资源管理器中,转到参考 :
Right click on references and select Add Reference:
右键单击参考,然后选择添加参考 :
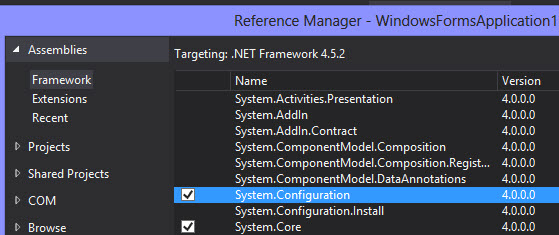
Select the System Configuration. This is necessary to retrieve information from the App.config file:
选择系统配置。 这是从App.config文件中检索信息所必需的:
Once you have the code done, you can start the application:
完成代码后,可以启动应用程序:
Press the Fill with Azure Data and you will be able to see the SQL Azure Data:
按“填充Azure数据”,您将能够看到SQL Azure数据:
结论 ( Conclusion )
In this new article, we created a Windows Application in a local machine that access to the Azure information. You can create applications in C#, Visual Basic J# or any other language to connect to Azure. The process is very simple once you are familiar the Azure Portal.
在这篇新文章中,我们在访问Azure信息的本地计算机上创建了Windows应用程序。 您可以使用C#,Visual Basic J#或任何其他语言创建应用程序以连接到Azure。 熟悉Azure门户后,此过程非常简单。
翻译自: https://www.sqlshack.com/how-to-connect-our-c-application-in-azure/
桌面应用程序 azure


 343
343


 被折叠的 条评论
为什么被折叠?
被折叠的 条评论
为什么被折叠?
 到【灌水乐园】发言


