


java 注释标记
总览 (Overview)
As a writer and content creator, I often use annotation and drawing markup tools to add value to the content I’m creating. You might not think of it as a big deal, but the human brain processes visuals 60,000 times faster than text. Is it true? Probably not. There’s no scientific evidence to back up this figure. However, it’s a fact that humans process visual data better. Therefore, I always try to deliver helpful, value-added content with a lot of visuals suitable for easy reading and understanding.
作为作家和内容创建者,我经常使用批注和图形标记工具为正在创建的内容添加价值。 您可能没有什么大不了的,但是人脑处理视觉图像的速度比文本快60,000倍。 是真的吗 可能不是。 没有科学证据支持这一数字。 但是,事实是人类可以更好地处理视觉数据。 因此,我总是尝试提供有用的增值内容,并提供大量易于阅读和理解的视觉效果。
During my first college days, I was constantly struggling with labs that included creating documentation with screenshots. Making those using the Print Screen option in Windows (labeled PrtScr on the keyboard) was time-consuming. This option captures the entire screen and the screenshot is not saved as a file, but it is just copied to the clipboard. I had to open an image editing tool (such as Microsoft Paint), paste the screenshot in the editor and save the file from there, etc. You get the point.
在上大学的第一天,我一直在努力与实验室合作,包括创建带有截图的文档。 使用Windows中的“打印屏幕”选项(在键盘上标记为PrtScr)进行设置非常耗时。 此选项将捕获整个屏幕,并且屏幕截图不会保存为文件,而只是复制到剪贴板中。 我必须打开图像编辑工具(例如Microsoft Paint),将屏幕截图粘贴到编辑器中,然后从那里保存文件,依此类推。
Fortunately, I come across a tool that made my life much easier. I don’t remember how I got it, did someone recommended it to me, or something else but I’ve been using it since then and it has saved me a lot of time and effort.
幸运的是,我遇到了一个使我的生活更加轻松的工具。 我不记得我是怎么得到它的,有人向我推荐过它,还是其他的东西,但是从那时起我一直在使用它,它节省了我很多时间和精力。
需求/软件 (Requirements/Software)
The tool is called Snagit and it’s a screen capture software that has built-in advanced image editing and screen recording features. To get started, feel free to try the full version of Snagit for 15 days by downloading it from the following links:
该工具称为Snagit ,它是一个屏幕捕获软件,具有内置的高级图像编辑和屏幕录制功能。 要开始使用,请通过以下链接下载Snagit的完整版本,持续15天:
Once Snagit has been downloaded, locate the executable installation file (snagit.exe) and run it. The file is most likely located in the Downloads folder, so open File Explorer and browse to:
下载Snagit后,找到可执行安装文件(snagit.exe)并运行它。 该文件很可能位于“下载”文件夹中,因此打开“文件资源管理器”并浏览至:
C:\Users\YOUR USERNAME\Downloads\
C:\ Users \您的用户名\下载\
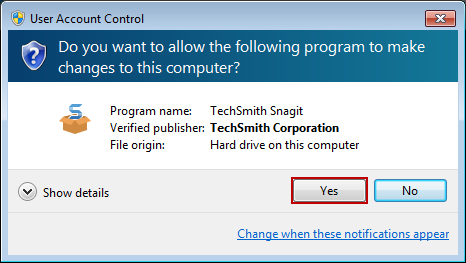
Once you locate the file, double-click it to begin installing Snagit. Depending on your User Account Control (UAC) settings you might be prompted to allow the application to make changes to the computer. Just click Yes to run the installation:
找到文件后,双击它开始安装Snagit。 根据您的用户帐户控制(UAC)设置,可能会提示您允许该应用程序对计算机进行更改。 只需单击“ 是”即可运行安装:
Choose the application desired language from the dropdown menu (1). Check the I accept the License Terms (2) checkbox and click Install (3). Or, click Options (4) to customize the settings:
从下拉菜单(1)中选择应用程序所需的语言。 选中我接受许可条款 (2)复选框,然后单击安装 (3)。 或者,单击选项 (4)以自定义设置:
Once again, after the Install is clicked, you might be prompted to allow the application to make changes to the computer. Just click Yes to continue with the installation:
再一次,单击“安装”后,系统可能会提示您允许应用程序对计算机进行更改。 只需单击“ 是”即可继续安装:
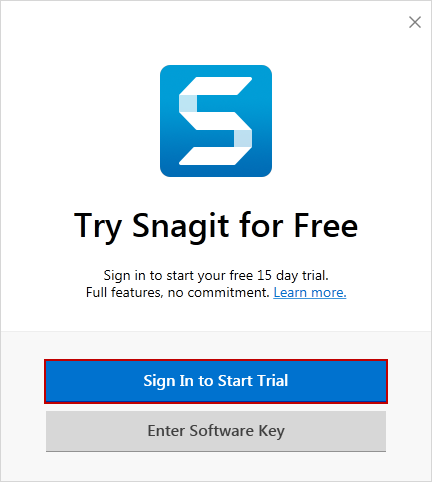
After a few minutes, you’ll be prompted to either start a free trial or enter product key. I’d suggest you try the application first and then if you like it, support the software developers and purchase a license. For now, let’s just choose the Sign In to Start Trial option:
几分钟后,系统会提示您开始免费试用或输入产品密钥。 我建议您先尝试该应用程序,然后如果您喜欢它,请支持软件开发人员并购买许可证。 现在,让我们选择“ 登录以开始试用”选项:
Finish up the registration process and make sure to enter a valid email address because it will be used later for sending the activation key. When the process is finished, Snagit will start:
完成注册过程,并确保输入有效的电子邮件地址,因为该地址将在以后用于发送激活密钥。 该过程完成后,Snagit将启动:
Once installed, Snagit will take over the PrtScr functionality on the system. The very first time, you’ll be introduced to applications features within the onscreen guide:
安装后,Snagit将接管系统上的PrtScr功能。 第一次,您将在屏幕指南中被介绍应用程序功能:
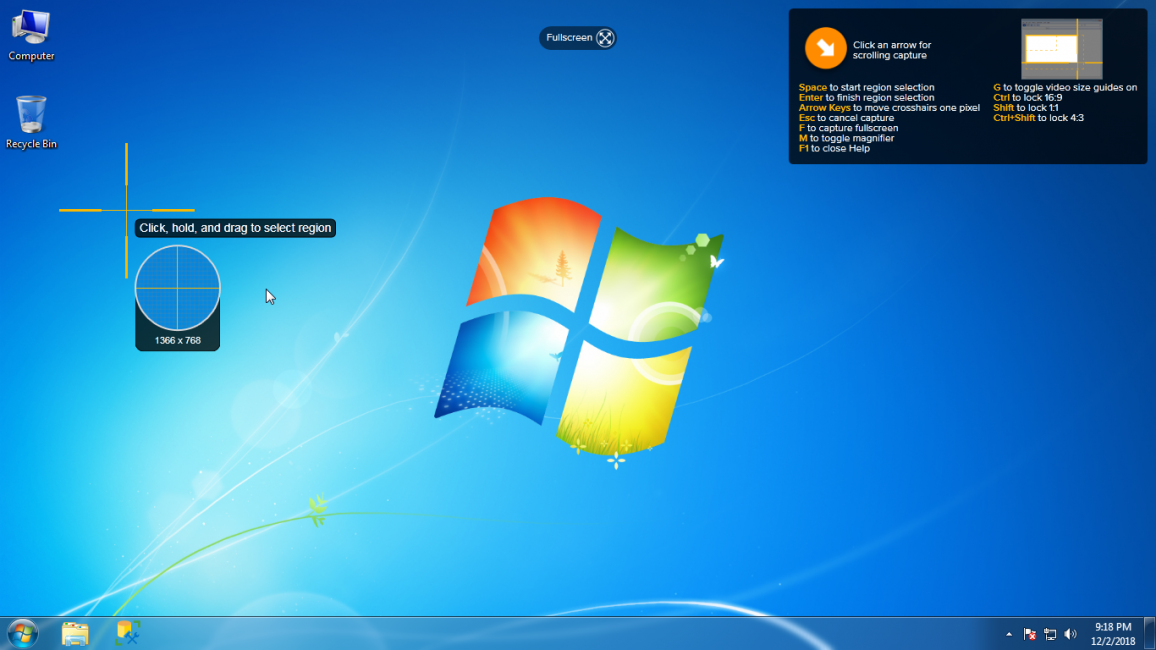
Here’s the list of default keyboard options/shortcuts shown during this step:
这是在此步骤中显示的默认键盘选项/快捷方式的列表:
- Space to start region selection 空间
- Enter to finish region selection 输入以完成区域选择
- Arrow Keys to move crosshairs one pixel 箭头键将十字准线移动一个像素
- Ecs to cancel capture Ecs
- F to capture fullscreen F捕捉全屏
- M to toggle magnifier M切换放大镜
- F1 to close Help F1关闭帮助
- G to toggle video size guides on G开启视频尺寸指南
- Ctrl to lock 16:9 Ctrl锁定16:9
- Shift to lock 1:1 转向锁1:1
- Ctrl+Shift to lock 4:3 Ctrl + Shift锁定4:3
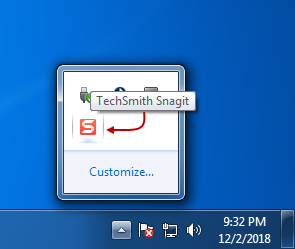
Close (x) Snagit to the notification area and you’ll still be able to use it every time the Print Screen key is used:
关闭(x)Snagit到通知区域,每次使用Print Screen键时,您仍然可以使用它:
From now on, when in need to take a screenshot of anything just hit the Print Screen on your keyboard, click, hold and drag to select a region, window, or scrolling screen:
从现在开始,当需要拍摄任何内容的屏幕截图时,只需按键盘上的“打印屏幕”,单击,按住并拖动以选择区域,窗口或滚动屏幕:
Unlike most of the capturing screen tools, Snagit does not only copies the screenshot to the clipboard but it will also open it (this is configurable) in its full suite of editing tools AKA Snagit Editor. From here, it’s up to you to build custom graphics with a few clicks without skill/knowledge of a designer.
与大多数捕获屏幕工具不同,Snagit不仅将屏幕截图复制到剪贴板,而且还将在其全套编辑工具AKA Snagit Editor中将其打开(可配置)。 从这里开始,您只需单击几下即可构建自定义图形,而无需设计人员的技能/知识。
I personally, always use the same settings and below I’d like to share with you some of my markup techniques that work best for me, best practices, tips, and tricks.
我个人而言,请始终使用相同的设置,以下,我想与您分享一些最适合我的标记技术,最佳做法,技巧和窍门。
色彩 (Colors)
Color is off-red, not true red on bright backgrounds. The color that catches the human eye the most is simply red. Red is the color of power. It gets people’s attention and it holds it, which is why it’s the most popular color for markups. However, I never use the true/bloody red (Hex: #FF0000). Instead, I use a darker shade of red (Hex: #C00000) which is more of a cherry color shade. True red indicates an error, something that’s wrong, etc. but a darker shade is less robust and still clearly visible on light colors – most importantly it does not cause eye strain:
颜色是偏红色的,在明亮的背景上不是真正的红色。 最吸引人眼的颜色就是红色。 红色是力量的颜色。 它引起了人们的注意并得到了关注,这就是为什么它是最流行的标记颜色。 但是,我从不使用真/血红色(十六进制:#FF0000)。 相反,我使用了较深的红色阴影(十六进制:#C00000),它更像是樱桃色阴影。 真实的红色表示错误,错误的地方等,但是较深的阴影不太牢固,在浅色下仍清晰可见–最重要的是,它不会引起眼睛疲劳:
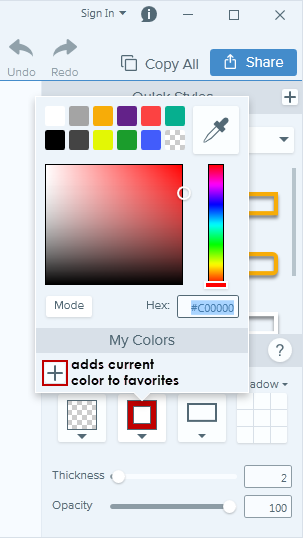
In Snagit, this can be defined for all tools. Simply select a tool from the toolbar, and then you’ll see its properties on the right pane where we can customize the look and feel of text and all other annotations. For the Shape tool, choose the following setting:
在Snagit中,可以为所有工具定义它。 只需从工具栏选择一个工具,然后您将在右窗格中看到其属性,我们可以在其中自定义文本和所有其他注释的外观。 对于“形状”工具,选择以下设置:
- Fill = transparent 填充 =透明
- Outline = Hex: #C00000 轮廓 =十六进制:#C00000
- Shape = sharp-cornered stroked rectangles 形状 =尖角笔触矩形
- Shadow = no shadow (this applies for everything) 阴影 =无阴影(这适用于所有情况)
- Thickness = 2px, and Opacity = 100% 厚度 = 2像素,不透明度= 100%
直与弯 (Straight vs curved)
Often there are curved, vs straight lines – I only use straight lines when two objects are too close so there’s not enough space to make the bezier curve. I also try to avoid dead spaces. When working in SSMS/VS, I move panes around trying to bring elements closer and at the same time show up everything that is needed. There’s no need to take a shot of the whole screen just to show 1/4 of it. In most cases, I make the bezier curves symmetrical, from one side to another, trying to “avoid” elements on the actual shot and use the empty spaces as much as possible:
经常有弯曲的vs.直线–我仅在两个物体太靠近时才使用直线,因此没有足够的空间来绘制贝塞尔曲线。 我还尝试避免死角。 在SSMS / VS中工作时,我四处移动窗格,试图使元素更接近,同时显示所需的所有内容。 无需拍摄整个屏幕即可显示1/4。 在大多数情况下,我使贝塞尔曲线从一侧到另一侧对称,尝试“避免”实际镜头中的元素,并尽可能使用空白空间:
箭 (Arrows)
For the Arrow tool, choose the following setting:
对于箭头工具,选择以下设置:
- Color = Hex: #C00000 颜色 =十六进制:#C00000
- Width = 2px 宽度 = 2像素
- Opacity = 100% 不透明度 = 100%
- Start size = 4px 起始尺寸 = 4px
- End size = 4px
- 结束尺寸 = 4 像素
- Bezier Curve set to enabled for 99% cases Bezier曲线设置为启用99%的情况
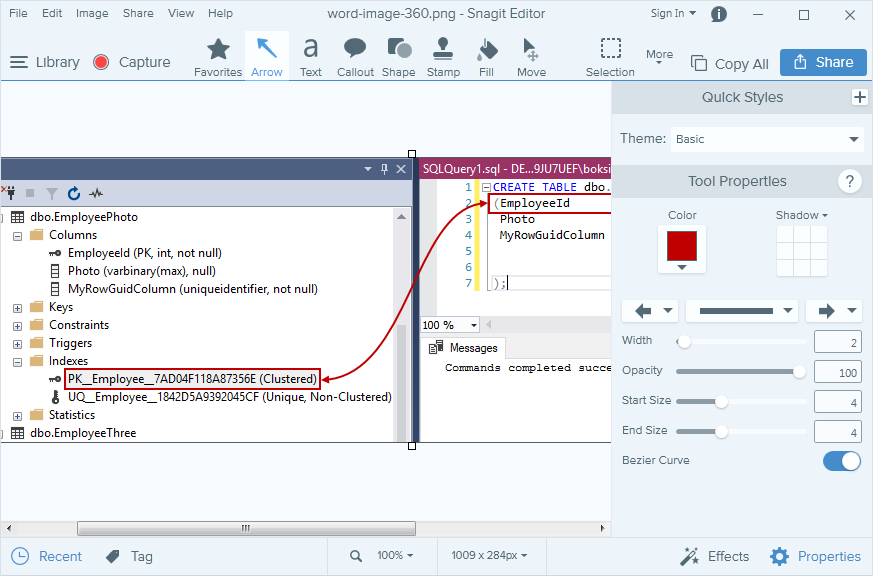
In the example above, I used arrow ending on both sides only because the elements are dependent on each other (one creates other). But in most cases, single side is preferable in which case you’d have to specify what end do you want. When you select any other than the arrow, the Start size option will be grayed out (not configurable):
在上面的示例中,我仅在两边使用箭头,这是因为元素相互依赖(一个相互创建)。 但是在大多数情况下,最好使用单面,在这种情况下,您必须指定想要的目标。 当您选择除箭头以外的任何其他位置时,“开始大小”选项将显示为灰色(不可配置):
In general, try to make better arrow tips – they need to be intuitive, showing connections, steps, etc.
通常,尝试做出更好的箭头提示-它们必须直观,显示连接,步骤等。
不同的背景颜色 (Different background colors)
White color on dark theme – As it can be seen below, I use pure write (Hex: #FFFFFF) on the shot with a dark background because any red on the dark theme is just wrong. This applies to every shape, and it’s always preferable to use applications set to dark there if supported. Except for the color, all other settings are the same as described above:
深色主题上为白色–如下所示,我在深色背景的镜头上使用纯写(十六进制:#FFFFFF),因为深色主题上的任何红色都是错误的。 这适用于每种形状,如果有支持,最好使用在那里设置为深色的应用程序。 除颜色外,所有其他设置与上述相同:
注释文本–是否带框 (Annotating text – box or not)
If you have to add text to your shot to make it more intuitive, it’s advisable to put the text in the box:
如果您必须在镜头中添加文字以使其更直观,建议将文字放在框中:
In some cases, you can fill the text box and change the text color to appropriate color. This is a personal choice/preference and feel free to use either of those:
在某些情况下,您可以填充文本框并将文本颜色更改为适当的颜色。 这是个人选择/偏好,可以随意使用以下任何一种:
For the text in general, I use the following setting:
对于一般的文本,我使用以下设置:
- Fill = pure white on dark backgrounds and pure black on white backgrounds 填充 =在深色背景上为纯白色,在白色背景上为纯黑色
- Outline = none 轮廓 =无
- Shadow = none 阴影 =无
- Font = Century Gothic 字体 =世纪哥特式
- Font Size = 10px 字体大小 = 10像素
- Line Width = 0% 线宽 = 0%
- Opacity = 100% 不透明度 = 100%
- Padding = 0% 填充 = 0%
技巧和窍门 (Tips and Tricks)
Use the Basic theme across all tools to avoid inconsistency:
在所有工具中使用“基本”主题可以避免不一致:
If you don’t need to copy the screenshot to the clipboard for pasting into another program or location after capture, disable it (this option works independently from All-in-one and Image settings):
如果不需要在捕获后将屏幕快照复制到剪贴板以粘贴到另一个程序或位置,请禁用它(此选项独立于“一体机”和“图像”设置):

Try to avoid cursor when taking the screenshot. If you, however, take a screenshot with it, you can easily remove it by selecting the cursor in the Editor and hitting the delete key:
截屏时请尽量避免将光标移开。 但是,如果要使用屏幕截图,则可以通过在编辑器中选择光标并按Delete键来轻松删除它:
Below is a short description of the commonly used tools and what they do:
以下是常用工具及其作用的简短说明:
- Arrow – adds arrows to an image 箭头 –向图像添加箭头
- Text – adds plain text 文本 -添加纯文本
- Callout – adds annotations with text 标注 -添加带有文字的注释
- Shape – adds shape 形状 –增加形状
- Crop – removes unwanted areas from the edges of an image 裁剪 –去除图像边缘上不需要的区域
- Cut Out – deletes a vertical or horizontal section of an image and join the two pieces together (great for eliminating dead spaces) 剪切 –删除图像的垂直或水平部分,并将两部分连接在一起(用于消除死角)
- Step – adds a series of numbers or letters in sequence 步骤 –按顺序添加一系列数字或字母
- Highlighter – highlights a rectangular area 荧光笔 –突出显示矩形区域
I hope you found this article helpful. Happy capturing and markup of the screenshots!
希望本文对您有所帮助。 截图的愉快捕获和标记!
Useful links:
有用的链接:
- Introduction to Snagit Snagit简介
- System Requirements 系统要求
- Uninstall on Windows or Mac 在Windows或Mac上卸载
- License Agreement 许可协议
- Privacy Policy 隐私政策
- Enter Your Software Key 输入您的软件密钥
翻译自: https://www.sqlshack.com/how-to-markup-annotate-content-like-a-boss/
java 注释标记


 3015
3015


 被折叠的 条评论
为什么被折叠?
被折叠的 条评论
为什么被折叠?
 到【灌水乐园】发言


