


sql azure 语法
In this article, we will review how to create a Kubernetes cluster in Azure Kubernetes Service, provision the persistent volume to store the database files and deploy SQL server on Kubernetes cluster.
在本文中,我们将回顾如何在Azure Kubernetes服务中创建Kubernetes群集,提供持久卷以存储数据库文件以及在Kubernetes群集上部署SQL Server。
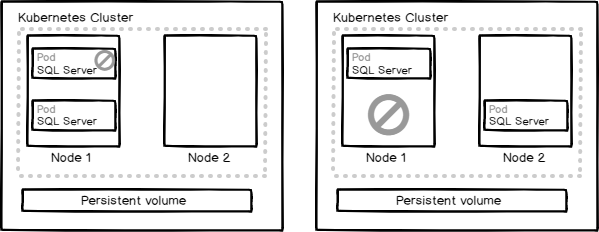
Kubernetes is a container orchestration tool which automates deploying, scaling and operating containers. SQL Server on Kubernetes cluster with persistent volume is like SQL Server failover cluster instance with the shared disk. In case of failure at the container level, a new pod is created on the same node and the volume is attached to the new pod. In case of a node failure, a new pod is created on the other node in the replica set and the persistent volume is attached to the new pod.
Kubernetes是一个容器编排工具,可自动执行容器的部署,扩展和操作。 具有持久卷的Kubernetes群集上SQL Server类似于具有共享磁盘SQL Server故障转移群集实例。 如果在容器级别发生故障,则会在同一节点上创建一个新容器,并将该卷附加到该容器上。 如果节点发生故障,则会在副本集中的另一个节点上创建一个新容器,并将持久卷附加到该新容器。
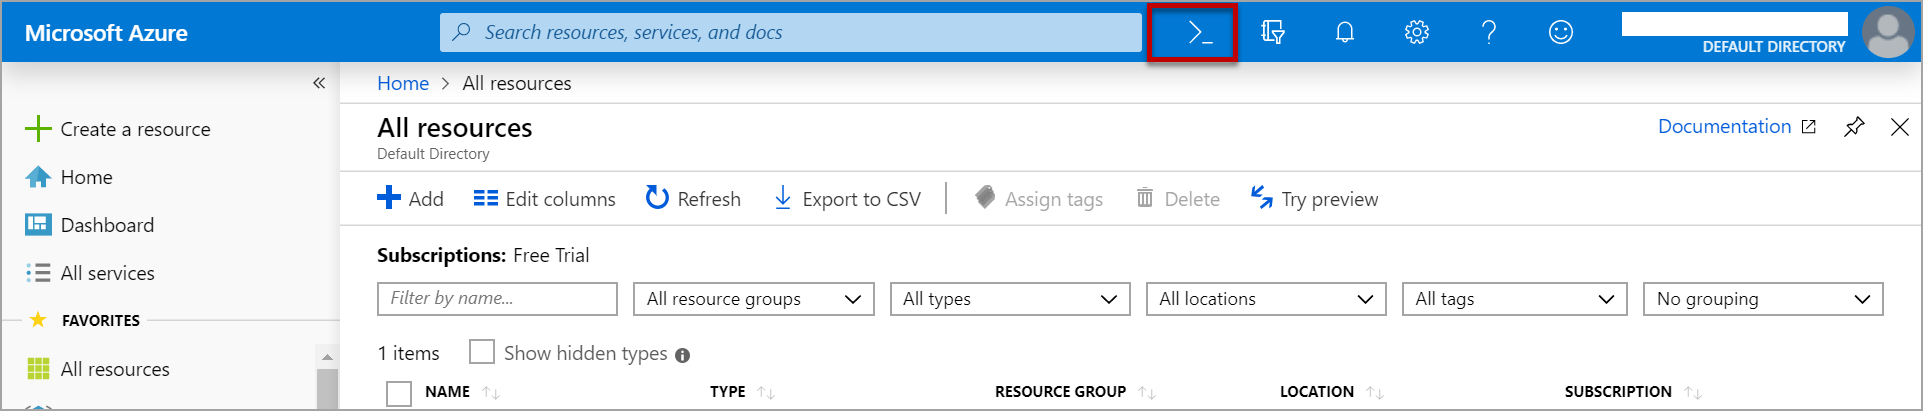
Let us see Step by step to deploy SQL Server on a Kubernetes cluster in Azure Kubernetes Service. We need to create an Azure account and login to the Azure portal. Click on the Cloud Shell icon as shown in the image to launch the console. If you are launching it for the first time, it will ask you to create storage for running cloud shell.
让我们逐步了解如何在Azure Kubernetes Service中的Kubernetes群集上部署SQL Server。 我们需要创建一个Azure帐户并登录到Azure门户。 单击镜像上的Cloud Shell图标,以启动控制台。 如果是第一次启动它,它将要求您创建用于运行云外壳的存储。
We can also execute commands from our local windows machine. To execute commands from the local machine you need to install azure CLI and kubectl on your machine. Azure CLI is a command line tool to manage Azure resources. Kubectl is a command line interface for running commands against Kubernetes cluster in Azure Kubernetes Service.
我们还可以从本地Windows计算机执行命令。 要从本地计算机执行命令,您需要在计算机上安装azure CLI和kubectl。 Azure CLI是用于管理Azure资源的命令行工具。 Kubectl是一个命令行界面,用于在Azure Kubernetes Service中针对Kubernetes群集运行命令。
- Download the MSI installer from https://docs.microsoft.com/en-us/cli/azure/install-azure-cli-windows?view=azure-cli-latest and install it.
- 从 https://docs.microsoft.com/zh-cn/cli/azure/install-azure-cli-windows?view=azure-cli-latest 下载MSI安装程序 并进行安装。
Once you install Azure CLI, use below command in the command prompt to login into the Azure account.
安装Azure CLI后,在命令提示符下使用以下命令登录到Azure帐户。
az login
Azure CLI opens your default browser and asks you to login using your Azure account.
Azure CLI打开默认浏览器,并要求您使用Azure帐户登录。
To run the kubectl commands on your local windows machine you have to download the kubectl.exec and set the environment variable.
要在本地Windows机器上运行kubectl命令,您必须下载kubectl.exec并设置环境变量。
- https://kubernetes.io/docs/tasks/tools/install-kubectl/#install-kubectl-on-windows.https://kubernetes.io/docs/tasks/tools/install-kubectl/#install-kubectl-on-windows下载安装程序。
To set the environment variable, right click on This PC and click on properties. Click on Advanced system settings -> Environment Variables -> Path -> Edit.
要设置环境变量,请右键单击此PC ,然后单击属性。 单击高级系统设置->环境变量->路径->编辑。
Click on New and add the path of kubectl.exe
单击新建,然后添加kubectl.exe的路径
在Azure Kubernetes服务中创建Kubernetes群集 (Creating a Kubernetes cluster in Azure Kubernetes Service)
Now we need to register the resource providers. Execute below commands to register them.
现在我们需要注册资源提供者。 执行以下命令进行注册。
az provider register -n Microsoft.Compute
az provider register -n Microsoft.ContainerService
az provider register -n Microsoft.Network
az provider register -n Microsoft.Storage

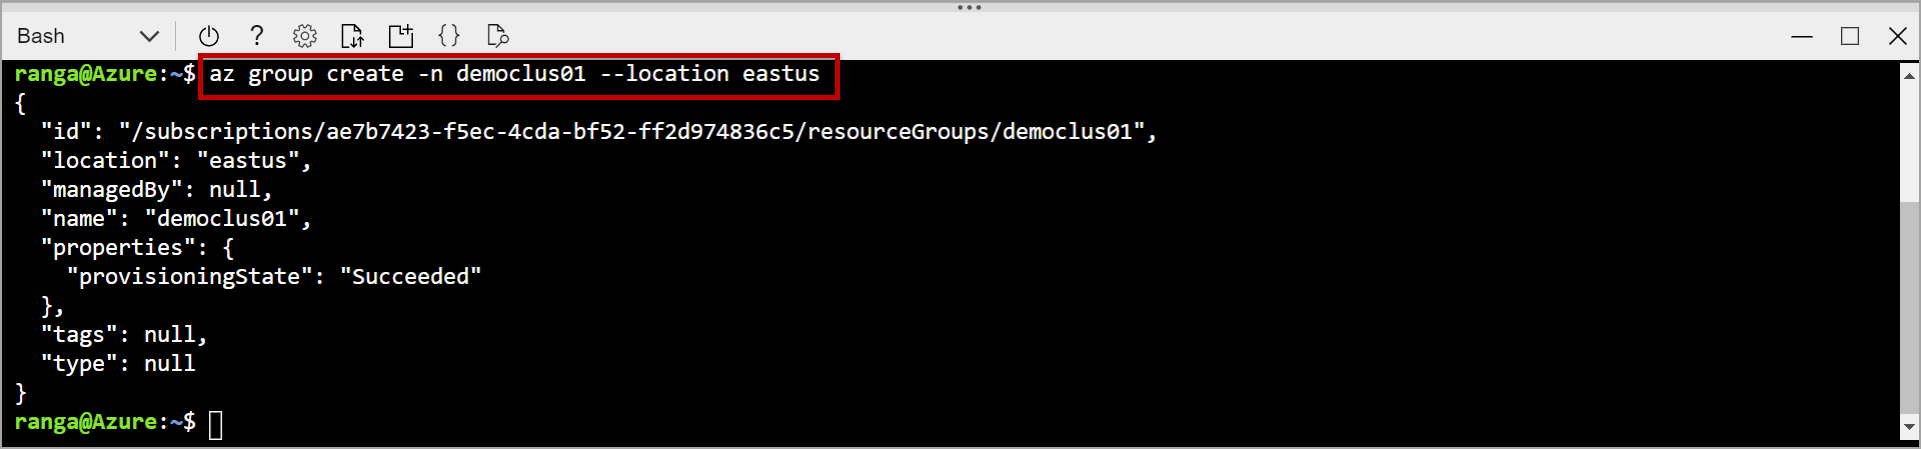
Once you register the required resource providers. We need to create a resource group. Use the below command to create a resource group in your desired location. A resource group is a collection of multiple resources of an Azure solution.
一旦注册了所需的资源提供者。 我们需要创建一个资源组。 使用以下命令在所需位置创建资源组。 资源组是Azure解决方案的多个资源的集合。
az group create -n democlus01 --location eastus
“democlus01” is the name of the resource group and “eastus” is the location. You can replace them as per your choice.
“ democlus01”是资源组的名称,“ eastus”是位置。 您可以根据自己的选择替换它们。
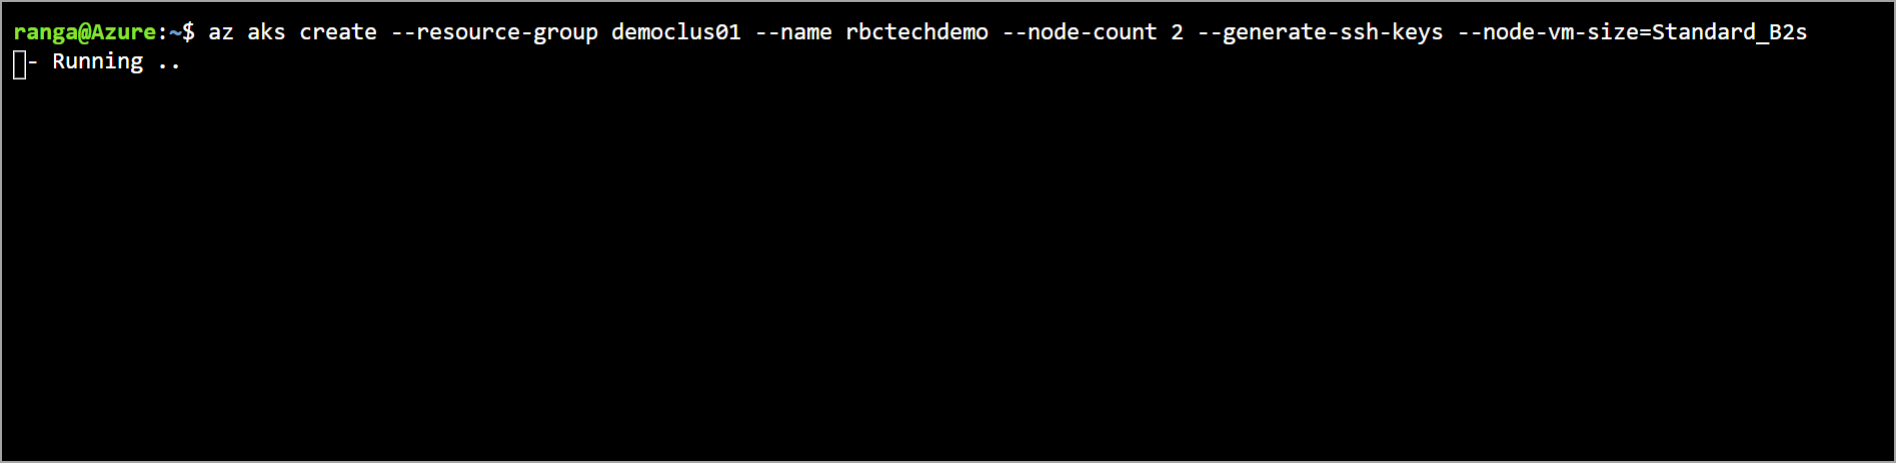
Create a Kubernetes cluster using the resource group you created above. Below command create a managed Kubernetes cluster with name “rbctechdemo” in the resource group “democlus01” with 2 nodes of size Standard_B2s which has 2 cores of CPU and 4GB RAM.
使用您在上面创建的资源组创建一个Kubernetes集群。 下面的命令在资源组“ democlus01”中创建一个名为“ rbctechdemo”的托管Kubernetes集群,该集群具有2个大小为Standard_B2s的节点,该节点具有2个CPU核心和4GB RAM。
az aks create --resource-group democlus01 --name rbctechdemo --node-count 2 --generate-ssh-keys --node-vm-size=Standard_B2s
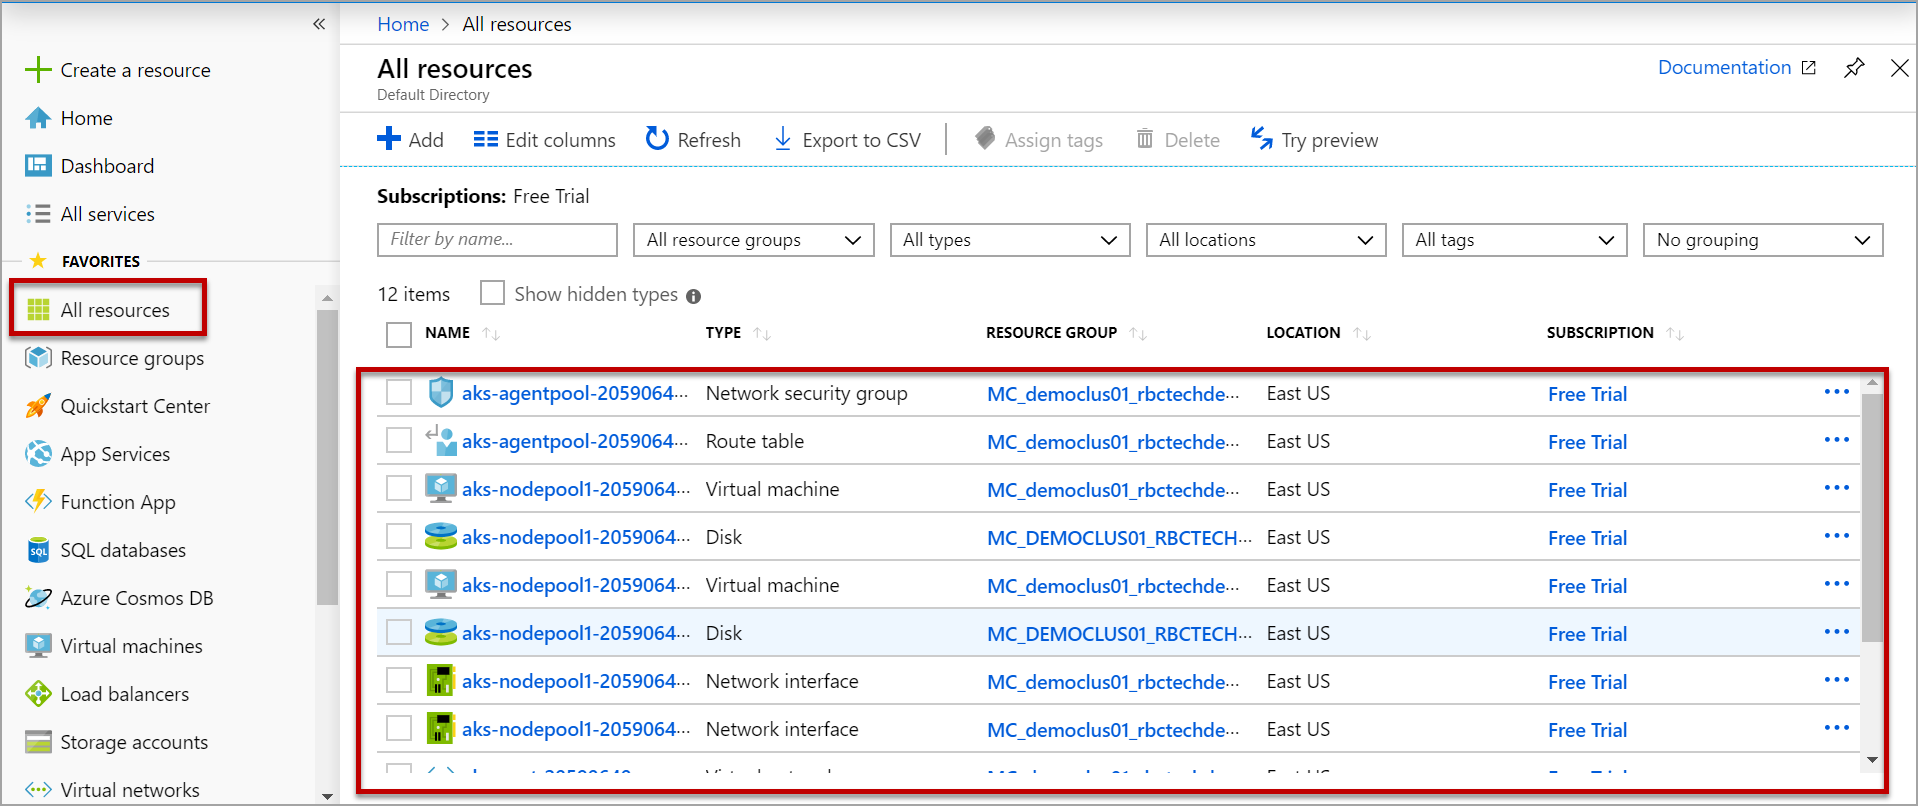
Once you run this command it will take some time around 10 minutes to create the managed Kubernetes cluster. It creates all the resources required for the Kubernetes cluster. To view the resources created, Click on All resources in the Azure portal.
一旦运行此命令,创建托管的Kubernetes集群将花费大约10分钟的时间。 它创建Kubernetes集群所需的所有资源。 若要查看创建的资源 ,请在Azure门户中单击“ 所有资源 ” 。
Get the credentials of the managed Kubernetes cluster by using the below command. This configures your kubectl to connect to your managed Kubernetes cluster.
使用以下命令获取托管的Kubernetes集群的凭据。 这会将您的kubectl配置为连接到托管的Kubernetes集群。
az aks get-credentials --resource-group democlus01 --name rbctechdemo

Now verify if your nodes in the Kubernetes cluster are ready. Use below kubectl command to get the status of the nodes in the cluster.
现在验证Kubernetes集群中的节点是否准备就绪。 使用下面的kubectl命令获取集群中节点的状态。
kubectl get nodes

配置持久卷和持久卷声明 (Configuring Persistent volume and Persistent volume claim)
When we deploy SQL server on Kubernetes cluster in Azure Kubernetes Service, the deployment is created in the pod. When the pod is deleted or restarted the data inside the pod is lost. To retain the data on SQL Server we need persistent volume and volume claim. A persistent volume is a piece of storage created by the administrator and used in the Kubernetes cluster.
当我们在Azure Kubernetes Service的Kubernetes群集上部署SQL Server时,将在pod中创建部署。 当吊舱被删除或重新启动时,吊舱内的数据将丢失。 要保留SQL Server上的数据,我们需要持久的卷和卷声明。 永久卷是由管理员创建并在Kubernetes集群中使用的一部分存储。
Open notepad and paste the below code and save as .yaml file. In this case, I saved code in VolumeClaim.yaml file.
打开记事本,粘贴以下代码,并另存为.yaml文件。 在这种情况下,我将代码保存在VolumeClaim.yaml文件中。
kind: StorageClass
apiVersion: storage.k8s.io/v1beta1
metadata:
  name: azure-disk
provisioner: kubernetes.io/azure-disk
parameters:
  storageaccounttype: Standard_LRS
  kind: Managed
---
kind: PersistentVolumeClaim
apiVersion: v1
metadata:
  name: mssql-data
  annotations:
    volume.beta.kubernetes.io/storage-class: azure-disk
spec:
  accessModes:
  - ReadWriteOnce
  resources:
    requests:
      storage: 8Gi
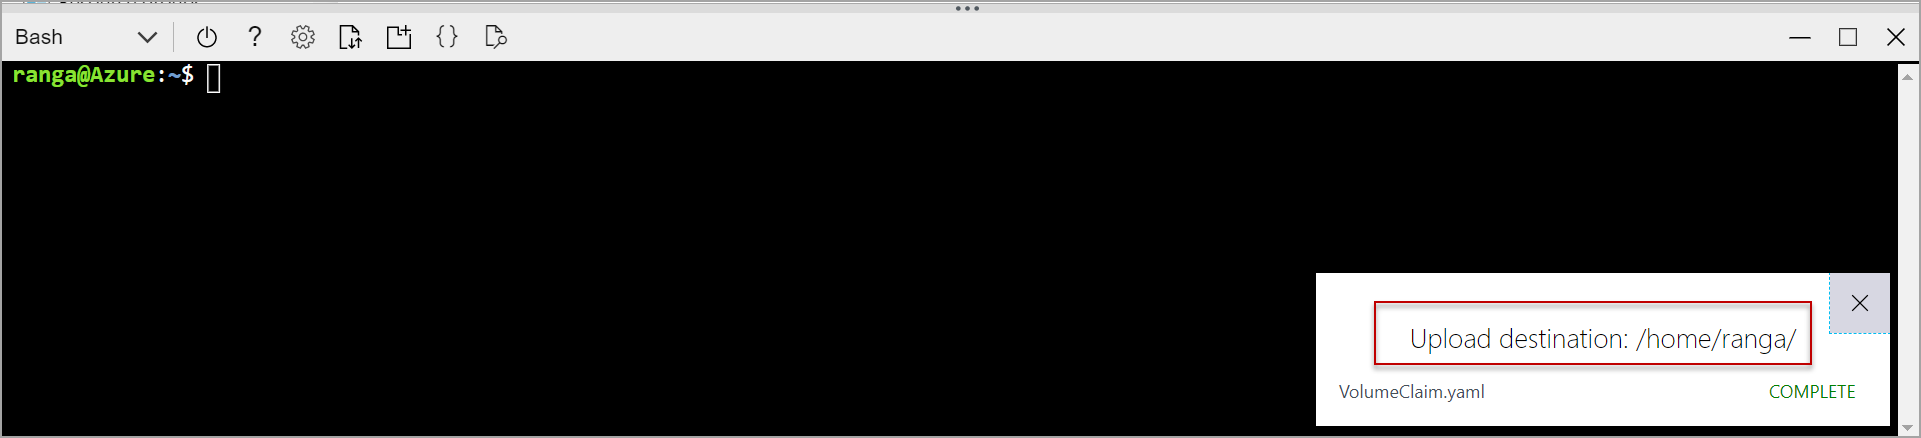
We need to upload the file to Azure cloud shell storage. To upload VolumeClaim.yaml to the cloud shell storage, Click on the Upload/Download icon in the console and Upload. Now select the VolumeClaim.yaml file from your drive and click on Open.
我们需要将文件上传到Azure云外壳存储。 要将VolumeClaim.yaml上传到云外壳存储,请在控制台中单击“上传/下载”图标,然后单击“上传”。 现在,从驱动器中选择VolumeClaim.yaml文件,然后单击“ 打开”。
Once the upload is completed it displays the path of the uploaded file. Please note the path which will be used in applying the VolumeClaim.yaml file. Please refer to the below image.
上传完成后,它将显示上传文件的路径。 请注意在应用VolumeClaim.yaml文件时将使用的路径。 请参考下图。
Use kubectl command to apply the VolumeClaim.yaml file.
使用kubectl命令应用VolumeClaim.yaml文件。
kubectl apply -f /home/ranga/VolumeClaim.yaml
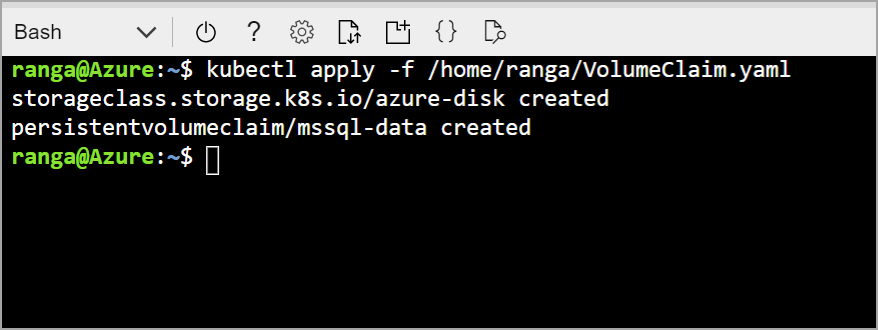
As we are using azure Kubernetes cluster we need to provision Azure disk. Once you apply the VolumeCliam.yaml it creates an azure disk which will be used as persistent volume and a volume claim with name mssql-data.
当我们使用Azure Kubernetes群集时,我们需要预配置Azure磁盘。 一旦应用了VolumeCliam.yaml,它就会创建一个天蓝色磁盘,该磁盘将用作永久卷以及名为mssql-data的卷声明。
Below are the commands to check the status of persistent volume and volume claim.
以下是用于检查持久卷和卷声明的状态的命令。
kubectl get pv
kubectl get pvc
The status of the persistent volume and volume claim should be bound.
持久卷和卷声明的状态应受约束 。

Now we will the volume claim in the SQL Server deployment file.
现在,我们将在SQL Server部署文件中进行批量声明。
部署SQL Server (Deploying SQL Server)
First, create a SA password in the Kubernetes cluster using below command which will be used in the deployment.
首先,使用下面的命令在Kubernetes集群中创建一个SA密码,该密码将在部署中使用。
kubectl create secret generic mssql --from-literal=SA_PASSWORD="yourownpassword"
Create a manifest file for SQL Server deployment, upload it to the cloud shell storage like how we did for VolumeClaim.yaml and apply the manifest file using kubectl.
创建用于SQL Server部署的清单文件,像我们对VolumeClaim.yaml所做的那样,将其上传到云外壳存储中,并使用kubectl应用清单文件。
Below is the sample code to deploy SQL Server Linux container of developer edition which uses the persistent volume claim mssql-data created above. The SQL Server will run on the specified port number (1433).
下面是部署开发人员版本SQL Server Linux容器的示例代码,该容器使用上面创建的持久卷声明mssql-data。 SQL Server将在指定的端口号(1433)上运行。
apiVersion: apps/v1beta1
kind: Deployment
metadata:
  name: mssql-deployment
spec:
  replicas: 1
  template:
    metadata:
      labels:
        app: mssql
    spec:
      terminationGracePeriodSeconds: 10
      containers:
      - name: mssql
        image: mcr.microsoft.com/mssql/server:2017-latest
        ports:
        - containerPort: 1433
        env:
        - name: MSSQL_PID
          value: "Developer"
        - name: ACCEPT_EULA
          value: "Y"
        - name: MSSQL_SA_PASSWORD
          valueFrom:
            secretKeyRef:
              name: mssql
              key: SA_PASSWORD
        volumeMounts:
        - name: mssqldb
          mountPath: /var/opt/mssql
      volumes:
      - name: mssqldb
        persistentVolumeClaim:
          claimName: mssql-data
---
apiVersion: v1
kind: Service
metadata:
  name: rbcsql
spec:
  selector:
    app: mssql
  ports:
    - protocol: TCP
      port: 1433
      targetPort: 1433
  type: LoadBalancer
In this case, I save the above code in sqldeployment.yaml file. Apply the manifest file using below command.
在这种情况下,我将上面的代码保存在sqldeployment.yaml文件中。 使用以下命令应用清单文件。
kubectl apply -f /home/ranga/sqldeployment.yaml
Once the manifest file is successfully applied, the pod is created in which SQL Server is deployed. Use below command to get the pod status.
成功应用清单文件后,将创建用于部署SQL Server的Pod。 使用以下命令获取广告连播状态。
kubectl get pods
Above command lists all the pods in the Kubernetes cluster and their status. Please refer to the below image. the pod is created, and the status is ContainerCreating.
以上命令列出了Kubernetes集群中的所有Pod及其状态。 请参考下图。 容器已创建,状态为ContainerCreating。

To know the exact event, use below command with pod name. this command also tells on which node the pod is running.
要知道确切的事件,请在Pod名称下使用以下命令。 该命令还告诉Pod在哪个节点上运行。
kubectl describe pods mssql-deployment-5bc9cc6d54-l4pzs

For the first time, it may take some time for the pod to come into the running state as it must pull the container image from docker hub. Subsequent deployments will be fast as the image already exists in the node.
第一次,吊舱可能需要一些时间才能进入运行状态,因为它必须从Docker集线器中拉出容器映像。 由于映像已存在于节点中,因此后续部署将很快。
Once the deployment is completed, the status of the pod will be changed to running.
部署完成后,窗格的状态将更改为正在运行。
Execute the below command in Azure cloud shell to know the services on Kubernetes cluster in Azure Kubernetes Service, internal and external IP address of the services.
在Azure云外壳中执行以下命令以了解Azure Kubernetes服务中Kubernetes群集上的服务,服务的内部和外部IP地址。
kubectl get services

Use the external IP address returned from the above command and the SA password you created earlier to connect to the SQL server.
使用上面命令返回的外部IP地址和您先前创建的SA密码连接到SQL Server。
Now open SQL Server management studio and create a database with few tables.
现在,打开SQL Server Management Studio,并创建一个包含少量表的数据库。
CREATE DATABASE [testdb]
GO

USE testdb

CREATE TABLE test (id int )
insert into test values (1),(2)
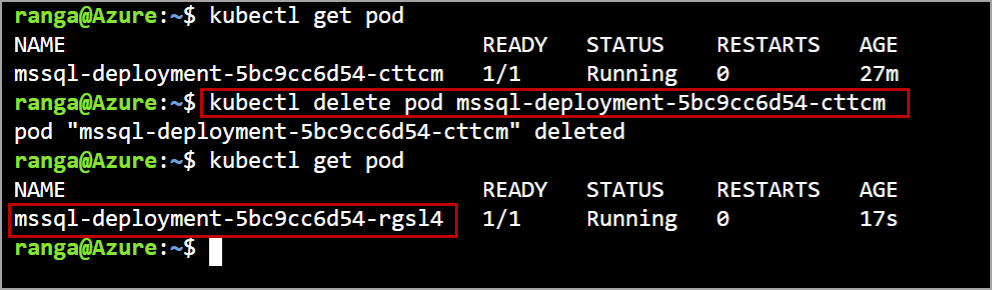
Let us delete the pod so that Kubernetes cluster will create a new pod and deploy the container image and attach the persistent volume to the new pod. Here the service is of load balancer type and the IP does not change even after recovery from failure.
让我们删除Pod,以便Kubernetes集群将创建一个新Pod并部署容器映像并将持久卷附加到新Pod。 这里的服务属于负载均衡器类型,即使从故障中恢复后,IP也不会更改。
Use the below statement to delete the pod.
使用以下语句删除吊舱。
kubectl delete pod mssql-deployment-5bc9cc6d54-cttcm
As soon as the pod is deleted, a new pod is created as per the deployment specification. Please refer to the below image.
吊舱一经删除,就会根据部署规范创建一个新的吊舱。 请参考下图。
After the new pod is created, verify the services by using the below command.
创建新容器之后,请使用以下命令验证服务。
kubectl get services
Login to the SQL server using management studio and query the tables you created earlier.
使用Management Studio登录到SQL Server,并查询您之前创建的表。
To delete the managed Kubernetes cluster use below command. This will delete all the resources created by aks create command.
要删除托管的Kubernetes集群,请使用以下命令。 这将删除aks create命令创建的所有资源。
az aks delete --name rbctechdemo --resource-group democlus01
Once you execute the above command it will ask for confirmation. On entering “Y” it will start deleting the cluster and its resources. It takes a few minutes to delete the cluster and all the resources.
一旦执行上述命令,它将要求您进行确认。 输入“ Y”后,它将开始删除集群及其资源。 删除群集和所有资源需要几分钟。
I hope you’ve found this article on SQL Server in Azure Kubernetes Service (AKS) useful. Feel free to post any feedback in the comments below
我希望您发现Azure Kubernetes Service(AKS)中有关SQL Server的这篇文章有用。 随时在下面的评论中发表任何反馈
翻译自: https://www.sqlshack.com/sql-server-in-azure-kubernetes-service-aks/
sql azure 语法


 808
808

 被折叠的 条评论
为什么被折叠?
被折叠的 条评论
为什么被折叠?
 到【灌水乐园】发言


