


kops
In this article, we will review how to create a Kubernetes cluster in AWS using KOPS, provision Elastic Block Store (EBS) as persistent volume to store the database files and deploy SQL Server in the K8s cluster.
在本文中,我们将回顾如何使用KOPS在AWS中创建Kubernetes集群,如何将弹性块存储(EBS)设置为持久卷来存储数据库文件并在K8s集群中部署SQL Server。
Here is step by step to configure the K8s cluster in AWS using KOPS.
这是逐步使用KOPS在AWS中配置K8s集群的步骤。
使用KOPS在AWS中创建K8s集群 (Creating a K8s cluster in AWS using KOPS)
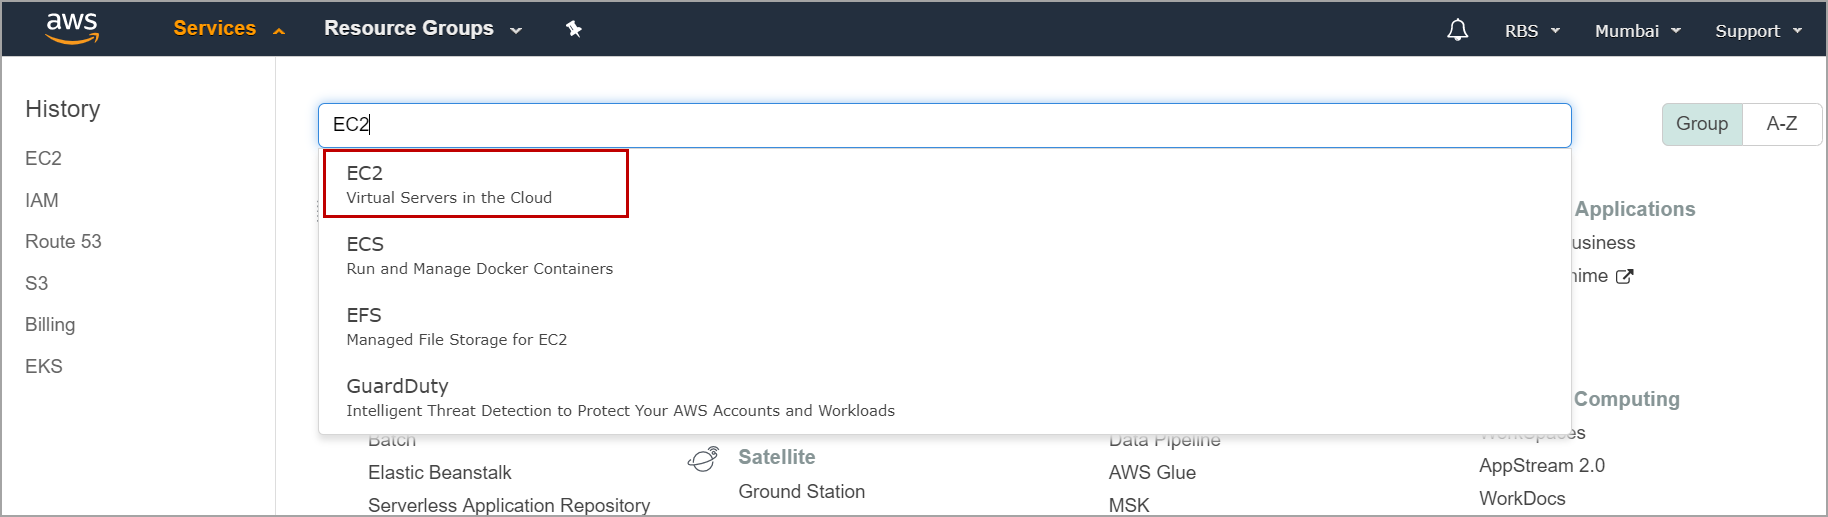
Log in to the AWS console, Click on Services and search for EC2. Click on EC2(Virtual Servers in the Cloud).
登录到AWS控制台,单击“ 服务”并搜索EC2。 单击EC2(云中的虚拟服务器) 。
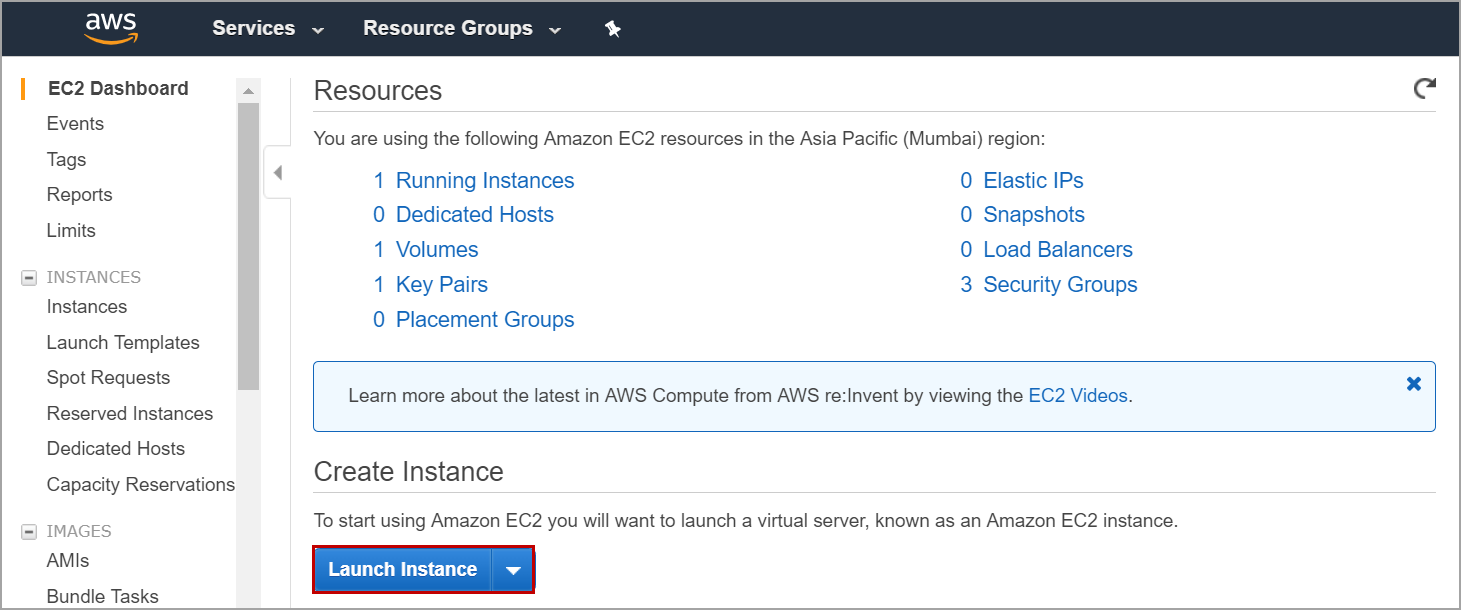
In the EC2 Dashboard, Click on Launch Instance and select Ubuntu server with t2.micro size.
在EC2仪表板中,单击启动实例,然后选择t2.micro大小的Ubuntu服务器。
Configure instance details, storage, and security groups and launch the instance using a new key pair or use the existing key pair if already have one.
配置实例详细信息,存储和安全组,并使用新的密钥对启动实例,或者使用现有的密钥对(如果已有的话)使用实例。
Create an IAM role with below policies and assign the role to Ubuntu instance you created above.This role is used to create Kubernetes cluster resouces.
使用以下策略创建一个IAM角色,并将该角色分配给您在上面创建的Ubuntu实例。该角色用于创建Kubernetes集群资源。
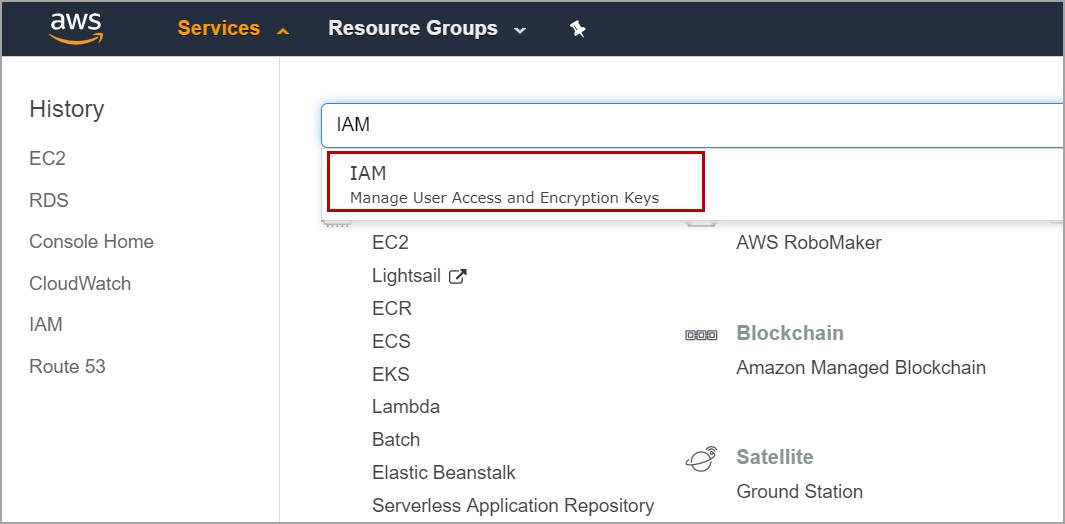
To create an IAM role, click on Services and search for IAM. Click on IAM (Manage User Access and Encrypted Keys)
要创建IAM角色,请单击“ 服务”并搜索IAM。 单击IAM(管理用户访问和加密密钥)
- AmazonS3FullAccess AmazonS3FullAccess
- AmazonEC2FullAccess AmazonEC2完全访问
- IAMFullAccess IAMF完全访问
- AmazonRoute53FullAccess 亚马逊Route53FullAccess
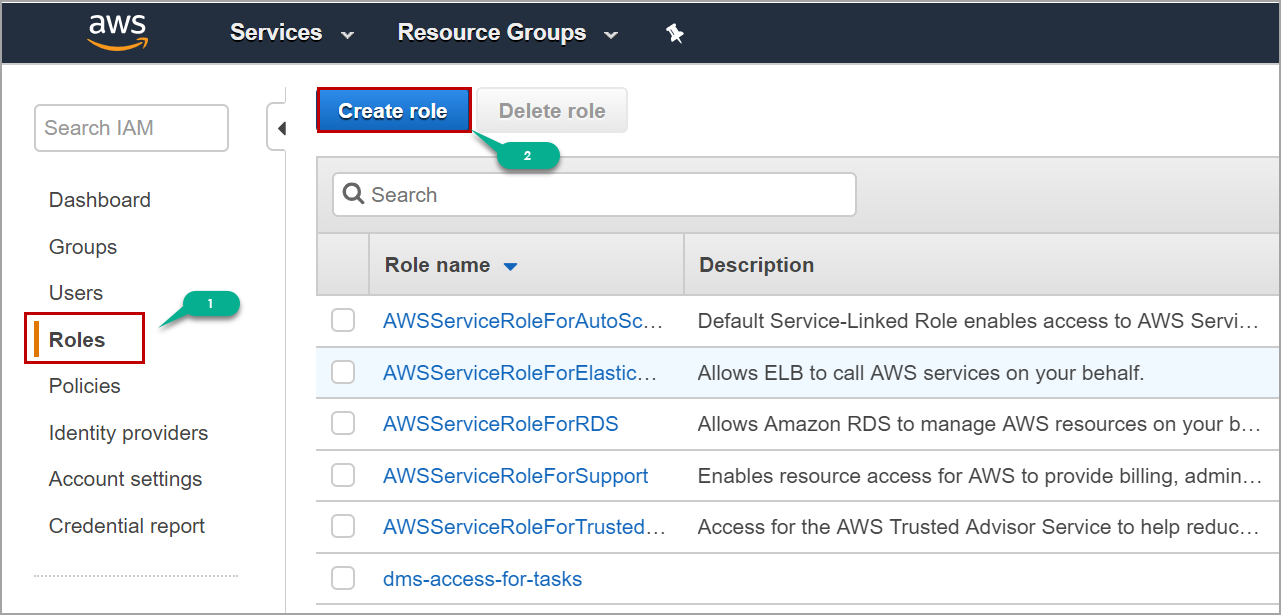
In IAM console, Click on Roles (1). Click on Create Role (2).
在IAM控制台中,单击“ 角色 (1)”。 单击创建角色 (2)。
Select EC2 in “Choose the service that will use the role” and click on Next: Permissions.
在“ 选择将使用该角色的服务 ”中选择EC2,然后单击“ 下一步:权限”。
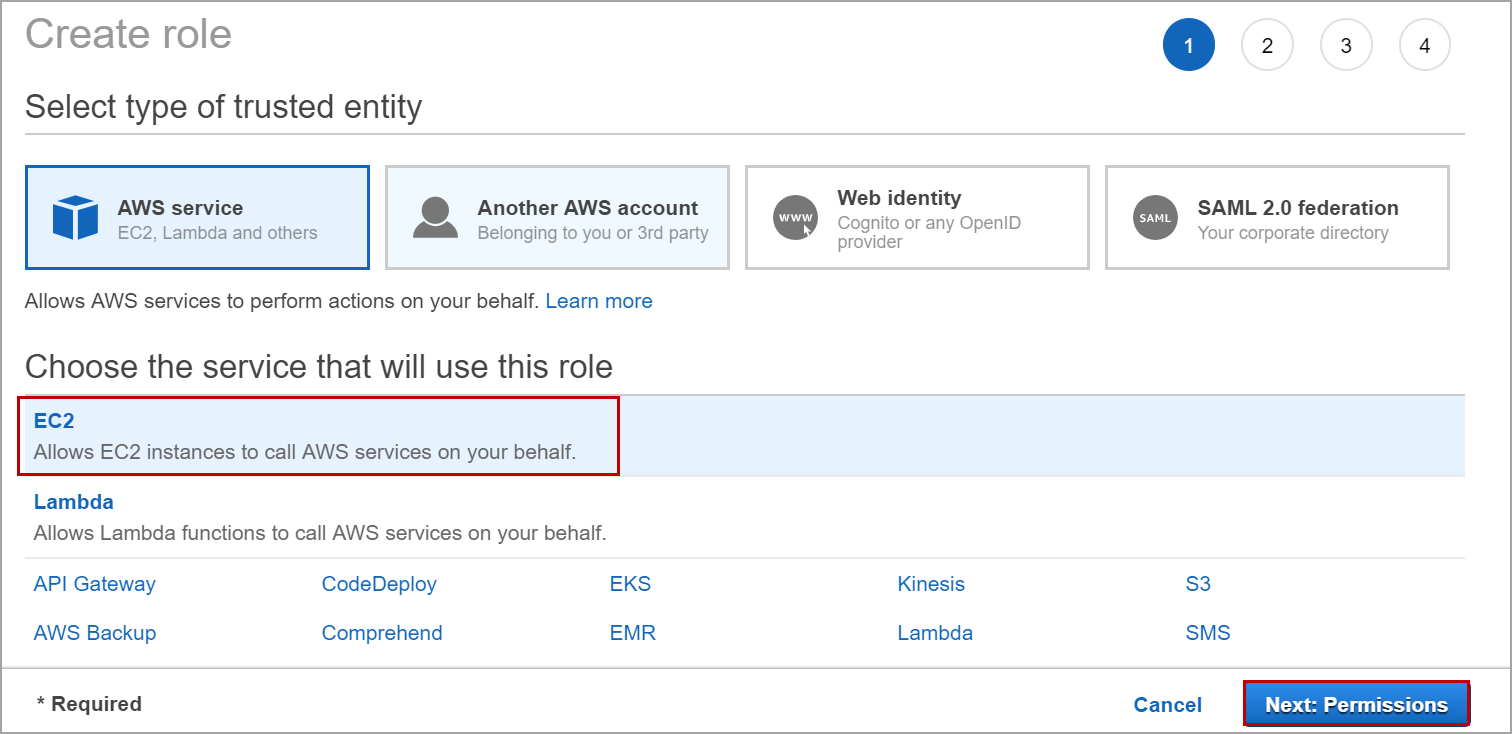
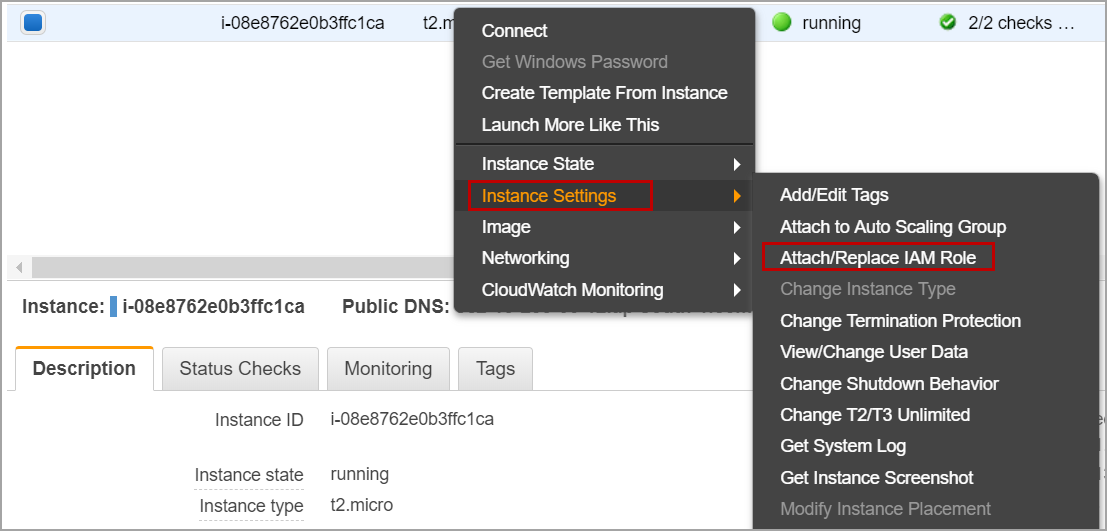
Select the above-mentioned policies. Click on Next and Review. Enter the role name and click on Create Role. Now navigate to the EC2 Dashboard and select the Ubuntu instance you created above, Right-click -> Instance Settings -> Attach/Replace IAM Role. Select the IAM role you created above and click on Apply.
选择上述策略。 单击下一步 , 然后单击查看 。 输入角色名称,然后单击创建角色 。 现在,导航到EC2仪表板,然后选择您在上面创建的Ubuntu实例,右键单击->实例设置->附加/替换IAM角色。 选择您在上面创建的IAM角色,然后单击Apply 。
To connect to the Ubuntu instance, we must download PuTTy from putty.org and install it. After installing PuTTy, open PuTTygen and click on load,
要连接到Ubuntu的情况下,我们必须从putty.org下载腻子安装。 安装腻子 ,打开的puttygen并点击加载后,
select the .pem file (key pair) which was used to launch the Ubuntu instance and click on Save private key.
选择用于启动Ubuntu实例的.pem文件(密钥对),然后单击Save private key 。
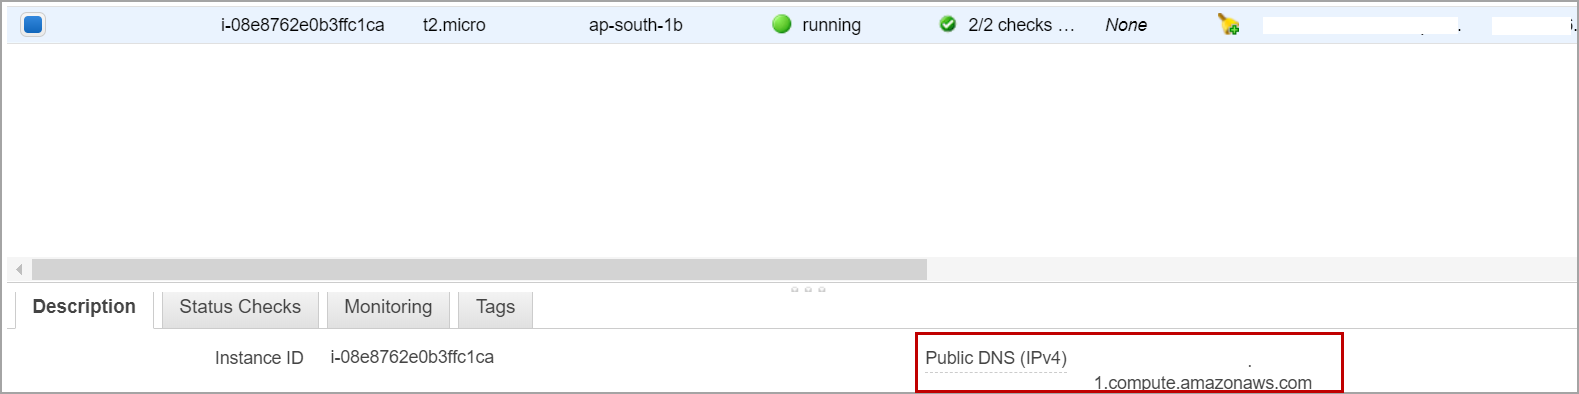
Now open putty and enter the hostname. To know the hostname of the Ubuntu instance, navigate to the EC2 dashboard, select the instance and copy the public DNS as shown in the below image.
现在打开腻子并输入主机名。 要知道Ubuntu实例的主机名,请导航到EC2仪表板,选择该实例并复制公共DNS,如下图所示。
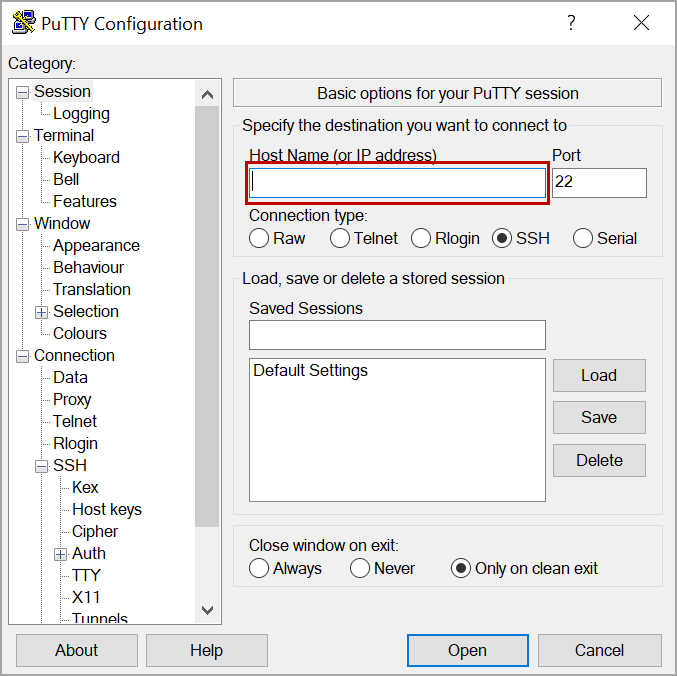
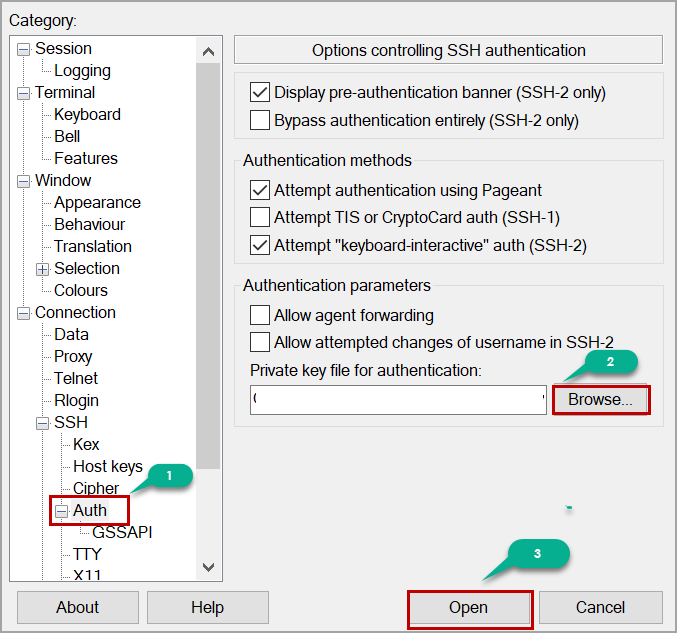
Click on Auth (1). Browse the private key you created in the above step (2). Click on Open (3).
单击身份验证 (1)。 浏览您在上述步骤(2)中创建的私钥。 单击打开 (3)。
Login with Ubuntu user.
用Ubuntu用户登录。
Log in as a superuser using below command.
使用以下命令以超级用户身份登录。
sudo su -
Install AWS CLI using below commands. AWS Command Line Interface is a tool to configure, manage AWS services from the command line.
使用以下命令安装AWS CLI。 AWS Command Line Interface是用于从命令行配置,管理AWS服务的工具。
curl https://s3.amazonaws.com/aws-cli/awscli-bundle.zip -o awscli-bundle.zip

apt install unzip

unzip awscli-bundle.zip

apt install unzip python

./awscli-bundle/install -i /usr/local/aws -b /usr/local/bin/aws
Once we install AWS CLI, we need to install the Kubernetes command-line tool (kubectl) on Ubuntu instance which is used to run commands against K8s cluster. Use below commands to download the latest version and install kubectl.
安装AWS CLI后,需要在Ubuntu实例上安装Kubernetes命令行工具(kubectl),该实例用于对K8s集群运行命令。 使用以下命令下载最新版本并安装kubectl。
curl -LO https://storage.googleapis.com/kubernetes-release/release/$(curl -s https://storage.googleapis.com/kubernetes-release/release/stable.txt)/bin/linux/amd64/kubectl

chmod +x ./kubectl

sudo mv ./kubectl /usr/local/bin/kubectl
Configure AWS CLI using below command. Leave the access key id and secret key blank as we are using the IAM role that is attached to the Ubuntu EC2 instance. Input the default region of your choice and output format like JSON.
使用以下命令配置AWS CLI。 当我们使用附加到Ubuntu EC2实例的IAM角色时,将访问密钥ID和秘密密钥保留为空白。 输入您选择的默认区域并输出格式,如JSON。
aws configure
We need to download and install KOPS on EC2 Ubuntu instance. KOPS is used to create a Kubernetes cluster on Amazon Web Services. Use below commands to download and install KOPS.
我们需要在EC2 Ubuntu实例上下载并安装KOPS。 KOPS用于在Amazon Web Services上创建Kubernetes集群。 使用以下命令下载并安装KOPS。
curl -LO https://github.com/kubernetes/kops/releases/download/$(curl -s https://api.github.com/repos/kubernetes/kops/releases/latest | grep tag_name | cut -d '"' -f 4)/kops-linux-amd64

chmod +x kops-linux-amd64

sudo mv kops-linux-amd64 /usr/local/bin/kops
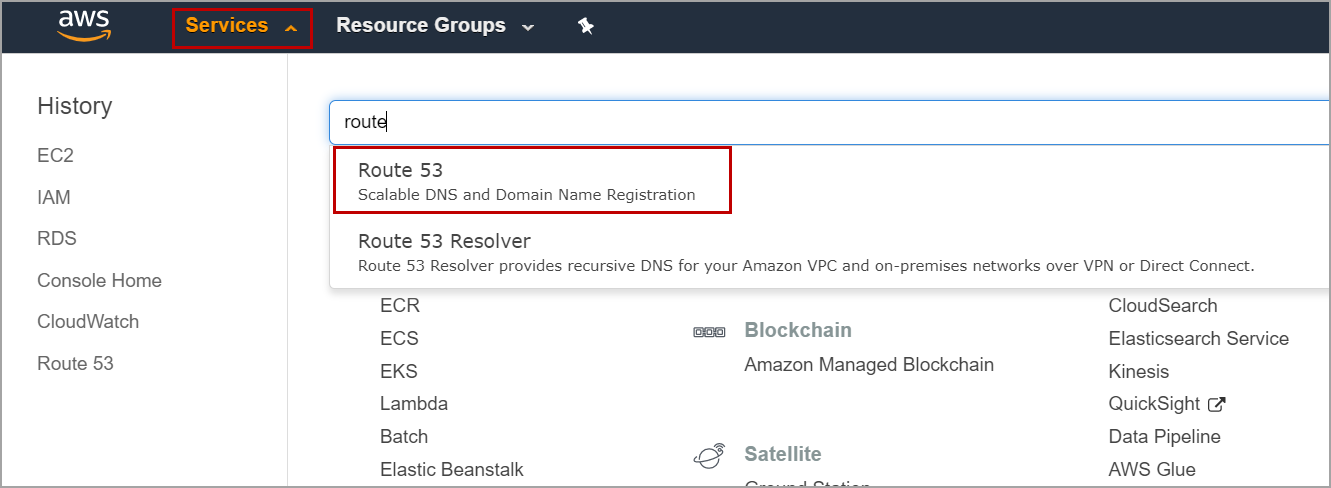
Now, create a private hosted zone in Route53. To create a hosted zone, click on Services and search for Route 53. Select Route 53 (scalable DNS and Domain Registration)
现在,在Route53中创建一个私有托管区域。 要创建托管区域,请单击“ 服务”并搜索Route53。选择Route 53(可伸缩DNS和域注册)
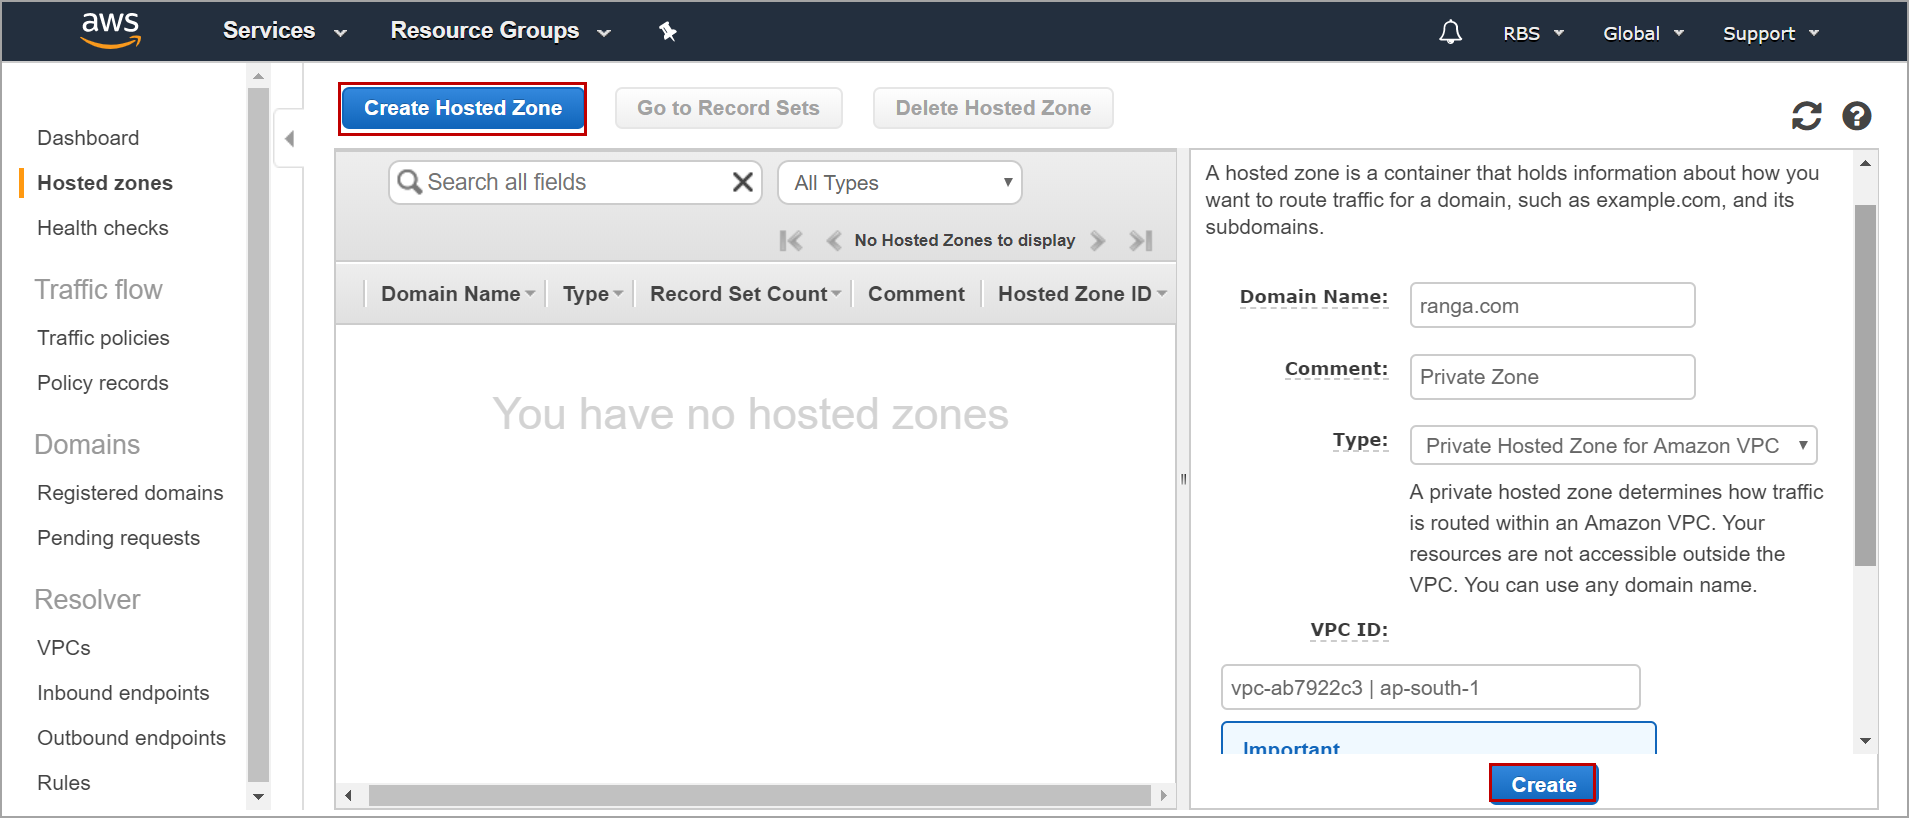
Click on Create Hosted Zone. enter the domain name and select Private Hosted Zone for Amazon VPC as type.
Select the VPC ID and click on Create.
单击创建托管区域 。 输入域名,然后选择Amazon VPC的“专用托管区域”作为类型。
选择VPC ID,然后单击“ 创建”。
Now we need to create an S3 bucket. This S3 bucket will hold the K8s cluster configuration. To create an S3 bucket and set environment variable, execute the below command in the console.
现在,我们需要创建一个S3存储桶。 该S3存储桶将保留K8s集群配置。 要创建S3存储桶并设置环境变量,请在控制台中执行以下命令。
aws s3 mb s3://kubeclus01

export KOPS_STATE_STORE=s3://kubeclus01
Create SSH key using below command.
使用以下命令创建SSH密钥。
ssh-keygen
Execute below commands to create Kubernetes cluster configuration which will be stored in the S3 bucket created above. This will only create the cluster configuration and not the cluster.
执行以下命令以创建Kubernetes集群配置,该配置将存储在上面创建的S3存储桶中。 这将仅创建群集配置,而不创建群集。
kops create cluster --cloud=aws --zones=ap-south-1b --name=ranga.com --dns-zone=ranga.com --dns private
Create the cluster by executing below command. This will create the cluster in the zone “ap-south-1b” with cluster name as “ranga.com”.
通过执行以下命令创建集群。 这将在群集名称为“ ranga.com”的“ ap-south-1b”区域中创建群集。
kops update cluster --name ranga.com --yes
Once you execute the above command, it will create all the necessary resources required for the cluster. Now execute validate command to validate the cluster.
一旦执行上述命令,它将创建集群所需的所有必要资源。 现在执行validate命令来验证集群。
kops validate cluster
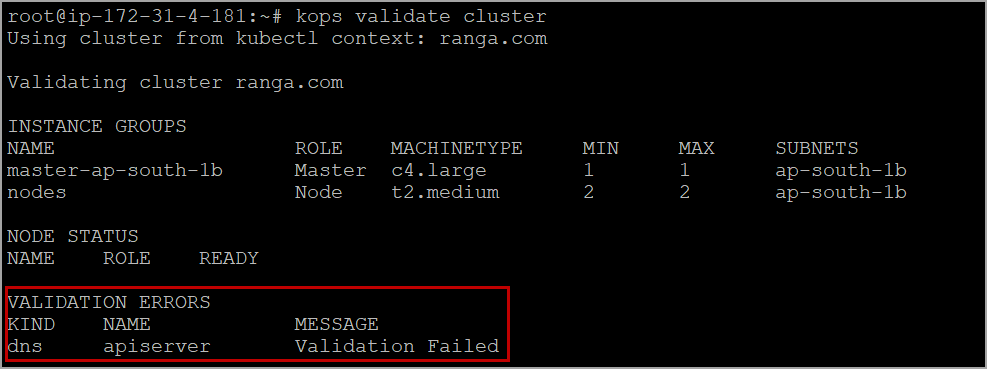
It takes some time to create all the cluster resources. Execute the same command after a few minutes. Once validation is a success and you see “your cluster is ready”. Then list the nodes using below command.
创建所有群集资源需要一些时间。 几分钟后执行相同的命令。 验证成功后,您将看到“您的集群已准备就绪”。 然后使用以下命令列出节点。
kubectl get nodes
创建持久卷声明 (Creating Persistent Volume Claim)
Once your Kubernetes cluster setup and ready, we need to create a persistent volume and volume claim to store the database files. As we created the K8s cluster on Amazon Web Services, we will create a persistent volume using AWS EBS.
设置好Kubernetes集群并准备好之后,我们需要创建一个持久卷和卷声明以存储数据库文件。 在Amazon Web Services上创建K8s集群时,我们将使用AWS EBS创建持久卷。
Use below code to create a manifest file directly on the Ubuntu server for creating persistent volume and volume claim.
使用以下代码直接在Ubuntu服务器上创建清单文件,以创建持久卷和卷声明。
kind: PersistentVolumeClaim
apiVersion: v1
metadata:
  name: dbvolumeclaim
  labels:
    type: amazonEBS
spec:
  accessModes:
    - ReadWriteOnce
  storageClassName: gp2
  resources:
    requests:
      storage: 10Gi
If you have any parsing errors due to special characters when you create the .yaml file directly on the Ubuntu server, Open the notepad in your local machine, paste the above code and save it as dbvclaim.yaml file and upload the dbvclaim.yaml file to S3 bucket using S3 console. Now on Ubuntu instance execute below command to download the same file from S3 bucket to the Ubuntu server.
如果直接在Ubuntu服务器上创建.yaml文件时由于特殊字符而导致任何分析错误,请在本地计算机上打开记事本,粘贴上面的代码并将其保存为dbvclaim.yaml文件,然后上传dbvclaim.yaml文件使用S3控制台到S3存储桶。 现在在Ubuntu实例上执行以下命令,将相同文件从S3存储桶下载到Ubuntu服务器。
aws s3 cp s3://kubeclus01/dbvclaim.yaml /root
Now apply the manifest file using kubectl to create persistent volume and volume claim on Kubernetes cluster.
现在使用kubectl应用清单文件以在Kubernetes集群上创建持久卷和卷声明。
kubectl apply -f dbvclaim.yaml
After executing the above command, it creates a persistent volume with a random name and volume claim with name “dbvolumecliam”
执行上述命令后,它将创建一个具有随机名称的永久卷,并使用名称“ dbvolumecliam”声明该卷
在AWS的K8s群集中部署SQL Server容器 (Deploying SQL Server container in K8s cluster in AWS)
Before deploying the SQL Server in K8s cluster created in AWS using KOPS, we need to give permissions to create a load balancer for the role which is attached to the master node in the cluster. Navigate to IAM console and click on the role associated with the master node. In my case it is masters.ranga.com. Click on Attach policies.
在使用KOPS在AWS中创建的K8s集群中部署SQL Server之前,我们需要授予权限,以为连接到集群中主节点的角色创建负载均衡器。 导航到IAM控制台,然后单击与主节点关联的角色。 就我而言,它是masters.ranga.com。 点击附加政策 。
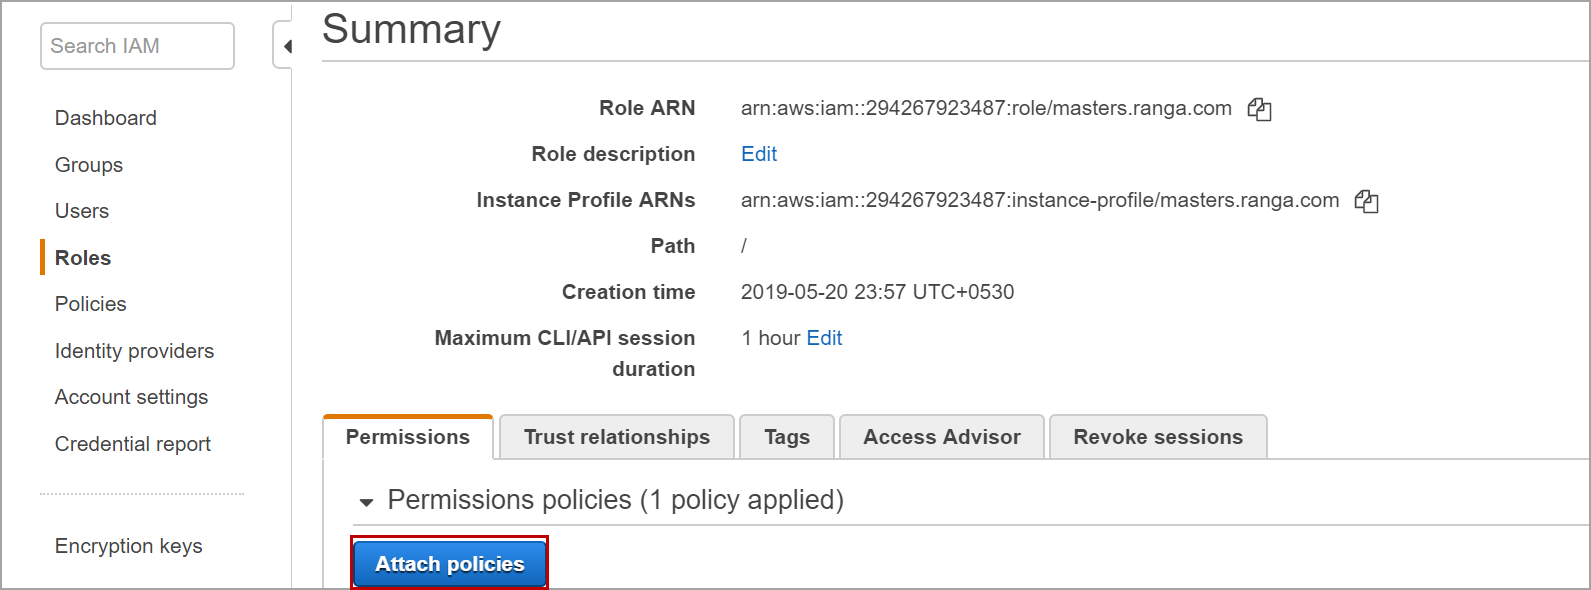
Select ElasticLoadBalancingFullAccess and click on Attach policies. This policy allows the master node to create load balancer and assign public IP to the service.
选择ElasticLoadBalancingFullAccess ,然后单击附加策略 。 该策略允许主节点创建负载均衡器并将公共IP分配给服务。
Create SA password in Kubernetes cluster which will be used in the SQL Server deployment. Your password should meet password policy requirements else your deployment fails and the pod show “CrashLoopBackOff” status.
在Kubernetes群集中创建SA密码,该密码将在SQL Server部署中使用。 您的密码应符合密码策略要求,否则您的部署将失败,并且窗格将显示“ CrashLoopBackOff ”状态。
kubectl create secret generic mssql --from-literal=SA_PASSWORD="yourpassword"
Create a manifest file which will be used for deploying the SQL Server container image. Replace claimName value with the name of your persistent volume claim. You can create the .yaml file directly on the server or upload it s3 from your local machine and download back to Ubuntu server.
创建一个清单文件,该清单文件将用于部署SQL Server容器映像。 用您的持久卷声明的名称替换ClaimName值。 您可以直接在服务器上创建.yaml文件,也可以从本地计算机上将其上传s3,然后下载回Ubuntu服务器。
apiVersion: apps/v1beta1
kind: Deployment
metadata:
  name: mssql-deployment
spec:
  replicas: 1
  template:
    metadata:
      labels:
        app: mssql
    spec:
      terminationGracePeriodSeconds: 10
      containers:
      - name: mssql
        image: mcr.microsoft.com/mssql/server:2017-latest
        ports:
        - containerPort: 1433
        env:
        - name: MSSQL_PID
          value: "Developer"
        - name: ACCEPT_EULA
          value: "Y"
        - name: MSSQL_SA_PASSWORD
          valueFrom:
            secretKeyRef:
              name: mssql
              key: SA_PASSWORD
        volumeMounts:
        - name: mssqldb
          mountPath: /var/opt/mssql
      volumes:
      - name: mssqldb
        persistentVolumeClaim:
          claimName: dbvolumeclaim
---
apiVersion: v1
kind: Service
metadata:
  name: mssql-deployment
spec:
  selector:
    app: mssql
  ports:
    - protocol: TCP
      port: 1433
      targetPort: 1433
  type: LoadBalancer
Apply the manifest file using kubectl to create a deployment in the K8s cluster.
使用kubectl应用清单文件以在K8s集群中创建部署。
kubectl apply -f sqldep.yaml
Once you execute the above command, it will create a deployment with name mssql-deployment in Kubernetes cluster. Now a pod is created with SQL Server running in it. Execute the below command to get the status of the pod.
一旦执行了以上命令,它将在Kubernetes集群中创建一个名称为mssql-deployment的部署。 现在,已在其中运行SQL Server的情况下创建了一个Pod。 执行以下命令以获取窗格的状态。
kubectl get pods
Once the container is created the status of the pod is changed to running. To know the details of the pod, execute below command by replacing the name of the pod.
创建容器后,容器的状态将更改为“正在运行”。 要了解Pod的详细信息,请通过替换Pod的名称执行以下命令。
kubectl describe pod mssql-deployment-5469897589-j79xg
In case of any errors during deploying, use below command and replace the pod name with the name of your pod to get the logs.
如果在部署过程中发生任何错误,请使用以下命令,并用您的Pod名称替换Pod名称以获取日志。
kubectl logs -p mssql-deployment-98f6fc85c-v59xs
To know the public IP of the SQL Server, execute below command. This command will list all the available services in the Kubernetes cluster with the service name, internal IP and external IP.
要了解SQL Server的公共IP,请执行以下命令。 该命令将列出Kubernetes集群中的所有可用服务以及服务名称,内部IP和外部IP。
kubectl get svc

To connect to the SQL Server, Open SQL Server management studio. input the copied external IP and password of SA which you created.
要连接到SQL Server,请打开SQL Server管理工作室。 输入您创建的SA的复制的外部IP和密码。
使用KOPS删除集群 (Deleting the Cluster using KOPS)
Execute below command to delete the K8s cluster using KOPS. Replace ranga.com with the name of your K8s cluster. This will delete all the resources created by KOPS. Before executing this command you need to remove the policy “ElasticLoadBalancingFullAccess” that you attached manually to the role associated with the master node.
执行以下命令以使用KOPS删除K8s集群。 将ranga.com替换为您的K8s群集的名称。 这将删除KOPS创建的所有资源。 在执行此命令之前,您需要删除手动附加到与主节点关联的角色的策略“ ElasticLoadBalancingFullAccess ”。
kops delete cluster ranga.com --yes
Once you execute above commad, It takes few minutes to delete the Kubernetes cluster and displays a message “Deleted cluster: cluster name” at the end.
一旦执行上面的命令,删除Kubernetes集群将花费几分钟,并在最后显示一条消息“ Deleted cluster:cluster name”。

翻译自: https://www.sqlshack.com/sql-server-in-kubernetes-cluster-using-kops/
kops


 334
334

 被折叠的 条评论
为什么被折叠?
被折叠的 条评论
为什么被折叠?
 到【灌水乐园】发言


