


mysql rds
In this article, I am going to explain how to configure the RDS MySQL Environment in AWS. RDS is the Relational Database Service Available from the Amazon which enables us to spin up any relational database instance without having to worry about the infrastructure behind it. Users can connect to this instance very easily and start building database applications with ease. This article will focus more on how to configure the RDS MySQL Environment and not much on the MySQL details.
在本文中,我将解释如何在AWS中配置RDS MySQL环境。 RDS是亚马逊提供的关系数据库服务 ,它使我们能够启动任何关系数据库实例,而不必担心其背后的基础架构。 用户可以非常轻松地连接到该实例,并轻松地开始构建数据库应用程序。 本文将重点关注如何配置RDS MySQL环境,而不是MySQL详细信息。
Although there are different tiers available to install the RDS MySQL Environment, for the sake of this tutorial, we will just explore the free tier of the RDS service. You can spin up an instance as required if you need to. Depending upon the processors and time, the service charge for the databases may vary. Using the free-tier, users are eligible to use the RDS service for free up to 750 hours a month and I think that is enough for the service to run without incurring any additional charges.
尽管可以使用不同的层来安装RDS MySQL环境,但出于本教程的目的,我们将仅探索RDS服务的免费层。 如果需要,可以根据需要启动实例。 根据处理器和时间的不同,数据库的服务费用可能会有所不同。 使用免费套餐,用户有资格每月每月最多免费使用RDS服务750小时,我认为这足以运行该服务而不会产生任何额外费用。
1.设置RDS环境 (1. Setting up the RDS environment)
Let us begin configuring the RDS MySQL Environment by first signing up for an AWS Account. Once you have successfully created the AWS account, search for RDS in the Find Services bar and hit enter.
让我们通过首先注册一个AWS帐户来开始配置RDS MySQL环境。 成功创建AWS账户后,在“ 查找服务”栏中搜索RDS ,然后按Enter。
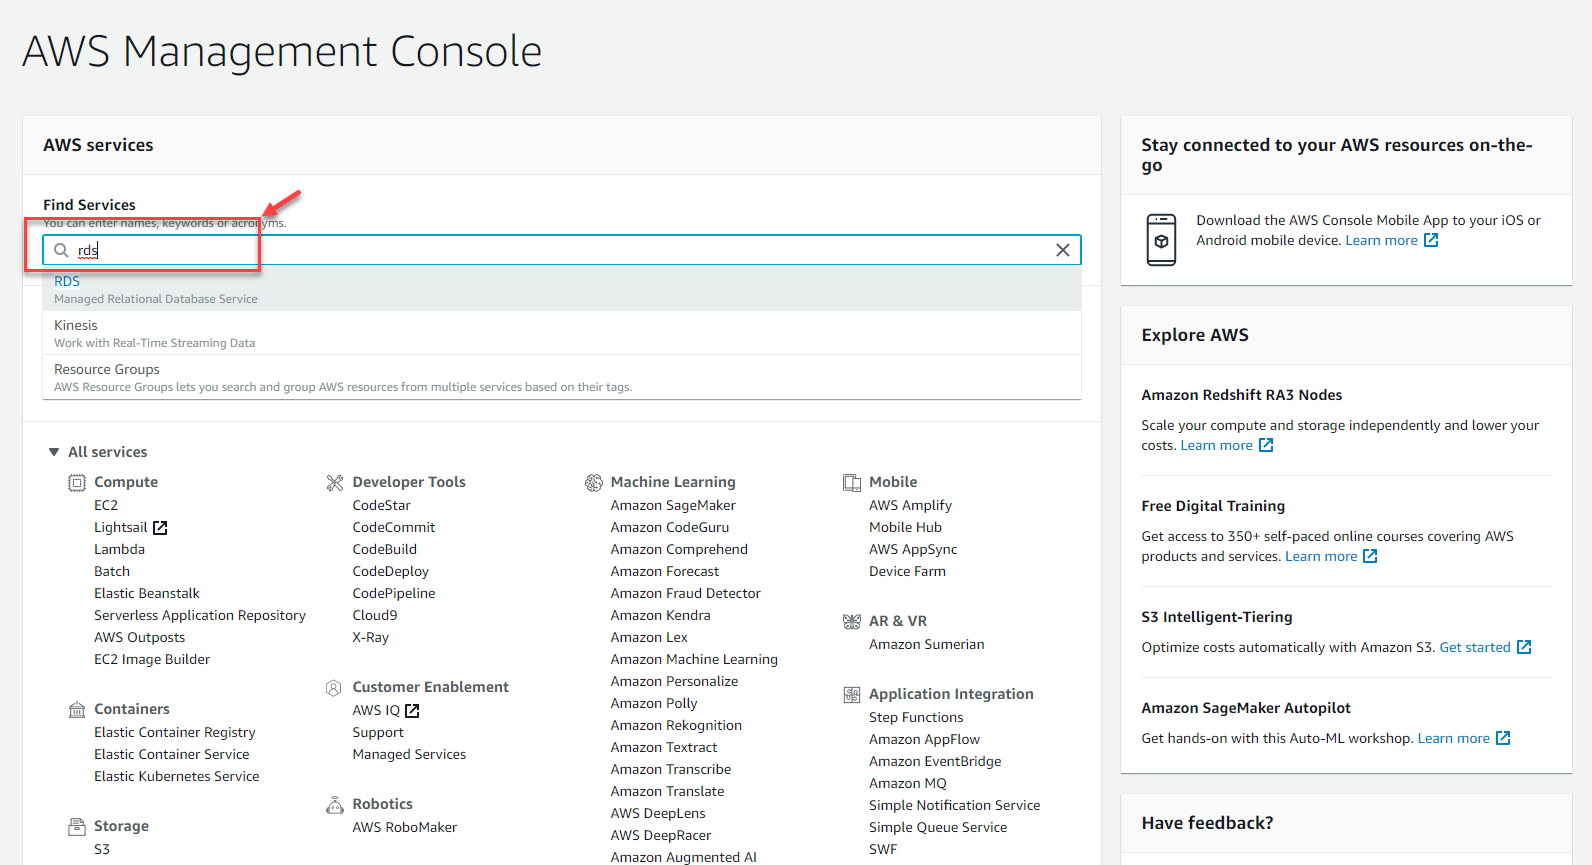
Figure 1 – Searching for AWS RDS
图1 –搜索AWS RDS
Open the RDS from the drop-down menu and proceed to create the RDS MySQL Environment. On the next page that appears, click on Create Database. This will open another page where you can define the necessary details required to set up the MySQL Database.
从下拉菜单中打开RDS,然后继续创建RDS MySQL环境。 在出现的下一页上,单击“ 创建数据库” 。 这将打开另一个页面,您可以在其中定义设置MySQL数据库所需的必要详细信息。
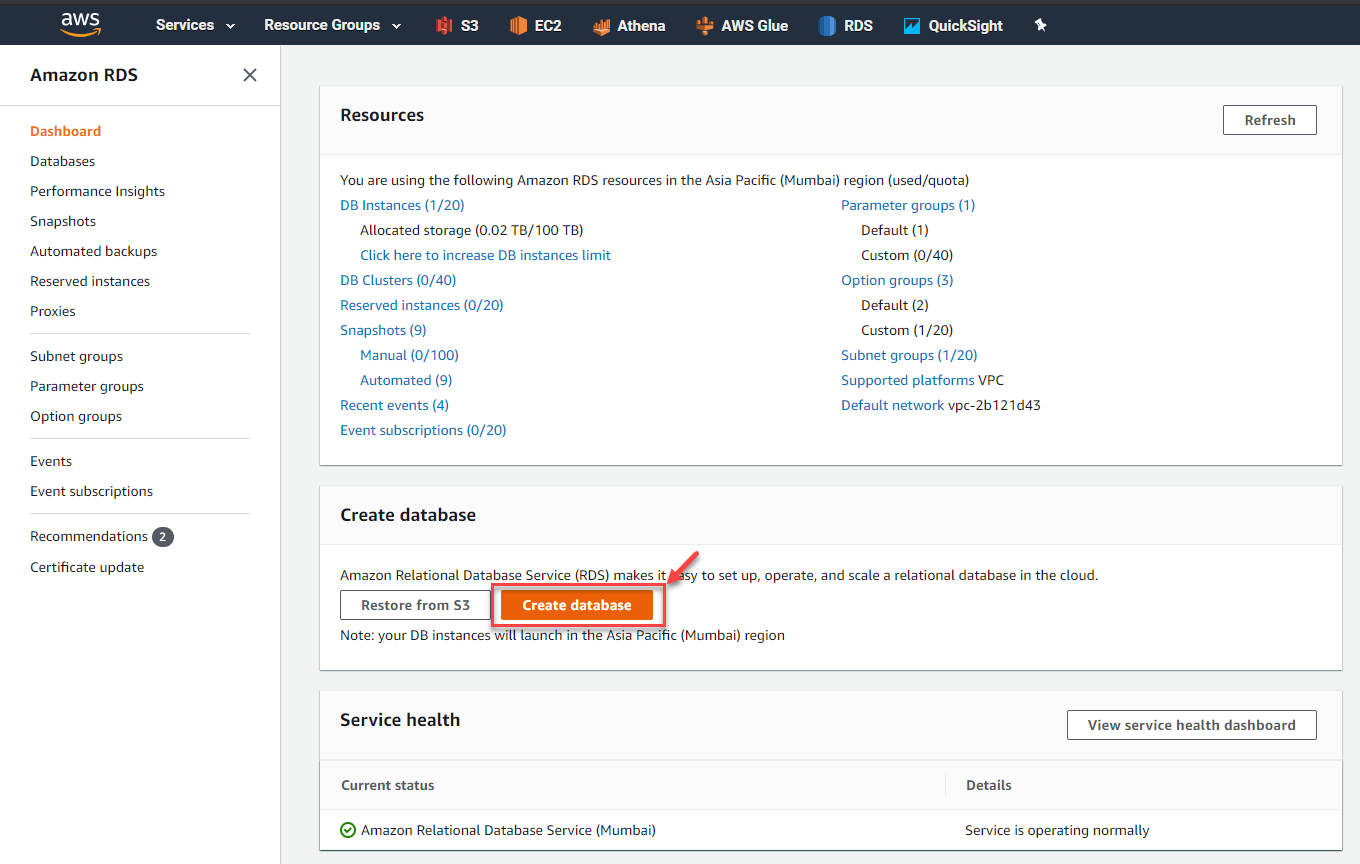
Figure 2 – Create Database Button in AWS RDS
图2 – AWS RDS中的创建数据库按钮
2.创建MySQL数据库 (2. Creating the MySQL database)
Once you click on the Create Database, a new page opens as follows, where you can define the database creation method and other options. Let us go ahead and apply the settings as defined in the figure below. We are going to select Standard Create as the database creation method. This will allow us to configure all the necessary settings on our own. Next, select the Engine Type as MySQL and the latest version. At the time of writing this article, the latest MySQL version in 8.0.16.
单击创建数据库后,将打开一个新页面,如下所示,您可以在其中定义数据库创建方法和其他选项。 让我们继续并应用下图所定义的设置。 我们将选择“ 标准创建”作为数据库创建方法。 这将使我们能够自行配置所有必要的设置。 接下来,选择引擎类型作为MySQL和最新版本 。 在撰写本文时,最新MySQL版本是8.0.16 。
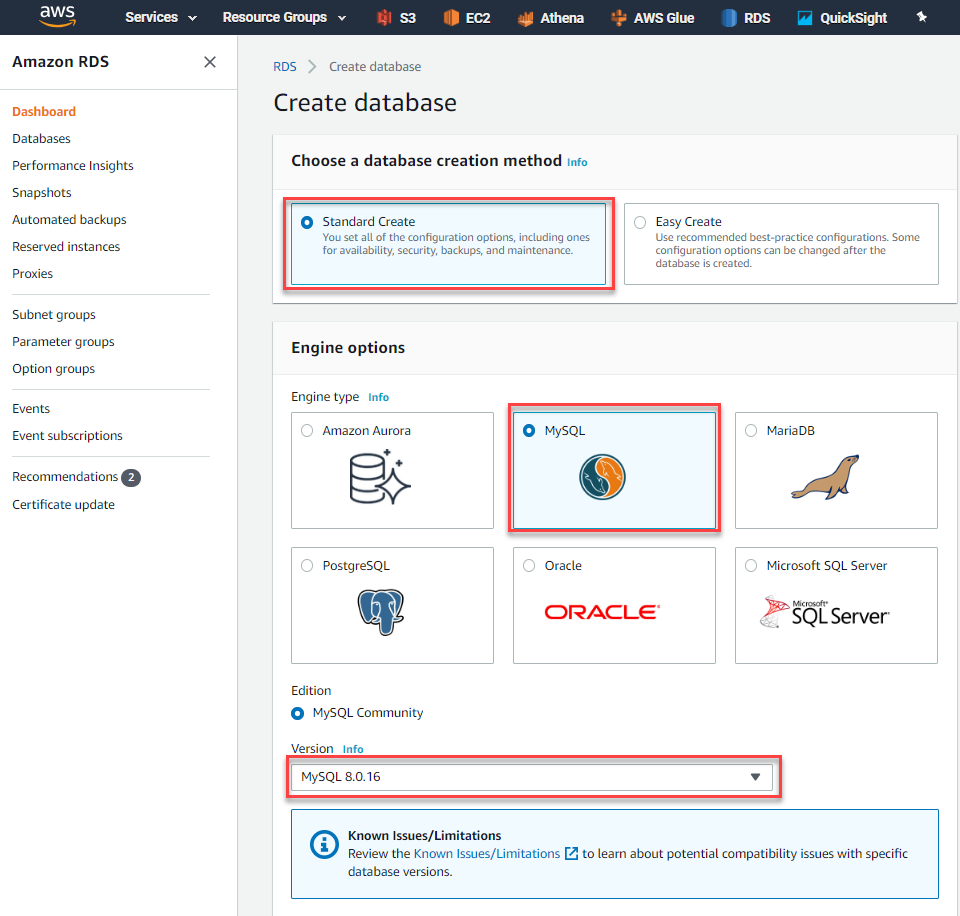
Figure 3 – Selecting the Database Engine
图3 –选择数据库引擎
In the next step, we are going to provide the name and connection details for the MySQL Database that we are going to create. Since we are going to create the database in the free tier, select the Free Tier from the template and proceed. Provide a suitable name for the database instance, for example, I’m going to use the database instance as “mysql-db-test01”. Similarly, provide a suitable master username and password for the same. This is the username and the password, that you will be using later to connect to this MySQL instance later. Also, you must keep these credentials safe so that it can be used later again.
在下一步中,我们将提供要创建MySQL数据库的名称和连接详细信息。 由于我们要在免费层中创建数据库,因此请从模板中选择“ 免费层 ”并继续。 为数据库实例提供一个合适的名称,例如,我将数据库实例用作“ mysql-db-test01 ”。 同样,提供适当的主用户名和密码。 这是用户名和密码,稍后您将使用它们来连接到该MySQL实例。 另外,您必须确保这些凭据安全,以便以后可以再次使用。
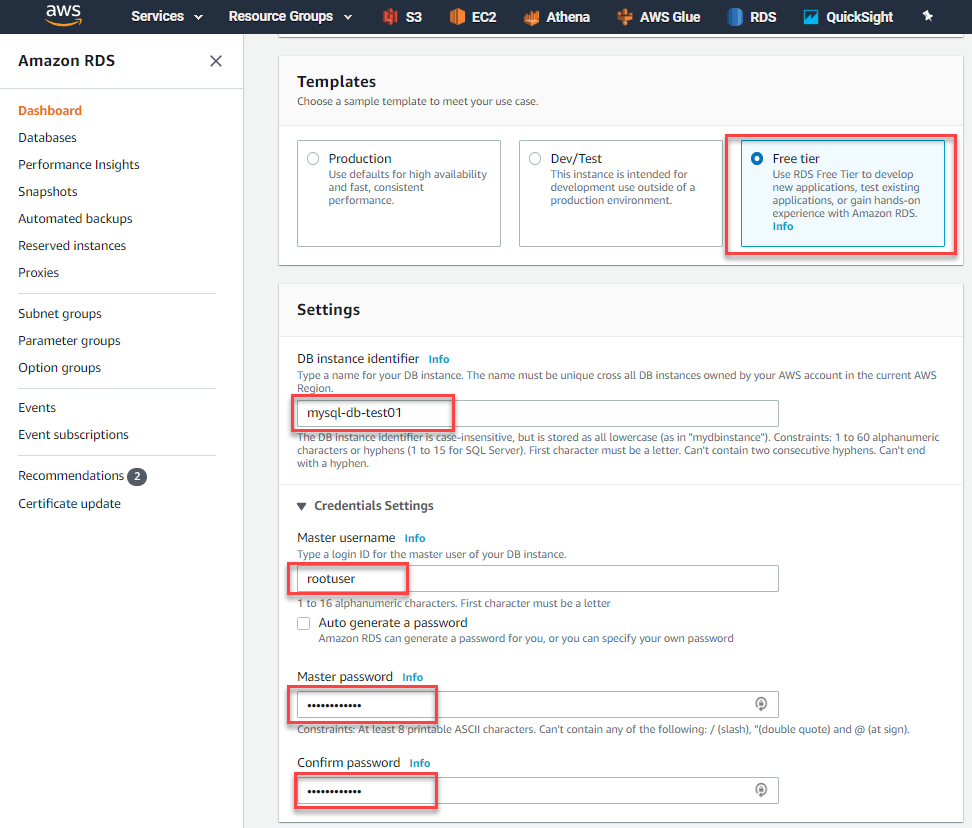
Figure 4 – Setting up the Instance Credentials
图4 –设置实例凭证
Now, that the instance credentials have been set up, let’s go ahead and set some other properties which are essential to set up the RDS MySQL Environment. Select the Database Instance Size as “db.t2.micro” and Storage Type as General Purpose SSD. By default, the memory size is allocated to 20GB which is fine for the moment.
现在,已经设置了实例凭据,让我们继续设置一些其他属性,这些属性对于设置RDS MySQL环境至关重要。 选择数据库实例大小为“ db.t2.micro ”,并选择存储类型为通用SSD 。 默认情况下,内存大小分配为20GB ,暂时可以。
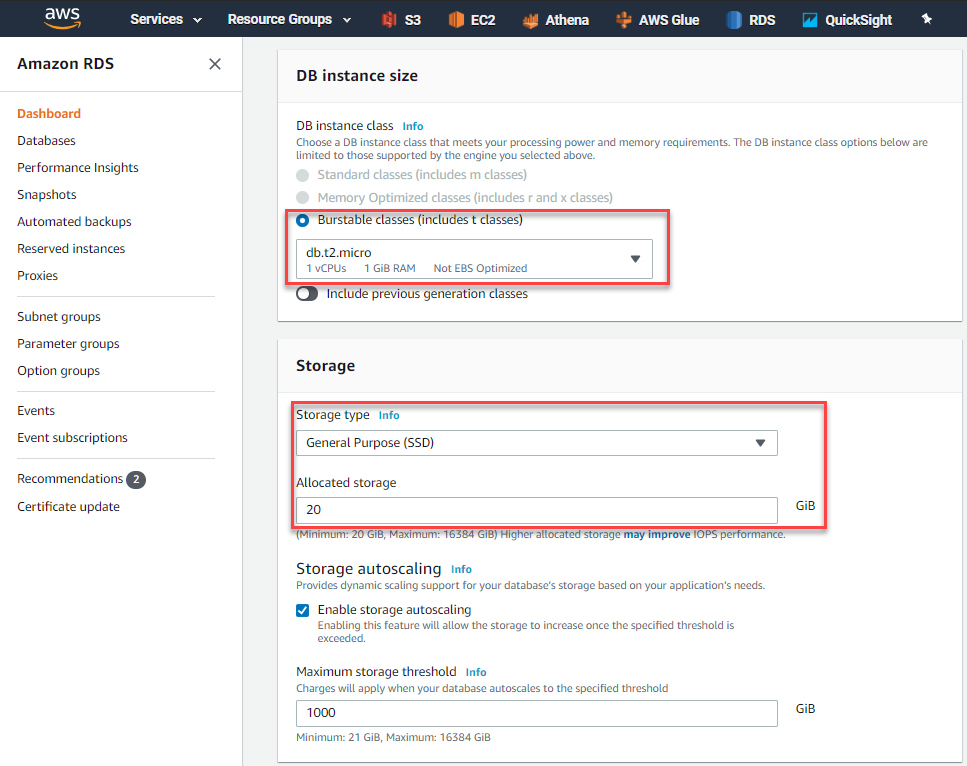
Figure 5 – Specifying the DB Instance Size
图5 –指定数据库实例大小
In the next step, we should define the Connectivity settings for the RDS Database instance. Select the default VPC connection that is already available within your login. For my use case, I have already created some RDS instances previously, so I’ll be using the same VPC for this instance as well. Additionally, we should also add a Subnet Group within the VPC connection. Since we will be accessing the database instance from outside the AWS Environment, we should enable the Publicly Accessible to Yes. Finally, for VPC Security Group, select “Choose Existing” and proceed forward.
在下一步中,我们应该为RDS数据库实例定义连接设置。 选择您的登录名中已经可用的默认VPC连接。 对于我的用例,我之前已经创建了一些RDS实例,所以我也将为此实例使用相同的VPC 。 此外,我们还应该在VPC连接中添加一个子网组 。 由于我们将要从AWS环境外部访问数据库实例,因此我们应该将“可公开访问 ”启用为“ 是” 。 最后,对于VPC安全组 ,选择“ 选择现有 ”,然后继续。
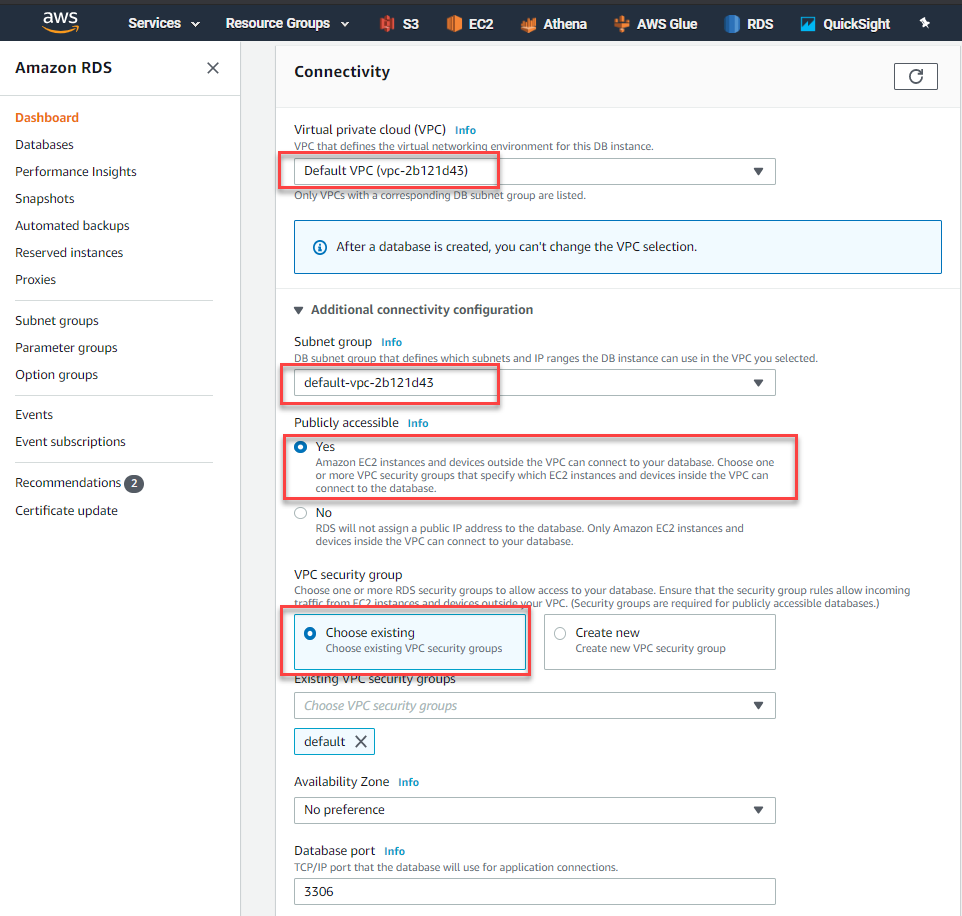
Figure 6 – Configuring Connectivity Settings for AWS RDS
图6 –为AWS RDS配置连接设置
Now that most of the configuration is done, the final step in creating the database is to select the Database Authentication Mode as Password Authentication. Once completed, click on Create Database.
现在,大多数配置已完成,创建数据库的最后一步是选择数据库身份验证模式作为密码身份验证。 完成后,点击创建数据库 。
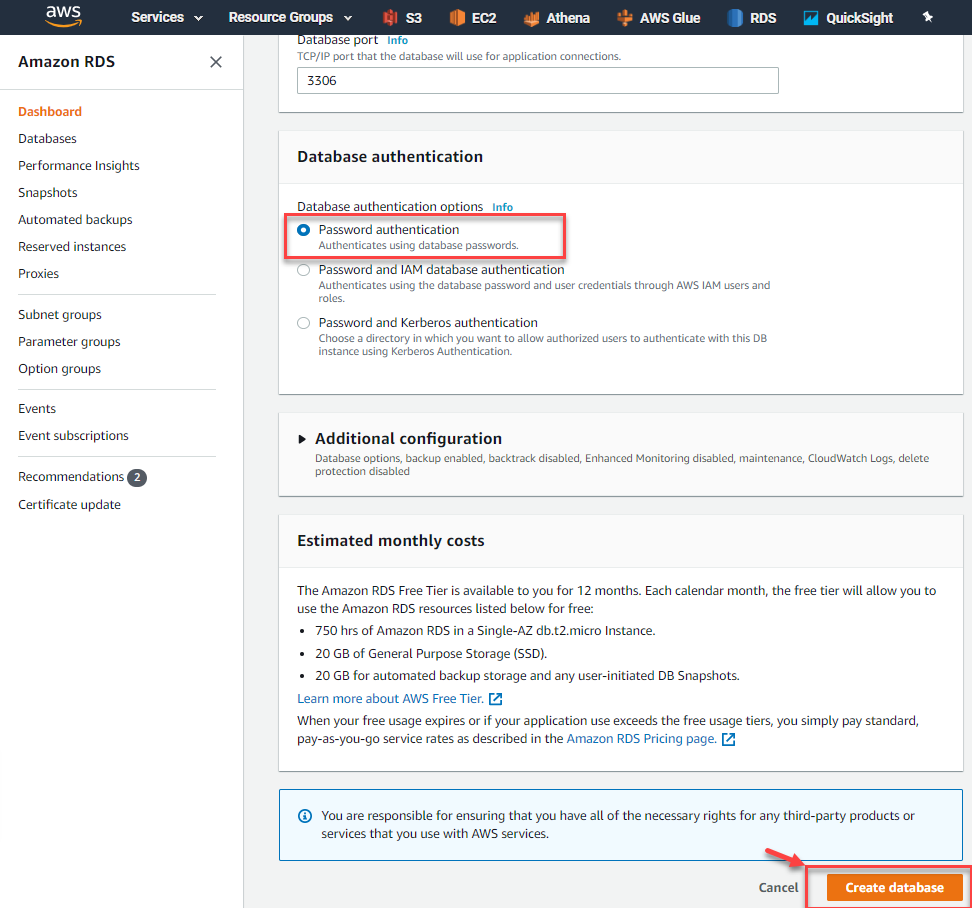
Figure 7 – Create Database in AWS RDS
图7 –在AWS RDS中创建数据库
3.配置RDS MySQL环境 (3. Configuring the RDS MySQL Environment)
Once you click on Create Database in the previous step, it might take a while for AWS to create the RDS instance and make it available for use. After a few moments, you will receive a notification that says the database has been created successfully.
在上一步中单击“ 创建数据库”后,AWS可能需要一段时间才能创建RDS实例并使之可用。 片刻之后,您将收到一条通知,指出数据库已成功创建。
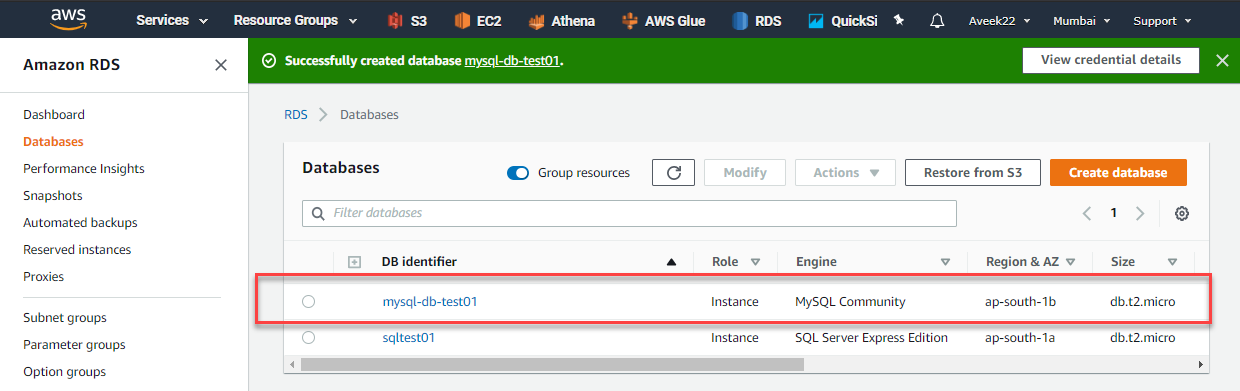
Figure 8 – RDS Instance for MySQL Created Successfully
图8 –已成功创建MySQL的RDS实例
As you can see in the figure above, I have already created an RDS instance for SQL Server previously, the newly added MySQL Community instance is also added to the Databases list. Go ahead and click on the DB Identifier for the MySQL Database. A new page will open containing more information about the MySQL database instance. The important thing to note here is the Endpoint which is available. This endpoint information will be used later to connect to the instance using the MySQL Workbench tool.
如上图所示,我以前已经为SQL Server创建了RDS实例,新添加MySQL Community实例也已添加到Databases列表中。 继续并单击“ MySQL数据库的数据库标识符”。 将打开一个新页面,其中包含有关MySQL数据库实例的更多信息。 这里要注意的重要事项是可用的端点。 稍后将使用此端点信息通过MySQL Workbench工具连接到实例。
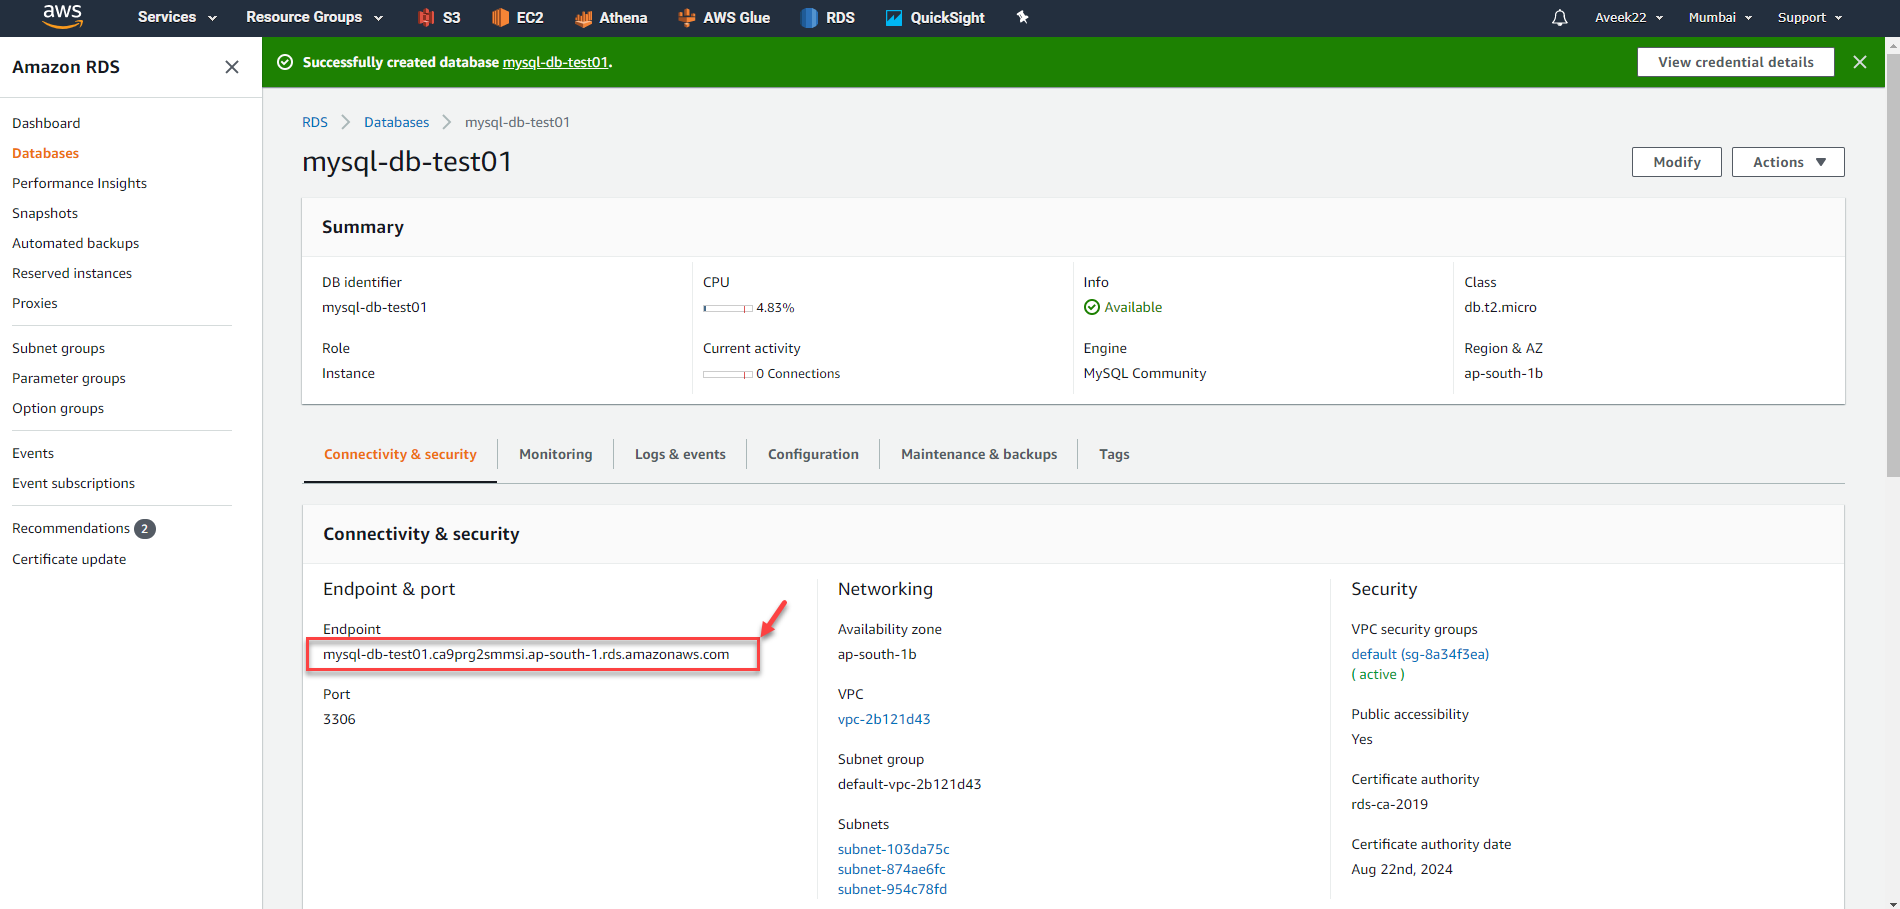
Figure 9 – MySQL Database Instance
图9 – MySQL数据库实例
The next step here is to allow connections from the public network to allow and connect to the instance. In order to enable this, click on the VPC Security Groups and then open the new page.
下一步是允许来自公共网络的连接以允许并连接到实例。 为了启用此功能,请单击VPC安全组 ,然后打开新页面。
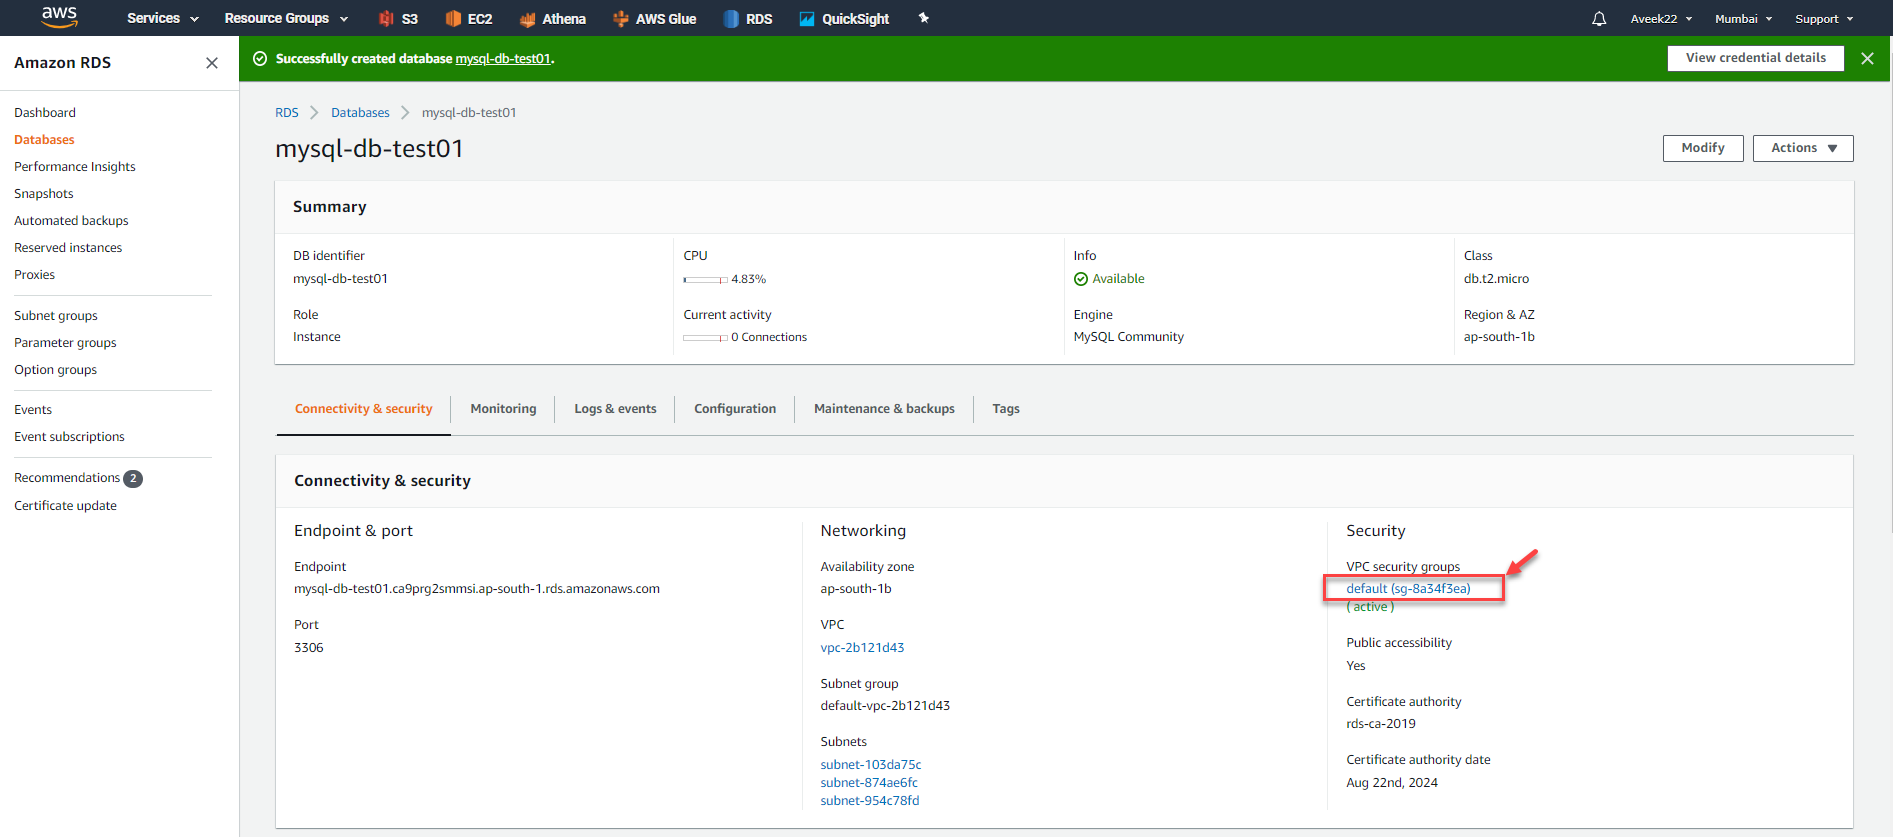
Figure 10 – VPC Security Groups
图10 – VPC安全组
In the following page that appears, select the Security Group ID and open it.
在出现的以下页面中,选择安全组ID并打开它。

Figure 11 – Security Group ID
图11 –安全组ID
In the Security Group page, select the Edit Inbound Rules button. This will allow us to edit the IP addresses that will have access to the MySQL Database instance.
在“ 安全组”页面中,选择“ 编辑入站规则”按钮。 这将使我们能够编辑可访问MySQL数据库实例的IP地址。
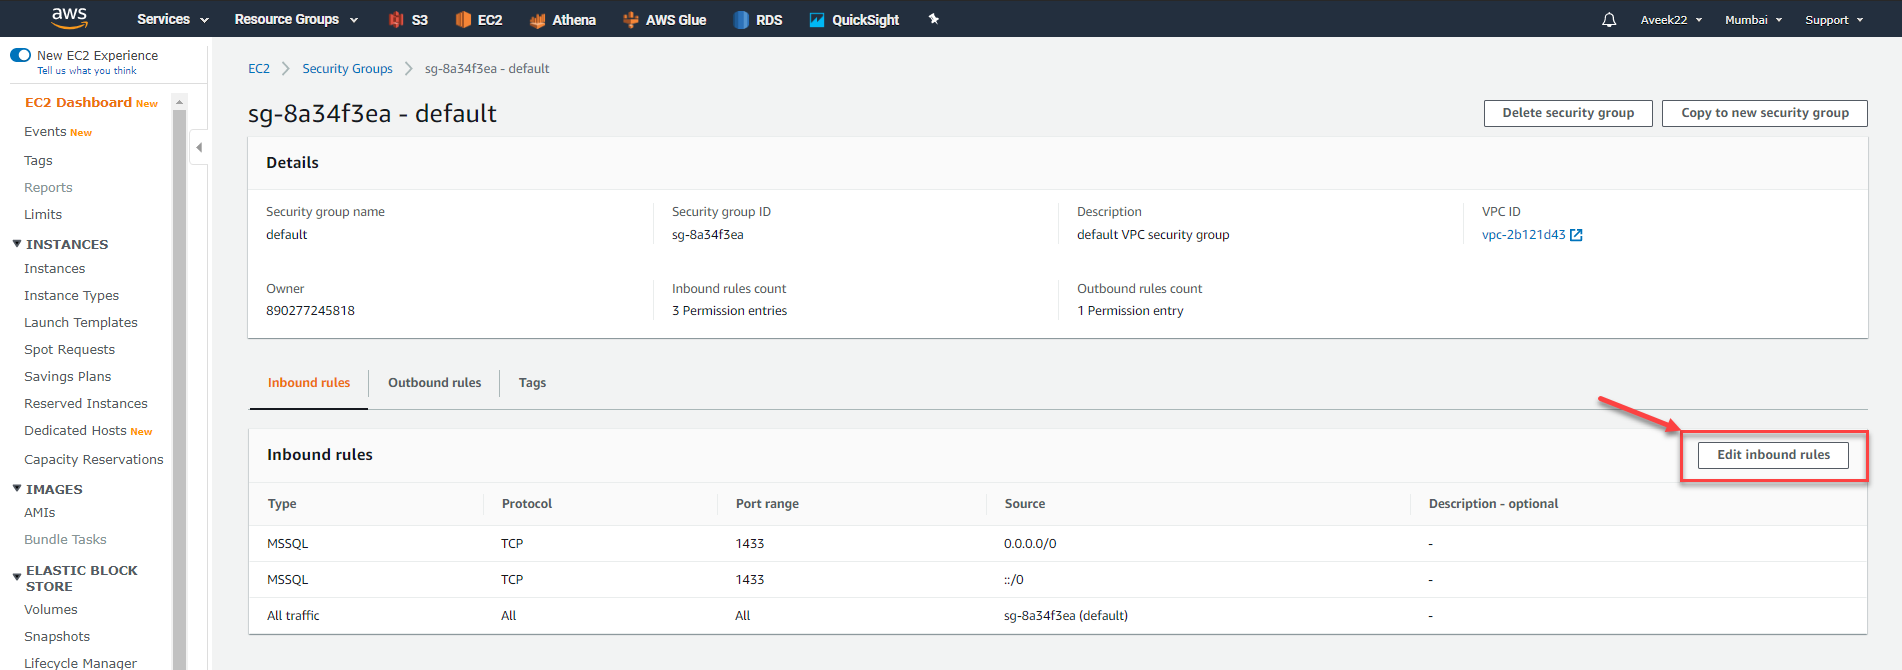
Figure 12 – Select Edit Inbound Rules
图12 –选择编辑入站规则
The Edit Inbound Rule page appears. On this page, we will add a custom rule which allows any IP address to connect to the RDS Instance on the port 3306. The port 3306 is the default port on which MySQL is usually configured. If you are using any other port, you should allow traffic to that specific port instead.
出现“ 编辑入站规则”页面。 在此页面上,我们将添加一个自定义规则,该规则允许任何IP地址通过端口3306连接到RDS实例。端口3306是通常在其上配置MySQL的默认端口。 如果使用任何其他端口,则应允许该特定端口的通信。
Click on the Add Rule button and select the Source as Anywhere. This will allow all traffic from outside the AWS environment to connect to the MySQL instance on the RDS. Click on Save Rules once done.
单击“ 添加规则”按钮,然后将“ 源”选择为“ 任意位置” 。 这将允许来自AWS环境外部的所有流量连接到RDS上MySQL实例。 完成后,单击“ 保存规则” 。
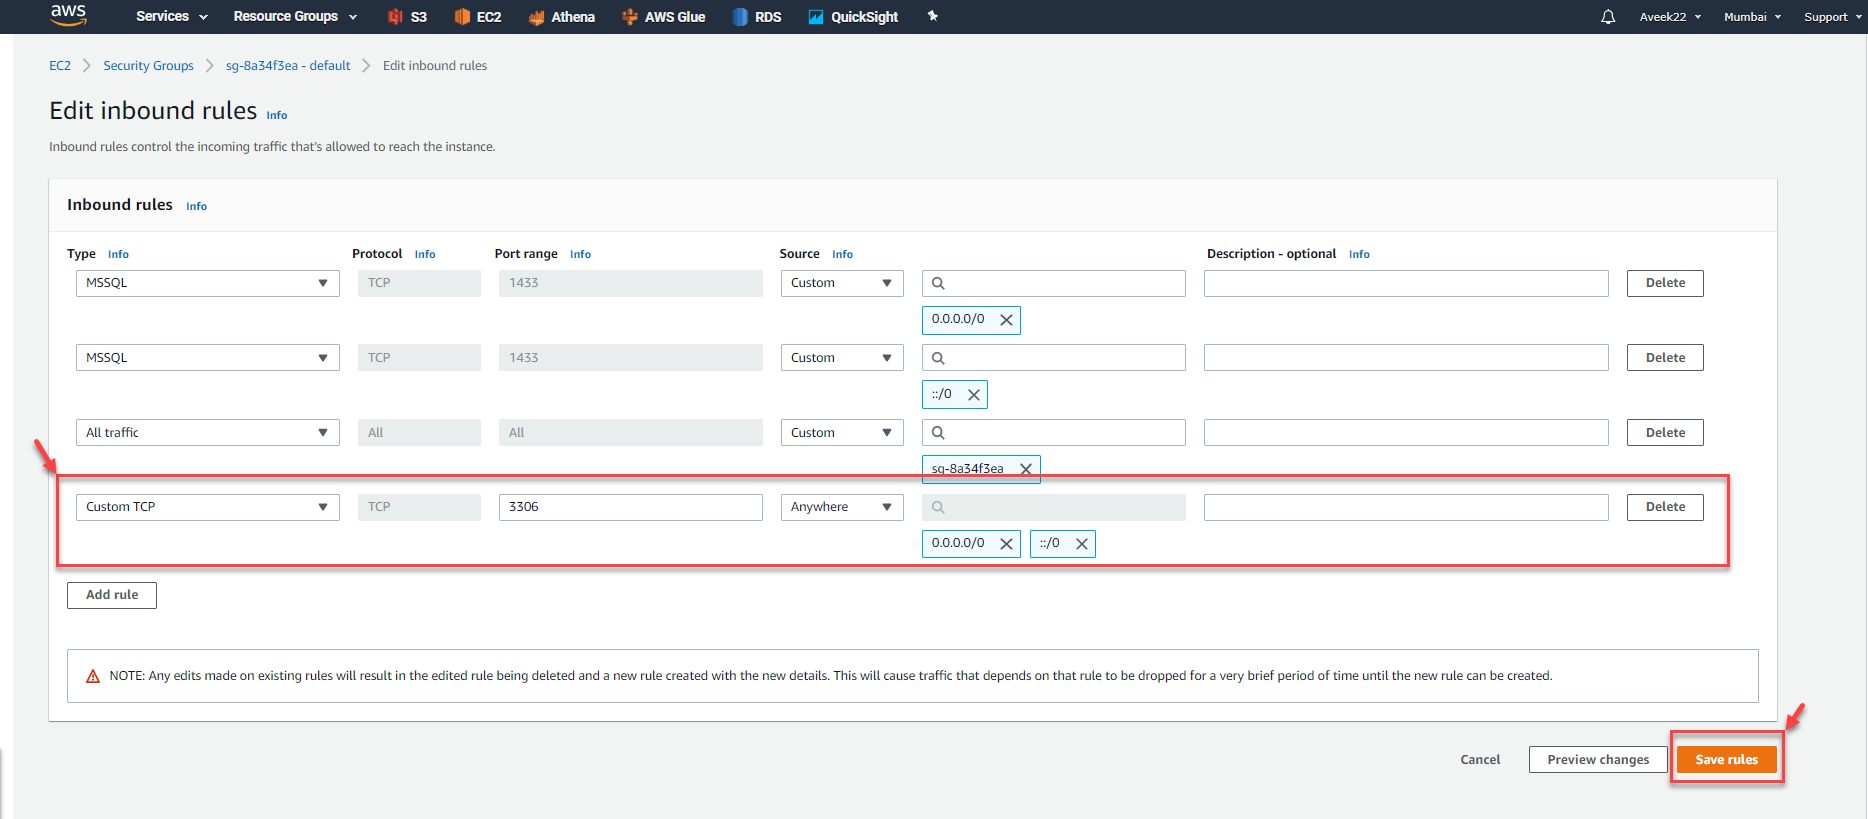
Figure 13 – Allow Inbound Connections
图13 –允许入站连接
You can see that the new rules have been added to the list and are now effective.
您可以看到新规则已添加到列表中,并且现已生效。
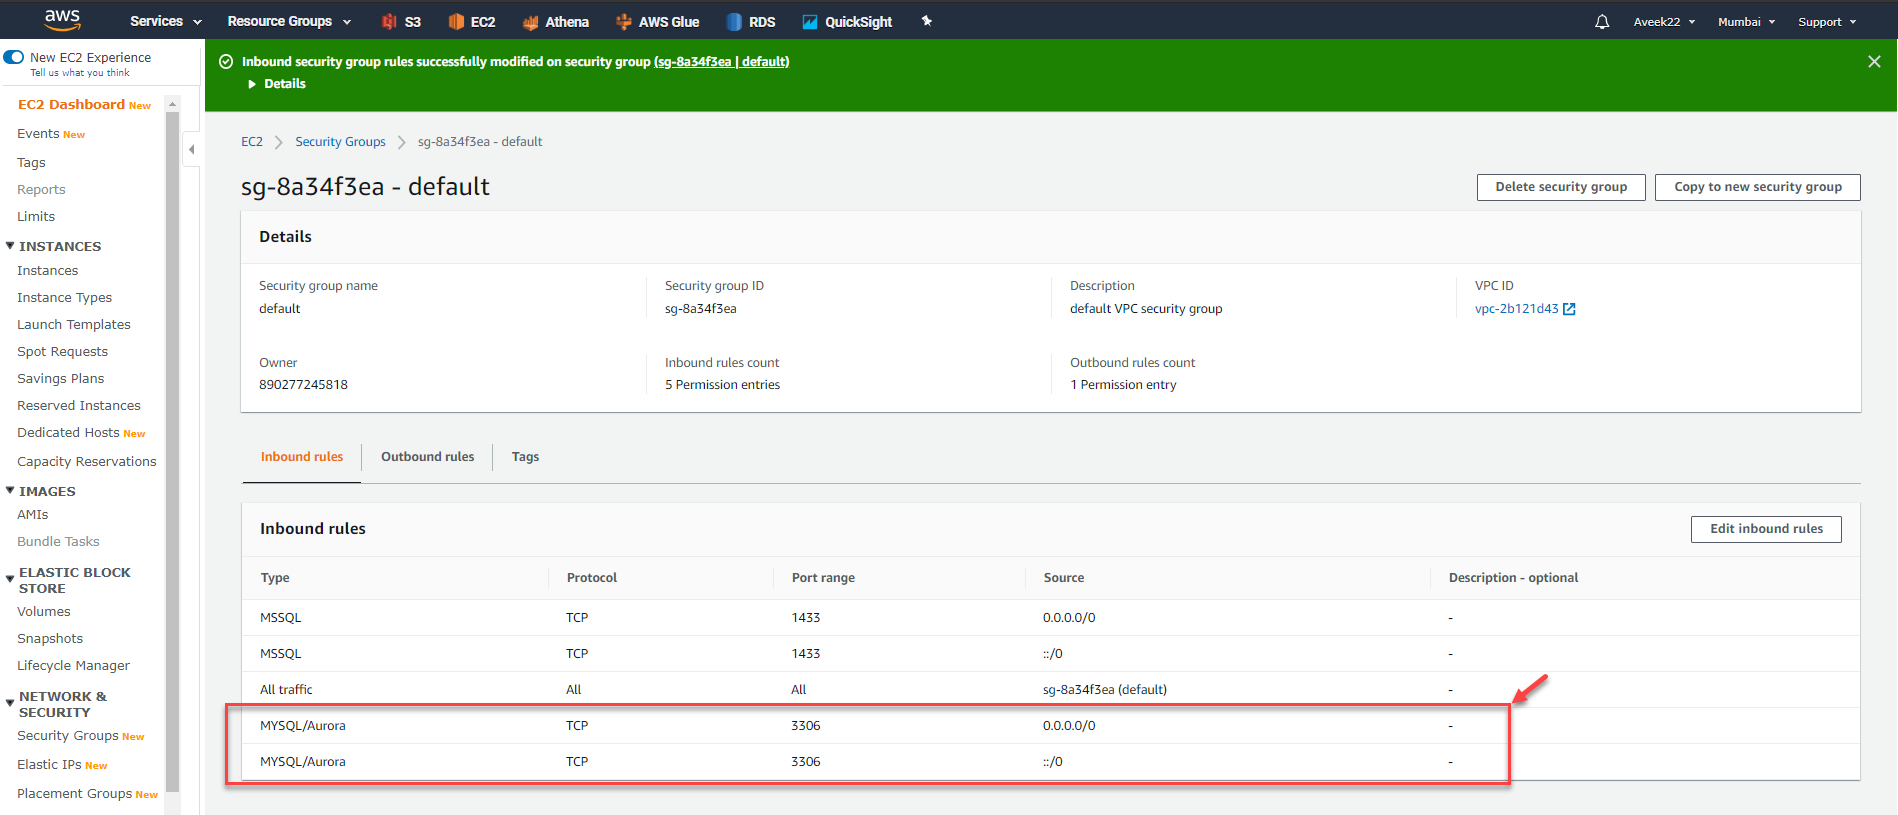
Figure 14 – Added Inbound Rules for MySQL
图14 –为MySQL添加的入站规则
4.使用MySQL Workbench连接到RDS环境 (4. Connecting to the RDS environment using MySQL Workbench)
Once we have created the database and all the necessary configurations are done, it is now time that we go ahead and connect to the instance. We will be using MySQL Workbench to connect to the RDS instance. You can also choose any other tool to connect to the instance and it will work the same.
创建数据库并完成所有必要的配置后,现在该我们继续并连接到实例了。 我们将使用MySQL Workbench连接到RDS实例。 您还可以选择任何其他工具来连接到实例,并且它的工作原理相同。
Enter the endpoint that we copied in the previous steps as the hostname and the master username as the username here and click on Test Connection.
在此处输入我们在先前步骤中复制的端点作为主机名,并输入主用户名作为用户名,然后单击“ 测试连接” 。
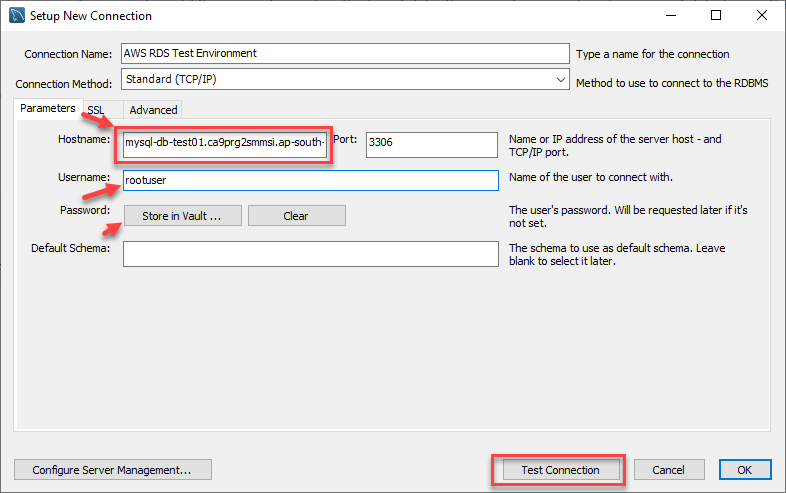
Figure 15 – Connecting to the RDS Instance
图15 –连接到RDS实例
You might be prompted to provide the password in the next step.
可能会提示您在下一步中提供密码。
Figure 16 – Password to connect to RDS
图16 –连接到RDS的密码
If the connection is successful, you will receive a notification saying the connection has been successful.
如果连接成功,您将收到一条通知,指出连接成功。
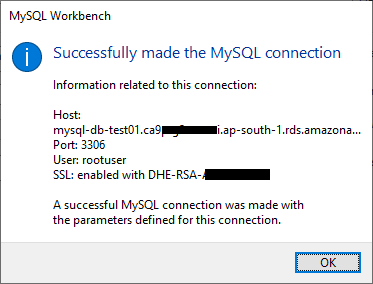
Figure 17 – MySQL Connection Successful
图17 – MySQL连接成功
You can now go ahead and create your own schemas and tables in the RDS Instance.
现在,您可以继续在RDS实例中创建自己的架构和表。
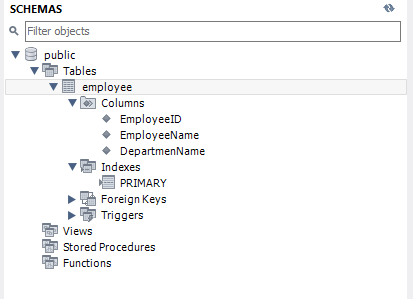
Figure 18 – Connected to RDS Instance
图18 –连接到RDS实例
结论 (Conclusion)
Amazon RDS is the relational database service offered by AWS using which it is very easy to start any RDBMS without worrying much about the infrastructure. In this article, we have seen how to configure the RDS MySQL Environment in AWS. We have also seen how to create the MySQL instance and how to allow remote connections to it from an external server. Finally, we have connected to the RDS MySQL Environment using the MySQL Workbench in local and executed simple queries.
Amazon RDS是AWS提供的关系数据库服务,使用它可以很容易地启动任何RDBMS,而无需过多担心基础架构。 在本文中,我们已经看到了如何在AWS中配置RDS MySQL环境。 我们还看到了如何创建MySQL实例,以及如何允许从外部服务器对其进行远程连接。 最后,我们使用MySQL Workbench在本地和执行的简单查询中连接到RDS MySQL环境。
翻译自: https://www.sqlshack.com/how-to-configure-amazon-rds-mysql-environment/
mysql rds


 473
473


 被折叠的 条评论
为什么被折叠?
被折叠的 条评论
为什么被折叠?
 到【灌水乐园】发言


