


sql azure 语法
Lately, database administrators often hear the question “have you tried Azure?“ or “can we use Azure for some of our databases?“. For me it was hard to answer these questions at first, but after a while I got to know what is really important behind these situations. In fact, what really matters is assessing the current environment, calculating the most suitable pricing tier and preparing a smooth migration.
最近,数据库管理员经常听到“您是否尝试过Azure?”或“我们可以对某些数据库使用Azure吗?”的问题。 对我来说,一开始很难回答这些问题,但过了一会儿我才知道在这些情况下真正重要的是什么。 实际上,真正重要的是评估当前环境,计算最合适的定价层并准备平稳迁移。
Within the article we will cover the following steps:
在本文中,我们将介绍以下步骤:
- calculating the Database transaction units (DTUs) and choosing a suitable pricing tier 计算数据库交易单位(DTU)并选择合适的定价层
- preparing an on premise SQL database for a migration to Azure 准备内部SQL数据库以迁移到Azure
- and migrating your database 并迁移您的数据库
Assessing your current environment has been made easier, with the advent of Azure SQL Database DTU Calculator* which allows you to calculate the required Database transaction units and the suitable pricing tier.
随着Azure SQL数据库DTU计算器 *的问世,使当前环境的评估变得更加容易,它使您可以计算所需的数据库交易单位和合适的定价层。
The calculator provides you with a PowerShell script to use, but let us do it the hard way. There are four counters we would need. I’ve added them to performance monitor and captured data for one hour and before that I have started a normal workload operations to run.
该计算器为您提供了一个PowerShell脚本供您使用,但让我们用困难的方式来做。 我们将需要四个计数器。 我将它们添加到性能监视器并捕获了一个小时的数据,然后才开始运行正常的工作负载操作。
The counters include:
计数器包括:
Processor – % Processor Time
Logical Disk – Disk Reads/sec
Logical Disk – Disk Writes/sec
Database – Log Bytes Flushed/sec
处理器–处理器时间百分比
逻辑磁盘–磁盘读取/秒
逻辑磁盘–磁盘写入/秒
数据库–刷新的日志字节/秒
Once we have the *.blg file with the data we should export it to a comma separated values (CSV) file using the RELOG utility, and then upload it to the Azure SQL Database DTU Calculator.
有了包含数据的* .blg文件后,我们应该使用RELOG实用程序将其导出到逗号分隔值(CSV)文件,然后将其上传到Azure SQL数据库DTU计算器。
C:\ >relog “Performance Counter.blg” -f csv -o perlog.csv
C:\>重新记录“ Performance Counter.blg” -f csv -o perlog.csv
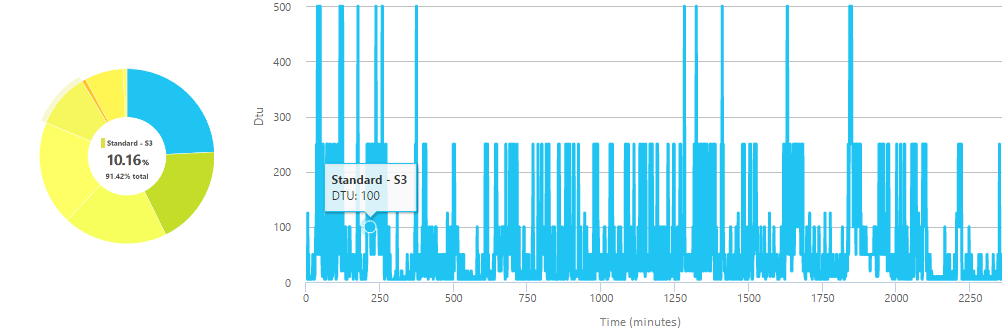
The outcome, for the instance I have, is showing me that most of my workload is below 250 DTUs and 95% of it can be covered by the tier ‘Standard – S3’ which is limited at 100 DTUs.
以我的情况为例,结果显示出我的大部分工作量低于250 DTU,而其中的95%可以由“标准– S3”层(仅限于100 DTU)覆盖。
To prepare your on premise SQL database for the migration we would need to find if there are any compatibility issues and fix them. There are several ways to do this, but in our case we will use SQL Server Data tools for Visual Studio.
为了为迁移准备内部SQL数据库,我们需要查找是否存在兼容性问题并加以解决。 有几种方法可以执行此操作,但在我们的案例中,我们将使用Visual StudioSQL Server数据工具。
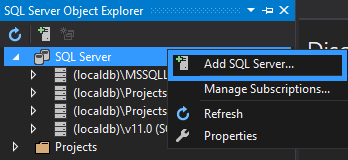
As a start, we will import the database schema of the database we will be migrating, to do so, in Visual Studio open the SQL Server Object explorer and add a new SQL Server – the one where your database is hosted.
首先,我们将导入要迁移的数据库的数据库架构,为此,请在Visual Studio中打开“ SQL Server对象”资源管理器并添加一个新SQL Server-承载数据库的服务器。
After locating your database, right click on it and create a new project.
找到数据库后,右键单击它并创建一个新项目。
Within the ‘Import database’ box under the import settings make sure that you are importing the application-scoped objects only and skipping the referenced logins, permissions and the database settings.
在导入设置下的“导入数据库”框中,请确保仅导入应用程序范围的对象,并跳过引用的登录名,权限和数据库设置。
Within the solution explorer you will see all objects scripted in their own files and distributed among different containers. Once the schema import is completed, it is required to configure the desired platform to which the project will be published, in our case that would be the latest version of Azure SQL Databases.
在解决方案资源管理器中,您将看到所有脚本编写在自己的文件中并分布在不同容器中的对象。 架构导入完成后,需要配置将项目发布到的所需平台,在我们的示例中,该平台将是Azure SQL数据库的最新版本。
Open the Properties of the solution to configure the target platform.
打开解决方案的属性以配置目标平台。
From the list of ‘Target platforms’ choose ‘Microsoft Azure SQL Database V12’.
从“目标平台”列表中,选择“ Microsoft Azure SQL数据库V12”。
Once this is completed, we can now do the first build of the project to verify that there are not any errors.
完成此操作后,我们现在可以进行项目的第一个构建,以验证没有任何错误。
To do so right click on the solution and select Build to build the project.
为此,请在解决方案上单击鼠标右键,然后选择“构建”以构建项目。
Most of the times there will be Errors or Warnings detected and displayed on the ‘Error list’ for each incompatibility.
在大多数情况下,每种不兼容都会检测到错误或警告并将其显示在“错误列表”中。
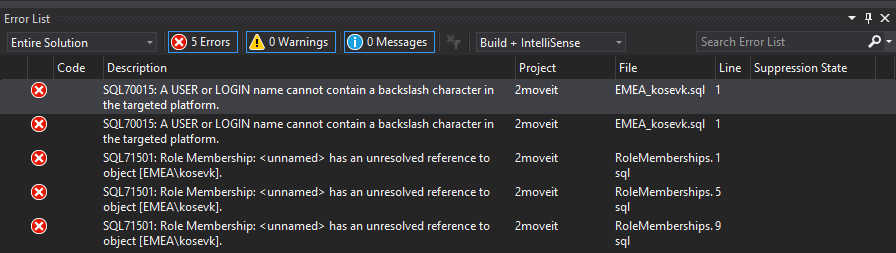
From the details in the ‘Error List’ you can see that within the files EMEA_kosevk.sql and RoleMemberships.sql there are incompatibilities. To fix them you should either edit or remove the T-SQL code causing it. In our case there is a login containing a backslash character and three references to it. To fix the error in this case we should remove the T-SQL code.
从“错误列表”中的详细信息中,您可以看到在文件EMEA_kosevk.sql和RoleMemberships.sql中存在不兼容性。 要修复它们,您应该编辑或删除引起它的T-SQL代码。 在我们的例子中,有一个包含反斜杠字符和三个引用的登录名。 为了解决这种情况下的错误,我们应该删除T-SQL代码。
Note that there are features that are not supported** in Azure SQL Databases such as ‘EXECUTE AS logins’ or Global temporary tables, be sure to check them.
请注意,Azure SQL数据库中有一些不支持的功能**,例如“ EXECUTE AS登录名”或全局临时表,请务必检查它们。
Once your database is verified for compatibility errors we can now publish the schema as a copy of the database, depending on the version of your SQL Server you may need to change the target platform. As we are using SQL Server 2016 we can move forward.
一旦验证了数据库的兼容性错误,我们现在就可以将架构发布为数据库的副本,具体取决于您可能需要更改目标平台SQL Server版本。 在使用SQL Server 2016时,我们可以继续前进。
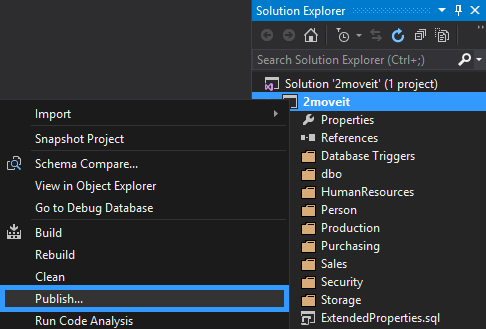
Start the publishing process by right clicking the project and then Publish.
右键单击项目,然后单击发布,开始发布过程。
Once the Publish operations completes successfully, we now have a compatible with Azure SQL databases copy of the schema.
一旦发布操作成功完成,我们现在就具有与架构的Azure SQL数据库副本兼容的功能。
We will now have to load the data in the new database. Using the SQL Server Data tools we will do a Data comparison and with its help we will move the data.
现在,我们必须将数据加载到新数据库中。 使用SQL Server数据工具,我们将进行数据比较,并在其帮助下移动数据。
In the SQL Server object explorer choose your source database and then right click ‘Data Comparison’.
在SQL Server对象资源管理器中,选择您的源数据库,然后右键单击“数据比较”。
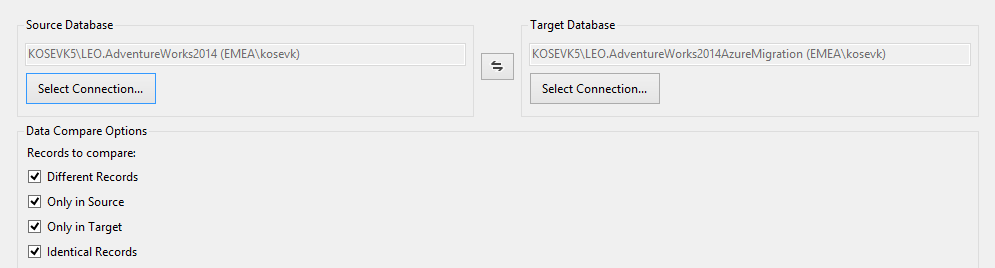
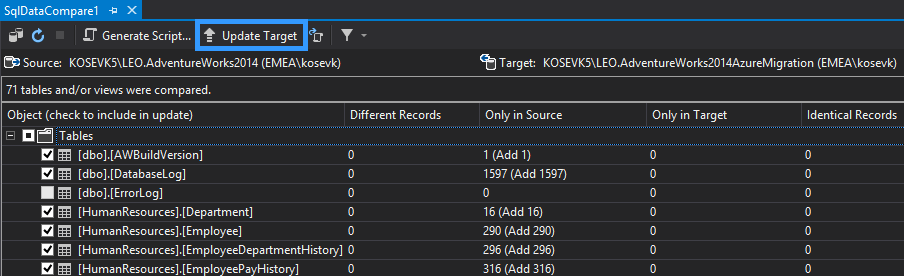
You can now review the differences between the two databases and if everything looks good on your side, click Update Target to migrate data from our source database in the one we are preparing for the migration.
现在,您可以查看这两个数据库之间的差异,如果一切看起来都不错,请单击“更新目标”以从源数据库中迁移数据,而我们正在为迁移做准备。
An alternative for medium to big databases, is to use Transactional Replication or BCP utility for both data load (or skip the data load) and the migration to Azure.
中型到大型数据库的替代方法是对数据加载(或跳过数据加载)和向Azure的迁移使用事务复制或BCP实用程序。
To migrate our database to Azure we will be using the SQL Server Management Studio.
要将数据库迁移到Azure,我们将使用SQL Server Management Studio。
There are of course other ways to do the same, easiest of all is using the SQL Database migration Wizard***. You can of course utilize Transactional replication or BACPAC.
当然,还有其他方法可以做到这一点,最简单的方法就是使用SQL数据库迁移向导***。 您当然可以利用事务复制或BACPAC。
Now that the SQL Server Management Studio (SSMS) is a standalone product, there is no excuse not to keep it up to date, this way you ensure that the studio will be in sync with the changes and updates of the Azure portal and API.
现在,SQL Server Management Studio(SSMS)是独立产品,没有任何借口不使它保持最新,这样您就可以确保Studio与Azure门户和API的更改和更新同步。
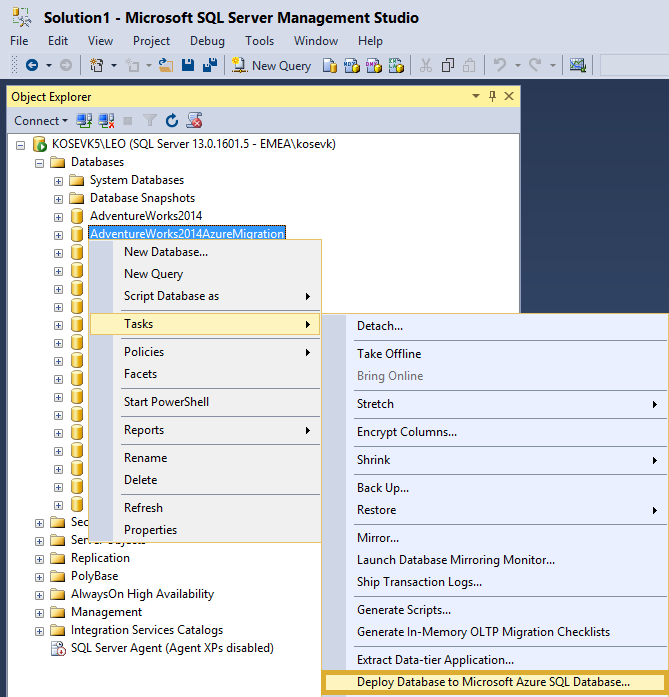
To start the migration within SSMS right click on the database copy we prepared, then Tasks, Deploy Database to Microsoft Azure SQL Database.
要在SSMS中开始迁移,请右键单击我们准备的数据库副本,然后单击“任务”,“将数据库部署到Microsoft Azure SQL数据库”。
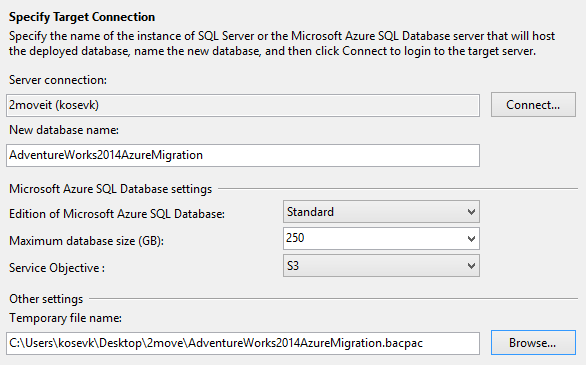
Configure the connection details and the Azure SQL Database settings.
配置连接详细信息和Azure SQL数据库设置。
The SQL Server 2moveit.database.windows.net has been created in advance. The results from the DTU calculations we have performed in the beginning will help us set the correct edition and service objective now. Additionally notice that the migration wizard is creating a temporary .bakpac file as well.
预先创建了SQL Server 2moveit.database.windows.net。 我们从一开始就进行的DTU计算得出的结果将帮助我们现在设置正确的版本和服务目标。 另外请注意,迁移向导也正在创建一个临时.bakpac文件。
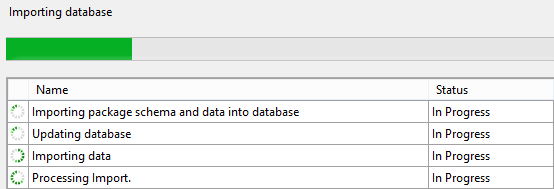
Once the process is started the .bacpac file will be filled with a data and then loaded to the Azure SQL Database. Depending on the speed of your disks and internet connection this may take a while.
该过程开始后,.bacpac文件将填充数据,然后加载到Azure SQL数据库。 根据磁盘和互联网连接的速度,这可能需要一段时间。
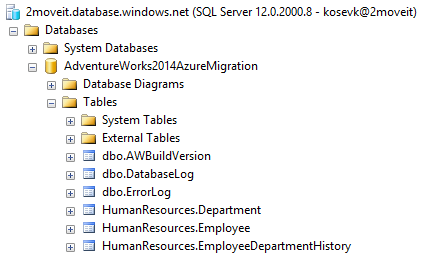
After the operation is completed we can see our migrated database.
操作完成后,我们可以看到我们的迁移数据库。
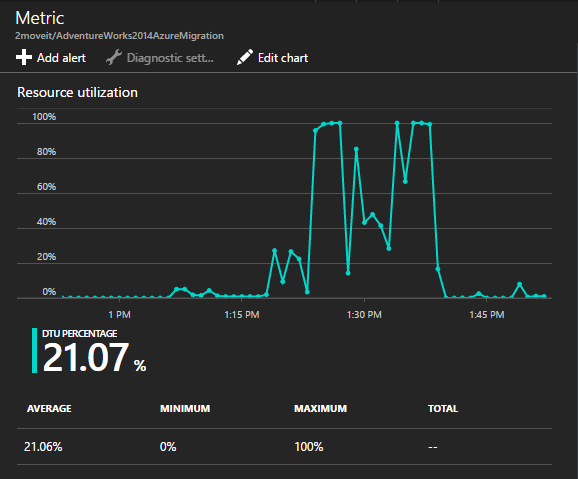
Upon creating our database we have set a DTU limit, however during the application lifecycle there may be need to extend them and choose a higher pricing tier. The recommendations from the DTU calculator do provide a good starting point, however it is best to monitor your databases after migrations to determine if the initial configurations are right for you. Azure SQL database provides you with overview of your database performance directly from the Azure Portal and directly from query your database****.
创建数据库后,我们已经设置了DTU限制,但是在应用程序生命周期中,可能需要扩展它们并选择更高的定价层。 DTU计算器的建议确实提供了一个很好的起点,但是,最好在迁移后监视数据库,以确定初始配置是否适合您。 Azure SQL数据库直接从Azure门户和直接从数据库查询中为您提供数据库性能的概述****。
翻译自: https://www.sqlshack.com/migrate-premise-sql-server-database-azure/
sql azure 语法


 285
285

 被折叠的 条评论
为什么被折叠?
被折叠的 条评论
为什么被折叠?
 到【灌水乐园】发言


