


innodb 集群
In this article, I am going to explain how we can deploy the MySQL InnoDB cluster. InnoDB Cluster is a high availability solution provided by MySQL that has single and multi-master capabilities and failover detection.
在本文中,我将解释如何部署MySQL InnoDB集群。 InnoDB Cluster是MySQL提供的高可用性解决方案,具有单主机和多主机功能以及故障转移检测功能。
MySQL InnoDB has three major components:
MySQL InnoDB具有三个主要组件:
- MySQL group replication – It is a group of database servers. It replicates the MySQL databases across the multiple nodes, and it has fault tolerance. When changes in the data occur in the MySQL databases, it automatically replicates to the secondary nodes of the server. The concept of the MySQL group replication is similar to the concept of the AlwaysOn availability group MySQL组复制 –它是一组数据库服务器。 它跨多个节点复制MySQL数据库,并且具有容错能力。 当MySQL数据库中的数据发生更改时,它将自动复制到服务器的辅助节点。 MySQL组复制的概念类似于AlwaysOn可用性组的概念
- MySQL Router – When a failover occurs, the client application must be aware of the PRIMARY instance and cluster topology. This functionality is handled by the MySQL Router. It routes that redirects the data requests to the available MySQL Server instance. MySQL Router acts as a proxy that is used to hide the multiple MySQL database servers. The concept of the MySQL Router is similar to the MySQL路由器 –发生故障转移时,客户端应用程序必须了解PRIMARY实例和群集拓扑。 该功能由MySQL路由器处理。 它路由将数据请求重定向到可用MySQL Server实例。 MySQL路由器充当用于隐藏多个MySQL数据库服务器的代理。 MySQL路由器的概念类似于Windows Server故障转移群集的Virtual network name of the Windows Server failover cluster 虚拟网络名称 。
- MySQL Shell – It is a configuration tool that can be used to connect, deploy, and manage the MySQL InnoDB cluster. MySQL Shell contains an Admin API that has a MySQL Shell –这是一个配置工具,可用于连接,部署和管理MySQL InnoDB集群。 MySQL Shell包含一个具有dbadbadbadba
To demonstrate the deployment process, I have created three virtual machines on my workstation. I have installed ubuntu 18.04 and MySQL Server 8.0 on the virtual machines. In this article, I am not going to explain the installation process of the MySQL Server on Linux. You can read How to install MySQL on Ubuntu article to understand the step by step installation process of MySQL Server on Ubuntu 18.04.
为了演示部署过程,我在工作站上创建了三个虚拟机。 我已经在虚拟机上安装了ubuntu 18.04和MySQL Server 8.0 。 在本文中,我将不解释在Linux上安装MySQL Server的过程。 您可以阅读如何在Ubuntu上安装MySQL的文章,以了解在Ubuntu 18.04上MySQL Server的逐步安装过程。
Following is the configuration of the virtual machines.
以下是虚拟机的配置。
| Host Name | IP Address | Operating System and MySQL Server version |
| SQLLinux01 | 192.168.0.107 | Ubuntu 18.04 , MySQL Server 8.0 |
| SQLLinux02 | 192.168.0.101 | Ubuntu 18.04 , MySQL Server 8.0 |
| SQLLinux03 | 192.168.0.105 | Ubuntu 18.04 , MySQL Server 8.0 |
主机名 | IP地址 | 操作系统和MySQL服务器版本 |
SQLLinux01 | 192.168.0.107 | Ubuntu 18.04,MySQL服务器8.0 |
SQLLinux02 | 192.168.0.101 | Ubuntu 18.04,MySQL服务器8.0 |
SQLLinux03 | 192.168.0.105 | Ubuntu 18.04,MySQL服务器8.0 |
I have also installed the following software.
我还安装了以下软件。
Vi editor: This tool is used to configure or edit the configuration file. You can install it by executing the following command:
Vi编辑器:此工具用于配置或编辑配置文件。 您可以通过执行以下命令来安装它:
nisarg@LinuxSQL01:~$ sudo apt-get install vi
nisarg @ LinuxSQL01:〜$ sudo apt-get安装vi
Net tools: It is a networking tool that can be used to test the connectivity between the nodes/servers. You can install it by executing the following command:
网络工具:这是一种网络工具,可用于测试节点/服务器之间的连接。 您可以通过执行以下命令来安装它:
nisarg@LinuxSQL01:~$ sudo apt-get install net-tools
nisarg @ LinuxSQL01:〜$ sudo apt-get install net-tools
I have divided the entire process of deploying the MySQL InnoDB cluster into the following steps:
我已将部署MySQL InnoDB集群的整个过程分为以下步骤:
- Map Domain Address with IP Address 用IP地址映射域名
- Configure MySQL Server to allow remote connections 配置MySQL服务器以允许远程连接
- Create a MySQL administrator user in and grant privileges 在其中创建MySQL管理员用户并授予特权
- Configure the group replication using MySQL Shell 使用MySQL Shell配置组复制
- Create a MySQL InnoDB cluster using MySQL Shell 使用MySQL Shell创建MySQL InnoDB集群
- Configure the MySQL Router using MySQL Shell 使用MySQL Shell配置MySQL路由器
- Monitor, manage, and scale the MySQL InnoDB cluster 监视,管理和扩展MySQL InnoDB集群
用IP地址映射域名 (Map Domain address with IP Address)
To map the domain address with IP Address, we must edit the hosts file. On Linux, the file is in /etc directory. The full path is /etc/hosts. The entries in the hosts file are in the following format:
要将域名与IP地址映射,我们必须编辑主机文件。 在Linux上,该文件位于/ etc目录中。 完整路径是/ etc / hosts 。 主机文件中的条目采用以下格式:
IP addresses DomainName [DomainAliase]
IP地址域名[DomainAliase]
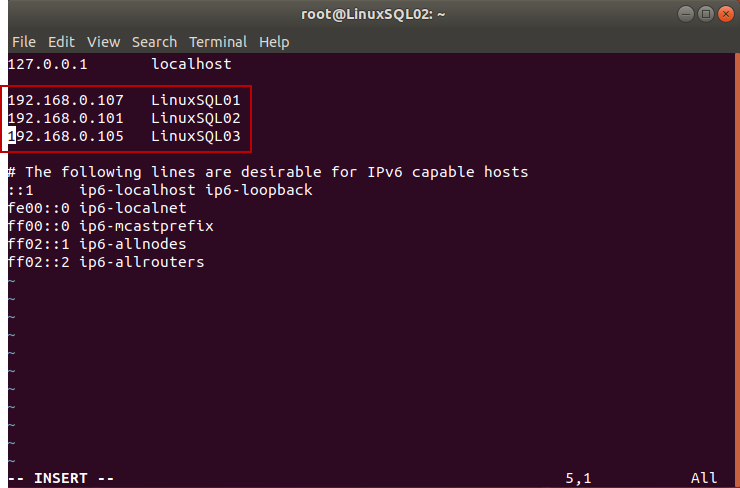
I am going to use vi editor to edit the hosts file. To edit the file, press the ‘I’ key and enter the IP Addresses and the hosts names in the following format.
我将使用vi编辑器来编辑hosts文件。 要编辑文件,请按“ I”键并以以下格式输入IP地址和主机名。
192.168.0.107 LinuxSQL01
192.168.0.101 LinuxSQL02
192.168.0.105 LinuxSQL03
192.168.0.107 LinuxSQL01
192.168.0.101 LinuxSQL02
192.168.0.105 LinuxSQL03
See the following image:
见下图:
Once the file is updated, press ‘:wq’ to save the changes in the hosts file.
文件更新后,按' :wq '将更改保存在主机文件中。
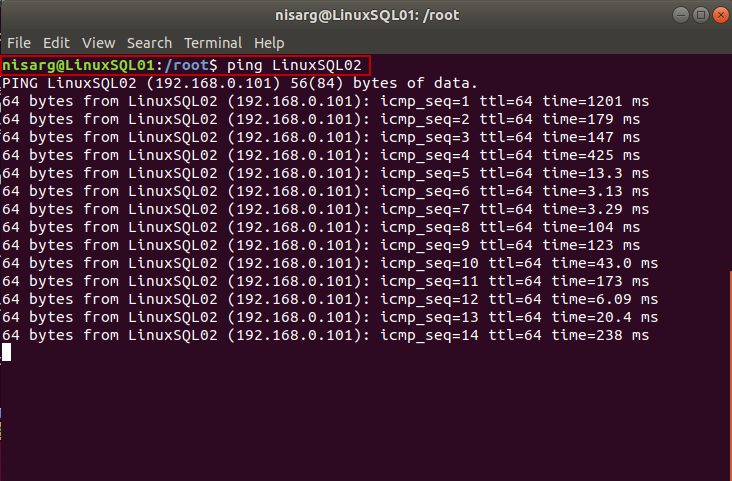
Once IP Addresses are mapped, run the ping command to test the connectivity using the hostname. Run the following command:
映射IP地址后,运行ping命令以使用主机名测试连接性。 运行以下命令:
nisarg@LinuxSQL01:~$ ping LinuxSQL02
nisarg @ LinuxSQL01:〜$ ping LinuxSQL02
See the following image:
见下图:
The above configuration settings must be performed on LinuxSQL02 and LinuxSQL03.
以上配置设置必须在LinuxSQL02和LinuxSQL03上执行。
配置MySQL服务器以允许远程连接 (Configure MySQL Server to allow remote connections)
When we install the MySQL database server, it does not allow remote connection. To connect to the remote connections, we must specify the IP Addresses in the configuration file mysqld.cnf using a text editor. The configuration file is located at /etc/mysql/mysql.conf.d/mysqld.cnf. You must specify the list of IP Addresses in the bind-address parameter. The format is bind-address = ‘IP Address of the Server.’ Specify the IP Addresses in the configuration file. It should look like the following:
当我们安装MySQL数据库服务器时,它不允许远程连接。 要连接到远程连接,我们必须使用文本编辑器在配置文件mysqld.cnf中指定IP地址。 配置文件位于/etc/mysql/mysql.conf.d/mysqld.cnf 。 您必须在bind-address参数中指定IP地址列表。 格式为bind-address ='服务器的IP地址'。 在配置文件中指定IP地址。 它应如下所示:
- Note: If you want to allow all the incoming connections, the value of the 注意:如果要允许所有传入连接,则bind-addressbind-address0.0.0.00.0.0.0
Once changes are applied, save the configuration file by pressing ‘:wq’.
应用更改后,请按' :wq '保存配置文件。
The above configuration settings must be performed on LinuxSQL02 and LinuxSQL03.
以上配置设置必须在LinuxSQL02和LinuxSQL03上执行。
在其中创建MySQL管理员用户并授予特权 (Create a MySQL administrator user in and grant privileges)
Now, let us create a MySQL user and grant appropriate permission to it. To create a user, first, connect to MySQL using the following command:
现在,让我们创建一个MySQL用户并为其授予适当的权限。 要创建用户,首先,使用以下命令连接到MySQL:
root@LinuxSQL01:~# mysql
root @ LinuxSQL01:〜# mysql
Once connected, execute the following command to create a user.
连接后,执行以下命令来创建用户。
Mysql> create user ‘nisarg’ identified by ‘N*****@****’;
Mysql>创建由'N ***** @ ****'标识的用户'nisarg';
Once the user is created, execute the following command to grant appropriate permission to it.
创建用户后,执行以下命令为其授予适当的权限。
GRANT ALL PRIVILEGES ON *.* To ‘nisarg’
将所有特权授予*。*到'nisarg'
If you are not using the root user to configure the group replication, you must grant the following set of permissions on metadata databases to the user.
如果您没有使用root用户来配置组复制,则必须向用户授予对元数据数据库的以下权限集。
| Metadata database | List of permissions to be assigned. |
| All databases | CREATE USER, FILE, PROCESS, RELOAD, REPLICATION CLIENT, REPLICATION SLAVE, SELECT, SHUTDOWN, SUPER |
| All databases that start with mysql | DELETE, INSERT, UPDATE |
| All databases that start with mysql_innodb_cluster_metadata | ALTER, ALTER ROUTINE, CREATE, CREATE ROUTINE, CREATE TEMPORARY TABLES, CREATE VIEW, DELETE, DROP, EVENT, EXECUTE, INDEX, INSERT, LOCK TABLES, REFERENCES, SHOW VIEW, TRIGGER, UPDATE |
| All databases that start with mysql_innodb_cluster_metadata_bkp | ALTER, ALTER ROUTINE, CREATE, CREATE ROUTINE, CREATE TEMPORARY TABLES, CREATE VIEW, DELETE, DROP, EVENT, EXECUTE, INDEX, INSERT, LOCK TABLES, REFERENCES, SHOW VIEW, TRIGGER, UPDATE |
| All databases that start with mysql_innodb_cluster_metadata_previous | ALTER, ALTER ROUTINE, CREATE, CREATE ROUTINE, CREATE TEMPORARY TABLES, CREATE VIEW, DELETE, DROP, EVENT, EXECUTE, INDEX, INSERT, LOCK TABLES, REFERENCES, SHOW VIEW, TRIGGER, UPDATE |
元数据数据库 | 要分配的权限列表。 |
所有数据库 | 创建用户,文件,过程,重新加载,复制客户端,复制从属,选择,关闭,超级 |
所有以mysql开头的数据库 | 删除,插入,更新 |
以mysql_innodb_cluster_metadata开头的所有数据库 | 更改,更改例程,创建,创建例程,创建临时表,创建视图,删除,拖放,事件,执行,索引,插入,锁定表,引用,显示视图,触发,更新 |
以mysql_innodb_cluster_metadata_bkp开头的所有数据库 | 更改,更改例程,创建,创建例程,创建临时表,创建视图,删除,拖放,事件,执行,索引,插入,锁定表,引用,显示视图,触发,更新 |
以mysql_innodb_cluster_metadata_previous开头的所有数据库 | 更改,更改例程,创建,创建例程,创建临时表,创建视图,删除,拖放,事件,执行,索引,插入,锁定表,引用,显示视图,触发,更新 |
Execute the following command to grant permission to the user.
执行以下命令向用户授予权限。
GRANT CREATE USER, FILE, PROCESS, RELOAD, REPLICATION CLIENT, REPLICATION SLAVE, SELECT, SHUTDOWN, SUPER ON *.* TO ‘nisarg’@’%’ WITH GRANT OPTION;
GRANT DELETE, INSERT, UPDATE ON mysql.* TO ‘nisarg’@’%’ WITH GRANT OPTION;
GRANT ALTER, ALTER ROUTINE, CREATE, CREATE ROUTINE, CREATE TEMPORARY TABLES, CREATE VIEW, DELETE, DROP, EVENT, EXECUTE, INDEX, INSERT, LOCK TABLES, REFERENCES, SHOW VIEW, TRIGGER, UPDATE ON mysql_innodb_cluster_metadata.* TO ‘nisarg’@’%’ WITH GRANT OPTION;
GRANT ALTER, ALTER ROUTINE, CREATE, CREATE ROUTINE, CREATE TEMPORARY TABLES, CREATE VIEW, DELETE, DROP, EVENT, EXECUTE, INDEX, INSERT, LOCK TABLES, REFERENCES, SHOW VIEW, TRIGGER, UPDATE ON mysql_innodb_cluster_metadata_bkp.* TO ‘nisarg’@’%’ WITH GRANT OPTION;
GRANT ALTER, ALTER ROUTINE, CREATE, CREATE ROUTINE, CREATE TEMPORARY TABLES, CREATE VIEW, DELETE, DROP, EVENT, EXECUTE, INDEX, INSERT, LOCK TABLES, REFERENCES, SHOW VIEW, TRIGGER, UPDATE ON mysql_innodb_cluster_metadata_previous.* TO ‘nisarg’@’%’ WITH GRANT OPTION;
授予创建用户,文件,过程,重载,复制客户端,复制从属,选择,关闭,超级打开*。*到GRANT选项的'nisarg'@'%';
GRANT DELETE,INSERT,UPDATE on mysql。*使用GRANT OPTION到'nisarg'@'%';
授予ALTER,ALTER ROUTINE,CREATE,CREATE ROUTINE,CREATE TEMPORARY TABLE,CREATE VIEW,DELETE,DROP,EVENT,EXECUTE,INDEX,INSERT,LOCK TABLE,引用,SHOW VIEW,TRIGGER,在mysql_innodb_cluster上更新UPDATE * '%',带有格randint选项;
授予ALTER,ALTER ROUTINE,CREATE,CREATE ROUTINE,CREATE TEMPORARY TABLE,CREATE VIEW,DELETE,DROP,EVENT,EXECUTE,INDEX,INSERT,LOCK TABLE,引用,SHOW VIEW,TRIGGER,在mysql_innodb_club_metadata上的更新**。 '%',带有格randint选项;
授予ALTER,ALTER ROUTINE,CREATE,CREATE ROUTINE,CREATE TEMPORARY TABLE,CREATE VIEW,DELETE,DROP,EVENT,EXECUTE,INDEX,INSERT,LOCK TABLE,引用,SHOW VIEW,TRIGGER,在mysql_innodb_prenis_metadata上的更新TO **。 '%',带有格randint选项;
配置组复制 (Configure the group replication)
To configure the group replication, we are going to use MySQL Shell. We will configure the group replication using the root user.
要配置组复制,我们将使用MySQL Shell。 我们将使用root用户配置组复制。
nisarg@LinuxSQL01:~# Sudo -s
[sudo] password for nisarg:
nisarg @ LinuxSQL01:〜# Sudo -s
nisarg的[sudo]密码:
Provide the correct password of user nisarg and hit enter.
提供用户nisarg的正确密码,然后按Enter。
Once we are connected to the root user, we will connect to the MySQL shell. To do that, execute the following command on terminal
连接到root用户后,我们将连接到MySQL shell。 为此,请在终端上执行以下命令
root@LinuxSQL01:~# mysqlsh LinuxSQL01 -u nisarg
root @ LinuxSQL01:〜# mysqlsh LinuxSQL01 -u nisarg
See the following image:
见下图:
We have performed a fresh installation of MySQL Server; hence we must change some configurations. The configuration changes are performed by using dba.ConfigureLocalInstance() command. This command is used to configure the InnoDB cluster administration. This command can be used locally and remotely.
我们已经完成了MySQL Server的全新安装; 因此我们必须更改一些配置。 使用dba.ConfigureLocalInstance()命令执行配置更改。 此命令用于配置InnoDB集群管理。 该命令可以在本地和远程使用。
The syntax of the command is dba.configurelocalinstance(username@MySQLServer:Portnumber);
该命令的语法为dba.configurelocalinstance(username @ MySQLServer:Portnumber);
Execute the following command on MySQL Shell to configure the group replication:
在MySQL Shell上执行以下命令以配置组复制:
MySQL JS > dba.configureLocalInstance(“nisarg@LinuxSQL01:3306”);
MySQL JS> dba.configureLocalInstance(“ nisarg @ LinuxSQL01:3306”);
The command shows the list of configuration parameters that need to be fixed. See the following image:
该命令显示需要修复的配置参数列表。 见下图:
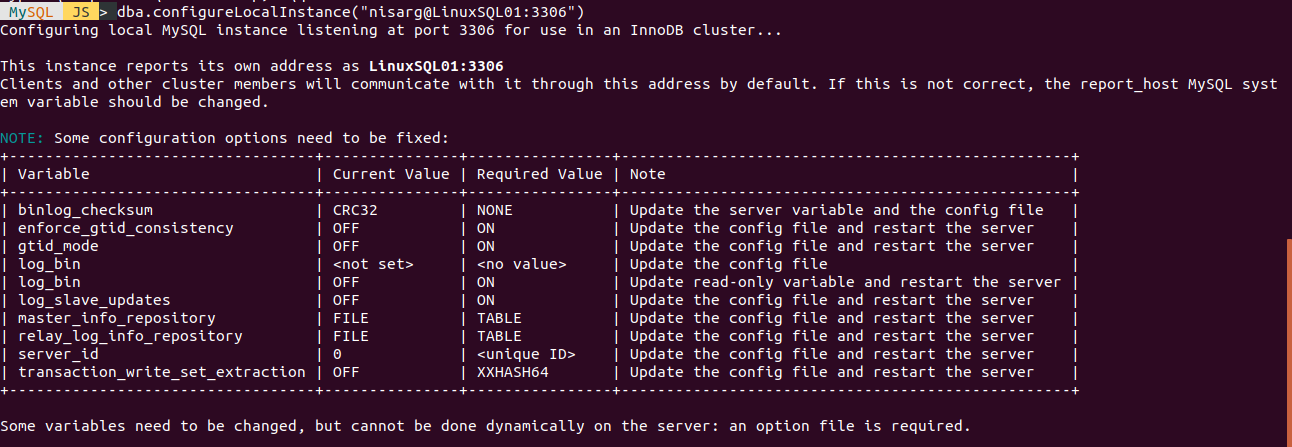
When you run the command, it prompts for the confirmation of the changes in the mysqld.cnf configuration file. The standard location of the file is /etc/mysql/mysql.conf.d/mysqld.cnf. Once you review and confirm the changes, it updates the mysqld.cnf file.
运行命令时,它会提示您确认mysqld.cnf配置文件中的更改。 该文件的标准位置是/etc/mysql/mysql.conf.d/mysqld.cnf 。 查看并确认更改后,它将更新mysqld.cnf文件。
The above steps must be performed on LinuxSQL02 and LinuxSQL03.
以上步骤必须在LinuxSQL02和LinuxSQL03上执行。
In my next article, I plan to explain the following:
在下一篇文章中,我打算解释以下内容:
- Create a MySQL InnoDB cluster using MySQL Shell 使用MySQL Shell创建MySQL InnoDB集群
- Configure the MySQL Router using MySQL Shell and test the failover 使用MySQL Shell配置MySQL路由器并测试故障转移
- How to monitor, manage, and scale the MySQL InnoDB cluster 如何监视,管理和扩展MySQL InnoDB集群
摘要 (Summary)
In this article, I have covered how we can:
在本文中,我介绍了如何:
- Map Domain Address with IP Address 用IP地址映射域名
- Configure MySQL Server to allow remote connections 配置MySQL服务器以允许远程连接
- Create a MySQL administrator user in and grant privileges 在其中创建MySQL管理员用户并授予特权
- Configure the group replication using MySQL Shell 使用MySQL Shell配置组复制
翻译自: https://www.sqlshack.com/deploy-mysql-innodb-clusters-for-high-availability/
innodb 集群


 1728
1728

 被折叠的 条评论
为什么被折叠?
被折叠的 条评论
为什么被折叠?
 到【灌水乐园】发言


