


sql server 加密
There are many new features in SQL Server 2016, but the one we will focus on in this post is:
SQL Server 2016中有许多新功能,但本文中我们将重点介绍的功能是:
- Always encrypted 始终加密
A feature many companies and developers have been waiting, is now finally being implemented in SQL Server. The feature is called Always Encrypted, the main purpose of this feature is to secure your data. Your data will only be visible to the ones logged into an application consuming the data, and will never be transferred from application to database unencrypted.
许多公司和开发人员一直在等待的功能,现在终于在SQL Server中实现。 该功能称为始终加密,此功能的主要目的是保护您的数据。 您的数据仅对登录到使用该数据的应用程序的用户可见,并且永远不会未经加密就从应用程序传输到数据库。
This will finally make sure that leaks of personal data should be a thing of the past, as only the application is able to consume the data, not even a DBA sitting at the server and using SQL Server Management Studio will be able to consume data.
最终,这将确保个人数据的泄漏已经成为过去,因为只有应用程序才能使用数据,甚至坐在服务器上并使用SQL Server Management Studio的DBA都无法使用数据。
The way Microsoft have implemented this always encrypted feature, is to let all the data in the tables be encrypted. The application that needs to look at data will have to use the new Enhanced ADO.net library, which will give your application the methods to de/encrypt data.
Microsoft实现此始终加密功能的方法是让表中的所有数据都被加密。 需要查看数据的应用程序将必须使用新的Enhanced ADO.net库,该库将为您的应用程序提供解密/加密数据的方法。
This way, the only way to insert data into a table, which contains encrypted columns, is to use parameterized insert statements from your application. It is not even possible to insert data from SQL Server Management Studio, if we try, the statement will fail.
这样,将数据插入包含加密列的表中的唯一方法是使用应用程序中的参数化插入语句。 甚至不可能从SQL Server Management Studio插入数据,如果尝试这样做,该语句将失败。
This way we ensure that only the persons using the application will be looking at un-encrypted data, thus reducing the number of people with a direct access to sensitive data.
这样,我们确保只有使用该应用程序的人员才能查看未加密的数据,从而减少了直接访问敏感数据的人员数量。
So how to get started with this feature?
那么如何开始使用此功能呢?
First we need to have a few things sorted out, we need the following created on a database that is to contain encrypted tables and columns.
首先,我们需要整理一些内容,我们需要在包含加密表和列的数据库上创建以下内容。
- A self-signed certificate, that is our Column Master Key (CMKD) on your machine. 自签名证书,即我们计算机上的列主密钥(CMKD)。
- A Column Encryption Key (CEK) 列加密密钥(CEK)
- A Column Master Key Definition in the database, storing information about CMKD location. 数据库中的列主键定义,用于存储有关CMKD位置的信息。
The CMKD is used to protect the CEK, and the CEK is the encryption key that protects your sensitive data from falling in the wrong hands.
CMKD用于保护CEK,而CEK是加密密钥,可保护您的敏感数据不被错误使用。
通过SQL Server Management Studio创建列主键定义 (Create Column Master Key Definition by SQL Server Management Studio)
First generate your CMKD on the database your working on, here we are on a database called AlwaysEncryptedDemo.
首先在您正在使用的数据库上生成您的CMKD,这里我们在一个名为AlwaysEncryptedDemo的数据库上。
- Navigate to the Security node 导航到“安全性”节点
- Open Always Encrypted Keys 打开始终加密的密钥
- Right click on “Column Master Key Definition” 右键单击“列主键定义”
Click on “New Column Master Key Definition”
单击“新列主键定义”
Figure 1- First create a Master Key Definition
图1-首先创建一个主密钥定义- In the next window, click “Generate self-signed Certificate” 在下一个窗口中,单击“生成自签名证书”
- Type in a Name for your Key (here “CMDK_01”) 输入密钥名称(此处为“ CMDK_01”)
- Select if the certificate should be stored in local store under either Current User or Local Machine 选择是否将证书存储在当前用户或本地计算机下的本地存储中
Click OK
点击确定
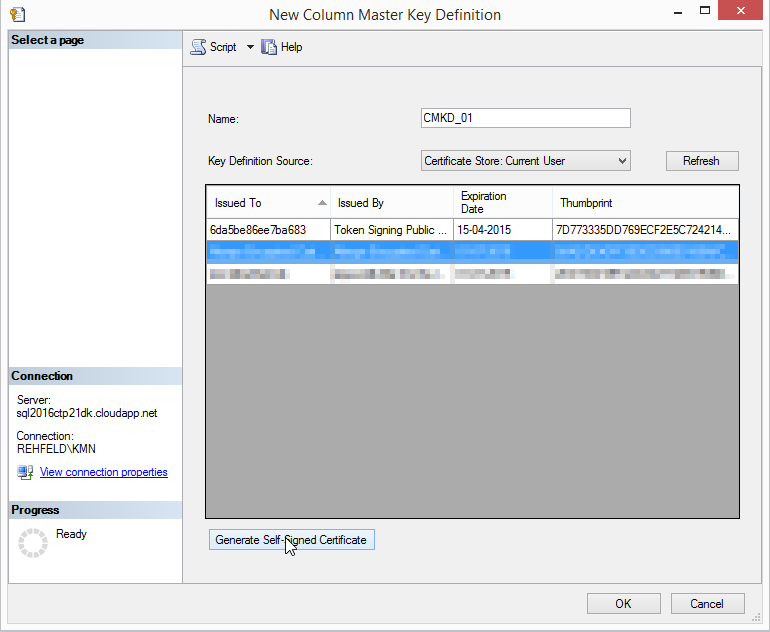
Figure 2- Generate a self signing certificate
通过SQL Server Management Studio创建列加密密钥 (Create Column Encryption Key by SQL Server Management Studio)
Now that we have the CMDK created and ready to secure our column encryption keys, let us move forward and create a Column Encryption Key.
现在,我们已经创建了CMDK,并准备保护列加密密钥,让我们继续前进,创建一个列加密密钥。
- Navigate to the Security node 导航到“安全性”节点
- Open Always Encrypted Keys 打开始终加密的密钥
- Right click on “Column Encryption Key” 右键单击“列加密密钥”
Click on “New Column Encryption Key”
点击“新列加密密钥”
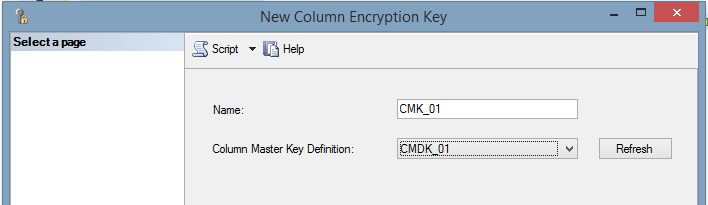
- On the next window, Type a name your Key (here “CMK_01”) 在下一个窗口中,输入名称作为密钥(此处为“ CMK_01”)
- Now select the Column Master Key Definition to be used for securing the key. 现在,选择要用于保护密钥的列主密钥定义。
- Click OK 点击确定
By now, you will be ready to create tables, where columns that you need to be encrypted can be this by using the encryption key just created. Later we will look at the table creation and how it can be enforced on tables already in your database.
到目前为止,您已经准备好创建表,可以使用刚刚创建的加密密钥在其中加密需要加密的列。 稍后,我们将研究表创建以及如何在数据库中已存在的表上强制执行表创建。
通过脚本创建列主键定义 (Create Column Master Key Definition by Script)
You could do it in SQL Server Management Studio, given you know the values.
只要您知道值,就可以在SQL Server Management Studio中进行操作。
-- To create the CMKD in T-sql here is the script.

USE [AlwaysEncryptedDemo]
/****** Object:  ColumnMasterKeyDefinition [AlwaysEncryptedDemo]    Script Date: 29-06-2015 12:29:26 ******/
CREATE COLUMN MASTER KEY DEFINITION [CMDK_01]
WITH
(
	KEY_STORE_PROVIDER_NAME = N'MSSQL_CERTIFICATE_STORE',
	KEY_PATH = N'CurrentUser/My/7D773335DD769ECF2E5C724214EB3AF63CD3A764'
)
GO
通过脚本创建列加密密钥 (Create Column Encryption Key by Script)
When a CMDK is created you could create the CEK by script as well, just like the script underneath here.
创建CMDK后,您也可以通过脚本创建CEK,就像下面的脚本一样。
-- To create the CEK in T-sql here is the script.

USE [AlwaysEncryptedDemo]
/****** Object:  ColumnEncryptionKey [AlwaysEncryptedColumnKey_1]    Script Date: 29-06-2015 12:30:28 ******/
CREATE COLUMN ENCRYPTION KEY [CEK_01]
WITH VALUES
(
	COLUMN MASTER KEY DEFINITION = [CMDK_01],
	ALGORITHM = 'RSA_OAEP',
	ENCRYPTED_VALUE = 0x016E008000630075007200720065006E00740075007300650072002F006D0079002F00370064003700370033003300330035006400640037003600390065006300660032006500350063003700320034003200310034006500620033006100660036003300630064003300610037003600340003DBA109D9421EC475D7CFB7B0A0B7C177C660FD66AA5A155C82E1AC02023BAC2872BB225E062DCBCC1810B2756895FAF66E26E89181D327157196D483978817010A7B7D51D85B184470B98C357BFCDFE99BA63873D6548D1D8E4918BF5AB685BC4BA13B56B9DB0A3550231E5D05FEAE151B61280FE55F5FAB2056CCF4628592551B43851B150109FE25B1EB64D53B56CEDFD40F7F05A935B9AD874774906A6889523F8E5B0667B7C45C0C61D61C45D0C6F66F878033E95886CC4CA331D7A7E7A1117D5021A8F443323F0B70D4E304712EA45542649D414A6F6B44178B685E5CCA5417D55A12165ECCE3771C3892858B838D531DADCB6E925978F3C29B0810D3
)
GO
创建具有加密列的表 (Creating a table with encrypted columns)
Now it is time for some table creation, and there are a few things to remember when doing that. The syntax for table creation is just like an ordinary table creation, we just need to add some options to the columns that we need encrypted.
现在是时候创建一些表了,这样做时需要记住一些事情。 表创建的语法就像普通表创建一样,我们只需要向需要加密的列中添加一些选项即可。
Underneath, here is an example of a plain simple table with no encryption defined.
下面是未定义加密的简单表的示例。
-- Ordinary table creation.

USE [AlwaysEncryptedDemo]
CREATE TABLE [dbo].[Client]
(
	[AlwaysEcryptedID] [int] IDENTITY(1,1) NOT NULL,
	[SocialSecurityNo] nvarchar(50) NOT NULL,
	[FirstName] nvarchar(50),
	[LastName] nvarchar(50)
) ON [PRIMARY]
Should we create the same table, and decide to add encryption to the SocialSecurityNumber, the script we needed to execute would be this one.
如果我们创建相同的表,并决定向SocialSecurityNumber添加加密,那么我们需要执行的脚本就是这个。
-- Table creation, with encryption on SosialSecurityNumber

USE [AlwaysEncryptedDemo]
CREATE TABLE [dbo].[Client]
(
	[AlwaysEcryptedID] [int] IDENTITY(1,1) NOT NULL,
	[SocialSecurityNo] nvarchar(50) COLLATE Latin1_General_BIN2
ENCRYPTED WITH (ENCRYPTION_TYPE = DETERMINISTIC, ALGORITHM='AEAD_AES_256_CBC_HMAC_SHA_256', COLUMN_ENCRYPTION_KEY=AlwaysEncryptedColumnKey_1),
	[FirstName] nvarchar(50),
	[LastName] nvarchar(50)
) ON [PRIMARY]
As the script shows above, the extra option is
如上面的脚本所示,额外的选项是
ENCRYPTED WITH (Encryption_Type = [Deterministic or Randomized)
, ALGORITHM = ['AEAD_AES_256_CBC_HMAC_SHA_256’]
, COLUMN_ENCRYPTION_KEY = [One of your CEK]
The difference between Deterministic and Randomized encryption, is that Deterministic always return the same encrypted value for the same text values, while randomized will generate a unique encrypted value even for the same string value.
确定性加密和随机加密之间的区别在于,对于相同的文本值,确定性总是返回相同的加密值,而即使对于相同的字符串值,随机化也会生成唯一的加密值。
This gives us the possibility to group, and do filtering on encrypted columns in our table. Just be aware that this might open a weak spot – as it will be possible to guess the values in the encrypted column by scrutinizing the patterns and values in the encryption key.
这使我们可以对表中的加密列进行分组和过滤。 请注意,这可能会带来一个薄弱环节–因为可以通过检查加密密钥中的模式和值来猜测加密列中的值。
举例说明: (To exemplify:)
An attribute is set to be encrypted Deterministic, and the value in the attribute Fullname is “Kenneth Michael Nielsen”
属性设置为确定性加密,属性全名中的值为“ Kenneth Michael Nielsen”
If the encrypted value is set to:
“0x012154786C89F6457EB7144115E8775A2DB64DE00CB4DA7C93AB6F14C3419C79CDA17D6C24BA14509019C7EA2A072F759AC749B6E20F758681F29FE2B740F2AF1D” then every record with “Kenneth Michael Nielsen” in the attribute Fullname would have the same encrypted value.
如果加密值设置为:
“ 0x012154786C89F6457EB7144115E8775A2DB64DE00CB4DA7C93AB6F14C3419C79CDA17D6C24BA14509019C7EA2A072F759AC749B6E20F758681F29FE2B740F2AF1D”然后在每个具有“肯尼思·迈克尔·尼尔森”值的记录中都将在同一属性中具有相同的全名 。
Had we instead used Randomized encryption, the encrypted values would be entirely randomized and we would not be able to determine any patterns.
如果我们改为使用随机加密,则加密值将完全随机化,并且我们将无法确定任何模式。
在SSMS中查看数据 (Viewing data in SSMS)
What would it look like for the DBA that take a sneak peek at the data in a table with always encryption enabled, as it says, data is always encrypted and even the DBA, is not able to make any sense of the data.
对于DBA来说,偷偷看了始终启用加密的表中的数据是什么样子,就像它说的那样,数据始终是加密的,甚至DBA也无法理解数据。
The DBA, would see something like this if he/she made a
如果DBA做了一个
This way, we can ensure that only the end-users that is granted access to the data is the one actually working with the data, and not having a data leak with 1000 of records holding sensitive data.
这样,我们可以确保只有被授予访问数据权限的最终用户才是实际使用数据的用户,并且不会因1000条包含敏感数据的记录而导致数据泄漏。
加密数据库中已经存在的表 (Encrypting a table already in you database)
In the scenario where you have a table in place in an already running database and you decide to implement always encryption on some attributes – we need to take the existing data and encrypt it. There are a few ways to do this, let me list a few of them:
在已经有一个正在运行的数据库中有一个表并且您决定始终对某些属性实施加密的情况下,我们需要获取现有数据并对其进行加密。 有几种方法可以做到这一点,让我列出其中的一些方法:
-
- Let the end-user application read from the old table, and write all new entries in the new. 让最终用户应用程序从旧表中读取,并在新表中写入所有新条目。
-
- Import all the old records into this new table during a service window 在服务窗口期间,将所有旧记录导入此新表中
- Roll out a new end-user application to read/write to a new table. 推出新的最终用户应用程序以读取/写入新表。
-
- Export all data from the existing table to CSV file. 将所有数据从现有表导出到CSV文件。
- Import the CSV file into a new table. 将CSV文件导入到新表中。
I will walk you through scenario 3, where we have our new table we created earlier, dbo.Client and I have a list of records from our old table without encryption that we import into the table dbo.Client.
我将引导您完成方案3,在该方案3中,我们有我们先前创建的新表dbo.Client,并且我有一个旧表中的记录列表,没有加密,我们将其导入表dbo.Client中。
Content of CSV file
CSV文件内容
| SocialSecurityNo | FirstName | LastName |
| 13546876151 | Peter | Doe |
| 13546876152 | jens | Doe |
| 13546876153 | hanne | Doe |
| 13546876154 | lotte | Doe |
| 13546876155 | pia | Doe |
| 13546876156 | jane | Doe |
| 13546876157 | rolf | Doe |
| 13546876158 | steve | Doe |
| 13546876159 | martin | Doe |
| 13546876160 | John | Doe |
| 13546876161 | Edwin | Doe |
| 社会保障号 | 名字 | 姓 |
| 13546876151 | 彼得 | 母鹿 |
| 13546876152 | 詹斯 | 母鹿 |
| 13546876153 | 汉妮 | 母鹿 |
| 13546876154 | 乐天 | 母鹿 |
| 13546876155 | 皮亚 | 母鹿 |
| 13546876156 | 简 | 母鹿 |
| 13546876157 | 罗夫 | 母鹿 |
| 13546876158 | 史蒂夫 | 母鹿 |
| 13546876159 | 马丁 | 母鹿 |
| 13546876160 | 约翰 | 母鹿 |
| 13546876161 | 埃德温 | 母鹿 |
- Right click the database AlwaysEncryptedDemo 右键单击数据库AlwaysEncryptedDemo
- Select Task 选择任务
Select Import Data
选择导入数据
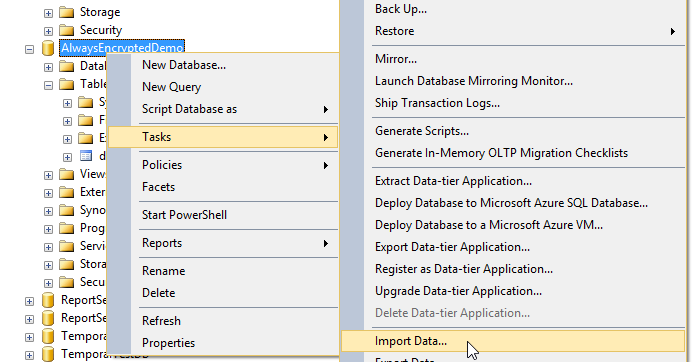
Figure 3- Select Import DataOn the “Welcome to SQL Server import and export wizard” click Next
在“欢迎使用SQL Server导入和导出向导”上,单击“下一步”。
- Then select Flat File Source in Data source. 然后在数据源中选择平面文件源。
Browse to your file AlwaysEncrypted.csv
浏览到您的文件AlwaysEncrypted.csv
Click Columns and it should look like this
单击列,它应该看起来像这样
- Now click Next 现在单击下一步
- In the Destination drop-down select “.net Framework Data Provider for SQL Server” 在“目标”下拉列表中,选择“用于SQL Server的.net Framework数据提供程序”
-
Server=myServerAddress;Database=myDataBase;Trusted_Connection=True;
Server = myServerAddress; Database = myDataBase; Trusted_Connection = True;
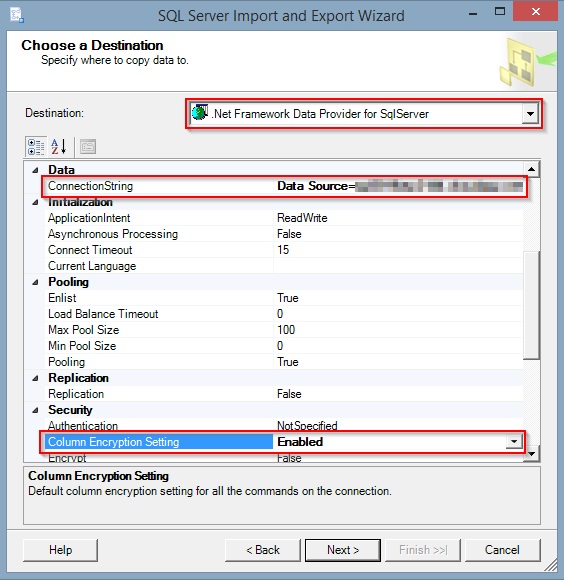
- Then set Column Encryption Setting to Enabled, and you are ready to import non encrypted data into you table with column encryption. 然后将“列加密设置”设置为“已启用”,即可使用列加密将未加密的数据导入表中。
Click Next
点击下一步
- In the source and destination, select the newly created table in destination – here dbo.client 在源和目标中,在目标中选择新创建的表–在此处dbo.client
- Click Next 点击下一步
- Most like there will be warnings on the next window, just take the appropriate actions to either fail or ignore potential errors. 就像在下一个窗口中会发出警告一样,只需采取适当的措施以使失败或忽略潜在的错误。
- Click next 点击下一步
- You can now save the import package as a SQL Server Integration Package, or run it immediately – choose the later 现在,您可以将导入程序包另存为SQL Server集成程序包,或立即运行-稍后选择
- Click next 点击下一步
- A summary appears and you should click Finish 出现摘要,您应该单击“完成”。
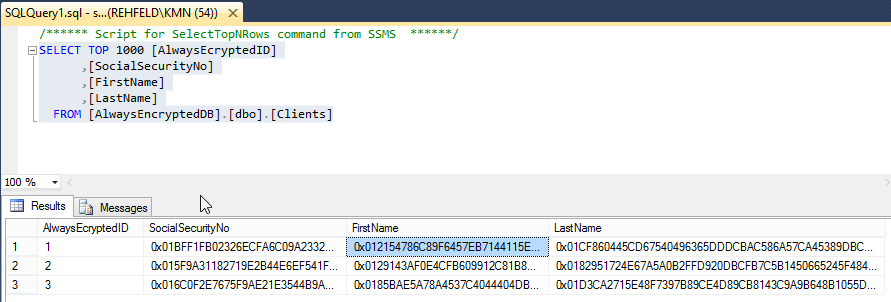
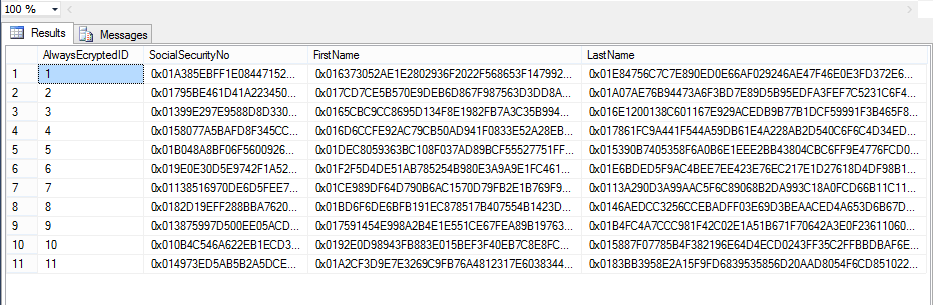
The last window should be this and we can now do a select from our dbo.client table and visually confirm that the data have been imported and encrypted.
最后一个窗口应该是这个窗口,现在我们可以从dbo.client表中进行选择,并直观地确认数据已被导入和加密。
-- SELECT From encrypted table

USE [AlwaysEncryptedDemo]
SELECT TOP 1000 [AlwaysEcryptedID]
      ,[SocialSecurityNo]
      ,[FirstName]
      ,[LastName]
 FROM [AlwaysEncryptedDemo].[dbo].[Client]
If we run the SQL statement above we should get a result like this one.
如果我们运行上面SQL语句,我们应该得到这样的结果。
结论 (Conclusion)
In this brief walkthrough of Always Encrypted, we have covered how to:
在“始终加密”的简短演练中,我们介绍了如何:
- Create Column Master Key Definition 创建列主键定义
- Create Column Encryption Key 创建列加密密钥
- Create tables to hold encrypted values 创建表以保存加密的值
- Encrypt data already in your database 加密数据库中已经存在的数据
In short, it is an easy feature to implement, and it should give the data-owner some peace of mind – knowing that only a handful of people (intended to manipulate data) is, in fact, the only ones able.
简而言之,这是一个易于实现的功能,它应该使数据拥有者放心-知道实际上只有少数人(打算操纵数据)才是有能力的。
I hope this has given you a good introduction to the subject and, hopefully, you will take it to your own test SQL server and have a go at it. The issue with working with the encrypted data from the end-user application is a whole other topic, and a topic I will catch up on later.
我希望这对您有一个很好的介绍,并且希望您可以将它带到自己的测试SQL Server上并开始使用。 使用来自最终用户应用程序的加密数据的问题是另一个主题,稍后我将继续讨论这个主题。
翻译自: https://www.sqlshack.com/new-features-in-sql-server-2016-always-encrypted/
sql server 加密


 639
639


 被折叠的 条评论
为什么被折叠?
被折叠的 条评论
为什么被折叠?
 到【灌水乐园】发言


