


sql server 群集
In the other article in this series: Deploy SQL Server for failover clustering with Cluster Shared Volumes – part 1 we have seen what a cluster shared volume is and what are the advantages and other considerations to keep in mind when deploying CSVs for SQL Server workloads. In this article, I will walk though actual installation of a failover cluster Instance leveraging CSVs.
在本系列的另一篇文章中: 部署SQL Server以使用群集共享卷进行故障转移群集–第1部分,我们了解了群集共享卷是什么,以及在为SQL Server工作负载部署CSV时要记住哪些优点和其他注意事项。 在本文中,我将详细介绍如何利用CSV实际安装故障转移群集实例。
To begin with, I will walk you through my cluster setup from 20,000 foot view. I created two brand new VMs running windows server 2012 R2 and renamed them accordingly. Nothing special w.r.t disk drives at this point, Just basic VMs with a system drive(C$).
首先,我将从20,000英尺的角度引导您完成群集的设置。 我创建了两个运行Windows Server 2012 R2的全新虚拟机,并相应地重命名了它们。 此时,没有什么特别的wrt磁盘驱动器,只有带有系统驱动器(C $)的基本VM。
I also created 2 virtual networks in my VMWare workstation which I will be using for configuring my Public and private NICs on my nodes.
我还在VMWare工作站中创建了2个虚拟网络,这些虚拟网络将用于在节点上配置公用和专用NIC。
On my first node:
在我的第一个节点上 :
192.168.1.100 is the IPv4 address of my DNS server and below are my NIC settings.
192.168.1.100是我的DNS服务器的IPv4地址,下面是我的NIC设置。
Once IP address has been configured, below is how I joined my node to domain (sqltrek.local in my case).
配置IP地址后,以下是我如何将节点加入域(在我的情况下为sqltrek.local)。
After providing domain admin credentials in the above screenshot, my node (SQLCLUSTCSV1) was added to my domain successfully. I followed the same process on my second node as well to join it to my domain. Once this part is done, I configured disks (traditional way) and installed Failover Clustering feature on both nodes.
在以上屏幕截图中提供域管理员凭据后,我的节点(SQLCLUSTCSV1)已成功添加到我的域中。 我在第二个节点上也遵循相同的过程,将其加入我的域。 完成此部分后,我将以传统方式配置磁盘并在两个节点上都安装了故障转移群集功能。
Please refer How to add a new disk to an existing SQL Server failover clustered instance for understanding how to add disks to WSFC (Windows Server Failover Cluster).
请参阅如何将新磁盘添加到现有SQL Server故障转移群集实例,以了解如何将磁盘添加到WSFC(Windows Server故障转移群集)。
Once all the prerequisites are in place, I created my windows cluster. Below is the snapshot of my cluster from Failover Cluster Manager.
所有先决条件就绪后,就创建了Windows群集。 下面是故障转移群集管理器中的群集快照。

Nothing fancy has been done so far, it’s just a traditional Failover cluster. You can notice that I used dedicated disk for my Quorum, you can use a file share or Azure Blob storage as witness instead if needed.
到目前为止,还没有完成任何工作,它只是传统的故障转移群集。 您可能会注意到我为Quorum使用了专用磁盘,如果需要,可以使用文件共享或Azure Blob存储作为见证。
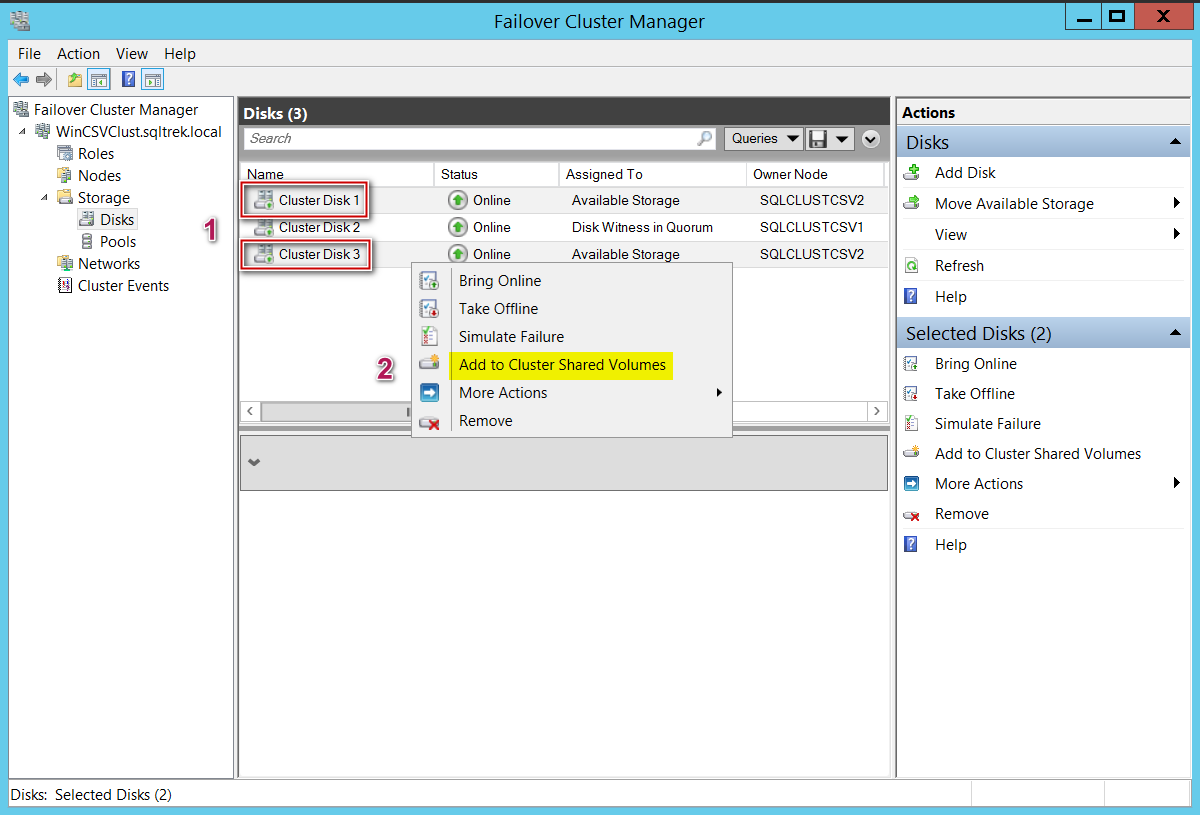
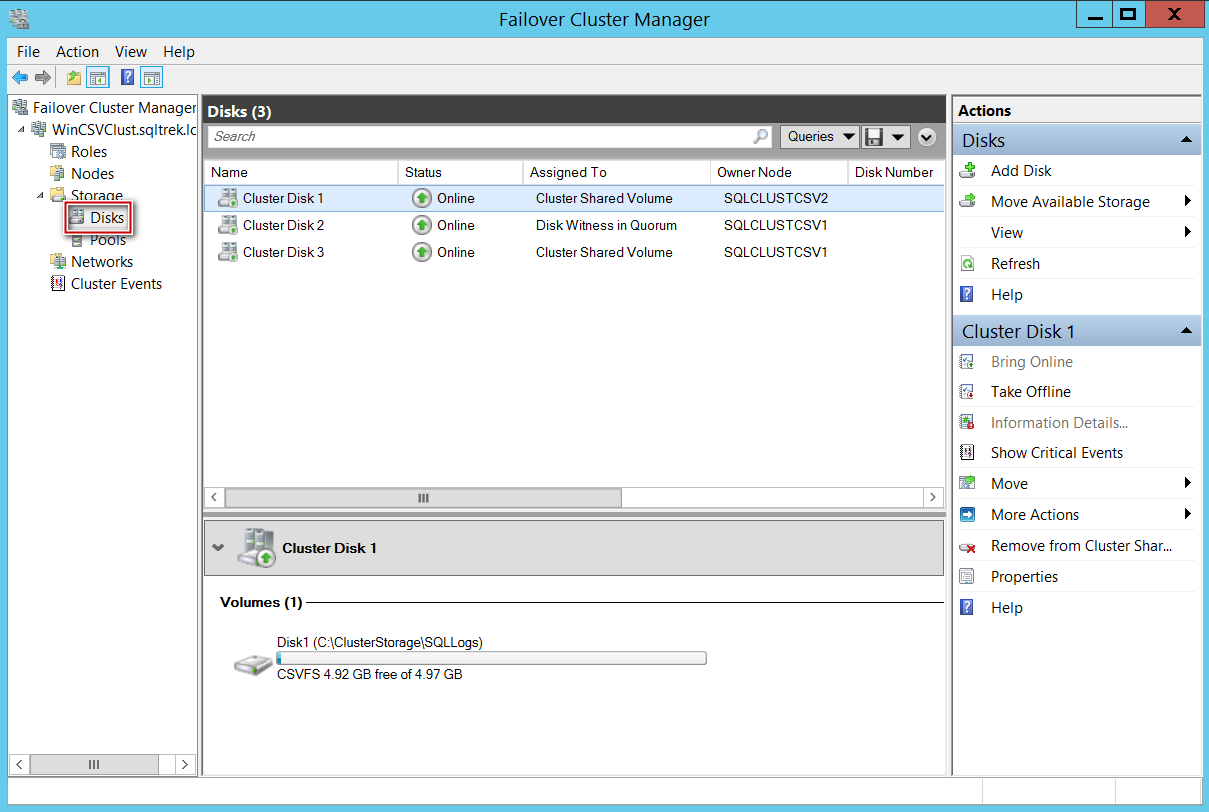
At this point, I have got two disk drives (Cluster disk 1 and cluster disk 3) which I would like to convert to Cluster shared volumes. To make them CSVs, select the available storage (you can select multiple drives at once as well), right click and select convert to CSV. That’s it, it’s really that simple to convert your traditional shared storage to CSVs as shown in the below screenshot.
此时,我有两个磁盘驱动器(集群磁盘1和集群磁盘3),我希望将其转换为集群共享卷。 要使它们成为CSV,请选择可用的存储(您也可以一次选择多个驱动器),右键单击并选择“转换为CSV”。 就是这样,将传统的共享存储转换为CSV真的很简单,如下面的屏幕截图所示。
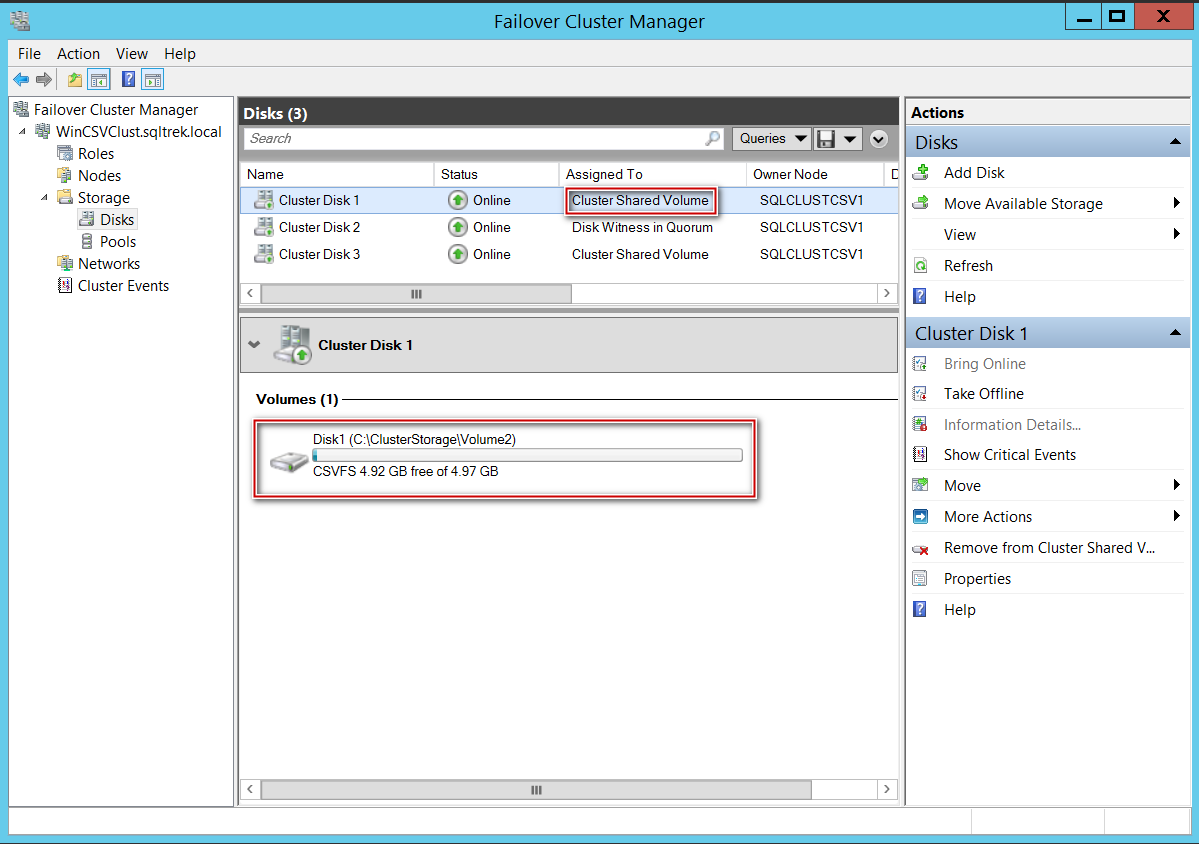
Once the drives got converted to CSVs successfully, you can see FCM reporting my disk drives as CSVs in below screenshot.
将驱动器成功成功转换为CSV后,您可以在下面的屏幕截图中看到FCM将我的磁盘驱动器报告为CSV。
Well, now let’s see how things will show up from disk management MMC.
好了,现在让我们看看如何从磁盘管理MMC中显示事物。
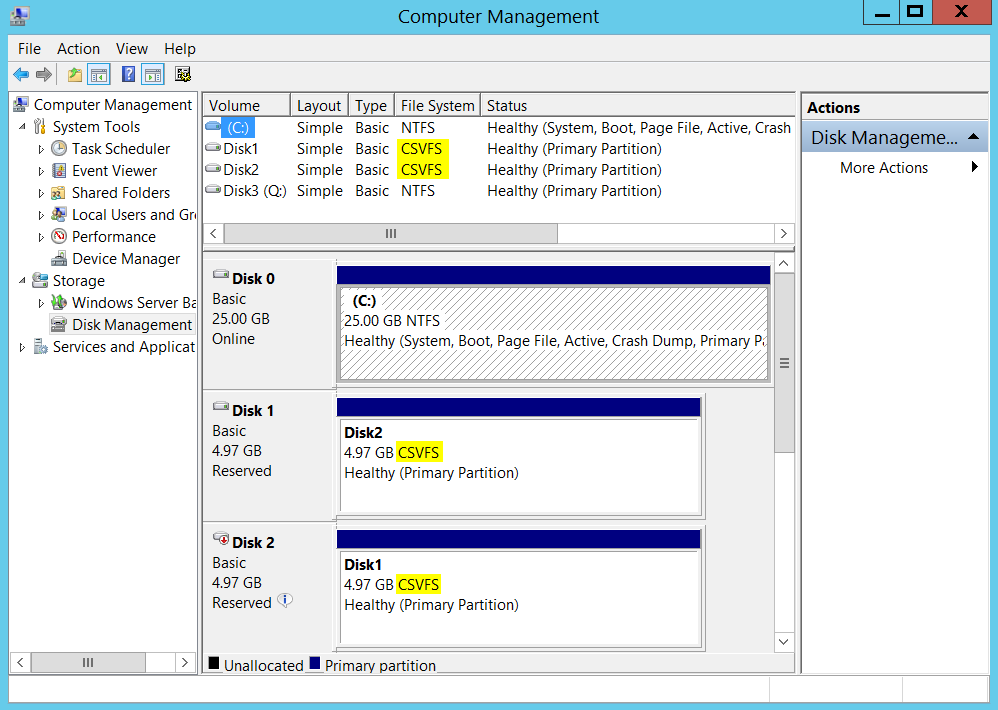
As you can see the CSV enabled volumes will appear as “CSVFS” instead of NTFS. As mentioned in the first part of this series, CSVFS is basically NTFS file system behind the scenes and the volumes are still formatted with NTFS. CSVFS is just an abstraction layer which enables applications (SQL Server in our case) to be aware that they are running on CSVs.
如您所见,启用CSV的卷将显示为“ CSVFS”而不是NTFS。 如本系列第一部分所述,CSVFS基本上是幕后的NTFS文件系统,并且卷仍使用NTFS进行格式化。 CSVFS只是一个抽象层,它使应用程序(在我们的例子中为SQL Server)能够知道它们正在CSV上运行。
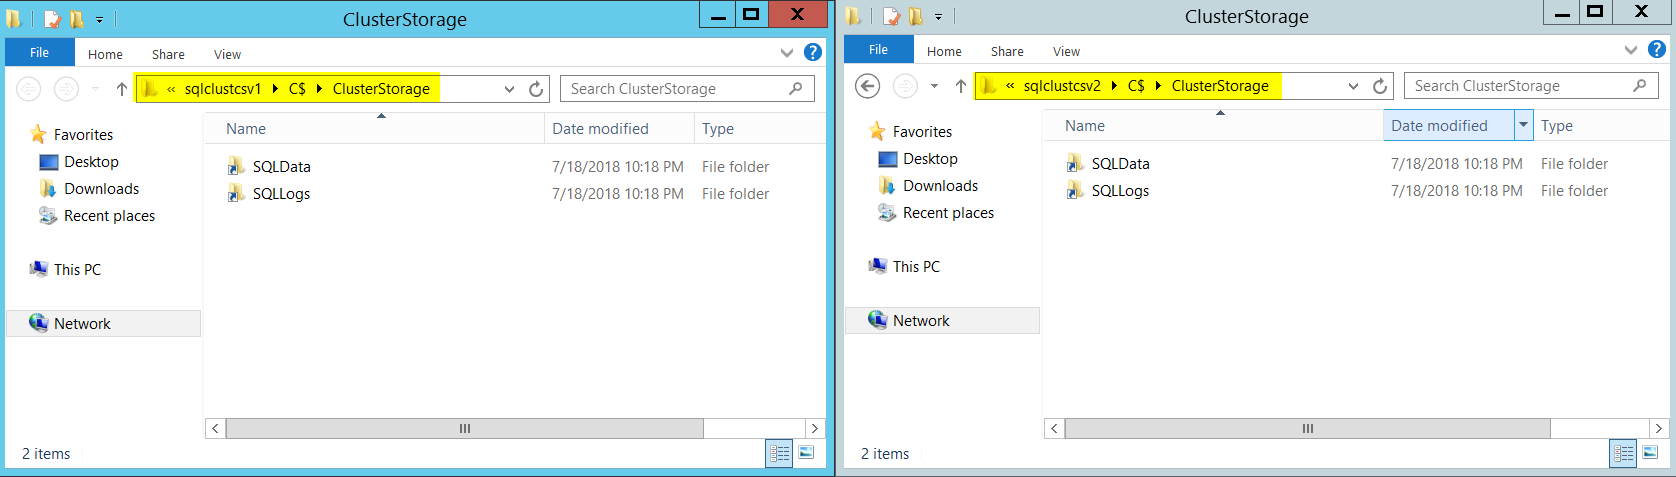
Now let’s see how things will appear by navigating from file system (explorer). As mentioned earlier, CSVs can be accessed and managed from any node. In other words, we get a consistent file/folder path across all the nodes. Windows exposes CSV volumes as folders under “ClusterStorage” in system drive (That’s typically our C: Drive) as shown below.
现在,让我们通过从文件系统(资源管理器)导航来查看情况。 如前所述,可以从任何节点访问和管理CSV。 换句话说,我们在所有节点上都获得了一致的文件/文件夹路径。 Windows将CSV卷显示为系统驱动器(通常是我们的C:驱动器)中“ ClusterStorage”下的文件夹。
I renamed my CSVs to “SQLDATA” and “SQLLOGS” and you can see it reflects the same from both my nodes.
我将CSV重命名为“ SQLDATA”和“ SQLLOGS”,您可以在两个节点上看到相同的内容。
Note: Microsoft recommends renaming the volumes accordingly before Installing SQL Server. Messing with volume names after setting up FCI might lead to unwanted behaviors.
注意 :Microsoft建议在安装SQL Server之前相应地重命名卷。 设置FCI后使用卷名引起混乱可能会导致不良行为。
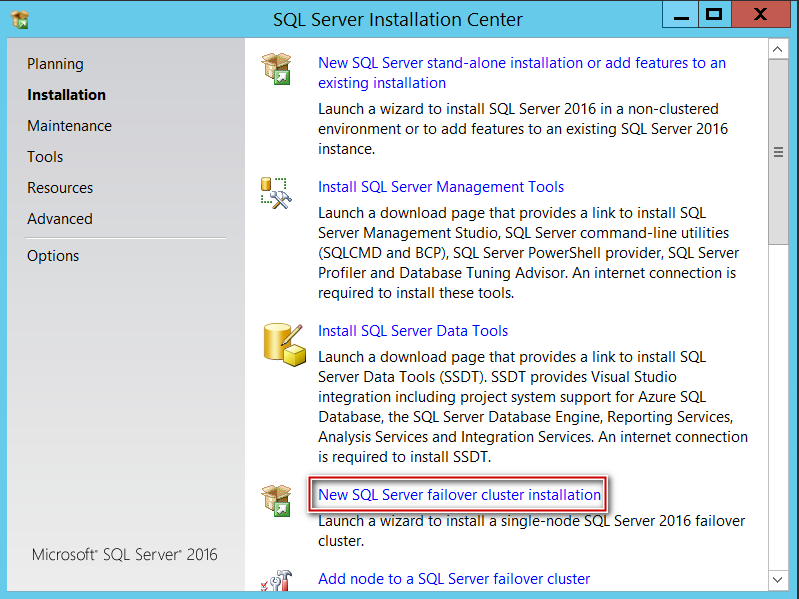
Now, let’s begin installing SQL Server FCI. I have my SQL Server media inserted on SQLCLUSTCSV1.
现在,让我们开始安装SQL Server FCI。 我在SQLCLUSTCSV1上插入了SQL Server媒体。
It’s time to choose your edition, I’ve selected developer for this demonstration purpose.
现在是时候选择您的版本了,出于这个演示目的,我已经选择了开发人员。
Accept EULA and select Next.
接受EULA并选择下一步。
Okay, now it’s time for validation, make sure you verify all the warnings and fix errors before proceeding further.
好的,现在是时候进行验证了,在继续进行之前,请确保您已验证所有警告并修复了错误。
Now select all the required features based on your requirement and click Next.
现在,根据您的要求选择所有必需的功能,然后单击“下一步”。

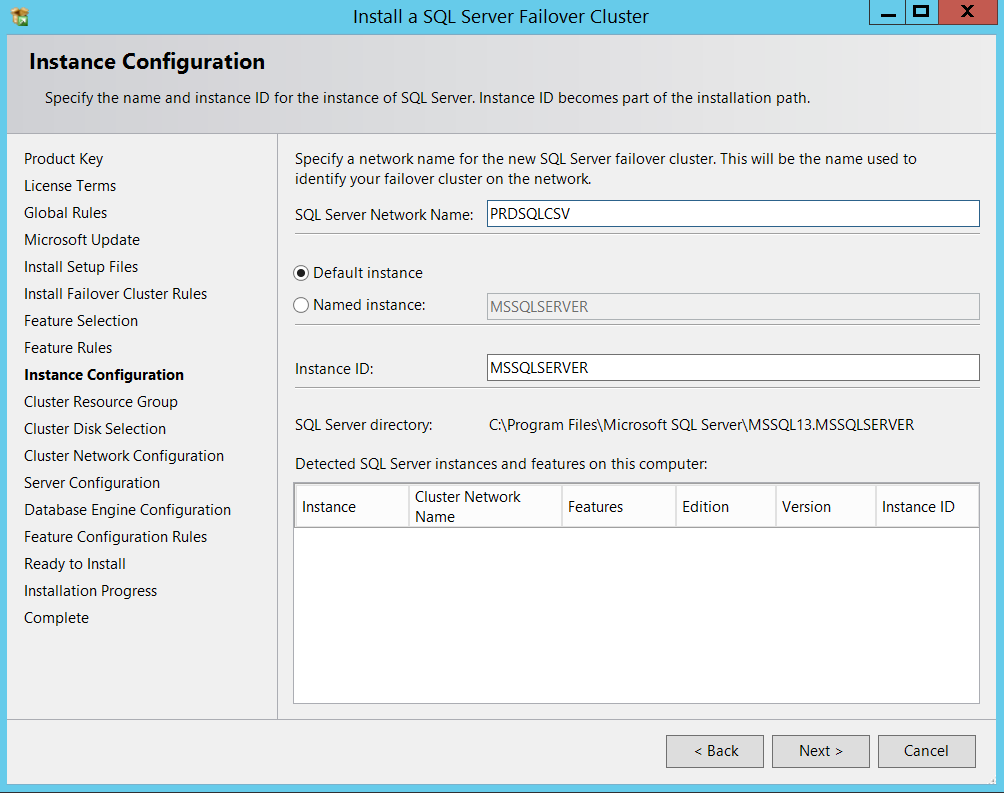
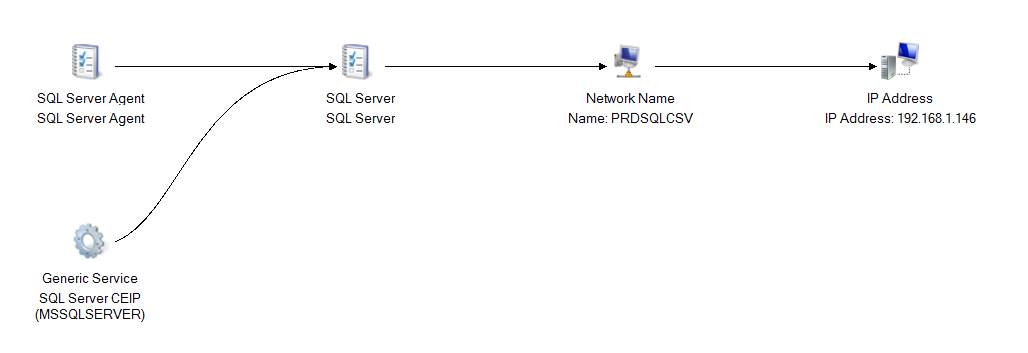
Provide a SQL Server Virtual network name and Instance name (I used PRODSQLCSV as my network name and a default Instance in this example).
提供一个SQL Server虚拟网络名称和实例名称(在此示例中,我使用PRODSQLCSV作为我的网络名称和默认实例)。
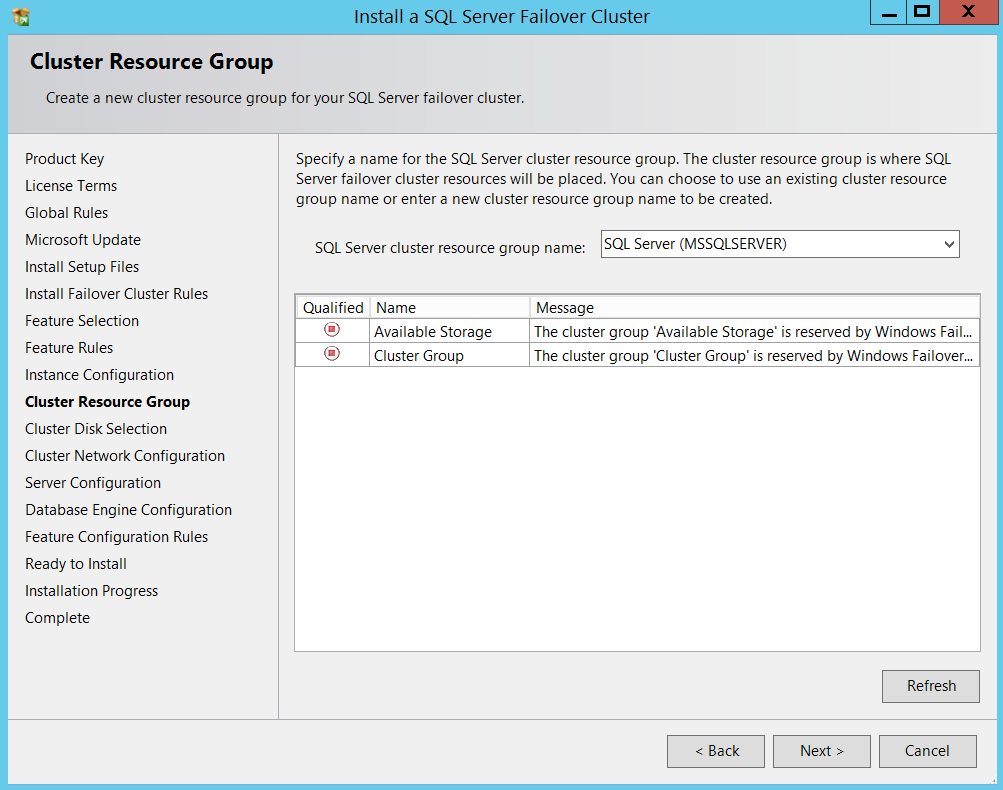
Now you can specify a name for SQL resource group if needed and click Next, I am just proceeding with defaults.
现在,您可以根据需要为SQL资源组指定一个名称,然后单击“下一步”,我将继续使用默认值。
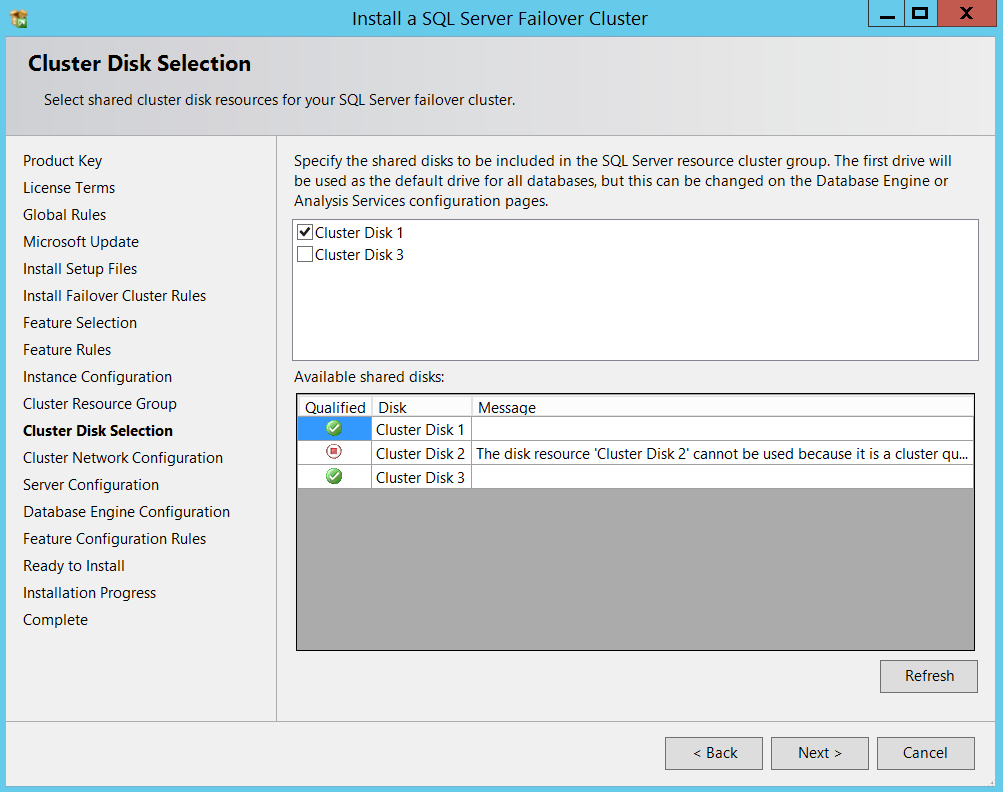
Now comes the cluster disk selection part, I am just proceeding with default selections for now. I will set my required paths when I get into Database engine configuration portion of the setup.
现在是集群磁盘选择部分,我现在仅继续进行默认选择。 进入安装程序的数据库引擎配置部分时,将设置所需的路径。
Uncheck DHCP and give it an IP and provide your service account details.
取消选中DHCP并为其提供IP,然后提供您的服务帐户详细信息。
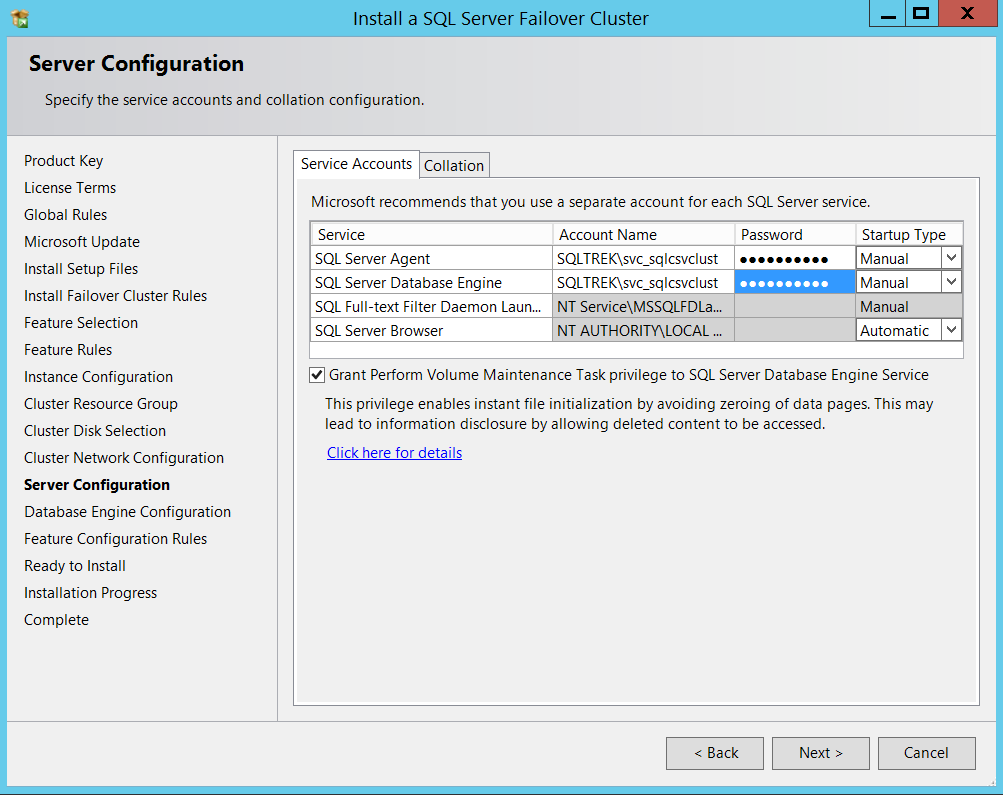
Tip: I usually recommend selecting “Grant Perform Volume Maintenance Tasks” check box. This basically enables Instant File Initialization for your data files.
提示 :我通常建议选中“授予执行卷维护任务”复选框。 这基本上为您的数据文件启用了即时文件初始化。
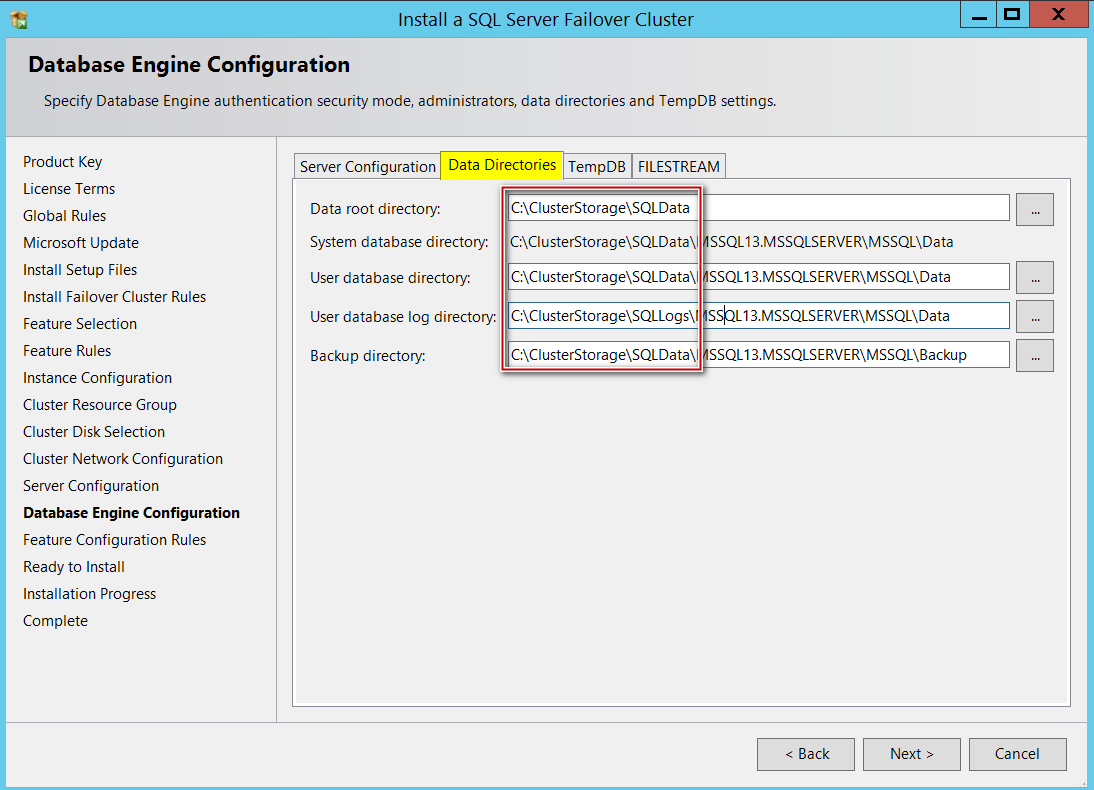
Now, we are at Database Engine Configuration section. This is where I provide my CSVs paths under “Data Directories” tab to host my databases.
现在,我们在“数据库引擎配置”部分。 在这里,我在“数据目录”选项卡下提供CSV路径来托管数据库。

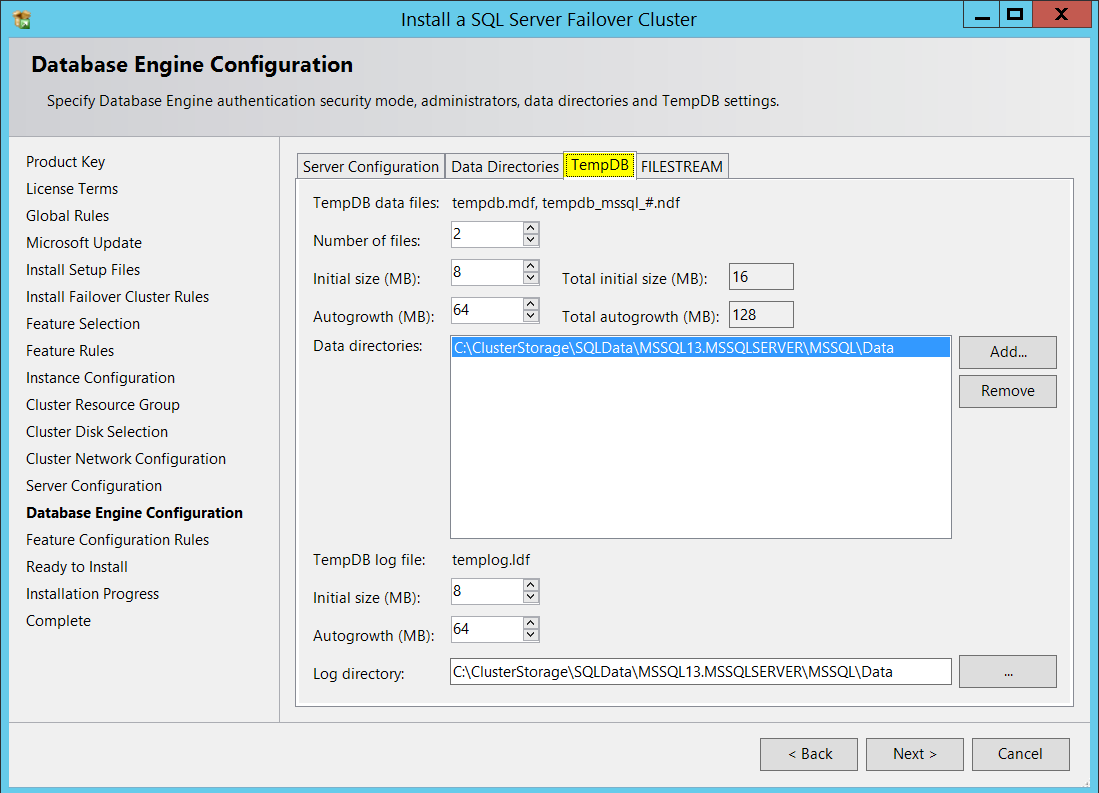
If you are curious, tempdb database file paths are shown below (You can also have your Tempdb on local disk(s) if that’s the standard practice you have in place)
如果您感到好奇,请在下面显示tempdb数据库文件的路径(如果您已将Tempdb放在标准位置,也可以将Tempdb放在本地磁盘上)
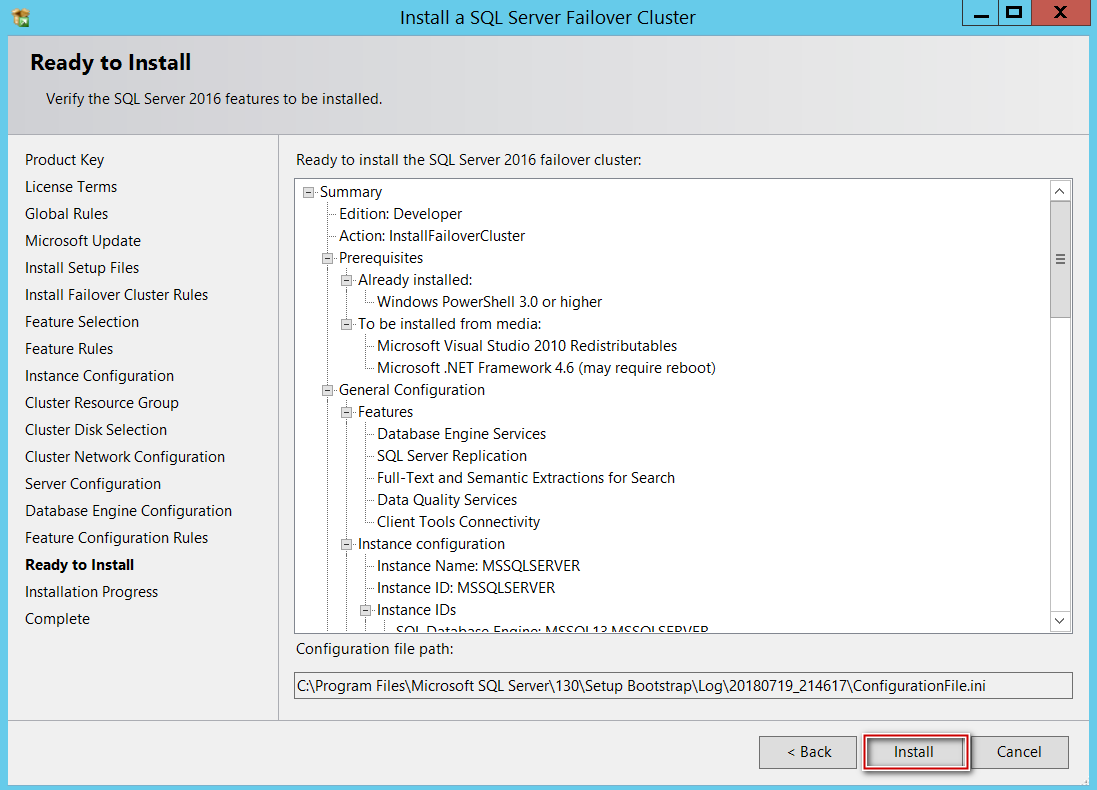
Once the database(s) paths have been configured pointing to CSV drives, click on Next and finalize Installation.
一旦配置了指向CSV驱动器的数据库路径,请单击“下一步”并完成安装。
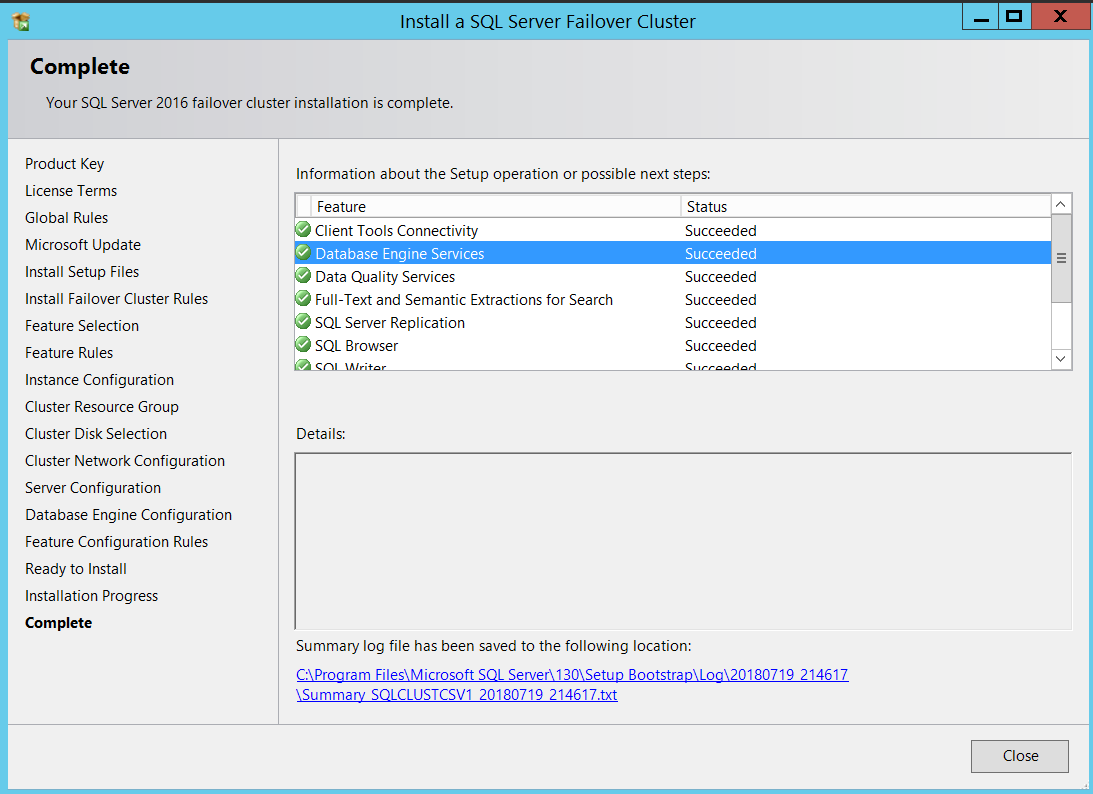
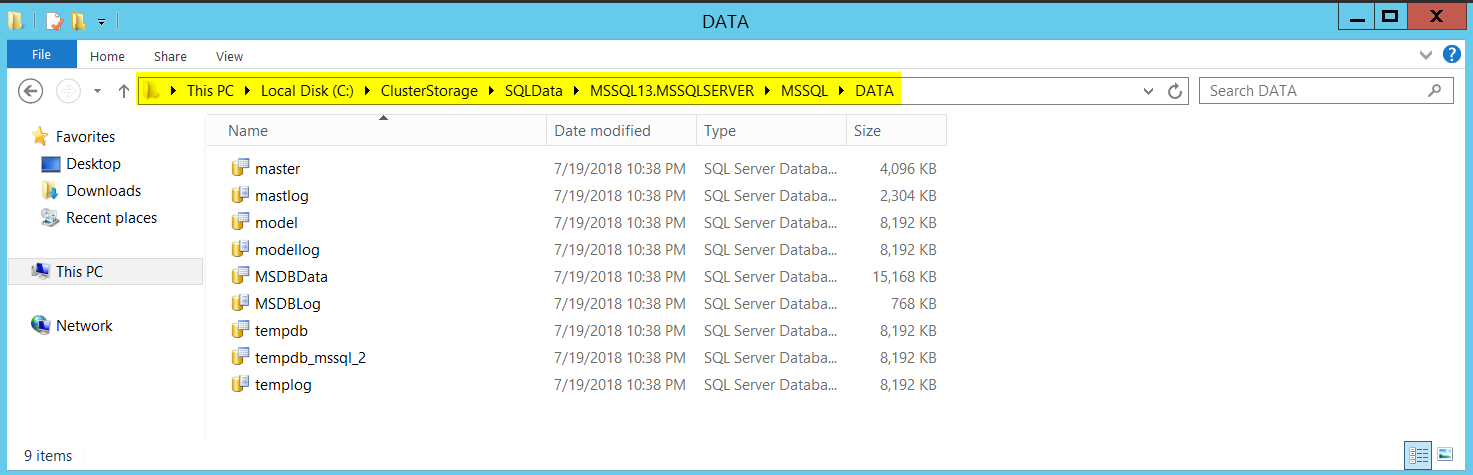
Upon successful Installation on my first node, below is how it looked navigating the file system.
在第一个节点上成功安装后,下面是在文件系统中导航的外观。
Now that we are done with installing SQL on first node, it’s time to add my second node (SQLCLUSTCSV2) to the SQL Server Failover cluster.
现在我们已经完成了在第一个节点上安装SQL的工作,是时候将第二个节点(SQLCLUSTCSV2)添加到SQL Server故障转移群集中了。
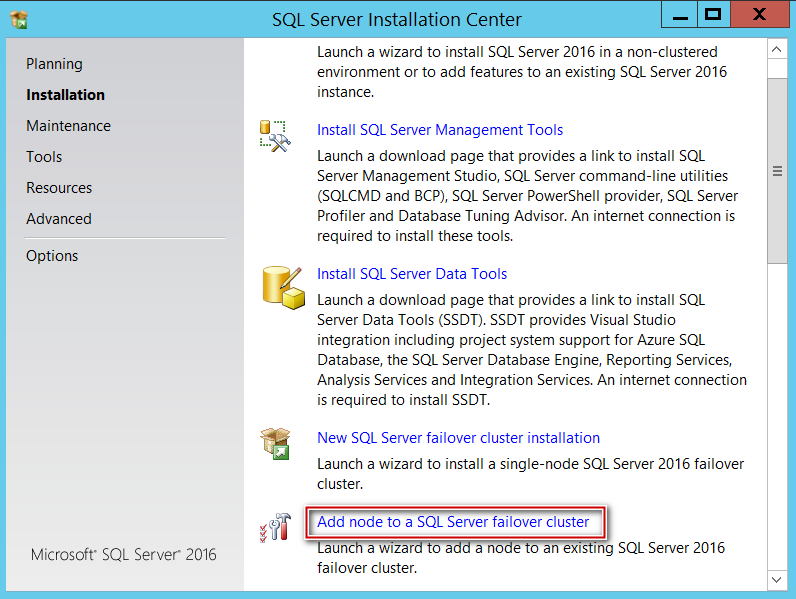
Inserted my SQL media on my Node 2 and made all the selections like choosing edition, Accept EULA and let the rule check run.
将我SQL介质插入节点2上,并进行所有选择,例如选择版本,接受EULA并运行规则检查。
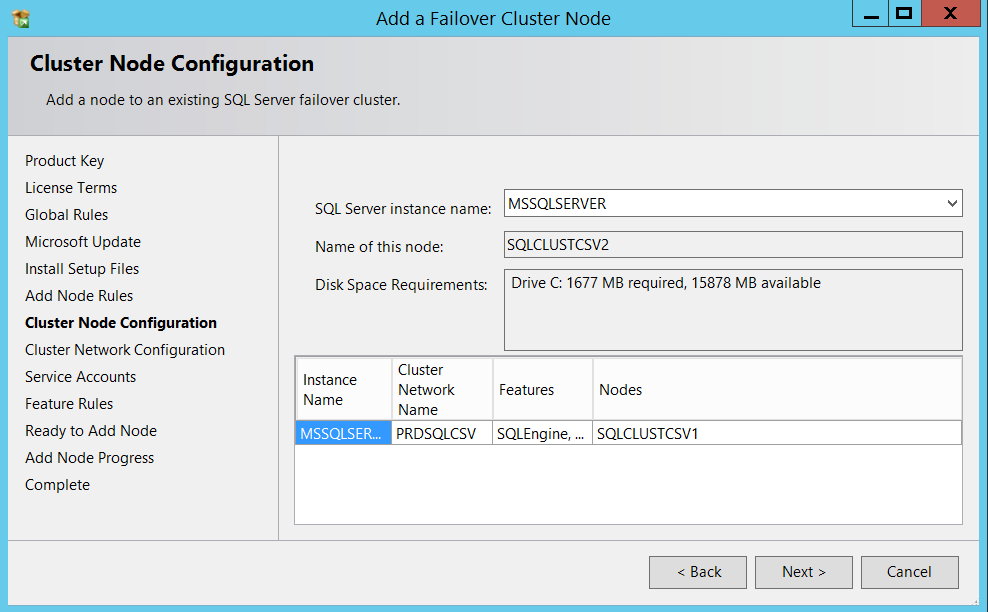
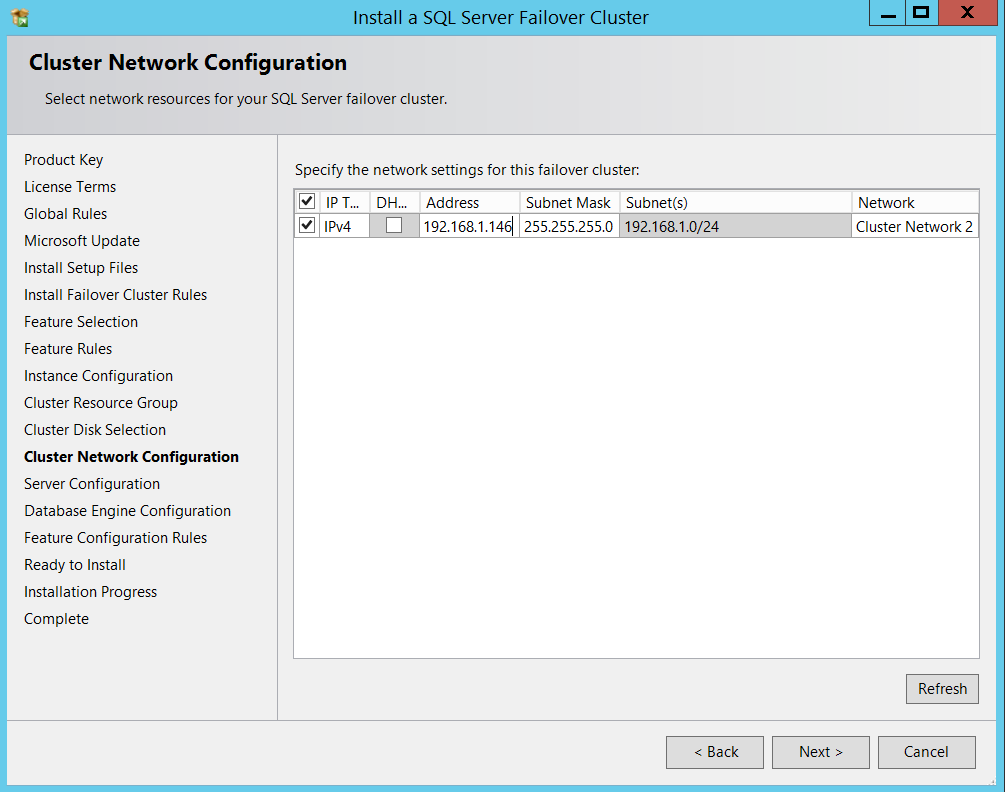
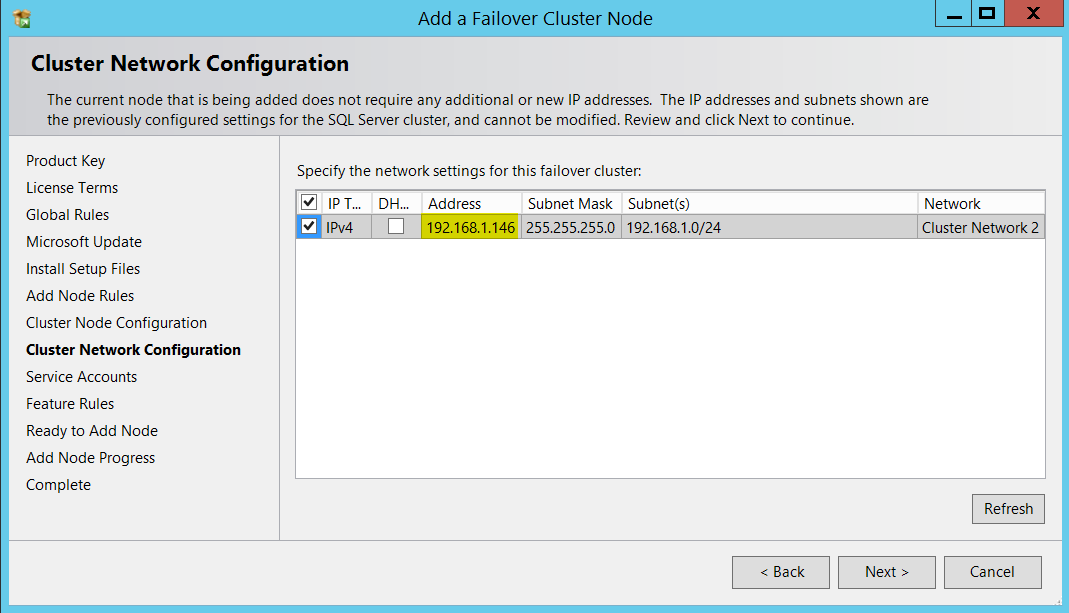
Made sure everything is intact in cluster network configuration section.
确保群集网络配置部分中的所有内容都完整无缺。
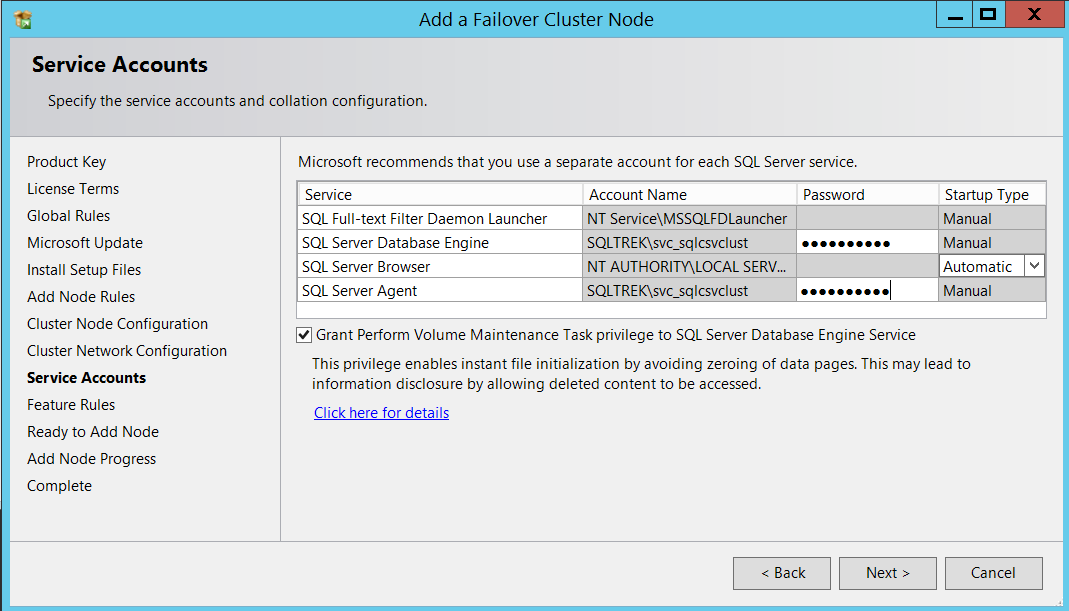
Now, it’s time to provide the service account(s) password(s).
现在,是时候提供服务帐户密码了。
Proceed to Next and click Install, That’s about it.
继续到下一步,然后单击安装,仅此而已。
This completes Installation of SQL Server Failover Cluster Instance leveraging CSVs. At this stage you can initiate a manual failover to make sure everything works as expected. Before concluding this article, I will show you what’s different when using CSVs instead of traditional shared storage from Failover Cluster Manager Standpoint when you connect to your cluster.
这样就可以利用CSV完成SQL Server故障转移群集实例的安装。 在此阶段,您可以启动手动故障转移以确保一切正常。 在结束本文之前,我将向您展示使用CSV而不是从故障转移群集管理器立场连接到群集时的传统共享存储时的区别。
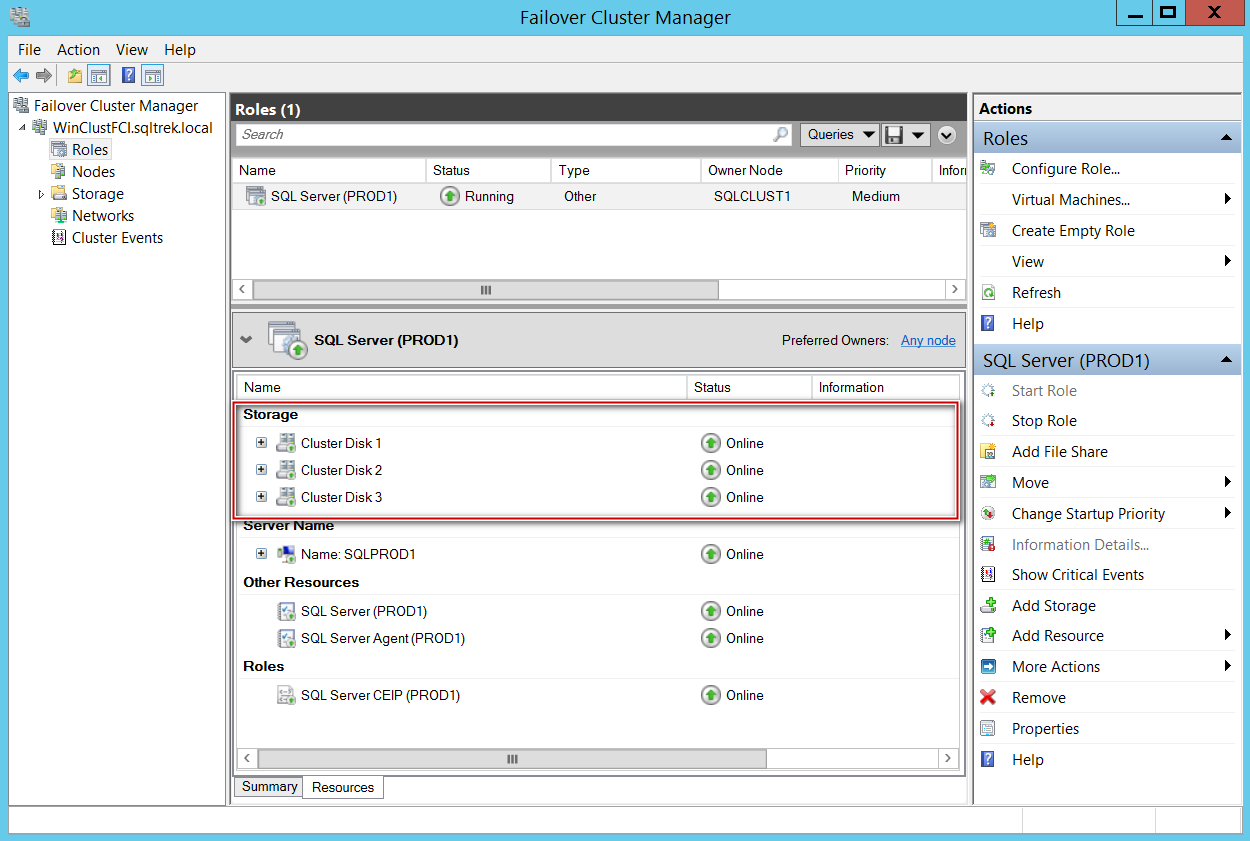
Below is the screenshot of my SQL Server FCI leveraging CSVs from Failover Cluster Manager.
下面是利用故障转移群集管理器中的CSV进行SQL Server FCI屏幕截图。
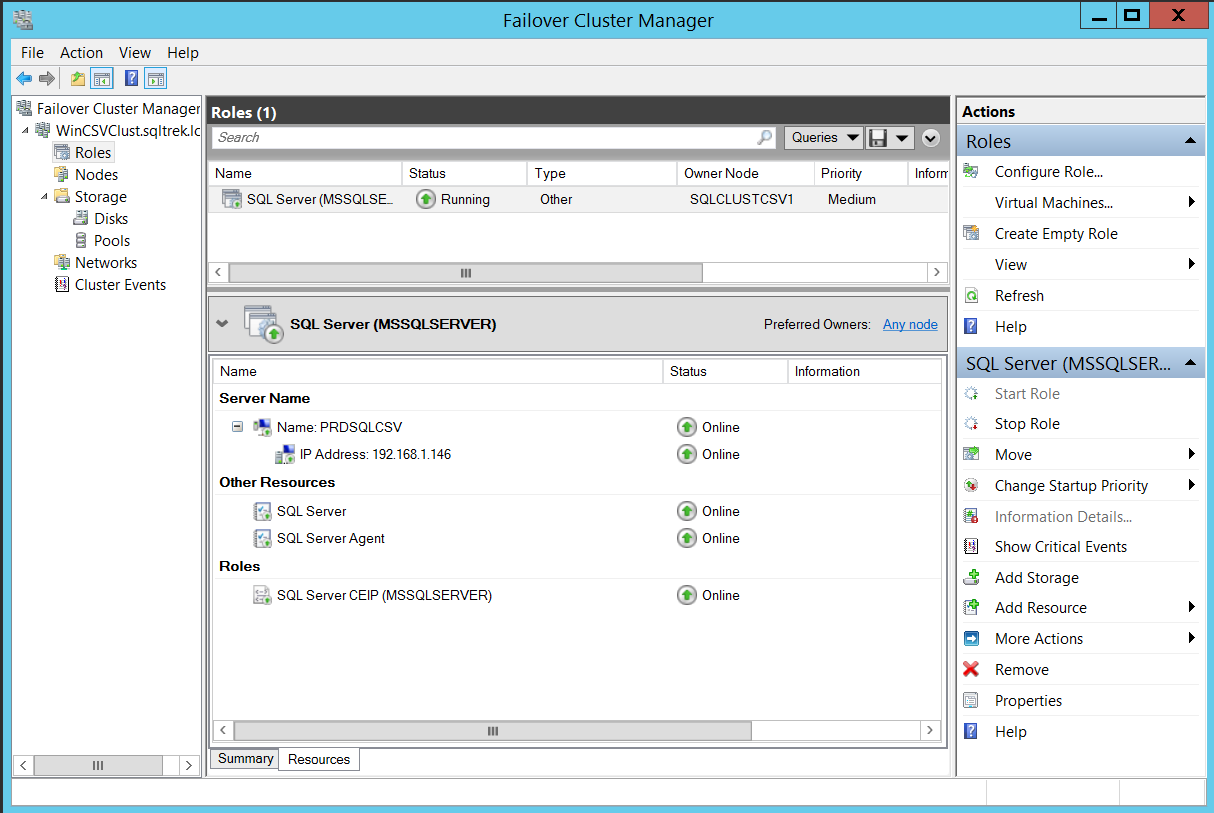
Notice that the disks are not listed (There is no visible storage group) under resources for SQL Server role, that’s because there is no direct dependency on the disks as we discussed earlier.
请注意,在SQL Server角色的资源下未列出磁盘(没有可见的存储组),这是因为如前所述,磁盘没有直接依赖关系。
Below is the generated dependency report, you can see disks not being listed here as well!
以下是生成的依赖性报告,您也可以看到未在此处列出的磁盘!
Let’s compare it what I have in my other FCI with traditional shared storage setup. You can see disks listed under resources and also being displayed in Dependency report.
让我们将其与其他FCI中具有传统共享存储设置的内容进行比较。 您可以看到资源下方列出的磁盘,这些磁盘也显示在“依赖性”报告中。

Conclusion:
结论:
Cluster Shared Volumes are definitely a great enhancement which SQL Server DBAs can take advantage of assuming you are running SQL 2014 or above. With so many added benefits over traditional storage solution, I suggest to test CSVs or at least consider implementing in POC environments when setting up an FCI.
<群集共享卷绝对是一项强大的增强功能,假定您运行的是SQL 2014或更高版本,SQL Server DBA可以利用此功能。 与传统的存储解决方案相比,它具有许多额外的优势,我建议测试CSV或至少在设置FCI时考虑在POC环境中实施。
<翻译自: https://www.sqlshack.com/deploy-sql-server-with-cluster-shared-volumes-part-2/
sql server 群集


 被折叠的 条评论
为什么被折叠?
被折叠的 条评论
为什么被折叠?
 到【灌水乐园】发言


