


oracle执行外部sql
In the previous article of the series, we took an overview of PolyBase in SQL Server 2017. We also learned about the Azure Data Studio and SQL Server 2019 preview extension to explore SQL Server 2019 features.
在本系列的上一篇文章中,我们对SQL Server 2017中的PolyBase进行了概述。我们还了解了Azure Data Studio和SQL Server 2019预览扩展,以探索SQL Server 2019功能。
In this article, we will use PolyBase to connect to Oracle database and see how we can create external tables pointing to Oracle database and access data without moving the data into the SQL Server 2019 database.
在本文中,我们将使用PolyBase连接到Oracle数据库,并了解如何在不将数据移至SQL Server 2019数据库的情况下创建指向Oracle数据库的外部表并访问数据。
Therefore, in this article, we will explore below topics
因此,在本文中,我们将探讨以下主题
- Install Oracle Express Edition database 安装Oracle Express Edition数据库
- Insert Sample database into the DB 将示例数据库插入数据库
- Create an external table using Azure SQL Data Studio 使用Azure SQL Data Studio创建外部表
- Access data table from an external table pointing to Oracle DB 从指向Oracle DB的外部表访问数据表
安装Oracle Express Edition数据库 (Install Oracle Express Edition database )
Firstly, we will install Oracle Express Edition 11g Release 2 and prepare sample database and tables. Later we will use access to this table from the SQL Server 2019 using an external table.
首先,我们将安装Oracle Express Edition 11g第2版并准备示例数据库和表。 稍后我们将使用外部表从SQL Server 2019中访问此表。
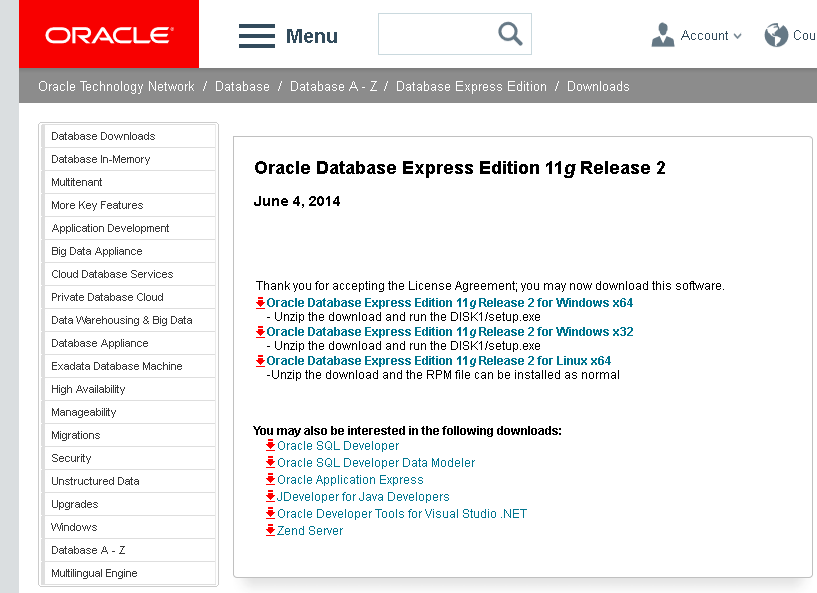
Download Oracle Express Edition 11g Release 2 from the link for windows x64 platform.
从Windows x64平台的链接下载Oracle Express Edition 11g第2版。
Once set up file download is completed, downloaded, double-click on it to launch the installation wizard.
设置文件下载完成后,下载并双击它以启动安装向导。
We get the below welcome screen to install Oracle Database 11g Express Edition. Click on Next.
我们将在下面的欢迎屏幕上安装Oracle Database 11g Express Edition。 点击下一步 。
Accept the license agreement and click on Next.
接受许可协议,然后单击“ 下一步” 。
By default, Setup installs the Oracle Database 11g Express Edition into C:\oracleexe folder. If we want to change, click on Browse and give the new path.
默认情况下,安装程序将Oracle Database 11g Express Edition安装到C:\ oracleexe文件夹中。 如果要更改,请单击浏览并提供新路径。
Enter the password for SYS and SYSTEM database admin accounts. Password will be the same for both the accounts. Both accounts are created automatically during the installation.
输入SYS和SYSTEM数据库管理员帐户的密码。 两个帐户的密码将相同。 这两个帐户都是在安装过程中自动创建的。
Both SYS and SYSTEM accounts can perform all administration tasks in Oracle while SYSTEM account cannot do the backup, recovery and database upgrades. You can refer to SYS and SYSTEM Users for more details.
SYS和SYSTEM帐户都可以执行Oracle中的所有管理任务,而SYSTEM帐户则不能执行备份,恢复和数据库升级。 您可以参考SYS和SYSTEM用户以获取更多详细信息。
In this page, review the installation setting. We can see here that default locations are:
在此页面中,查看安装设置。 我们可以在这里看到默认位置是:
Oracle Home: C:\oraclexe\app\oracle\product\11.2.0\server
Oracle主页 :C:\ oraclexe \ app \ oracle \ product \ 11.2.0 \ server
Oracle Base: C:\oraclexe
Oracle基础 :C:\ oraclexe
Port for Oracle Database listener: 1521
Oracle Database侦听器的端口 :1521
Click on Install to begin installing Oracle Database 11g Express Edition.
单击“ 安装”以开始安装Oracle Database 11g Express Edition。
We get the progress of the status of installation as shown below:
我们得到安装状态的进度,如下所示:
We get below message once the Oracle Database 11g Express Edition is installed successfully.
成功安装Oracle Database 11g Express Edition后,我们将收到以下消息。
We can see a new folder in start menu “Oracle Database 11g Express Edition”.
我们可以在开始菜单“ Oracle Database 11g Express Edition”中看到一个新文件夹。
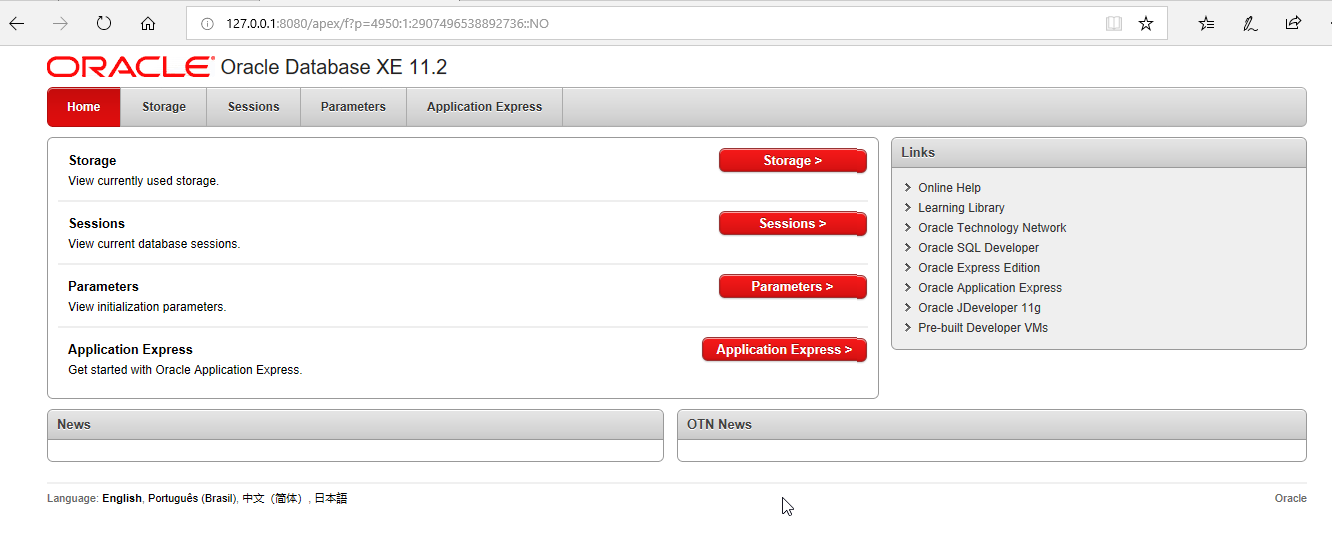
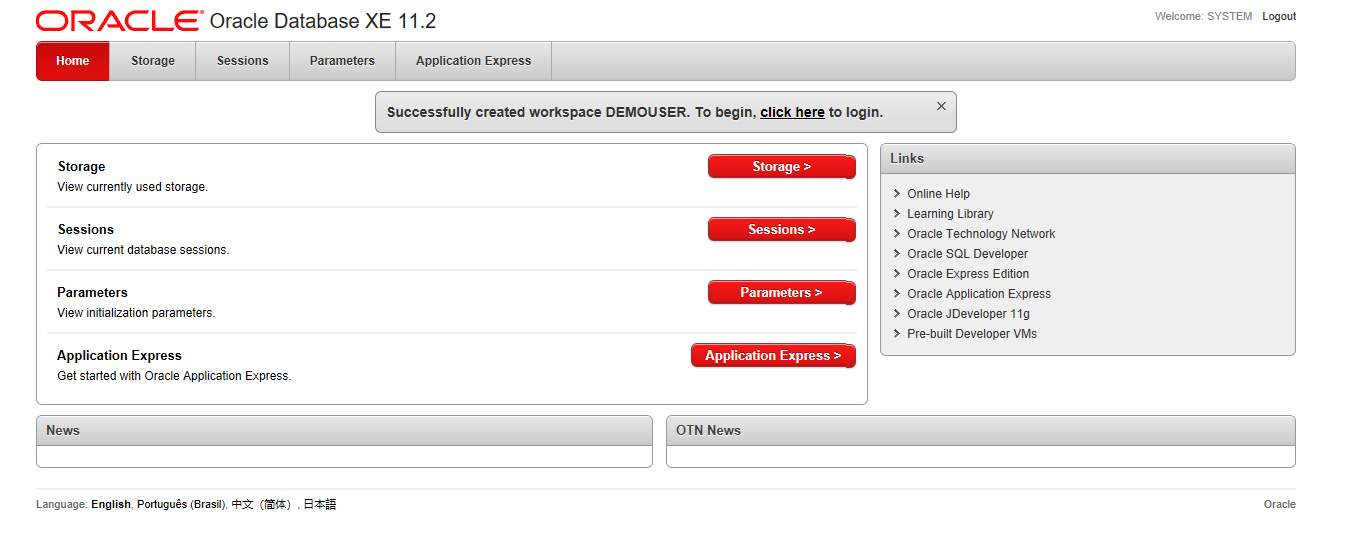
Click on Get Started and it opens a web page of Oracle Database XE 11.2 with all configuration options, session, parameters details, SQL editor etc.
单击“入门” ,它将打开Oracle Database XE 11.2的网页,其中包含所有配置选项,会话,参数详细信息,SQL编辑器等。
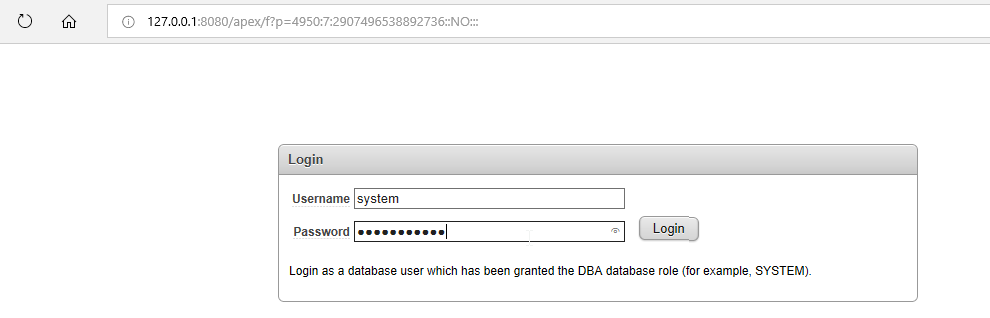
Log in with a database user having DBA role. We can log in here with the SYSTEM account created while doing the installation.
使用具有DBA角色的数据库用户登录。 我们可以使用安装时创建的SYSTEM帐户登录到此处。
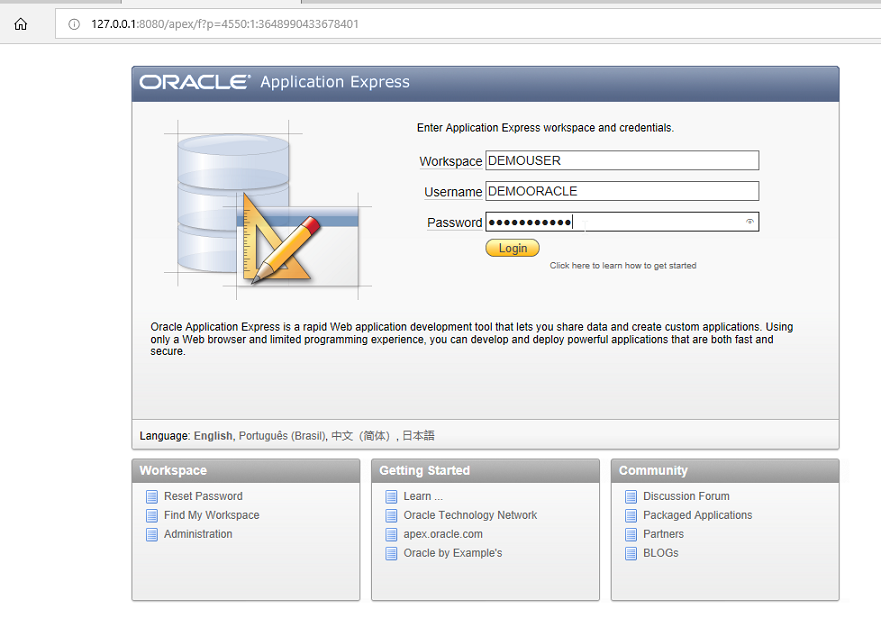
In the next step, we will create a shared work area (workspace) which works as a virtual private database. Enter the database username, application express username, and password.
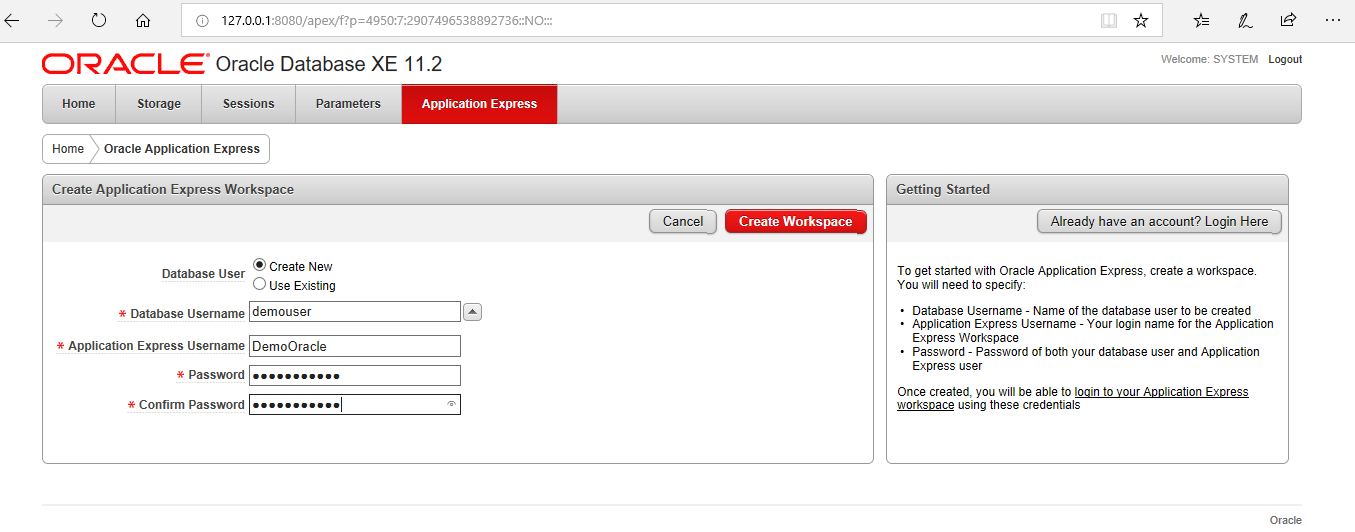
在下一步中,我们将创建一个共享工作区(工作区),用作虚拟专用数据库。 输入数据库用户名,应用程序快速用户名和密码。
We can see in below image that the workspace is created successfully. Now we will log in to the workspace with the credentials created.
我们可以在下图中看到成功创建工作区。 现在,我们将使用创建的凭据登录到工作区。
Enter the credentials.
输入凭据。
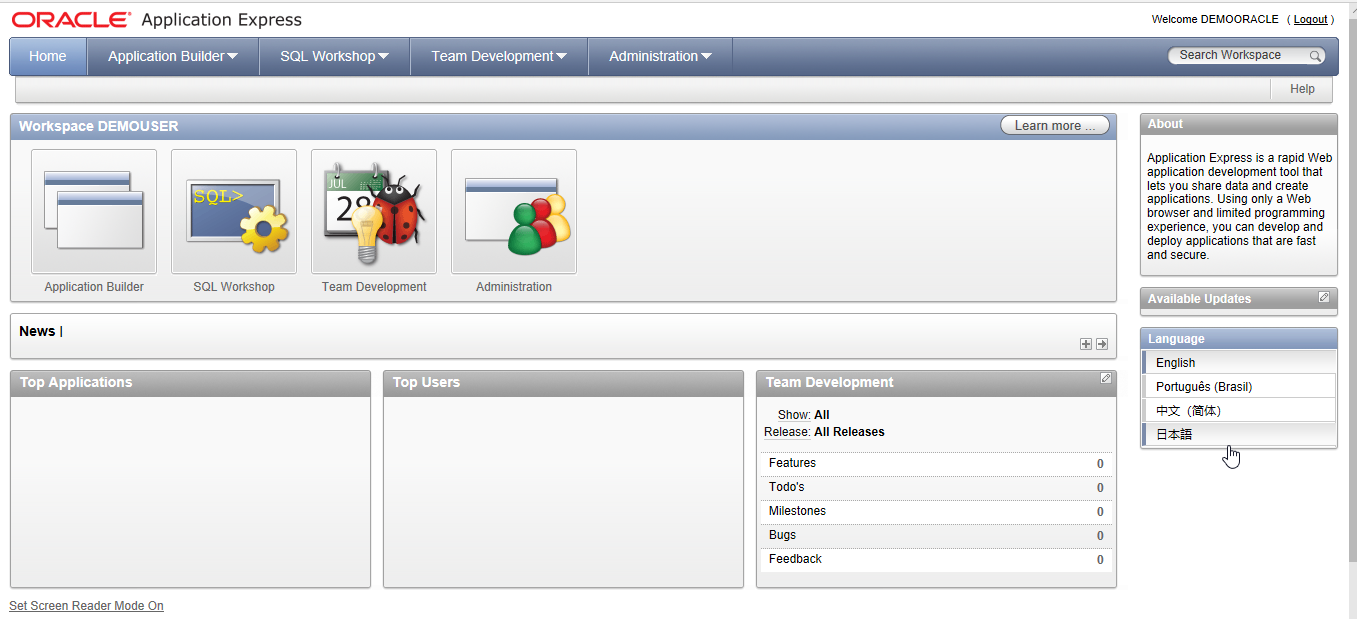
We can see the workspace where we can run the SQL query, create objects etc.
我们可以看到可以在其中运行SQL查询,创建对象等的工作区。
In the next step, we will run the script that will create the sample objects and insert data into the objects. Copy the script and provide a name to the script.
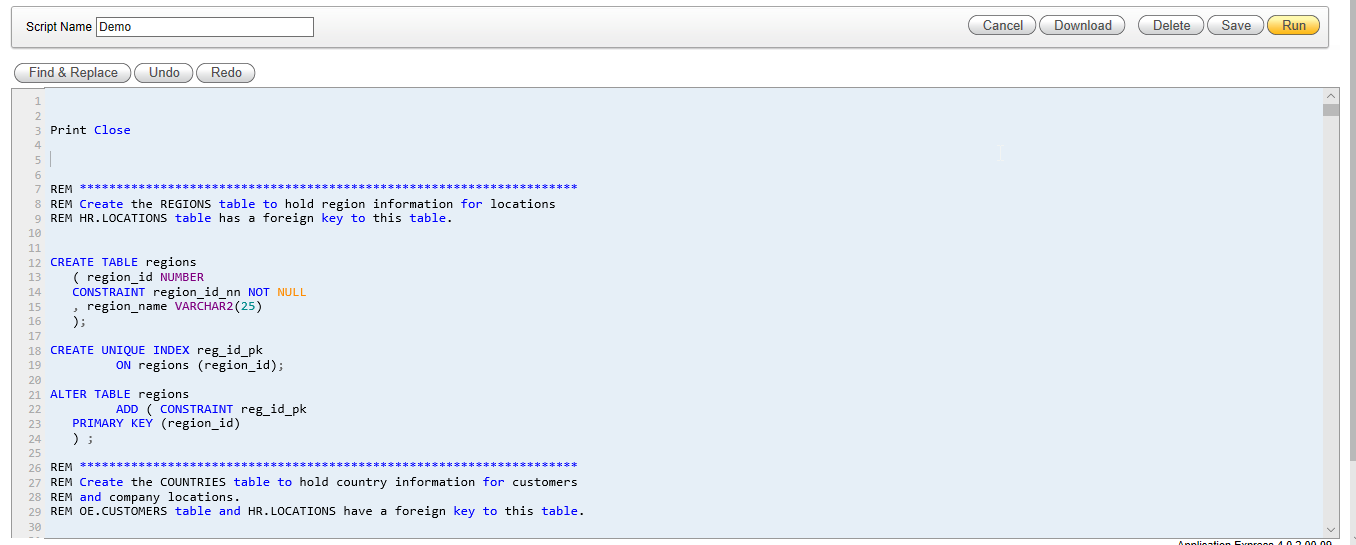
在下一步中,我们将运行脚本 ,该脚本将创建示例对象并将数据插入到对象中。 复制脚本并为脚本提供一个名称。
Click on Run Now to execute the script.
单击立即运行以执行脚本。
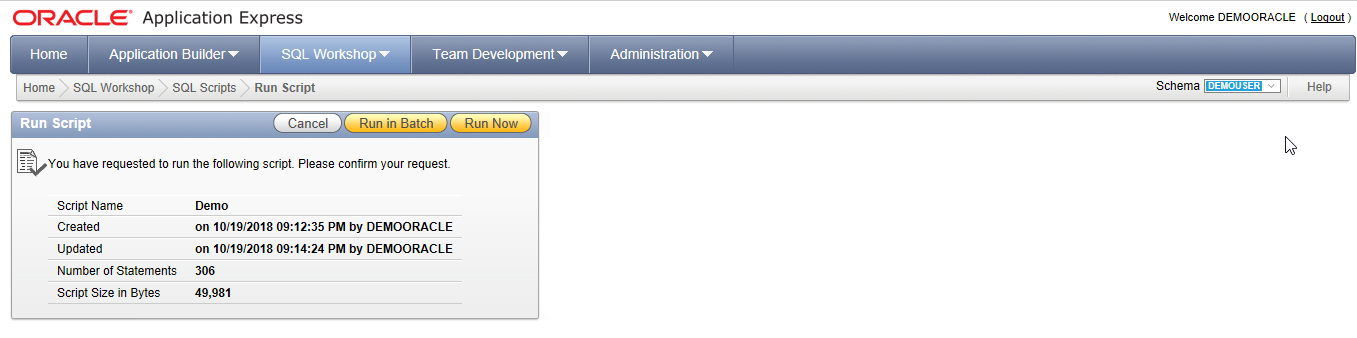
We can see that the script is executed successfully.
我们可以看到脚本已成功执行。
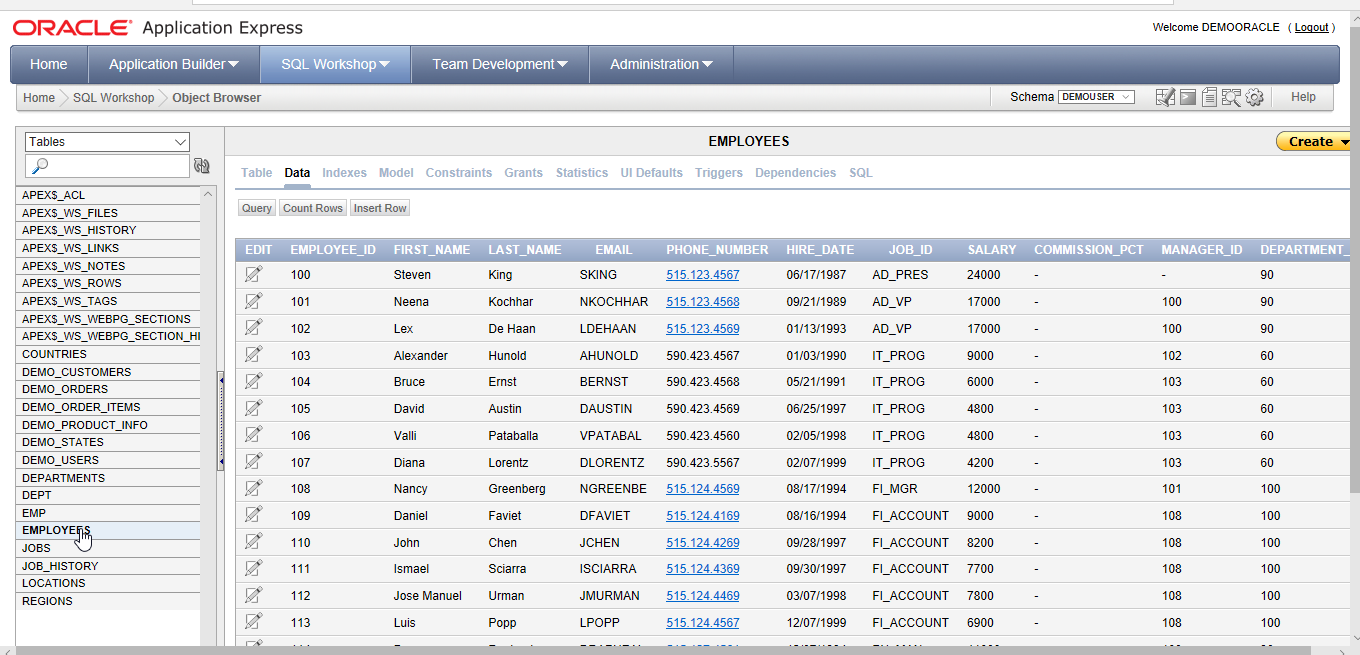
Now go to object browser and we can see that objects and the data into that. For example, in below screen, we can see the data in the Employees table.
现在转到对象浏览器,我们可以看到该对象和其中的数据。 例如,在下面的屏幕中,我们可以在Employees表中查看数据。
Now we have the Oracle database and sample object ready. Therefore, in the next step, we will use the Azure Data Studio to create an external table for Oracle data source.
现在,我们已经准备好了Oracle数据库和示例对象。 因此,在下一步中,我们将使用Azure Data Studio为Oracle数据源创建一个外部表。
Azure Data Studio使用PolyBase访问Oracle中的外部数据 (Azure Data Studio to access external data in Oracle using PolyBase)
As discussed, so far below are the requirements to access Oracle database using PolyBase with Azure Data Studio
如前所述,到目前为止,下面是使用带有Azure Data Studio的PolyBase访问Oracle数据库的要求
- SQL Server 2019 preview 4 SQL Server 2019预览版4
- Azure Data Studio with SQL Server 2019 extension 带有SQL Server 2019扩展的Azure Data Studio
- Oracle Data Source Oracle数据源
- Polybase services should be running with SQL Server database services. Polybase服务应与SQL Server数据库服务一起运行。

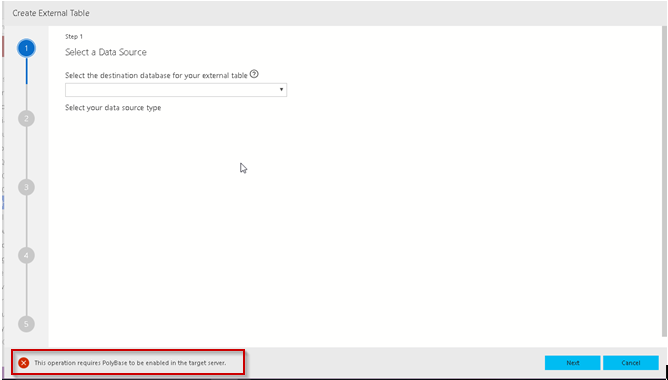
If PolyBase is not installed, we will get the error “the Operation requires PolyBase to be enabled on the target server”.
如果未安装PolyBase,我们将收到错误消息“该操作要求在目标服务器上启用PolyBase”。
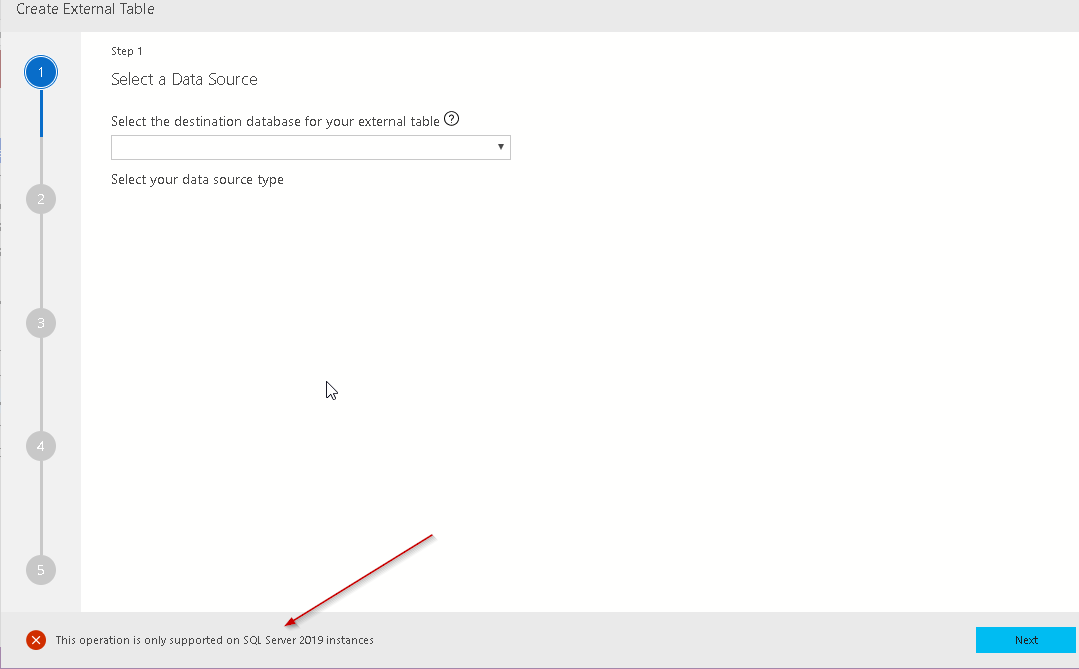
This feature is available for SQL Server 2019 only, we get the below error if we try to use external table wizard for instances other than SQL Server 2019.
此功能仅适用于SQL Server 2019,如果尝试对SQL Server 2019以外的实例使用外部表向导,则会出现以下错误。
在Azure Data Studio中创建外部表的步骤 (Steps to Create External Tables in Azure Data Studio)
In this step, we will configure the external table using PolyBase with the help of External table wizard in Azure Data Studio.
在此步骤中,我们将借助Azure Data Studio中的外部表向导使用PolyBase配置外部表。
Right click on the Database and Create External Table.
右键单击数据库并创建外部表。
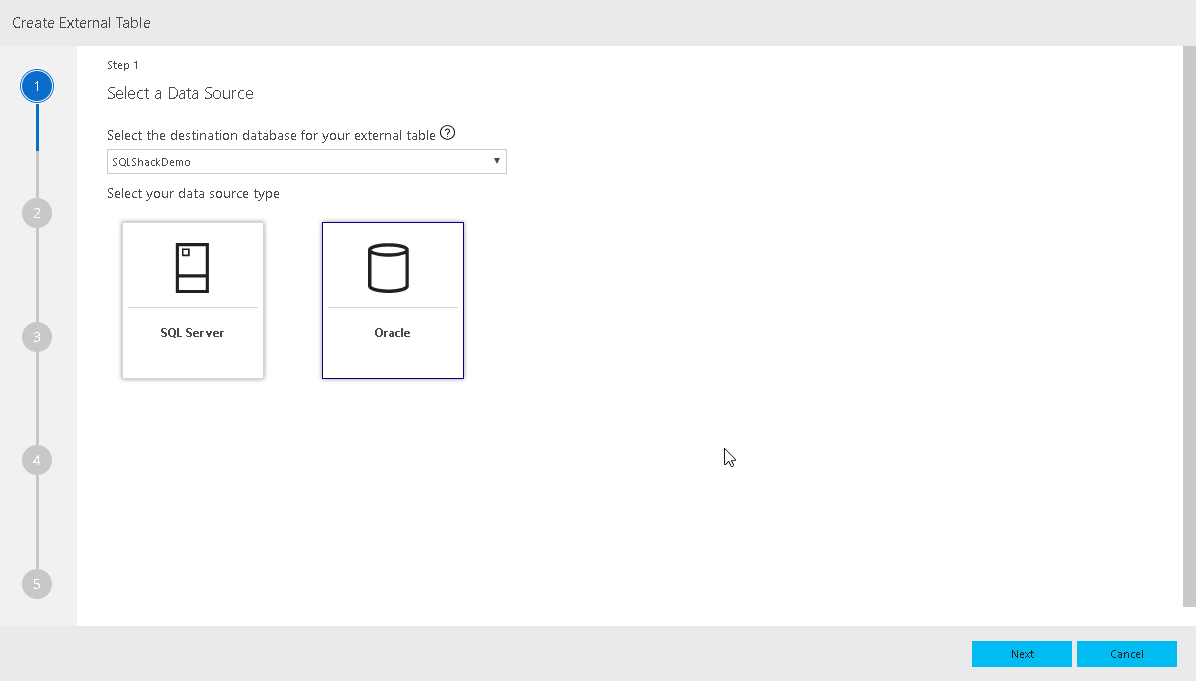
This launches the below external table wizard. This shows the two data sources: SQL Server and Oracle.
这将启动下面的外部表向导。 这显示了两个数据源:SQL Server和Oracle。
By default, SQL Server is highlighted. In this article, we want to create a data source for Oracle.
默认情况下,SQL Server突出显示。 在本文中,我们要为Oracle创建数据源。
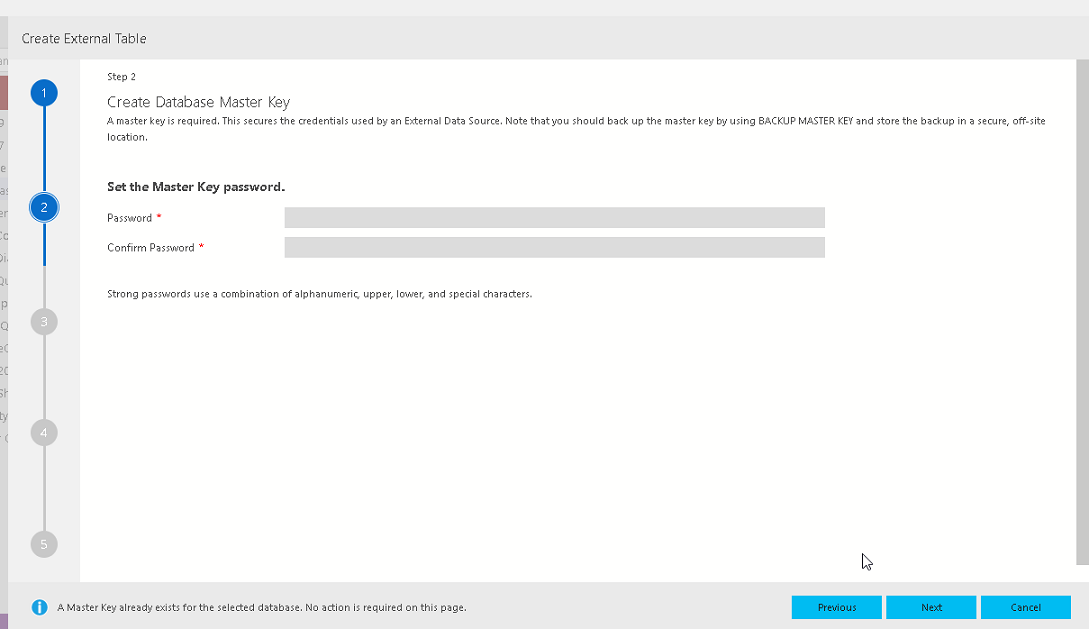
In this step, we will create the Database Master Key. We will provide the master key password.
在此步骤中,我们将创建数据库主密钥。 我们将提供主密钥密码。
If a master key already exists on the database, we get the message that master key already exists on this database.
如果数据库中已经存在一个主密钥,则会收到消息,表明该数据库中已经存在一个主密钥。
Alternatively, we can create Database master key using the below script
另外,我们可以使用以下脚本创建数据库主密钥
CREATE MASTER KEY ENCRYPTION BY PASSWORD = “Complex password”;
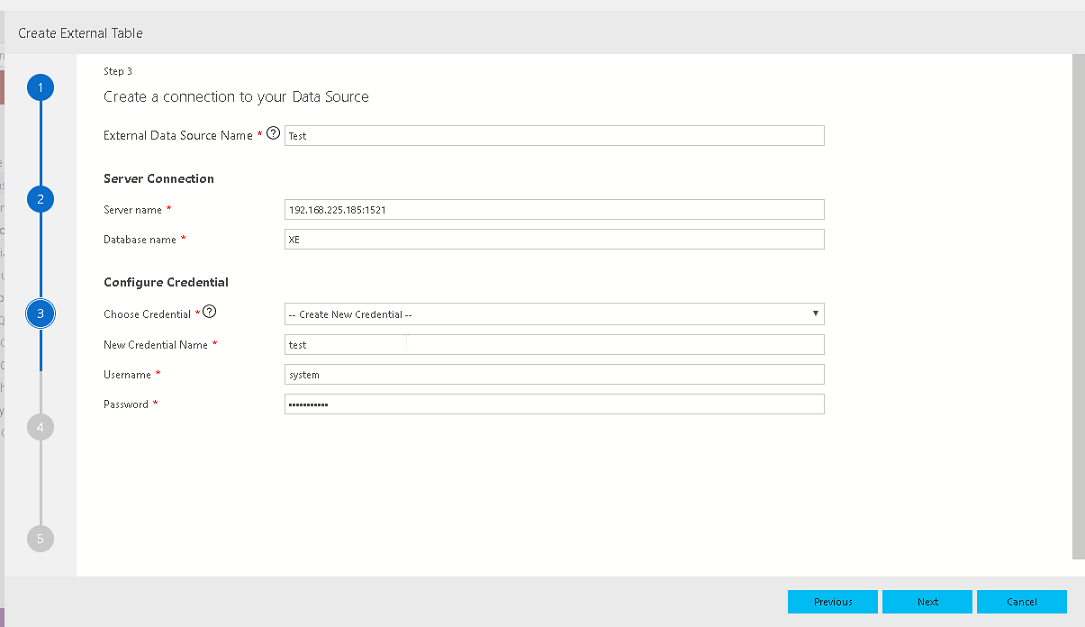
Click on Next to create a connection to Data source. Enter the below details:
单击下一步创建到数据源的连接。 输入以下详细信息:
Server name: Server name should be of format server: port
服务器名称 :服务器名称应采用以下格式:服务器:端口
Database Name: Default service name for Oracle express edition is XE. We can give the service name as per our DB configurations.
数据库名称 :Oracle Express Edition的默认服务名称是XE。 我们可以根据数据库配置提供服务名称。
Credentials: Enter the database-scoped credential or we can create new credentials here.
凭证 :输入数据库范围的凭证,或者我们可以在此处创建新的凭证。
Click on Next to move forward.
单击下一步前进。
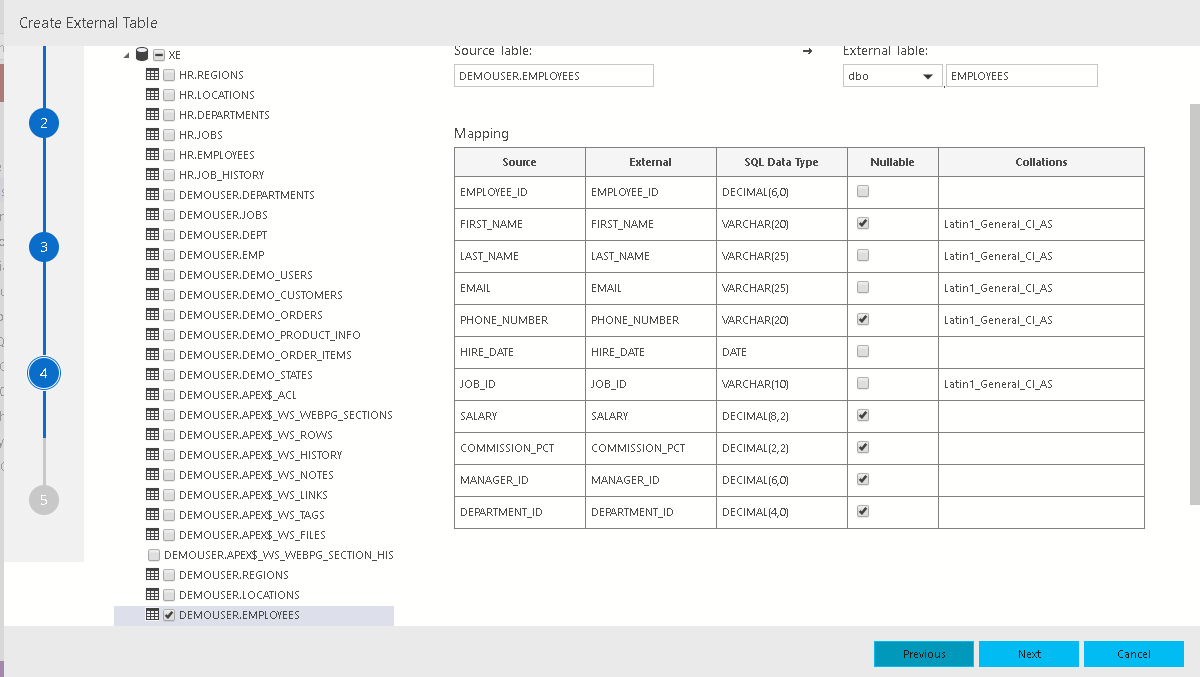
In the next step, we will choose the external table to access from the SQL Server. In this demo, we will select DEMOUSER.Employees table.
在下一步中,我们将选择要从SQL Server访问的外部表。 在此演示中,我们将选择DEMOUSER.Employees表。
Once we select this table, we can see the source table and its corresponding external table name. We can also see the source and destination column mapping and properties.
选择此表后,我们可以看到源表及其对应的外部表名称。 我们还可以看到源列和目标列的映射和属性。
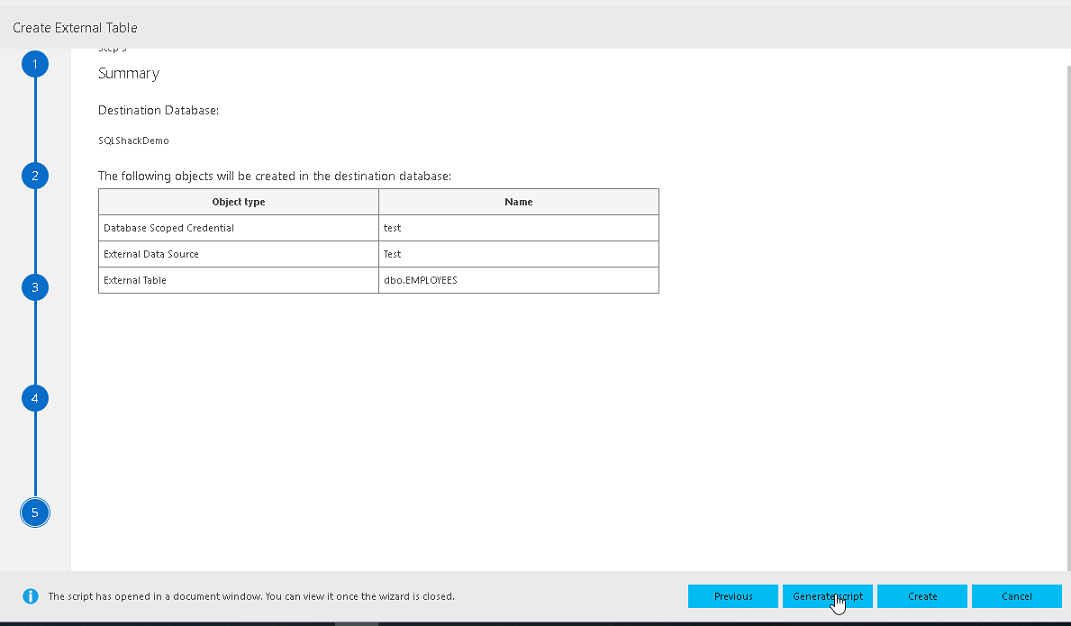
Next steps show a summary of the tasks such as destination database, database scoped credential name, external data source name, and external table name.
后续步骤显示了任务的摘要,例如目标数据库,数据库范围的凭据名称,外部数据源名称和外部表名称。
If we want to generate a script for this external table configuration, click on Generate Script. This will create a script in a new query window.
如果我们要为此外部表配置生成脚本 ,请单击生成脚本 。 这将在新的查询窗口中创建一个脚本。
Click on Create to create an external table.
单击创建以创建一个外部表。
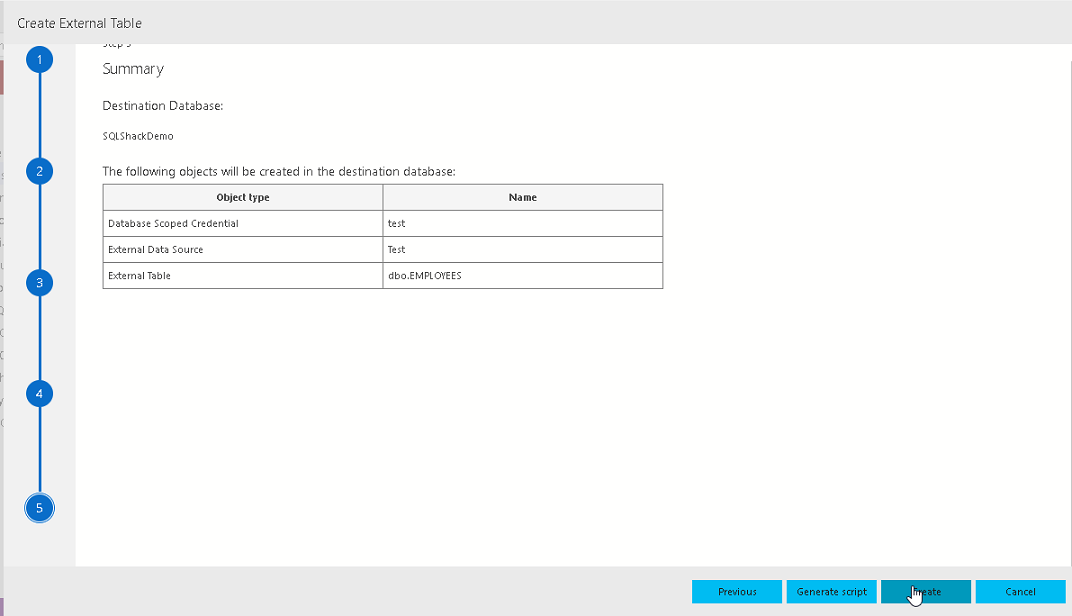
In the task history, we can see that the external table is created successfully.
在任务历史记录中,我们可以看到外部表已成功创建。
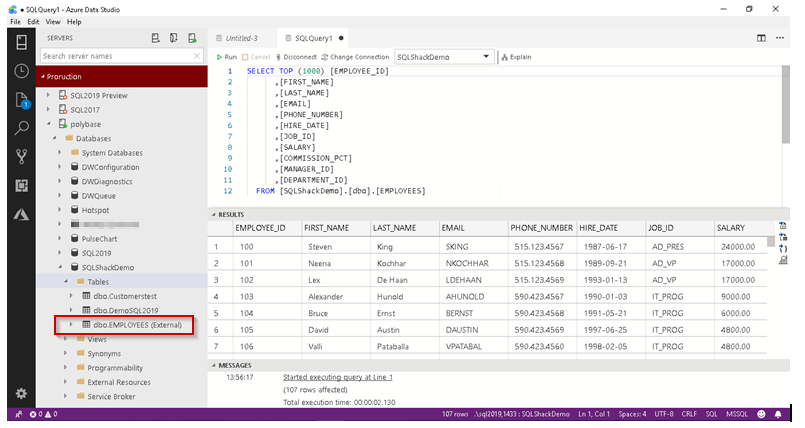
We can see in the database dbo. Employees table exists. We can easily identify external tables with EXTERNAL keywords as a suffix to the table name in Azure Data Studio.
我们可以在数据库dbo中看到。 员工表存在。 我们可以使用EXTERNAL关键字作为Azure Data Studio中表名的后缀来轻松标识外部表。
As shown below, we can view the records in the table similar to a relational database table.
如下所示,我们可以查看表中的记录,类似于关系数据库表。
Below is the script generated by the external table creation wizard in Azure Data Studio. We will explain this script in further articles.
下面是由Azure Data Studio中的外部表创建向导生成的脚本。 我们将在后续文章中解释此脚本。
BEGIN TRY
    BEGIN TRANSACTION T35c299624c5449ae8a5e37d96282f89
        USE [SQLShackDemo];
        CREATE DATABASE SCOPED CREDENTIAL [test]
            WITH IDENTITY = system, SECRET = ABC@system1;
        CREATE EXTERNAL DATA SOURCE [Test]
            WITH (LOCATION = oracle://192.168.225.185:1521, CREDENTIAL = [test]);
        CREATE EXTERNAL TABLE [dbo].[EMPLOYEES]
        (
            [EMPLOYEE_ID] DECIMAL(6,0) NOT NULL,
            [FIRST_NAME] VARCHAR(20) COLLATE Latin1_General_CI_AS,
            [LAST_NAME] VARCHAR(25) COLLATE Latin1_General_CI_AS NOT NULL,
            [EMAIL] VARCHAR(25) COLLATE Latin1_General_CI_AS NOT NULL,
            [PHONE_NUMBER] VARCHAR(20) COLLATE Latin1_General_CI_AS,
            [HIRE_DATE] DATE NOT NULL,
            [JOB_ID] VARCHAR(10) COLLATE Latin1_General_CI_AS NOT NULL,
            [SALARY] DECIMAL(8,2),
            [COMMISSION_PCT] DECIMAL(2,2),
            [MANAGER_ID] DECIMAL(6,0),
            [DEPARTMENT_ID] DECIMAL(4,0)
        )
        WITH (LOCATION = [XE].[DEMOUSER].[EMPLOYEES], DATA_SOURCE = [Test]);
    COMMIT TRANSACTION T35c299624c5449ae8a5e37d96282f89
END TRY
BEGIN CATCH
    IF @@TRANCOUNT > 0
        ROLLBACK TRANSACTION T35c299624c5449ae8a5e37d96282f89
    DECLARE @ErrorMessage NVARCHAR(4000) = ERROR_MESSAGE();
    DECLARE @ErrorSeverity INT = ERROR_SEVERITY();
    DECLARE @ErrorState INT = ERROR_STATE();
    RAISERROR(@ErrorMessage, @ErrorSeverity, @ErrorState);
END CATCH;
In SQL Server Management Studio, the external table is present in tables -> external tables section.
在SQL Server Management Studio中,外部表位于表->外部表部分中。
If we view the query execution plan for this external table in Azure Data Studio, we can see the operator Remote Query that shows data is extracted from the remote data source when we run the query and actually does not hold any data.
如果在Azure Data Studio中查看此外部表的查询执行计划,则可以看到操作员“远程查询”,该数据显示在运行查询时数据是从远程数据源中提取的,但实际上不保存任何数据。
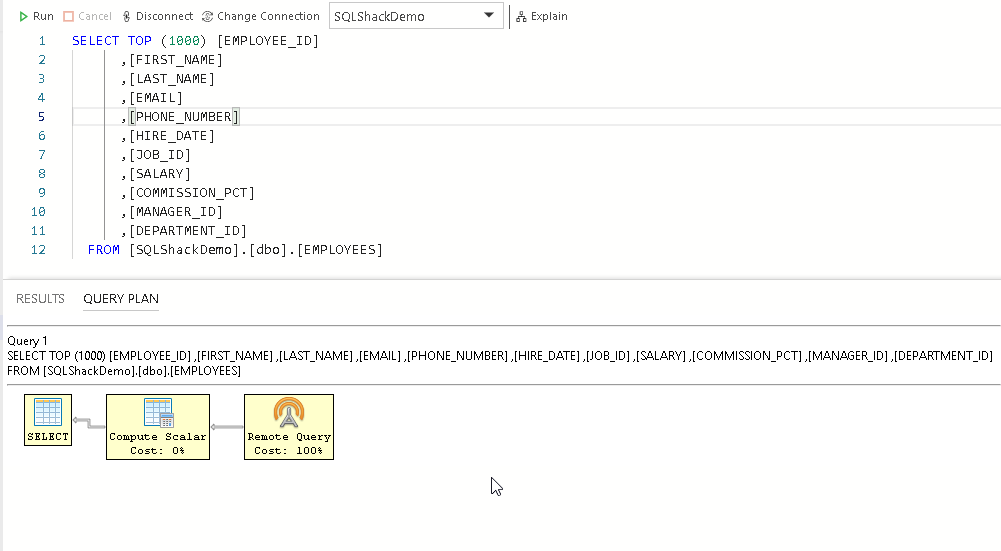
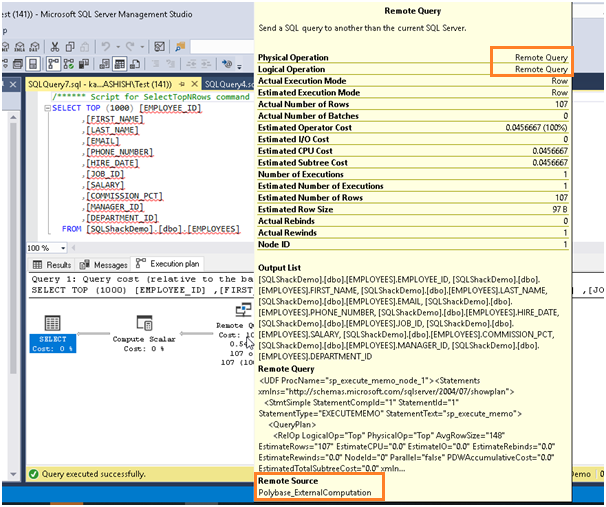
Similar to Azure Data Studio, we can get more details of the execution plan and operator as shown below. We can see that remote source is Polybase_ExternalConfiguration.
与Azure Data Studio相似,我们可以获得执行计划和运算符的更多详细信息,如下所示。 我们可以看到远程源是Polybase_ExternalConfiguration。
Let us update the records in Oracle database. In this below example, we can see that the employee name for employee id 100 is updated from Steven King to Rajendra Gupta.
让我们更新Oracle数据库中的记录。 在下面的示例中,我们可以看到员工ID为100的员工名称已从Steven King更新为Rajendra Gupta。
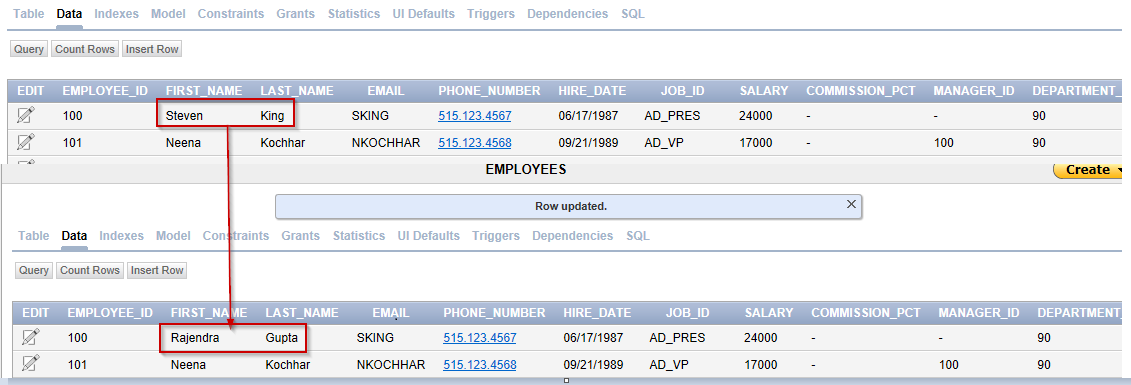
Now let us verify the updated employee name using an external table. Therefore, we can view the live data using the external table. We do not need to bring the data again since it accesses live data from the data source. It does not store of the copy of the data.
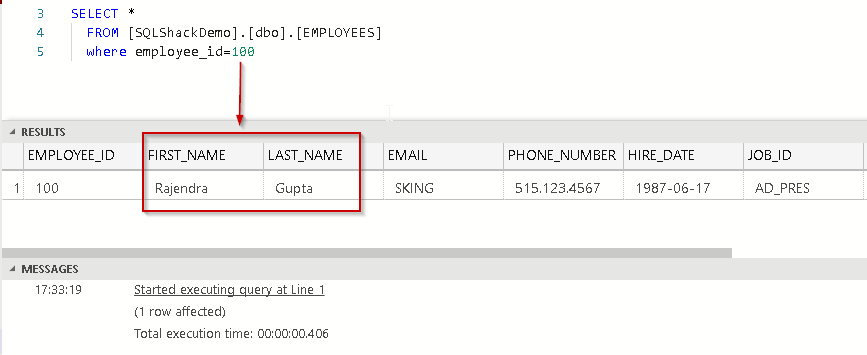
现在,让我们使用外部表验证更新后的员工姓名。 因此,我们可以使用外部表查看实时数据。 我们不需要再次带来数据,因为它可以从数据源访问实时数据。 它不存储数据副本。
We can create statistics on an external table to get optimal performance.
我们可以在外部表上创建统计信息以获得最佳性能。
CREATE STATISTICS EMPLOYEESKeyStatistics ON Employees (Employee_ID) WITH FULLSCAN;

结论 (Conclusion)
SQL Server 2019 preview (SQL Server vNext CTP 2.0) provides the ability to access relational and non-relational data using data virtualization technique PolyBase. This is very useful and nice enhancements to access all data at a single place only. We can access this data the similar way of a relational data. In the next article, we will create an external table using T-SQL for the same data source pointing to Oracle and explore more features of external tables.
SQL Server 2019预览版(SQL Server vNext CTP 2.0)提供了使用数据虚拟化技术PolyBase访问关系和非关系数据的功能。 这是非常有用且很好的增强功能,仅可在单个位置访问所有数据。 我们可以像关系数据一样访问此数据。 在下一篇文章中,我们将使用T-SQL为指向Oracle的相同数据源创建一个外部表,并探索外部表的更多功能。
目录 (Table of contents)
| 增强的PolyBase SQL 2019-安装和基本概述 |
| 增强的PolyBase SQL 2019-Oracle DB的外部表 |
| 增强的PolyBase SQL 2019-使用t-SQL的外部表 |
| 增强的PolyBase SQL 2019-外部表SQL Server,目录视图和下推式 |
| 增强的PolyBase SQL 2019 – MongoDB和外部表 |
翻译自: https://www.sqlshack.com/enhanced-polybase-sql-2019-external-tables-for-oracle-db/
oracle执行外部sql


 4963
4963

 被折叠的 条评论
为什么被折叠?
被折叠的 条评论
为什么被折叠?
 到【灌水乐园】发言


