


This article installs SQL Server on Linux on the Amazon EC2 instance with Red Hat OS prepared in the earlier article.
本文使用前面文章中准备的Red Hat OS在Amazon EC2实例上的Linux上安装SQL Server。
介绍 (Introduction)
In the previous article, Installation of SQL Server Linux on Red Hat in Amazon EC2 instances, we explored the preparation of Amazon EC2 instance with the Red Hat Linux operating system installation. It is our first virtual server in the Amazon cloud. In this article, we will install SQL Server Linux 2017 on this EC2 instance and connect with the SQL database through SQLCMD command-line tools.
在上一篇文章“ 在Amazon EC2实例中的Red Hat上安装SQL Server Linux”中 ,我们探讨了通过Red Hat Linux操作系统安装来准备Amazon EC2实例的过程。 这是我们在亚马逊云中的第一台虚拟服务器。 在本文中,我们将在此EC2实例上安装SQL Server Linux 2017并通过SQLCMD命令行工具与SQL数据库连接。
先决条件 (Prerequisites)
- Amazon EC2 instance with Red Hat Linux 带有Red Hat Linux的Amazon EC2实例
- Configured Security groups (firewall) for the EC2 instance 为EC2实例配置的安全组(防火墙)
启动Amazon EC2实例 (Launch Amazon EC2 instance)
Login in AWS web console and launch EC2 from the services. It opens the EC2 dashboard, as shown below:
在AWS Web控制台中登录并从服务启动EC2。 它将打开EC2仪表板,如下所示:
We stopped our EC2 instance created earlier. It only shows the running instances in the dashboard.
我们停止了先前创建的EC2实例。 它仅在仪表板中显示正在运行的实例。
Click on Running instances, and it shows an instance in the stopped status:
单击“正在运行的实例”,它将显示处于停止状态的实例:
EC2 instance should be in running status so that we can install SQL Server Linux on it. Click on Actions | Instance State | Start for starting this instance:
EC2实例应处于运行状态,以便我们可以在其上安装SQL Server Linux。 单击操作 | 实例状态 | 开始启动该实例:
It asks confirmation before starting the EC2 instance. Click on Yes, Start:
在启动EC2实例之前,它将要求确认。 单击是,开始 :
It takes some time to start the Amazon EC2 instance. It also performs the 2/2 status check that it performed earlier during instance creation:
启动Amazon EC2实例需要花费一些时间。 它还执行在实例创建期间之前执行的2/2状态检查:
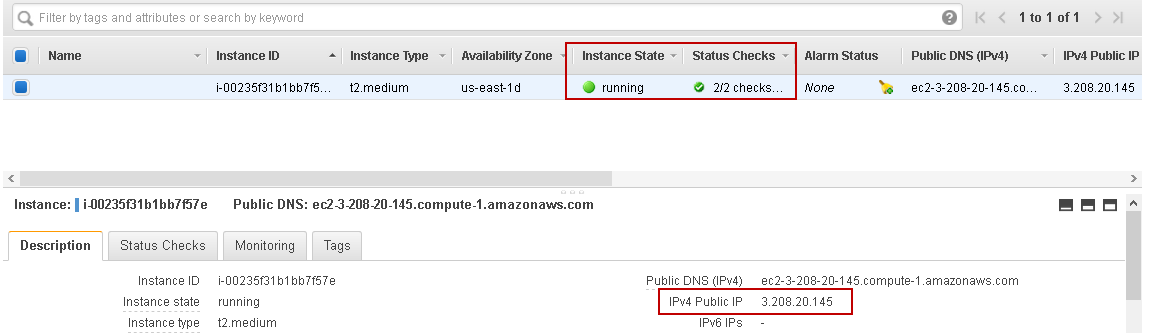
Once the instance is up, launch Putty and connect to EC2 instance using public IP address and private key (.PPK file):
实例启动后,启动Putty并使用公共IP地址和私钥(.PPK文件)连接到EC2实例:
After connected to EC2 instance, it is a best practice to update all packages to the latest versions. Execute the following command:
连接到EC2实例后,最佳做法是将所有软件包更新为最新版本。 执行以下命令:
sudo yum update
It checks for all packages, plug-in for updates:
它检查所有软件包,插件检查更新:
Once all checks are complete, it asks for downloading the packages with download size. In this following screenshot, we can see it requires 315 MB download for 237 packages upgrade:
完成所有检查后,它会要求下载具有下载大小的软件包。 在以下屏幕截图中,我们可以看到需要315 MB下载才能升级237个软件包:
Enter “y” for download and install all required packages upgrades. This process might take longer, depending upon download size and network speed. Once all upgrades are successful, you can see the following screen:
输入“ y”进行下载并安装所有必需的软件包升级。 此过程可能需要更长的时间,具体取决于下载大小和网络速度。 一旦所有升级成功,您将看到以下屏幕:
Amazon EC2 RHEL实例上SQL Server安装 (SQL Server installation on Amazon EC2 RHEL instance)
Once we have completed all previous steps, we are ready for SQL Server Linux installation. Let’s use the following steps for the SQL Server installation.
完成上述所有步骤后,即可开始安装SQL Server Linux。 让我们使用以下步骤进行SQL Server安装。
步骤1:下载SQL Server 2017存放区 (Step 1: Download SQL Server 2017 repository)
The first step is to download the SQL Server 2017 repository file for Red Hat Linux. Execute the following command in the SSH terminal:
第一步是下载Red Hat LinuxSQL Server 2017存储库文件。 在SSH终端上执行以下命令:
$ sudo curl -o /etc/yum.repos.d/mssql-server.repo https://packages.microsoft.com/config/rhel/7/mssql-server-2017.repo
In Linux, we use Sudo for executing the command with the highest privileges. The above command downloads the required SQL Server package from specified URL and downloads it into a new repository /etc/yum.repos.d/mssql-server.repo
在Linux中,我们使用Sudo以最高特权执行命令。 上面的命令从指定的URL下载所需SQL Server程序包,并将其下载到新的存储库/etc/yum.repos.d/mssql-server.repo中。
In the output of the terminal window, we can see the repository file downloading progress, current speed, time spent and time left:
在终端窗口的输出中,我们可以看到存储库文件的下载进度,当前速度,花费的时间和剩余时间:
步骤2:从存储库安装SQL Server (Step 2: Install SQL Server from the repository)
In this step, execute the following command for installing SQL Server using Sudo access:
在此步骤中,执行以下命令以使用Sudo访问安装SQL Server:
sudo yum install mssql-server
It checks for the dependencies and gives you information about the packages it needs to download.
它检查相关性,并为您提供有关需要下载的软件包的信息。
It also shows the size of each package and time spent in downloading the package:
它还显示每个软件包的大小以及下载该软件包所花费的时间:
It automatically resolves a few dependencies. In this screenshot, we can see that it needs to download 186 MB file for other dependencies. We can see the dependency package, architecture, version and repository for it:
它会自动解决一些依赖性。 在此屏幕截图中,我们可以看到它需要下载186 MB的文件来获取其他依赖关系。 我们可以看到依赖包,体系结构,版本和存储库:
Enter “y”, and it downloads the remaining packages. Once the package is downloaded, it imports the public repository GPG key from the Microsoft repository URL but requires user confirmation to proceed. You can also view user id (gpgsecurity@microsoft.com) along with key source URL:
输入“ y”,它将下载剩余的软件包。 下载软件包后,它将从Microsoft存储库URL导入公共存储库GPG密钥,但需要用户确认才能继续。 您还可以查看用户ID(gpgsecurity@microsoft.com)以及关键源URL:
Enter “y”, and it installs SQL Server Linux on Amazon EC2 instance. SQL Server set up also guides you for the next step.
输入“ y”,它将在Amazon EC2实例上安装SQL Server Linux。 SQL Server的设置还将指导您进行下一步。
In the following screenshot, we can note down the following steps:
在以下屏幕截图中,我们可以记录以下步骤:
- SQL Server configuration using mssql-conf utility 使用mssql-conf实用程序SQL Server配置
- Restart SQL Server Linux service using systemctl utility 使用systemctl实用工具重新启动SQL Server Linux服务
SQL Server配置 (SQL Server configuration )
Execute the command to complete the set up for SQL Server Linux as shown in the screenshot (number 1).
执行命令以完成SQL Server Linux的设置,如屏幕快照(编号1)所示。
指定SQL Server Linux版本 (Specify SQL Server Linux edition)
Firstly, it asks you about the edition of SQL Server. It gives you a list of available editions such as Standard, Enterprise, Express along with sequence number of each instance:
首先,它询问您有关SQL Server的版本。 它为您提供了可用版本(例如Standard,Enterprise,Express)的列表以及每个实例的序列号:
Suppose we want to install the SQL Server Linux developer edition, we need to provide input (2) for it.
假设我们要安装SQL Server Linux开发人员版本,我们需要为其提供输入(2)。
接受Microsoft产品的许可条款 (Accept license terms for Microsoft product)
The next step is to accept the license terms and conditions. It is a mandatory step, and we cannot say No! If you are interested in reading the license agreement, copy the specified URL and read it.
下一步是接受许可条款和条件。 这是必须执行的步骤,我们不能拒绝! 如果您有兴趣阅读许可协议,请复制指定的URL并阅读。
Enter “yes” to proceed with the installation:
输入“是”继续安装:
指定sysadmin(SA)帐户密码 (Specify the sysadmin (SA) account password)
It now asks you to provide for the SA account. Provide a SA user password and confirm it. You do not see any character while typing the password in Linux. It is the desired behavior of the Linux OS. SQL Server set up is now complete, and it starts the SQL Services for you:
现在,它要求您提供SA帐户。 提供一个SA用户密码并确认。 在Linux中键入密码时看不到任何字符。 这是Linux OS的预期行为。 现在,SQL Server的安装已完成,它会为您启动SQL Services:
在Amazon EC2实例中安装SQL Server命令行工具 (Installation of SQL Server command-line tools in Amazon EC2 instance )
SQL Server set up does not install command line tools SQLCMD. We can install them with the following steps:
SQL Server设置未安装命令行工具SQLCMD。 我们可以按照以下步骤安装它们:
下载资料库 (Download the repository)
$ sudo curl -o /etc/yum.repos.d/msprod.repo https://packages.microsoft.com/config/rhel/7/prod.repo
安装客户端工具 (Install client tools)
Execute the yum install command for mssql-tools, and it resolves the required dependencies as shown in the following screenshot:
对mssql-tools执行yum install命令,它将解析所需的依赖关系,如以下屏幕快照所示:
$ sudo yum install -y mssql-tools
Enter “yes” twice for accepting the license terms for unixODBC and SQL ODBC as shown in below image:
输入两次“是”以接受unixODBC和SQL ODBC的许可条款,如下图所示:
It quickly installs mssql-tools and its dependencies:
它可以快速安装mssql-tools及其依赖项:
We should add /opt/mssql-tools/bin/ to the PATH environment variables. It helps to run the mssql -tools without specifying the full path for it. It modifies the PATH environment variables for both login sessions and interactive/non-login sessions using bash and bashrc profile. If we do not add the /opt/mssql-tools/bin in the PATH environment variable, we need to use this path while using the SQLCMD tool:
我们应该将/ opt / mssql-tools / bin /添加到PATH环境变量中。 它有助于运行mssql -tools而不为其指定完整路径。 它使用bash和bashrc配置文件修改登录会话和交互式/非登录会话的PATH环境变量。 如果未在PATH环境变量中添加/ opt / mssql-tools / bin,则在使用SQLCMD工具时需要使用以下路径:
We can now use SQLCMD for database connection and executing queries.
现在,我们可以使用SQLCMD进行数据库连接和执行查询。
在Amazon EC2实例上使用SQLCMD连接SQL Server Linux (Connect SQL Server Linux using SQLCMD on Amazon EC2 instance)
First, check the SQL Services status using the systemctl command:
首先,使用systemctl命令检查SQL Services状态:
$ systemctl status mssql-server
Its status should be active (running). It also shows the timestamp since when the service is up:
其状态应为活动(运行)。 它还显示自服务启动以来的时间戳记:
In the SQLCMD, specify the following parameters:
在SQLCMD中,指定以下参数:
- -S: SQL Instance name. In the local instance, we can specify localhost for this parameter -S: SQL实例名称。 在本地实例中,我们可以为此参数指定localhost
- -U: user name. By default, it takes SA user for the connection -U:用户名。 默认情况下,连接使用SA用户
- -P: password, we can skip this parameter. SQL Server automatically asks you for a password for authentication purposes -P :密码,我们可以跳过此参数。 SQL Server自动要求您提供密码以进行身份验证
Execute the following command and provide the password for it:
执行以下命令并提供密码:
$ sqlcmd -S localhost -U sa
Once the connection is successful, it prompts the cursor to the next line:
连接成功后,它将提示光标到下一行:
We can execute SQL statements in the SQLCMD command prompt. We use a go statement to execute the transaction batch in SQLCMD, as shown below.
我们可以在SQLCMD命令提示符下执行SQL语句。 我们使用go语句在SQLCMD中执行事务批处理,如下所示。
We can also connect this SQL instance from SSMS outside the Amazon EC2 instance. We can use either public IP or Public DNS for this connection:
我们还可以从Amazon EC2实例外部的SSMS连接此SQL实例。 我们可以为此连接使用公共IP或公共DNS:

Firewall (security groups) should allow connection to port 1433 else connection will not be allowed outside EC2 instance.
防火墙(安全组)应允许连接到端口1433,否则EC2实例外部将不允许连接。
使用EC2实例外部的SSMS与公共DNS连接 (Connection with Public DNS using SSMS outside EC2 instance)
使用EC2实例外部的SSMS与公共IP连接 (Connection with Public IP using SSMS outside EC2 instance)
In the following screenshot, we can see a successful connection to SQL Server on Linux from SSMS outside the EC2 instance:
在以下屏幕截图中,我们可以看到从EC2实例外部的SSMS成功连接到Linux上SQL Server:
Right-click on SQL instance and go to Properties. In this page, we can view the SQL Server version, edition, memory and CPU information:
右键单击SQL实例,然后转到属性 。 在此页面中,我们可以查看SQL Server的版本,版本,内存和CPU信息:
Click on the database settings page and view the default database locations. The default locations are as follows:
单击数据库设置页面,然后查看默认数据库位置。 默认位置如下:
- Data: /var/opt/mssql/data 数据: / var / opt / mssql / data
- Log: /var/opt/mssql/data 日志: / var / opt / mssql / data
- Backup: /var/opt/mssql/data 备份: / var / opt / mssql / data
在Amazon EC2实例上停止SQL Services (Stop SQL Services on Amazon EC2 instance)
We use the systemctl stop command for stopping SQL Services in RHEL:
我们使用systemctl stop命令在RHEL中停止SQL Services:
>sudo systemctl stop mssql-server
It does not show any messages for this command execution. We can verify the status of SQL Services for verification purpose:
它不显示任何有关此命令执行的消息。 我们可以验证SQL Services的状态以进行验证:
>sudo systemctl status mssql-server
In the output, we can see that process is inactive(dead) that shows SQL Server services are stopped:
在输出中,我们可以看到该进程处于非活动状态(已死),表明SQL Server服务已停止:
At last, we should stop Amazon EC2 instance if we are not using it. We only pay for the hourly resource usage, as shown in the previous article. It is a good practice to stop an instance, especially if it is created for test purposes only.
最后,如果我们不使用Amazon EC2实例,则应该停止它。 如上一篇文章所示,我们仅按小时使用资源付费。 停止实例是一个好习惯,尤其是仅出于测试目的而创建实例时。
In the EC2 dashboard, select the specific instance and go-to actions. In the actions, go to Instance state and stop the instance:
在EC2仪表板中,选择特定实例并执行操作。 在操作中,转到“实例”状态并停止实例:
结论 (Conclusion)
In this article, we explore SQL Server Linux and client tools installation in Amazon EC2 instance for the Red Hat Linux operation system. You should explore this and be familiar with both Amazon cloud infrastructure and SQL Server on Linux.
在本文中,我们探讨了在Red Hat Linux操作系统的Amazon EC2实例中安装SQL Server Linux和客户端工具。 您应该对此进行探索,并熟悉Amazon云基础架构和Linux上SQL Server。
翻译自: https://www.sqlshack.com/sql-server-linux-installation-for-amazon-ec2-instance-with-red-hat-os/


 被折叠的 条评论
为什么被折叠?
被折叠的 条评论
为什么被折叠?
 到【灌水乐园】发言


