


This article is an in-depth guide on how PowerShell can be used to maintain and manage SQL backup on Linux and Windows machines.
本文是有关如何使用PowerShell在Linux和Windows计算机上维护和管理SQL备份的深入指南。
Here’s an outline of what this article is all about:
以下是本文的概述:
- Introduction 介绍
- Technical specifications 技术指标
- How to load SQL Server modules on Windows machine 如何在Windows计算机上加载SQL Server模块
- Security – Credential Management 安全性–凭证管理
- The objectives of Backup and Restore 备份和还原的目标
- Library Linkage 图书馆联系
- How SQL Server 2017 backup feature is used on Linux 如何在Linux上使用SQL Server 2017备份功能
- And more … 和更多 …
介绍 (Introduction)
Tools to take SQL database backups, such as sqlcmd, SSMS, and PowerShell, are common to all platforms supported by SQL Server. In this post, I’m going to show how you can backup your SQL Server 2017 databases on a Linux machine using PowerShell.
进行SQL数据库备份的工具(例如sqlcmd,SSMS和PowerShell)对于SQL Server支持的所有平台都是通用的。 在本文中,我将展示如何使用PowerShell在Linux计算机上备份SQL Server 2017数据库。
先决条件 (Pre-requisites)
- RedHat Server 7.3 or CentOS 7.0 or higher RedHat Server 7.3或CentOS 7.0或更高版本
- SQL Server 2017 or higher SQL Server 2017或更高版本
- SQL Server Management Studio (SSMS) 16.5 or higher SQL Server Management Studio(SSMS)16.5或更高版本
流程图 (Flow Diagram)
在Windows上安装最新版本SQL PowerShell (Install the newest version of SQL PowerShell on Windows)
The latest version of SSMS is optimized to work efficiently with SQL Server 2017 on Linux. To download and install the latest version, see Download SQL Server Management Studio.
最新版本的SSMS经过优化,可与Linux上SQL Server 2017高效配合使用。 要下载并安装最新版本,请参阅下载SQL Server Management Studio 。
Launch PowerShell and import the sqlserver module
启动PowerShell并导入sqlserver模块
Let’s start by launching PowerShell on Windows. Open a command prompt on your Windows computer, and type PowerShell to launch a new Windows PowerShell session.
让我们从在Windows上启动PowerShell开始。 在Windows计算机上打开命令提示符 ,然后键入PowerShell以启动新的Windows PowerShell会话。
PowerShell
电源外壳
SQL Server provides a Windows PowerShell module named SqlServer that can be used to import the SQL Server components (SQL Server provider and cmdlets) into a PowerShell environment. (The name of the SQL PowerShell module for SSMS has changed from SQLPS to SQLServer.)
SQL Server提供了一个名为SqlServer的Windows PowerShell模块,可用于将SQL Server组件(SQL Server提供程序和cmdlet)导入PowerShell环境。 (用于SSMSSQL PowerShell模块的名称已从SQLPS更改为SQLServer。)
SSMS uses the new wrapper EXE to instantiate the SQL PowerShell environment. If you do not have the module, use the Install-Module cmdlet to install the SqlServer module. This will add new functionality and cmdlets to your PowerShell session. The new module will be installed to “%Program Files%\WindowsPowerShell\Modules\SqlServer”.
SSMS使用新的包装程序EXE实例化SQL PowerShell环境。 如果没有该模块,请使用Install-Module cmdlet安装SqlServer模块。 这会将新功能和cmdlet添加到PowerShell会话中。 新模块将安装到“%Program Files%\ WindowsPowerShell \ Modules \ SqlServer”。
Copy and paste the command below at the PowerShell prompt to import the SqlServer module into your current PowerShell session:
将以下命令复制并粘贴到PowerShell提示符下,以将SqlServer模块导入当前的PowerShell会话中:
PS P:\> Import-Module -name SqlServer -DisableNameChecking
Type the command below at the PowerShell prompt to verify that the SqlServer module was imported correctly:
在PowerShell提示符下键入以下命令,以验证SqlServer模块是否已正确导入:
PS P:\> Get-Module -name SqlServer

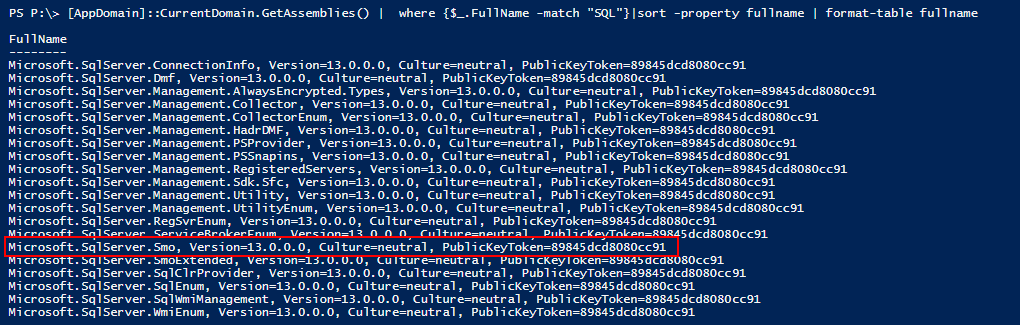
How to find what assemblies are loaded in windows
如何查找Windows中加载了哪些程序集
Based on the version of PowerShell, load the associated assembly. In most cases, the following command should be able to find and load the SQL server SMO assembly.
根据PowerShell的版本,加载关联的程序集。 在大多数情况下,以下命令应能够找到并加载SQL Server SMO程序集。
The AppDomain.GetAssemblies method gets the assemblies that have been loaded into the execution context of this application domain.
AppDomain.GetAssemblies方法获取已加载到此应用程序域的执行上下文中的程序集。
PS P:\> [AppDomain]::CurrentDomain.GetAssemblies() | where {$_.FullName -match "SQL"}|sort -property fullname | format-table fullname
If you know the full assembly name use the .Load() method.
如果知道完整的程序集名称,请使用.Load()方法。
PS P:\>[reflection.assembly]::Load("Microsoft.SqlServer.Smo, Version=13.0.0.0, Culture=neutral,PublicKeyToken=89845dcd8080cc91")
or,
要么,
PS P:\> Add-Type -Assembly "Microsoft.SqlServer.Smo, Version=13.0.0.0, Culture=neutral, PublicKeyToken=89845dcd8080cc91
Remember that the function, LoadWithPartialName has been deprecated. The recommended solution for PowerShell is to use Add-Type or load the specific library.
请记住,不推荐使用LoadWithPartialName函数。 对于PowerShell,推荐的解决方案是使用Add-Type或加载特定的库。
How to handle Credentials in Powershell
如何在Powershell中处理凭证
The three ways of managing credentials are as follows
凭证管理的三种方式如下
- Hard code the login credentials 硬编码登录凭据
- Using Get-Credential cmdlets 使用Get-Credential cmdlet
- Using a Secured file 使用安全文件
硬编码登录凭据 (Hard code the login credentials)
Often, we encounter a case where a password is hard coded in the script. Of course, the problem with this is that your password will be exposed to anyone with access to the script file.
通常,我们会遇到在脚本中硬编码密码的情况。 当然,这样做的问题是您的密码将向有权访问脚本文件的任何人公开。
The below sample code depicts the use of hard coded credential in the script
以下示例代码描述了脚本中硬编码凭据的使用
# The Linux SQL instance IP address
$serverInstance = "10.2.6.50"
$User = 'SA'
# Convert plain text into a secure string
$Pass = ConvertTo-SecureString 'thanVitha@2015' -AsPlainText –Force
#supply the $Pass variable as SecureString for the password
$Credentials = New-Object -TypeName System.Management.Automation.PSCredential -ArgumentList $User,$Pass
#Build the connection
$server = New-Object ('Microsoft.SqlServer.Management.Smo.Server') $serverInstance
# Set credentials
$server.ConnectionContext.LoginSecure=$false
$server.ConnectionContext.set_Login($Credentials.UserName)
$server.ConnectionContext.set_SecurePassword($credentials.Password)
# Connect to the Server and get a few properties
$server.Information
The output is given below
输出如下
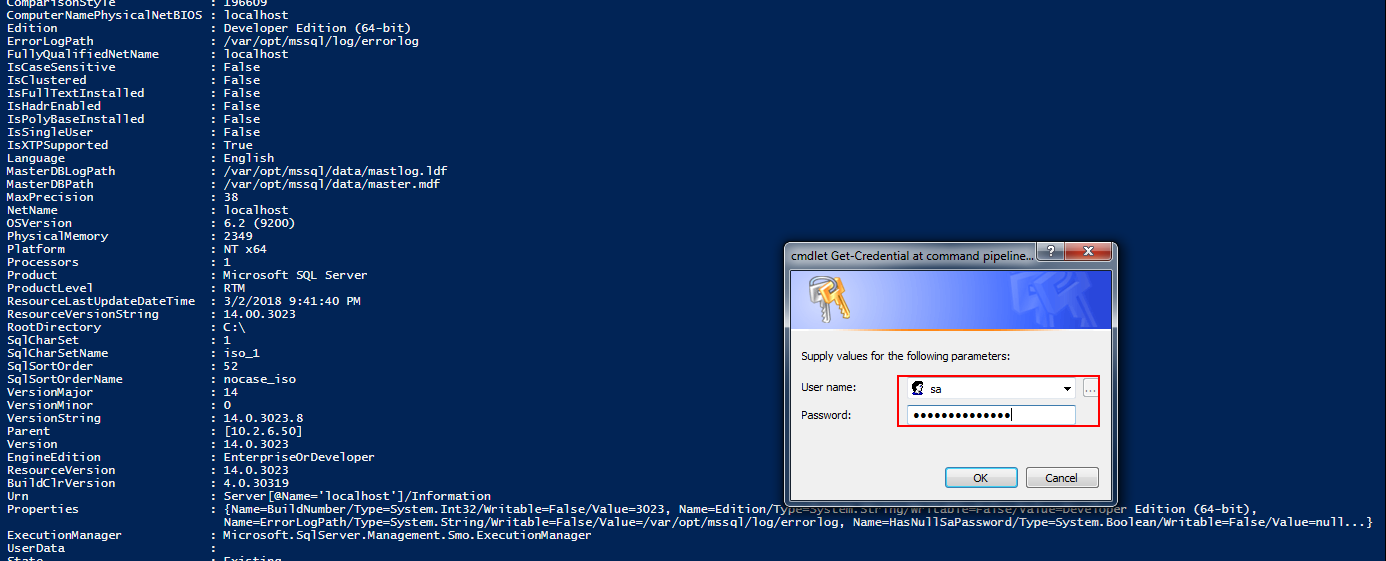
使用Get-Credential cmdlet –弹出一个对话框 (Using Get-Credential cmdlet – Pop a dialog box)
Get-Credential displays a window to enter credential details. This will appear every time you run the script. The $credential variable stores the username and password. The credentials are then fed to the respective queries for further processing.
Get-Credential显示一个窗口,用于输入凭据详细信息。 每次您运行脚本时都会出现。 $ credential变量存储用户名和密码。 然后将凭证馈送到各个查询以进行进一步处理。
The below sample code depicts the use of Get-Credential cmdlet
下面的示例代码描述了Get-Credential cmdlet的用法
# The Linux SQL instance IP address
# Prompt for credentials to login into SQL Server
$serverInstance = "10.2.6.62"
$credential = Get-Credential
# Load the SMO assembly and create a Server object
[System.Reflection.Assembly]::LoadWithPartialName('Microsoft.SqlServer.SMO') | out-null
$server = New-Object ('Microsoft.SqlServer.Management.Smo.Server') $serverInstance
# Set credentials
$server.ConnectionContext.LoginSecure=$false
$server.ConnectionContext.set_Login($credential.UserName)
$server.ConnectionContext.set_SecurePassword($credential.Password)
# Connect to the Server and get a few properties
$server.Information
使用安全文件 (Using a Secured file)
First, the password has to be written to a file.
首先,必须将密码写入文件。
PS P:\> read-host -AsSecureString |ConvertFrom-SecureString |Out-File c:\SQLOnCentOS.txt
Second, the credentials are read from the file using PSCredential class. You don’t need to re-enter the password over and over again.
其次,使用PSCredential类从文件中读取凭据。 您不需要一次又一次地输入密码。
# The Linux SQL instance IP address
$serverInstance = "10.2.6.62"
$User = 'sa'
# Convert plain text into a secure string
$User = 'sa'
$pass= cat c:\SQLOnCentOS.txt |ConvertTo-SecureString
#supply the $Pass variable as SecureString for the password
$Credentials = New-Object -TypeName System.Management.Automation.PSCredential -ArgumentList $User,$Pass
#Build the connection
$server = New-Object ('Microsoft.SqlServer.Management.Smo.Server') $serverInstance
# Set credentials
$server.ConnectionContext.LoginSecure=$false
$server.ConnectionContext.set_Login($credential.UserName)
$server.ConnectionContext.set_SecurePassword($credential.Password)
# Connect to the Server and get a few properties
$server.Information
Save the credentials as XML that can only be used on that computer with only your account.
将凭据另存为XML,仅在您的帐户下只能在该计算机上使用。
Pop the credential dialog and input your credentials. This is a one-time thing.
弹出凭证对话框并输入您的凭证。 这是一次性的事情。
Get-Credential | Export-Clixml \\Path\To\CredentialFile.xml
Now, make the script,
现在,制作脚本,
#record your credentials into the variable, $Credentials
$Credentials = Import-Clixml \\Path\To\CredentialFile.xml
#Build the connection
$server = New-Object ('Microsoft.SqlServer.Management.Smo.Server') $serverInstance
# Set credentials
$server.ConnectionContext.LoginSecure=$false
$server.ConnectionContext.set_Login($credential.UserName)
$server.ConnectionContext.set_SecurePassword($credential.Password)
# Connect to the Server and get a few properties
$server.Information
Backup
后备
Designing an effective backup and restore strategy requires careful planning, implementation, and testing. This section talks about using SQL Server Management Objects (SMO) to back up an SQL database hosted on a Linux Machine.
设计有效的备份和还原策略需要仔细的计划,实施和测试。 本节讨论使用SQL Server管理对象(SMO)备份Linux机器上托管SQL数据库。
Let’s start this section by instantiating the SMO class library
让我们从实例化SMO类库开始
$server = New-Object ('Microsoft.SqlServer.Management.Smo.Server') $serverInstance
After connecting to the Linux SQL Instance, the properties of the databases can be listed using the below call:
连接到Linux SQL实例后,可以使用以下调用列出数据库的属性:
$server.Databases
The below call lists only the user-defined databases.
下面的调用仅列出用户定义的数据库。
$dbs = $server.Databases | where { $_.IsSystemObject -eq $False }
Prepare the backup file to back up the AdventureWorks database. The following code provides the metadata of the backup file and its backup directory location
准备备份文件以备份AdventureWorks数据库。 以下代码提供了备份文件的元数据及其备份目录位置
    $backupDirectory='C:\var\opt\mssql\data'
    $dbName = 'AdventureWorks'
    $timestamp = Get-Date -format yyyy-MM-dd-HHmmss
    $targetPath = $backupDirectory + "\" + $dbName + "_" + $timestamp + ".bak"
Define the backup object that will be used for the database backup operation
定义将用于数据库备份操作的备份对象
$smoBackup = New-Object ("Microsoft.SqlServer.Management.Smo.Backup")
Let’s retrieve the backup type information using an enumeration. The action property defines the type of backup.
让我们使用枚举检索备份类型信息。 action属性定义备份的类型。
PS P:\> [enum]::GetNames('Microsoft.SqlServer.Management.Smo.BackupActionType')
| Member name | Description |
| Database | Backs up all the data files in the database. |
| Files | Backs up specified data files. This option is recommended only when the transactions that have occurred since the last backup are isolated to the file or group of files that are being backed up. |
| Log | Backs up the transaction log. |
| 成员名字 | 描述 |
| 数据库 | 备份数据库中的所有数据文件。 |
| 档案 | 备份指定的数据文件。 仅当自上次备份以来发生的事务隔离在要备份的文件或文件组中时,才建议使用此选项。 |
| 记录 | 备份事务日志。 |
For a full backup, the Action property is set to a database, whereas for a differential backup, the Action property is set to a database along with having the incremental property set to $TRUE. For transaction log backup, on the other hand, we just change the Backup Action to Log.
对于完全备份,将Action属性设置为数据库,而对于差异备份,将Action属性设置为数据库,同时将递增属性设置为$ TRUE 。 另一方面,对于事务日志备份,我们只需将“备份操作”更改为“日志”。
# To perform the full backup
   $smoBackup.Action = "Database"
# To turnoff  Differential backup
    $smoBackup.Incremental = $False
#Name of the database to backup
    $smoBackup.Database = $dbName
Specify the backup description so that we know what this backup is and when it was taken.
指定备份说明,以便我们知道该备份是什么以及何时进行备份。
    $smoBackup.BackupSetDescription = "Full Backup of " + $dbName
    $smoBackup.BackupSetName = $dbName + " Backup"
    $smoBackup.MediaDescription = "Disk"
We can configure what type of backup device is going to be used for the backup. In this case, it’s a file. To add a backup file to a device, use AddDevice() method.
我们可以配置将用于备份的备份设备类型。 在这种情况下,它是一个文件。 要将备份文件添加到设备,请使用AddDevice()方法。
PS P:\> [enum]::GetNames('Microsoft.SqlServer.Management.Smo.DeviceType')
| Member name | Description |
| File | Specifies a disk file. |
| LogicalDevice | Specifies a logical device. |
| Pipe | Specifies a named pipe. |
| Tape | Specifies a tape device. |
| Url | Specifies a URL. |
| VirtualDevice | Specifies a virtual device. |
| 成员名字 | 描述 |
| 文件 | 指定磁盘文件。 |
| 逻辑设备 | 指定逻辑设备。 |
| 管 | 指定命名管道。 |
| 胶带 | 指定磁带设备。 |
| 网址 | 指定一个URL。 |
| 虚拟设备 | 指定虚拟设备。 |
$smoBackup.Devices.AddDevice($targetPath, "File")
Now, the configuration is set; let’s initiate the database backup.
现在,配置已设置; 让我们启动数据库备份。
$smoBackup.SqlBackup($server)
Let’s perform a dry run by combining all the pieces of above code:
让我们结合以上所有代码来进行一次试运行:
# The Linux SQL instance IP address
$serverInstance = "10.2.6.50"
# Backup directory of the SQL instance on Linux Machine
$backupDirectory='C:\var\opt\mssql\data'
#Define login credential
$User = 'sa'
$pass= cat c:\SQLOnCentOS.txt |ConvertTo-SecureString
$Credentials = New-Object -TypeName System.Management.Automation.PSCredential -ArgumentList $User,$Pass
#Load Assembly
[reflection.assembly]::Load("Microsoft.SqlServer.Smo, Version=13.0.0.0, Culture=neutral, PublicKeyToken=89845dcd8080cc91") | Out-NULL

#Instantiate SQL Instance of Linux Machine

$server = New-Object Microsoft.SqlServer.Management.Smo.Server -ArgumentList $serverInstance
# Set credentials
$server.ConnectionContext.LoginSecure=$false
$server.ConnectionContext.set_Login($credential.UserName)
$server.ConnectionContext.set_SecurePassword($credential.Password)

# Connect to the Server and get a few properties of databases. The below code list only the user defined databases for backup
$dbs = $server.Databases | where { $_.IsSystemObject -eq $False }
#Looping through every databases
   $dbName = 'SQLShackDemo'
    $timestamp = Get-Date -format yyyy-MM-dd-HHmmss
    $targetPath = $backupDirectory + "\" + $dbName + "_" + $timestamp + ".bak"
 #Define the backup object that will be used for the database backup
    $smoBackup = New-Object ("Microsoft.SqlServer.Management.Smo.Backup")
# To perform the full backup
   $smoBackup.Action = "Database"
# To turnoff  Differential backup
    $smoBackup.Incremental = $False
#Specify the backup description so that we know what this backup is and when it was taken.
    $smoBackup.BackupSetDescription = "Full Backup of " + $dbName
    $smoBackup.BackupSetName = $dbName + " Backup"
    $smoBackup.Database = $dbName
    $smoBackup.MediaDescription = "Disk"
   # Add a backup device using AddDevice() method to a file.
   $smoBackup.Devices.AddDevice($targetPath, "File")
   #Initiate Database Backup
    $smoBackup.SqlBackup($server)
write-host "FULL back up $dbName ($serverName) to $targetPath"
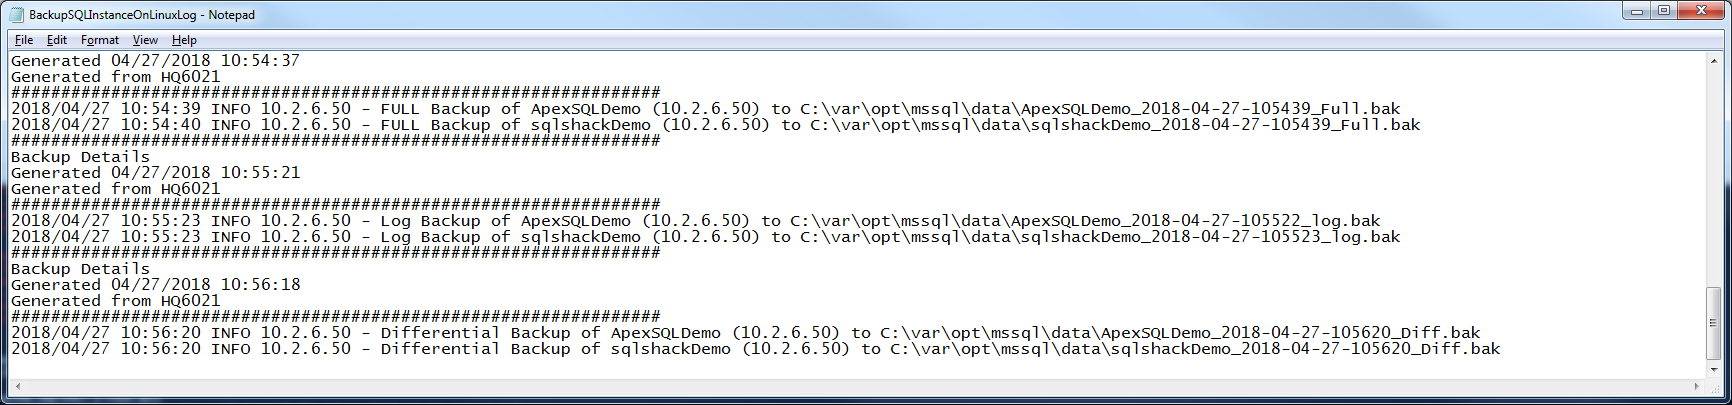
That gives us the sample output like below:
这给了我们如下示例输出:
The following sample script can be used to back up a database with the following schedule:
以下示例脚本可用于按照以下时间表备份数据库:
Every Sunday Evening at 10 PM – Full Backup
Every [Mon-Sat] Evening at 10 PM – Differential Backup
Every hour – Transaction Log
每个星期日晚上晚上10点–完全备份
每个[Mon-Sat]晚上晚上10点–差异备份
每小时–交易记录
You can run the script on multiple Linux machines by passing the associated IP addresses as a parameter to the calling function Get-SQLinuxBackup. The same script can also be used to run backups for SQL instances on the Windows machines.
通过将关联的IP地址作为参数传递给调用函数Get-SQLinuxBackup,可以在多台Linux机器上运行脚本。 相同的脚本也可以用于在Windows计算机上为SQL实例运行备份。
Get-SQLinuxBackup -SQLServerInstance "10.2.6.50" -logfile "C:\Backup\BackupSQLInstanceOnLinuxLog.txt"
Now, copy and save the PowerShell script as C:\BackupLinuxInstance.ps1.
现在,将PowerShell脚本复制并保存为C:\ BackupLinuxInstance.ps1。
In the script, it is necessary to make changes to the following variables
在脚本中,有必要对以下变量进行更改
- BackupDirectory 备份目录
- Credentials 证书
<#
.SYNOPSIS
    Bakcup Automation for SQL Server 2107 databases on Linux machine using Task Scheduler and Powershell

.DESCRIPTION
    A step by step details is discussed in the script
    1. Load the new SQL Server Module
    2. Load SMO library
    3. Credential usage
    4. Define Backup strategy
    5. Inititate Backup

.NOTES

    File Name  : get-SQLinuxBackup
    Author     : Prashanth Jayaram ,sqlpowershell@gmail.com
    Requires   : PowerShell V3

.EXAMPLE 1
    The first example - You can call the script
    C:\ PS> get-SQLinuxBackup -SQLServerInstance '10.2.6.62' -logfile

.EXAMPLE 2
   Set-WriteLog  -Message "$($_.Server) is reachable and starting the process " -Logfile $Logfile

.PARAMETER 1
   SQLServerInstance -   This is the IP address of the Linux instance

.PARAMETER 2
   logfile -   This is write the progress of the script

#>

 FUNCTION Get-SQLinuxBackup{
 [CmdletBinding(SupportsShouldProcess=$true,ConfirmImpact='Low')]
    Param(
        [Parameter(Mandatory=$true,
                  Position=0)]
            [String]$SQLServerInstance,
        [Parameter(Mandatory=$true,
                  Position=1)]
            [String]$Logfile

    )


# Prepare headers for the log file for each execution of script

Add-Content $logfile "#################################################################"
Add-Content $logfile "Backup Details"
Add-Content $logfile "Generated $(get-date)"
Add-Content $logfile "Generated from $(gc env:computername)"
Add-Content $logfile "#################################################################"

Function Set-WriteLog {
    [CmdletBinding()]
    Param(
    [Parameter(Mandatory=$False)]
    [ValidateSet("INFO","WARN","ERROR")]
    [String]
    $Level = "INFO",

    [Parameter(Mandatory=$True)]
    [string]
    $Message,

    [Parameter(Mandatory=$False)]
    [string]
    $logfile
    )

    $Stamp = (Get-Date).toString("yyyy/MM/dd HH:mm:ss")
    $Line = "$Stamp $Level $Message"
    If($logfile) {
    Add-Content $logfile -Value $Line
    }
    Else {
        Write-Output $Line
    }
}


# Import sqlserver module

Import-Module sqlserver -DisableNameChecking

# set the backup directory

$backupDirectory='C:\var\opt\mssql\data'

# the credentials are hardcoded

$User = 'sa'
$Pass = ConvertTo-SecureString 'thanVitha@2015' -AsPlainText -Force

$Credential = New-Object -TypeName System.Management.Automation.PSCredential -ArgumentList $User,$Pass

# load the assembly

[reflection.assembly]::Load("Microsoft.SqlServer.Smo, Version=13.0.0.0, Culture=neutral, PublicKeyToken=89845dcd8080cc91") | Out-NULL

# declare the SMO isntance of given SQL Server

$server = New-Object ('Microsoft.SqlServer.Management.Smo.Server') $SQLServerInstance
# Set credentials
$server.ConnectionContext.LoginSecure=$false
$server.ConnectionContext.set_Login($credential.UserName)
$server.ConnectionContext.set_SecurePassword($credential.Password)

# listing the user defined databases

$dbs = $server.Databases | where { $_.IsSystemObject -eq $False }

# backup start data and time

$BackupStartTime = get-date
$timestamp = Get-Date -format yyyy-MM-dd-HHmmss

# Full Backup should start on or after 10 PM on every Sunday and daily on or after 9 PM differential backup should start

if ($BackupStartTime.Hour -eq 10)
{
    if ($BackupStartTime.DayOfWeek -eq "Sunday")
    {
        foreach ($database in $dbs)
            {
            $dbName = $database.Name
            $targetPath = $backupDirectory + "\" + $dbName + "_" + $timestamp +"_Full"+ ".bak"
            $smoBackup = New-Object ("Microsoft.SqlServer.Management.Smo.Backup")
            $smoBackup.Action = "Database"
            $smoBackup.BackupSetDescription = "Full Backup of " + $dbName
            $smoBackup.BackupSetName = $dbName + " Backup"
            $smoBackup.Database = $dbName
            $smoBackup.MediaDescription = "Disk"
            $smoBackup.Devices.AddDevice($targetPath, "File")
            $smoBackup.SqlBackup($server)
           Set-WriteLog  -Message "$SQLServerInstance - FULL Backup of $dbName ($SQLServerInstance) to $targetPath"  -Logfile $Logfile

         }
    }
    else
    {
      foreach ($database in $dbs)
    {
        $dbName = $database.Name
        $targetPath = $backupDirectory + "\" + $dbName + "_" + $timestamp +"_Diff"+ ".bak"
        $smoBackup = New-Object ("Microsoft.SqlServer.Management.Smo.Backup")
        $smoBackup.Incremental = $true
        $smoBackup.Action = 1
        $smoBackup.BackupSetDescription = "Differential Backup of " + $dbName
        $smoBackup.BackupSetName = $dbName + " Backup"
        $smoBackup.Database = $dbName
        $smoBackup.MediaDescription = "Disk"
        $smoBackup.Devices.AddDevice($targetPath, "File")
        $smoBackup.SqlBackup($server)

         Set-WriteLog  -Message "$SQLServerInstance - Differential Backup of $dbName ($SQLServerInstance) to $targetPath"  -Logfile $Logfile
     }

    }
}
else
{

$dbs = $server.Databases | where { $_.IsSystemObject -eq $False -and $_.RecoveryModel  -ne 3}

foreach ($database in $dbs)
{
    $dbName = $database.Name
    $timestamp = Get-Date -format yyyy-MM-dd-HHmmss
    $targetPath = $backupDirectory + "\" + $dbName + "_" + $timestamp  +"_log"+".bak"

    $smoBackup = New-Object ("Microsoft.SqlServer.Management.Smo.Backup")
    $smoBackup.Action = "Log"
    $smoBackup.BackupSetDescription = "Log Backup of " + $dbName
    $smoBackup.BackupSetName = $dbName + " Backup"
    $smoBackup.Database = $dbName
    $smoBackup.MediaDescription = "Disk"
    $smoBackup.Devices.AddDevice($targetPath, "File")
    $smoBackup.SqlBackup($server)

    Set-WriteLog  -Message "$SQLServerInstance - Log Backup of $dbName ($SQLServerInstance) to $targetPath"  -Logfile $Logfile
 }

}
}

# function calling

Get-SQLinuxBackup -SQLServerInstance "10.2.6.50" -logfile  "C:\Backup\BackupSQLInstanceOnLinuxLog.txt"
Task Scheduler
任务计划程序
How to create an event using the Task Scheduler:
如何使用任务计划程序创建事件:
- Open “Task Scheduler” (Go to START—Run. Type “Tasks”, and hit Enter) 打开“任务计划程序”(转到“开始”-“运行”。键入“任务”,然后按Enter)
- Click on “Create task” 点击“创建任务”
- Pick a name for the task, and choose “Run whether user is logged on or not” 选择任务的名称,然后选择“运行,无论用户是否登录”
- Choose the “Triggers” Tab, Click “New” 选择“触发器”选项卡,单击“新建”
- Specify the option you like, and then click “OK” to create a trigger 指定所需的选项,然后单击“确定”以创建触发器
- Choose “Actions” tab, Click “New” 选择“操作”标签,然后单击“新建”
- Copy following command to “Program/script” textbox C:\Windows\System32\WindowsPowerShell\v1.0\powershell.exe 将以下命令复制到“程序/脚本”文本框C:\ Windows \ System32 \ WindowsPowerShell \ v1.0 \ powershell.exe
- Enter the path of the saved script file in “Add arguments (optionally)” textbox 在“添加参数(可选)”文本框中输入保存的脚本文件的路径
As per the screenshot, I saved the file under C:\BackupJob_SQL2017_Linux.PS1. Therefore, in the add arguments text box, I entered: C:\ BackupJob_SQL2017_Linux.PS1;exit
根据屏幕快照,我将文件保存在C:\ BackupJob_SQL2017_Linux.PS1下。 因此,在添加参数文本框中,我输入: C:\ BackupJob_SQL2017_Linux.PS1; exit
- Right click and run the job. 右键单击并运行作业。

- Verify the output 验证输出
That completes the guide to creating a backup of a database hosted on a Linux machine.
这就完成了创建Linux机器上托管的数据库备份的指南。
目录 (Table of contents)
参考资料 (References)
- Backup.SqlBackup Method (Server) Backup.SqlBackup方法(服务器)
- Backing Up and Restoring Databases and Transaction Logs 备份和还原数据库和事务日志
- Backup Class 备份类


 704
704

 被折叠的 条评论
为什么被折叠?
被折叠的 条评论
为什么被折叠?
 到【灌水乐园】发言


