


 本文介绍了如何在VMware Workstation中创建一个跨多个子网的实验室环境,用于模拟SQL Server Always On可用性组。实验涉及设置路由和远程访问服务,以及配置Windows服务器故障转移群集,创建Always On Availability Group和监听器,以模拟灾难恢复场景。
思科模拟器划分子网实验报告
In this article, we are going to see how to create a multi subnet cluster spanning across multiple subnets for lab purposes. Creating such an environment should help creating Availability groups simulating a far replica residing in a different Data Center (Subnet) acting as a disaster recovery site in your lab for learning/experimenting real world scenarios.
在本文中,我们将看到如何为实验室目的创建跨多个子网的多子网群集。 创建这样的环境应该有助于创建可用性组,以模拟驻留在您实验室中充当灾难恢复站点的另一个数据中心(子网)中的远程副本,以学习/实验现实世界的场景。
Let’s get into action, below is what we are going to setup for our lab purposes to simulate a multi subnet cluster environment and create an Always On Availability group.
让我们开始行动,以下是我们为实验室目的而设置的内容,以模拟多子网集群环境并创建Always On Availability组。
- Two nodes (Replicas) residing in my production/primary Data center (Subnet 192.168.1.x) – Let’s say these two replicas are used for High availability, assuming we have low latency, since they are residing in the same data center (Probably in the same rack), I will set them up with Synchronous Mode with Automatic Failover 我的生产/主数据中心(子网192.168.1.x)中的两个节点(Replicas)–假设这两个副本位于相同的数据中心中,假设它们具有低延迟,这两个副本用于高可用性在同一机架中),我将其设置为具有自动故障转移功能的同步模式
- Third node (Replica) sitting in my disaster recovery data center which is geographically dispersed (Subnet 192.168.2.x) – Assuming it’s connected over WAN and is used just for DR purposes, I would set this replica in Asynchronous Mode with Manual Failover 位于我的灾难恢复数据中心中的第三个节点(Replica)位于地理位置分散(子网192.168.2.x)–假设它通过WAN连接并且仅用于灾难恢复目的,那么我将该副本设置为具有手动故障转移功能的异步模式
Again, It’s not mandatory to always setup near replicas with Synch/Auto mode and far replica with Asynchronous/Manual mode. That’s just an example what I would use in my lab environment when creating Always On availability groups to begin with.
同样,并非总是必须在同步/自动模式下设置近副本,而在异步/手动模式下设置远副本。 这只是一个示例,当我开始创建Always On可用性组时会在实验室环境中使用。
So, what exactly do we need to be able to setup multiple subnets and routing in a lab environment using VMware Work station? Well, the answer is “Routing and Remote Access“ in windows server. In my lab environment, I have a dedicated VM which acts like AD and DNS server (FYI, I use the same VM for provisioning my SAN storage as well). So, the very first step would be installing Remote Access server role by going to Add Roles/Features on my AD/DNS server.
那么,我们到底需要什么才能使用VMware Workstation在实验室环境中设置多个子网和路由? 好吧,答案是Windows服务器中的“ 路由和远程访问 ”。 在我的实验室环境中,我有一个专用的VM,其行为类似于AD和DNS服务器(FYI,我也使用相同的VM来配置SAN存储)。 因此,第一步是通过在我的AD / DNS服务器上添加“角色/功能”来安装远程访问服务器角色 。
Note: I have already created two custom networks in my VMware environment as shown below using virtual editor.
注意: 我已经在VMware环境中使用虚拟编辑器创建了两个自定义网络,如下所示。
Also, I have created 2 network interface cards on this VM as shown below.
另外,我还在此VM上创建了2个网络接口卡,如下所示。
Once this is in place, go to server manager and navigate to new roles and features and select “remote access” as shown below.
设置到位后,转到服务器管理器并导航到新角色和功能,然后选择“远程访问”,如下所示。
Now click the Next button three times and you should be seeing a window where you get an option to select “Routing” as shown below.
现在,单击“下一步”按钮三下,您应该会看到一个窗口,您可以在其中选择“路由”,如下所示。
By doing so, DirectAccess and VPN will be automatically selected, click next twice and you get to below screen.
这样,将自动选择DirectAccess和VPN,单击下一步两次,您将进入以下屏幕。
Again, all the required components are automatically selected by windows, just proceed to Next and finish the installation. After successful installation, I was able to search “Routing and Remote Access” as shown below from start menu.
同样,所有必需的组件都由Windows自动选择,只需继续下一步并完成安装即可。 成功安装后,我可以从开始菜单中搜索“路由和远程访问”,如下所示。
Open Routing and remote access config tool; right click on the root node and select “Enable and Configure Routing and remote access” as shown below.
打开路由和远程访问配置工具; 右键单击根节点,然后选择“启用并配置路由和远程访问”,如下所示。
Click next and select custom configuration and choose “LAN Routing”.
单击下一步,选择自定义配置,然后选择“ LAN路由”。
Click Next, finish and start the service and you should see the screen below.
单击下一步 ,完成并启动服务,您应该看到下面的屏幕。
Here comes the interesting piece of the puzzle. You have to navigate to IPV4 section and under General right click and select “new routing protocol” and select “RIP Version 2 for Internet Protocol” as shown below.
有趣的难题来了。 您必须导航到IPV4部分,然后在“常规”下单击鼠标右键,然后选择“ 新的路由协议 ”,然后选择“ Internet协议的RIP版本2 ”,如下所示。
After selecting finish, you should notice a new sub section called “RIP” under IPV4 section. Right click on the RIP under Ipv4 and select new Interface and select a NIC. In my case I chose my first network interface card (Eth 0) and clicked “okay” as shown below to begin with.
选择完成后,您应该在IPV4部分下注意到一个称为“ RIP”的新子部分。 右键单击Ipv4下的RIP,然后选择新接口并选择一个NIC。 就我而言,我选择了我的第一个网络接口卡(Eth 0),然后单击“确定”,如下所示。
Now you will see below screen, just accept the defaults and click okay again.
现在,您将在下面的屏幕上看到,只需接受默认值,然后再次单击确定即可。
Repeat the same process for your second NIC. You can see, there is only one network interface card (Eth1) listed this time as the first one has already been added to routing.
对第二个NIC重复相同的过程。 您会看到,这次只列出了一个网络接口卡(Eth1),因为第一个已经添加到路由中。
With all the hard work we did, this is how my end product looks like. Basically, I made my “SANDC” virtual machine act as a router between my subnets, leveraging “Routing” software piece of windows operating system.
经过我们的所有努力,这就是我的最终产品的样子。 基本上,我利用Windows操作系统的“路由”软件,使“ SANDC”虚拟机充当了子网之间的路由器。
Now let’s see what needs to be done on the actual VMs which will act as replicas in our cluster. As I said earlier, I will be creating 2 VMs (Let’s say “SQLTPA1” and “SQLTPA2”) in 192.168.1.X subnet and one VM (“SQLATL3”) in 192.168.2.x subnet and add them to my domain.
现在,让我们看看将在集群中充当副本的实际VM上需要做什么。 如前所述,我将在192.168.1.X子网中创建2个VM(假设为“ SQLTPA1”和“ SQLTPA2”),并在192.168.2.x子网中创建一个VM(“ SQLATL3”)并将其添加到我的域中。
Note: I disabled windows firewall on every machine in my lab to make it simple and avoid issues with Ports.
注意: 我在实验室中的每台计算机上都禁用了Windows防火墙,以简化操作并避免端口问题。
在第一个虚拟机– SQLTPA1上: (On the first Virtual machine – SQLTPA1:)
Go to the properties of the network card and set the Ipv4 address to 192.168.1.126. Set the subnet mask to 255.255.255.0 and the default gateway to 192.168.1.100. I chose the default gateway to be the IP address of NIC 1 on my SANDC VM (That’s where the Routing and Remote Access service is running in my lab).
转到网卡的属性,并将Ipv4地址设置为192.168.1.126。 将子网掩码设置为255.255.255.0,并将默认网关设置为192.168.1.100。 我选择默认网关作为SANDC VM上NIC 1的IP地址(这是我的实验室中运行“路由和远程访问”服务的位置)。
Similarly, I setup my 2nd virtual machine on my production site to IP address 192.168.1.127, Set the subnet mask to 255.255.255.0 and the default gateway to 192.168.1.100.
同样,我将生产站点上的第二个虚拟机设置为IP地址192.168.1.127,将子网掩码设置为255.255.255.0,将默认网关设置为192.168.1.100。
在第三个虚拟机– SQLATL3上: (On the third virtual machine – SQLATL3:)
Go to the properties of the network card and set the Ipv4 address to 192.168.2.126. Set the subnet mask to 255.255.255.0 and the default gateway to 192.168.2.100. I chose the default gateway to be the IP address of my second NIC on my SANDC VM (That’s where the Routing and Remote Access service is running in my lab).
转到网卡的属性,并将Ipv4地址设置为192.168.2.126。 将子网掩码设置为255.255.255.0,将默认网关设置为192.168.2.100。 我选择默认网关作为SANDC VM上第二个NIC的IP地址(这是我的实验室中运行“路由和远程访问”服务的位置)。
Let’s validate all my configuration settings done so far.
让我们验证到目前为止完成的所有配置设置。
From SANDC machine:
从SANDC机器:
Ping test from SQLTPA1 to SQLATL3:
从SQLTPA1到SQLATL3的ping测试:
Ping test from SQLATL3 to SQLTPA1:
从SQLATL3到SQLTPA1的ping测试:
Perfect, we did it. This is how we can setup a lab environment in VMware workstation simulating multiple subnets. Just wanted to make sure before wrapping up this section of our lab setup, this is not something how windows/network admins would setup routing in real world production environments. We would be having a real physical hardware router instead of routing service in windows server ?, with separate subnets residing in different physical locations (Data Centers) and with a H/W firewall device set with proper rules in place.
完美,我们做到了。 这是我们可以在VMware工作站中设置实验室环境以模拟多个子网的方法。 只是想确保在完成我们的实验室设置这一部分之前,这不是Windows /网络管理员如何在实际生产环境中设置路由的方法。 我们将拥有一个真正的物理硬件路由器,而不是Windows Server?中的路由服务,而单独的子网位于不同的物理位置(数据中心),并且硬件/防火墙设备设置了适当的规则。
So far, we did a walkthrough of setting up a foundation in a lab environment for creating Always On Availability groups spanning multiple subnets. Now, let’s build an actual multi subnet windows failover cluster making these machines as nodes and then build an Always On availability group on top of it and explore what and how is it different from an Always On availability group spanning in a single subnet.
到目前为止,我们已经完成了在实验室环境中建立基础的演练,以创建跨越多个子网的Always On Availability组。 现在,让我们构建一个实际的多子网Windows故障转移群集,将这些计算机作为节点,然后在其之上构建一个Always On可用性组,并探索它与跨越单个子网的Always On可用性组有什么不同以及如何区别。
安装和设置WSFC(Windows服务器故障转移群集): (Installing and setting up WSFC (Windows Server Failover Clustering): )
In the previous section of this article, we took care of networking piece of the puzzle for creating a multi subnet cluster in a lab environment using VMware workstation, leveraging windows server routing services. Now, let’s get into the actual fun part of creating an Always On availability group simulating multiple data centers, two near replicas in one subnet serving high availability and a far replica serving disaster recovery purposes in a different subnet. Okay, let’s get started.
在本文的上一部分中,我们解决了网络难题,即利用Windows服务器路由服务在使用VMware工作站的实验室环境中创建多子网群集。 现在,让我们进入创建一个模拟多个数据中心的Always On可用性组的实际乐趣部分,一个子网中的两个近副本可提供高可用性,而另一个子网中的远端副本可用于不同子网中的灾难恢复。 好的,让我们开始吧。
First thing first, we have to install failover clustering feature on all the three nodes which will be participating in our Always On Availability groups. I logged in to all my VMs as a domain admin (I don’t want to deal with permission issues now for setting up my lab) and went to server manager and navigated to “Add roles and features” and selected “Failover Clustering” as shown below.
首先,我们必须在将要加入我们的Always On Availability组的所有三个节点上安装故障转移群集功能。 我以域管理员身份登录了所有虚拟机(我现在不想在设置实验室时处理权限问题),然后转到服务器管理器并导航至“添加角色和功能”,然后选择“故障转移群集”作为如下所示。
Windows will automatically select all the required sub components as needed, just click on Next and Install.
Windows将根据需要自动选择所有必需的子组件,只需单击下一步并安装。
After few seconds, I got the below confirmation.
几秒钟后,我得到了以下确认。
Well, Once I am done with installing failover clustering feature on all my three virtual machines (SQLTPA1, SQLTPA2 and SQLATL3) it’s time to build our cluster.
好了,一旦我在所有三个虚拟机(SQLTPA1,SQLTPA2和SQLATL3)上安装了故障转移群集功能,就可以构建群集了。
Step 1:
第1步:
On my SQLTPA1 machine, I opened Failover cluster manager application and selected “Create cluster” as shown below.
在我SQLTPA1机器上,我打开了故障转移群集管理器应用程序,然后选择“创建群集”,如下所示。
Step 2:
第2步:
Added all the three nodes by providing FQDN as shown below and click Next.
通过提供FQDN来添加所有三个节点,如下所示,然后单击“下一步”。
Step 3:
第三步:
I chose to run validation tests, it’s not mandatory to run these tests but It’s highly recommended to run these tests to identify potential issues with our environment.
我选择运行验证测试,并不一定要运行这些测试,但是强烈建议运行这些测试来确定环境的潜在问题。
I skipped storage tests in this case as I won’t be setting up a traditional SQL server failover cluster for this lab purposes with clustered shared LUNs. (We don’t need shared disks for setting up Always On Availability groups). Well, below is how my validation results looked like, Again…I am not worried about warnings related to storage at this point.
在这种情况下,我跳过了存储测试,因为出于此实验目的,我不会使用群集共享LUN设置传统SQL Server故障转移群集。 (我们不需要共享磁盘来设置Always On Availability组)。 好了,下面是我的验证结果,再次……我现在不担心与存储有关的警告。
Step 4:
第4步:
I gave a name to my cluster and provided IP addresses, one for each subnet as shown below.
我为群集命名,并提供IP地址,每个子网一个,如下所示。
Unchecked “Add eligible storage” and proceed to Next.
取消选中“添加合格的存储”,然后继续下一步 。
This completes the process of setting up cluster, as you can see in the below screenshot, I got a confirmation after few seconds.
如下面的屏幕截图所示,这完成了设置群集的过程,几秒钟后我得到了确认。
Tadah!!! Yup, It’s really that simple. You can see the create cluster wizard being nice to us and reminding us about Quorum configuration which is the most important piece of any failover cluster setup. After all Quorum is one which dictates the availability and health of a failover cluster and all the dependent Applications/Roles and Services.
塔达! 是的,真的很简单。 您会看到创建集群向导对我们很友好,并提醒我们有关Quorum配置的信息,这是所有故障转移集群设置中最重要的部分。 毕竟,Quorum决定了故障转移群集以及所有相关的应用程序/角色和服务的可用性和运行状况。
Okay…. Now, Let’s see how to create a Quorum. Connect to the cluster and navigate to “configure cluster quorum settings” as shown below.
好的…。 现在,让我们看看如何创建仲裁。 连接到群集,然后导航到“配置群集仲裁设置”,如下所示。
Select advanced configuration option as shown below. (See the reason why in the next step)
选择高级配置选项,如下所示。 (请参阅下一步的原因)
As you can see in the below screenshot, I un selected the node which is in my DR subnet. The idea is basically to avoid remote machine sitting in my DR data center deciding the health of my cluster (Doing this will ensure my DR replica vote doesn’t count to decide health of my production replicas), so I removed its vote by unchecking my DR node.
如下面的屏幕快照所示,我未选择DR子网中的节点。 该想法基本上是为了避免远程计算机位于我的灾难恢复数据中心中,以决定群集的运行状况(这样做将确保我的灾难恢复副本的投票不影响决定我的生产副本的运行状况),因此我通过取消选中DR节点。
Now I chose to use file share witness. (I already have a shared folder which I will be using as a file share witness for this lab setup.)
现在,我选择使用文件共享见证。 (我已经有一个共享文件夹,该文件夹将用作此实验室设置的文件共享见证。)
This completes creating failover cluster. Now it’s time to install SQL Server on all the three nodes.
这样就完成了故障转移群集的创建。 现在是时候在所有三个节点上安装SQL Server了。
Note: I am not going to cover how to install a standalone SQL Server instance in this article. I went ahead and installed SQL Server 2017 RTM on all the three nodes along with SQL Server Management Studio.
注意:在本文中,我不会介绍如何安装独立SQL Server实例。 我继续将SQL Server 2017 RTM与SQL Server Management Studio一起安装在所有三个节点上。
Once the installation is complete, now it’s time to enable “Always on high availability” feature by going to SQL Server Configuration manager and navigating to properties of the SQL Instance as shown below.
安装完成后,现在是时候通过转到SQL Server配置管理器并导航到SQL实例的属性来启用“始终具有高可用性”功能,如下所示。
Restart SQL Server services and we are all set at this point. Once AG feature is enabled on all the nodes (I will refer them as Replicas from now on), we can go ahead and create Always On availability groups.
重新启动SQL Server服务,我们已经准备就绪。 一旦在所有节点上启用了AG功能(从现在开始我将它们称为副本服务器),我们就可以继续创建Always On可用性组。
创建始终在线可用性组和侦听器: (Creating Always On Availability Groups and Listeners:)
For this demo purpose, I created four databases “Packers”, “Bears”, “Steelers” and “Ravens”. I will be creating an Always On availability group (AG) called “AG_NFCNorth” and place Packers and Bears in it and an AG called “AG_AFCNorth” for Steelers and Ravens databases, the respective listeners will be “list_NFCNorth” and “list_AFCNorth”.
为此,我创建了四个数据库“ Packers”,“ Bears”,“ Steelers”和“ Ravens”。 我将创建一个名为“ AG_NFCNorth”的Always On可用性组(AG),并将Packers and Bears和一个名为“ AG_AFCNorth”的AG放置在Steelers和Ravens数据库中,相应的侦听器将分别为“ list_NFCNorth”和“ list_AFCNorth”。
Okay, below screenshot shows how it looks like to begin with:
好的,下面的屏幕截图显示了它的开头:
Nothing fancy so far. Now on my SQLTPA1 node, I went to Always On High Availability folder in object explorer and selected “New Availability group wizard”. I gave a name to my AG as mentioned earlier and selected “Database level health detection” checkbox (This check is not mandatory).
到目前为止还算不上什么。 现在,在我SQLTPA1节点上,转到对象资源管理器中的Always On High Availability文件夹,然后选择“ New Availability组向导”。 如前所述,我为我的AG命名,并选中了“数据库级运行状况检测”复选框(此检查不是必需的)。
Now, made sure my databases meet prerequisites (Full recovery model and at least one full backup) and selected Packers and Bears databases.
现在,确保我的数据库满足先决条件(完整恢复模型和至少一个完整备份)并选择了Packers and Bears数据库。
After adding the required databases, time to specify all our replicas as shown below.
添加所需的数据库之后,请如下所示指定所有副本。
I left default values for Endpoint and Backup preferences for this lab setup. You can tweak Backup preferences, like giving priorities for replicas and selecting where to run the backups etc as per your requirements. The one which I would like to stress here for our multi subnet cluster lab setup is “Listener” tab.
我为此实验设置保留了Endpoint和Backup首选项的默认值。 您可以调整备份首选项,例如根据需要为副本设置优先级以及选择在何处运行备份。 对于多子网群集实验室设置,我想在此强调的是“侦听器”选项卡。
Note: You can go ahead and skip creating listener at this point and come back later after creating Always On availability group if needed, it’s not mandatory to create listener at this stage.
注意:此时,您可以继续跳过创建侦听器的操作,如果需要,可以在创建Always On可用性组之后稍后再返回,在此阶段创建侦听器不是强制性的。
Now, under listener tab, I gave a DNS name for my listener as I mentioned earlier (lsit_NFCNorth).
现在,在侦听器选项卡下,我为侦听器指定了DNS名称(如前所述)(lsit_NFCNorth)。
For step 4 (Assigning IP to listener), since this AG is spanning across multiple subnets, we have to provide two IP addresses one for each subnet. This is the part which differs from creating a listener in an AG setup in single subnet.
对于第4步(将IP分配给侦听器),由于此AG跨越多个子网,因此我们必须为每个子网提供两个IP地址。 这部分与在单个子网的AG设置中创建侦听器不同。
After clicking on Add button in the above screenshot, I provided an IP for 192.168.1..x subnet as shown below.
在上面的屏幕快照中单击“添加”按钮后,我为192.168.1..x子网提供了IP,如下所示。
Click OK and now click on ADD button one more time and provide IP address for your second subnet as shown below.
单击确定 ,然后再次单击添加按钮,并为您的第二个子网提供IP地址,如下所示。
Once I am done with adding two IP addresses, below is how my wizard looks like at this stage.
添加完两个IP地址后,下面是此阶段向导的外观。
You can see both the IP addresses in the above screenshot, one from each subnet tied to my listener. Click Next and choose how to join the database in Always On availability group. In my lab I have a shared folder which I plan to leverage for this purpose as shown below.
您可以在上面的屏幕截图中看到两个IP地址,每个IP地址都与我的侦听器绑定在一起。 单击下一步,然后在Always On可用性组中选择如何加入数据库。 在我的实验室中,我计划使用一个共享文件夹来实现此目的,如下所示。
Proceed to next and make sure the validation report is all green as shown below and go to Next and Finish.
继续执行下一步,确保确认报告为绿色,如下所示,然后转到下一步和完成。
It just took couple of minutes for me in my lab setup for this entire process, remember my databases are pretty much empty.
在整个实验过程中,我花了几分钟才完成我的实验,记住我的数据库几乎是空的。
I followed the same steps to create my second AG (AG_AFCNorth) and a corresponding listener (List_AFCNorth). When am all done, this is how everything looks in my lab from my SSMS.
我按照相同的步骤创建了第二个AG(AG_AFCNorth)和一个对应的侦听器(List_AFCNorth)。 完成后,这就是从我的SSMS看实验室中一切的样子。
Now, Let’s see how things look from Failover Cluster manager. Before going any further, let me tell you that I failed over my “AG_AFCNorth” to my DR site (192.168.2.x). I did this on purpose to show you how things will look depending on which subnet the AG is currently residing in.
现在,让我们看看故障转移群集管理器的情况。 在继续之前,让我告诉您我已将我的“ AG_AFCNorth”故障转移到我的灾难恢复站点(192.168.2.x)。 我这样做的目的是向您展示根据AG当前所在的子网的情况。
See below screenshots where under List_AFCNorth, the IP 192.168.1.x shows offline and for List_NFCNorth, the IP 192.168.2.x shows offline.
请参阅以下屏幕截图,其中List_AFCNorth下的IP 192.168.1.x显示为脱机,而List_NFCNorth下的IP 192.168.2.x显示为脱机。
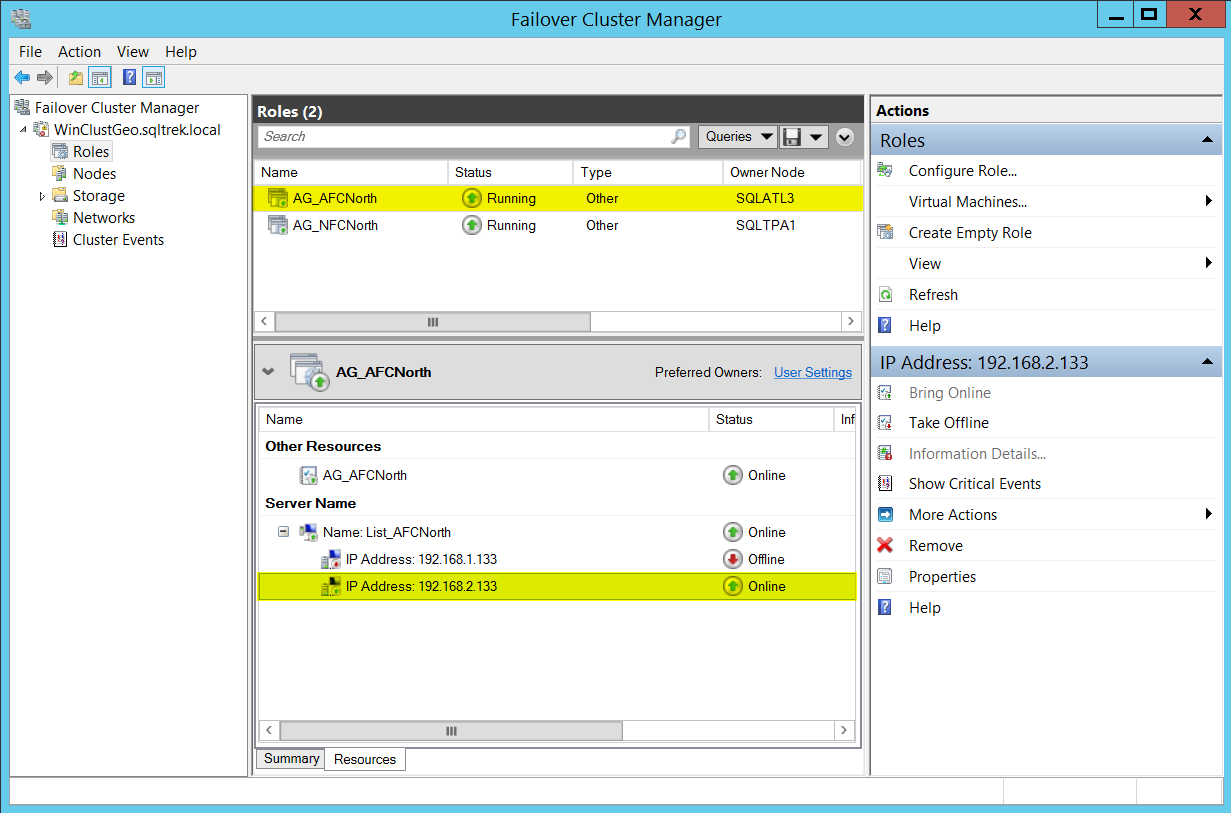
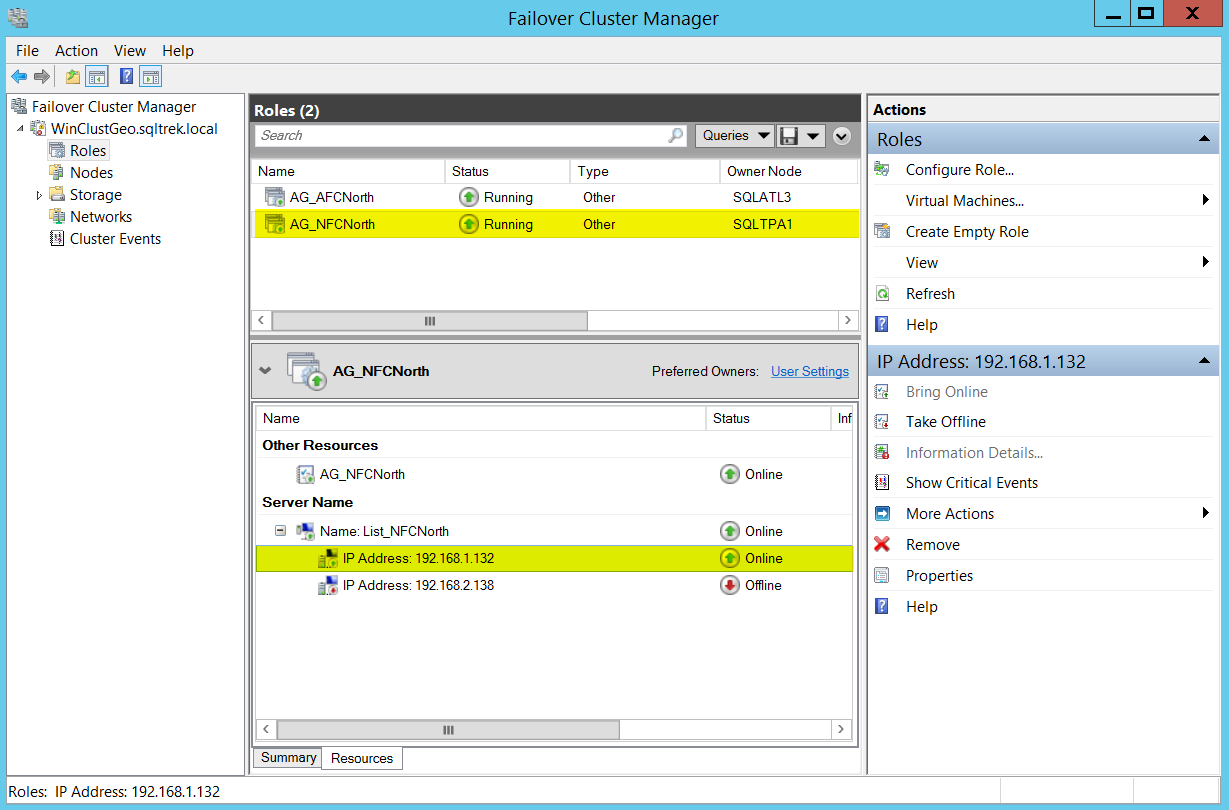
This is because at any given point of time, a listener can only be owned by one subnet. The IP will be online/offline depending on which subnet the listener is currently residing on.
这是因为在任何给定的时间点,一个侦听器只能由一个子网拥有。 IP将处于联机/脱机状态,具体取决于侦听器当前所在的子网。
Now let’s see how it looks on my DNS. I opened DNS manager on my SANDC machine and expanded Forward lookup zones and went to my domain “sqltrek.local” as shown below.
现在,让我们看看它在我的DNS上的外观。 我在SANDC计算机上打开了DNS管理器,并扩展了正向查找区域,然后转到我的域“ sqltrek.local”,如下所示。
As you can see, we have two A records being created for each listener, one under each subnet. This is very similar to what we would see for the virtual network name if we were to build a traditional failover cluster spanning across multiple subnets.
如您所见,我们为每个侦听器创建了两个A记录,每个子网下都有一个。 这与我们要构建跨越多个子网的传统故障转移群集时的虚拟网络名称非常相似。
That is it folks! I hope this article helps you in setting up a lab simulating multiple data centers. With this setup in place, now I can experiment and learn things on how my AGs are different when spanning across multiple sites. I can reproduce issues, simulate application connectivity, practice patching, practice failover/DR testing and what not right here in my personal laptop ?
那就是伙计们! 我希望本文能帮助您建立一个模拟多个数据中心的实验室。 有了此设置之后,现在我可以进行实验并学习有关跨多个站点时AG的不同之处。 我可以重现问题,模拟应用程序连接,练习补丁,进行故障转移/ DR测试,而在我的个人笔记本电脑上还有什么不对劲?
思科模拟器划分子网实验报告


 1786
1786

 被折叠的 条评论
为什么被折叠?
被折叠的 条评论
为什么被折叠?
 到【灌水乐园】发言


