


There are often situations I want to test a piece of software or the latest version of SQL Server for a proof of concept, maybe even the new Power BI Report Server. I could install these locally, where I’ve likely got previous SQL installs or an already burgeoning system. You could be lucky that you have access to Virtual Machines that you can build out for the task. Now add a few hours to setup Windows or even just the applications themselves. Those VMs may be in Azure, or AWS, now add a few £’s or $’s every time you want to work on something. Did you remember to turn them off?
在很多情况下,我想测试一种软件或最新版本SQL Server以进行概念验证,甚至可能是新的Power BI Report Server。 我可以在本地安装这些程序,我以前可能已经在这些程序中安装了SQL或已经发展Swift的系统。 您可以幸运地访问到可以为该任务构建的虚拟机。 现在添加几个小时来设置Windows,甚至只是应用程序本身。 这些VM可能位于Azure或AWS中,现在每次您要处理某些事情时,都会增加几英镑。 您记得关闭它们吗?
I’d like to show you a PowerShell solution to that problem. AutomatedLab is a set of PowerShell modules that you can use to create and manage a group of virtual machines in Hyper-V. Depending on your requirements, you could have a script for a single VM with SQL Server installed, all the way to a full Active Directory domain with a domain controller, file Server, SQL Server etc. A full set of AD accounts, sample DBs, and installed tools automatically deployed. You can then delete the full “Lab” with a single command.
我想向您展示针对该问题的PowerShell解决方案。 AutomatedLab是一组PowerShell模块,可用于在Hyper-V中创建和管理一组虚拟机。 根据您的要求,您可以为安装了SQL Server的单个VM编写脚本,并一直到具有域控制器,文件服务器,SQL Server等的完整Active Directory域。完整的AD帐户,示例数据库,并自动部署已安装的工具。 然后,您可以使用单个命令删除完整的“实验室”。
I’ll run through what’s required to build a few different SQL lab configurations with some custom additions. There’s also a great getting started guide & a wealth of information over on the AutomatedLab Wiki page to get you started & carry you further too.
我将介绍构建一些不同SQL实验配置以及一些自定义添加所需要的内容。 在AutomatedLab Wiki页面上,还有一个很好的入门指南和大量信息,可帮助您入门并进一步发展。
先决条件 (Prerequisites)
You can install Hyper-V as a feature if you have Windows 10 Professional or Enterprise, otherwise, you’ll need a Windows Server or Hyper-V Server to deploy your VMs to. You can use the AutomatedLab module in Azure but that is a topic for another post.
如果您具有Windows 10专业版或企业版,则可以将Hyper-V作为功能安装,否则,需要Windows Server或Hyper-V Server才能将VM部署到其中。 您可以在Azure中使用AutomatedLab模块,但这是另一篇文章的主题。
Installing Hyper-V on Windows 10
在Windows 10上安装Hyper-V
From the Control Panel, search for or navigate to Turn Windows features on or off. Check the Hyper-V feature to install all sub-features & click OK. You’ll likely need your install media for this
在控制面板中,搜索或导航至“ 打开或关闭Windows功能”。 检查 Hyper-V功能以安装所有子功能并单击“确定”。 您可能需要为此安装媒体
Once you’ve installed the Hyper-V feature you can follow the Installation guide on the GitHub Wiki
安装Hyper-V功能后,您可以按照GitHub Wiki上的安装指南进行操作。
The installation MSI contains everything you need to get started, including some sample scripts to give you an idea of what’s possible.
安装MSI包含您入门所需的一切,包括一些示例脚本,以使您了解可能的情况。
Alternatively, you can install the PowerShell module using the following command:
或者,您可以使用以下命令安装PowerShell模块:
Import-Module AutomatedLab
This won’t give you all the required folder structures, sample scripts and post-Installation scripts so you’re best using the MSI.
这不会为您提供所有必需的文件夹结构,示例脚本和安装后脚本,因此最好使用MSI。
入门 (Getting Started)
Once you’ve installed the AutomatedLab components you can continue to their Getting Started guide for what you need next but to summarize, we need to get the software & operating systems we want to use inside the VMs.
安装AutomatedLab组件后,您可以继续阅读其入门指南,以获取下一个需要的内容,但总结一下,我们需要获取要在VM中使用的软件和操作系统。
If you’re not lucky enough to have a TechNet subscription you can pick up Evaluation copies for everything we need from Microsoft’s evaluation center
如果您不太幸运获得TechNet订阅,则可以从Microsoft的评估中心获取我们需要的所有内容的评估副本。
Unfortunately, your version choices are often limited to recent releases here. I.e. SQL Server 2014, 2016 & 2017 RTM. Here are the direct links to get us started with Windows Server 2016 & SQL Server 2016:
不幸的是,您选择的版本通常仅限于此处的最新版本。 即SQL Server 2014、2016和2017 RTM。 以下是直接让我们开始使用Windows Server 2016和SQL Server 2016的直接链接:
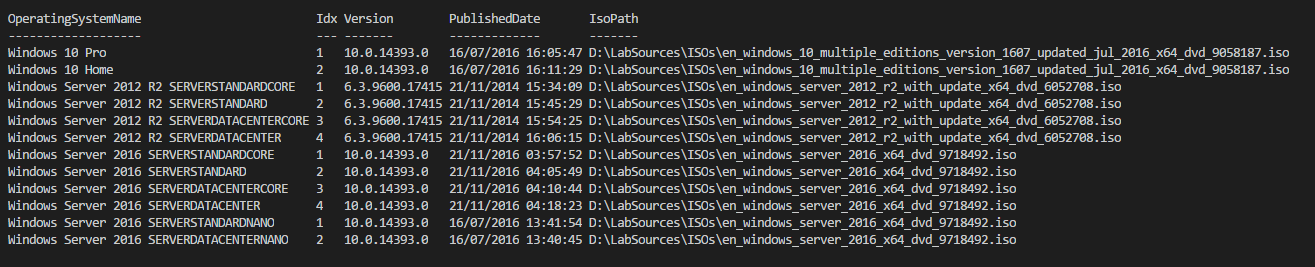
Once you have these ISO files, place them in the LabSources\ISOs folder. You can test these ISOs have been picked up by AutomatedLab using the following command (described in their wiki), replacing the drive letter with your own relevant one:
拥有这些ISO文件后,将它们放置在LabSources \ ISOs文件夹中。 您可以使用以下命令(在其Wiki中描述)测试AutomatedLab已拾取的这些ISO,并将驱动器号替换为您自己的相关字母:
Get-LabAvailableOperatingSystem -Path D:\LabSources
The output will look something like this:
输出将如下所示:
使用自己的数据库 (Using your own databases)
AutomatedLab has the functionality to install the AdventureWorks sample databases with some post-installation steps but to demonstrate how to do it with your own databases I’ll use the new WorldwideImporters database & Data Warehouse.
AutomatedLab具有通过一些安装后步骤来安装AdventureWorks示例数据库的功能,但是为了演示如何使用您自己的数据库,我将使用新的WorldwideImporters数据库和数据仓库。
The first thing we want to do is to prepare our sample databases. I’ve used the Worldwide Importers database & data warehouse but this may be where you want to reference your own databases.
我们要做的第一件事是准备示例数据库。 我已经使用了全球进口商数据库和数据仓库,但这可能是您要引用自己的数据库的地方。
Method 1
方法一
The first method I use for this requires a beta version of AutomatedLab (4.3.1) as a small bug in the Send-ModuleToPSSession was blocking the use of the dbatools module. If you update to 4.3.1 using this Beta MSI you can then execute the rest to deploy your databases.
为此,我使用的第一种方法需要Beta版本的AutomatedLab(4.3.1),因为Send-ModuleToPSSession中的一个小错误阻止了dbatools模块的使用。 如果使用此Beta MSI更新到4.3.1,则可以执行其余的操作来部署数据库。
Once you’ve updated the version, you can run the following code block to move & restore the databases with dbatools.
更新版本后,可以运行以下代码块以使用dbatools移动和还原数据库。
#Copy DBs to VM
Copy-LabFileItem -Path 'D:\LabSources\Sample DBs\' -ComputerName ($LabName + "SQL2") -DestinationFolderPath C:\

#Move dbaTools module to Server
Send-ModuleToPSSession -Module (Get-Module -Name dbatools -ListAvailable) -Session (New-LabPSSession -ComputerName ($LabName + "SQL2")) -IncludeDependencies

#Invoke dbatools command
Invoke-LabCommand -ActivityName 'Restore DBs' -ScriptBlock { Restore-DbaDatabase -SqlServer $env:COMPUTERNAME -Path C:\Sample DBs\ } -ComputerName ($LabName + "SQL2") -PassThru
Method 2
方法二
This is just a workaround for the bug described above & simply involves giving the target lab server internet access to install the module directly from the PowerShell Gallery.
这只是上述bug的一种解决方法,仅涉及向目标实验室服务器提供Internet访问权限,以直接从PowerShell画廊安装模块。
First, we create the Virtual switch, connected to our Ethernet port:
首先,我们创建连接到以太网端口的虚拟交换机:
Add-LabVirtualNetworkDefinition -Name External -HyperVProperties @{ SwitchType = 'External'; AdapterName = 'Ethernet' }
Then we add this to our machine definition
然后我们将其添加到我们的机器定义中
$netAdapter = @()
$netAdapter += New-LabNetworkAdapterDefinition -VirtualSwitch $labName
$netAdapter += New-LabNetworkAdapterDefinition -VirtualSwitch External -UseDhcp
We then add the -NetworkAdapter flag to our Add-LabMachineDefinition command:
然后,将-NetworkAdapter标志添加到我们的Add-LabMachineDefinition命令中:
Add-LabMachineDefinition -Name $sql1 -Memory 2GB -Roles SQLServer2016 -NetworkAdapter $netAdapter
This will attach a second network connection to the machine you create, allowing Internet access. Our Database restore script block above is then altered to install dbatools from the PowerShell Gallery like so:
这会将第二个网络连接附加到您创建的机器上,从而可以访问Internet。 然后,将上面的数据库还原脚本块更改为从PowerShell库安装dbatools,如下所示:
 #Copy DBs to VM
Copy-LabFileItem -Path 'D:\LabSources\Sample DBs\' -ComputerName $sql1 -DestinationFolderPath C:\

#Install dbaTools module on Server
Invoke-LabCommand -ActivityName 'Install dbatools' -ScriptBlock { Install-Module -Name dbatools -ErrorAction SilentlyContinue } -ComputerName $sql1 -PassThru

#Invoke dbatools command
Invoke-LabCommand -ActivityName 'Restore DBs' -ScriptBlock { Restore-DbaDatabase -SqlServer $env:COMPUTERNAME -Path C:\Sample DBs\ } -ComputerName $sql1 -PassThru
With this method, you will be prompted twice, to accept the installation of PowerShellGet and install dbatools from an untrusted source (PowerShell Gallery). To prevent the second warning change its InstallationPolicy value by running the Set-PSRepository cmdlet on the target Lab server.
使用此方法,将提示您两次,以接受PowerShellPower的安装并从不受信任的源(PowerShell Gallery)安装dbatools。 为防止出现第二个警告,请在目标Lab服务器上运行Set-PSRepository cmdlet更改其InstallationPolicy值。

Method 3
方法3
An alternative is to simply run the dbatools command directly from your local machine. This would require passing a SQL credential though which we have not setup as part of the lab creation but this could be created manually via SQL Server Management Studio. You would then execute this command from the host machine:
一种替代方法是直接从本地计算机直接运行dbatools命令。 这将需要传递SQL凭据,尽管我们没有在实验室创建过程中进行设置,但是可以通过SQL Server Management Studio手动创建。 然后,您将在主机上执行以下命令:
$sql1 = 'SQLServerName'
Restore-DbaDatabase -SqlServer $sql1 -Path 'C:\Sample DBs' -SqlCredential NewLogin
For all methods, I have created a folder where my database backups are stored.
对于所有方法,我都创建了一个文件夹,用于存储数据库备份。
We can then add these database steps to the main Lab creation code. For these lab scripts, I have used the second Method, to retrieve the dbatools module from the PowerShell Gallery as it’s the easiest to demonstrate and doesn’t require the beta version of the module.
然后,我们可以将这些数据库步骤添加到Lab的主要创建代码中。 对于这些实验脚本,我使用了第二种方法,从PowerShell库中检索dbatools模块,因为它最容易演示,并且不需要该模块的beta版本。
基础实验室 (A Basic Lab)
The quickest way to get up & running is to just create a single SQL Server Lab:
建立和运行的最快方法是只创建一个SQL Server Lab:
Internet Connected Lab:
互联网连接实验室:
#----------------------------------------
# Author: 	Craig Porteous
# Date:		20/10/2017
# This creates a basic SQL Lab & restores
# Sample DBs using the dbatools module
#----------------------------------------
# Prerequisites
#----------------------------------------
# Install dbatools module locally
# > Install-Module dbatools
#----------------------------------------


#Define the Lab name
$labName = 'BasicLab'

#create an empty lab template and define where the lab XML files and the VMs will be stored
New-LabDefinition -Name $labName -DefaultVirtualizationEngine HyperV

#Define the network range
Add-LabVirtualNetworkDefinition -Name $labName
#Define an External, Internet connection
Add-LabVirtualNetworkDefinition -Name External -HyperVProperties @{ SwitchType = 'External'; AdapterName = 'Ethernet' }

#Set installation user
Set-LabInstallationCredential -Username pInstall -Password Somepass1

#Read all ISOs in the LabSources folder and add the SQL 2014 ISO
Add-LabIsoImageDefinition -Name SQLServer2016 -Path $labSources\ISOs\en_sql_server_2016_standard_with_service_pack_1_x64_dvd_9540929.iso


#defining default parameter values, as these ones are the same for all the machines
$PSDefaultParameterValues = @{
	'Add-LabMachineDefinition:Network' = $labName
	'Add-LabMachineDefinition:ToolsPath'= "$labSources\Tools"
	'Add-LabMachineDefinition:OperatingSystem' = 'Windows Server 2016 SERVERSTANDARD'
}
#Define Network adapter
$netAdapter = @()
$netAdapter += New-LabNetworkAdapterDefinition -VirtualSwitch $labName
$netAdapter += New-LabNetworkAdapterDefinition -VirtualSwitch External -UseDhcp

#Create VM
$sql1 = ($LabName + "SQL1")
Add-LabMachineDefinition -Name $sql1 -Memory 2GB -Roles SQLServer2016 -NetworkAdapter $netAdapter

Install-Lab

Show-LabDeploymentSummary -Detailed

#Copy DBs to VM
Copy-LabFileItem -Path 'D:\LabSources\Sample DBs\' -ComputerName $sql1 -DestinationFolderPath C:\

#Move dbaTools module to Server
#Send-ModuleToPSSession -Module (Get-Module -Name dbatools -ListAvailable) -Session (New-LabPSSession -ComputerName $sql1) -IncludeDependencies

#Install dbaTools module on Server
Invoke-LabCommand -ActivityName 'Install dbatools' -ScriptBlock { Install-Module -Name dbatools -ErrorAction SilentlyContinue } -ComputerName $sql1 -PassThru

#Invoke dbatools command
Invoke-LabCommand -ActivityName 'Restore DBs' -ScriptBlock { Restore-DbaDatabase -SqlServer $env:COMPUTERNAME -Path C:\Sample DBs\ } -ComputerName $sql1 -PassThru
The creation of this Basic lab took just under 25 minutes to complete (on my Windows 10 laptop), meaning you can execute the script and get on with something else while your lab is being created.
基本实验室的创建仅用不到25分钟的时间即可完成(在Windows 10笔记本电脑上),这意味着您可以在创建实验室的同时执行脚本并继续进行其他操作。
域实验室 (Domain Lab)
We can make our lab more complex by creating a dummy domain, giving us the ability to use domain accounts & test AD security without impacting your company or organisation’s Active Directory accounts. I’ll also create 2 SQL servers and restore the sample database to SQL1 and the sample Data Warehouse to SQL2.
通过创建虚拟域,我们可以使我们的实验室更加复杂,使我们能够使用域帐户和测试AD安全性,而不会影响您的公司或组织的Active Directory帐户。 我还将创建2个SQL服务器,并将示例数据库还原为SQL1,并将示例数据仓库还原为SQL2。
#----------------------------------------
# Author: 	Craig Porteous
# Date:		16/10/2017
# This creates a domain with 2 SQL Servers
# & restores Sample DBs using the dbatools
# module
#----------------------------------------
# Prerequisites
#-----------------------------------
# Install dbatools module locally
# > Install-Module dbatools
#-----------------------------------


#Define the Lab name
$labName = 'DomainLab'

#Domain based on Lab name
$domainName = "$labName.com"

#create an empty lab template and define where the lab XML files and the VMs will be stored
New-LabDefinition -Name $labName -DefaultVirtualizationEngine HyperV

#Define the network range
Add-LabVirtualNetworkDefinition -Name $labName
#Define an External, Internet connection
Add-LabVirtualNetworkDefinition -Name External -HyperVProperties @{ SwitchType = 'External'; AdapterName = 'Ethernet' }

#Set installation user
Set-LabInstallationCredential -Username pInstall -Password Somepass1
#Create domain definition with the domain admin account
Add-LabDomainDefinition -Name $domainName -AdminUser pInstall -AdminPassword Somepass1

#Read all ISOs in the LabSources folder and add the SQL 2014 ISO
Add-LabIsoImageDefinition -Name SQLServer2016 -Path $labSources\ISOs\en_sql_server_2016_standard_with_service_pack_1_x64_dvd_9540929.iso


#defining default parameter values, as these ones are the same for all the machines
$PSDefaultParameterValues = @{
	'Add-LabMachineDefinition:Network' = $labName
	'Add-LabMachineDefinition:ToolsPath'= "$labSources\Tools"
	'Add-LabMachineDefinition:DomainName' = $domainName
	'Add-LabMachineDefinition:OperatingSystem' = 'Windows Server 2016 SERVERSTANDARD'
}

#the first machine is the root domain controller. Everything in $labSources\Tools gets copied to the machine's Windows folder
Add-LabMachineDefinition -Name ($LabName + "DC1") -Memory 512MB -Roles RootDC

#Define Network adapter
$netAdapter = @()
$netAdapter += New-LabNetworkAdapterDefinition -VirtualSwitch $labName
$netAdapter += New-LabNetworkAdapterDefinition -VirtualSwitch External -UseDhcp

#Create VM
$sql1 = ($LabName + "SQL1")
Add-LabMachineDefinition -Name $sql1 -Memory 2GB -Roles SQLServer2016 -NetworkAdapter $netAdapter

#Create VM
$sql2 = ($LabName + "SQL2")
Add-LabMachineDefinition -Name $sql2 -Memory 2GB -Roles SQLServer2016

Install-Lab

Show-LabDeploymentSummary -Detailed

#Copy DBs to SQL1 VM
Copy-LabFileItem -Path 'D:\LabSources\Sample DBs\' -ComputerName $sql1 -DestinationFolderPath C:\
Copy-LabFileItem -Path 'D:\LabSources\Sample DWs\' -ComputerName $sql1 -DestinationFolderPath C:\


#Install dbaTools module on SQL1
Invoke-LabCommand -ActivityName 'Install dbatools' -ScriptBlock { Install-Module -Name dbatools -ErrorAction SilentlyContinue } -ComputerName $sql1 -PassThru

#Restore Database on SQL1
Invoke-LabCommand -ActivityName 'Restore DBs' -ScriptBlock { Restore-DbaDatabase -SqlServer $env:COMPUTERNAME -Path 'C:\Sample DBs' } -ComputerName $sql1 -PassThru
#Restore Data Warehouse DB on SQL2 from SQL1
Invoke-LabCommand -ActivityName 'Restore DWs' -ScriptBlock { Restore-DbaDatabase -SqlServer $sql2 -Path 'C:\Sample DWs' } -Variable (Get-Variable -Name sql2) -ComputerName $sql1 -PassThru
At the end of the Domain Lab, I am only connecting _SQL1 to the internet. This is where I am executing the Restore command to both servers.
在域实验室的最后,我仅将_SQL1连接到Internet。 这是我在两台服务器上执行“还原”命令的地方。
更复杂的解决方案 (More Complex Solutions)
From this basic domain lab, we can start getting more complex. The sample scripts provided with the AutomatedLab install demonstrate examples for adding dummy AD accounts, subdomains, file servers, exchange servers, etc. We can setup several SQL Servers to demonstrate High availability scenarios for example.
从这个基本的领域实验室中,我们可以开始变得更加复杂。 AutomatedLab安装随附的示例脚本演示了添加虚拟AD帐户,子域,文件服务器,交换服务器等的示例。我们可以设置多个SQL Server来演示例如高可用性方案。
参考资料 (References)
- AutomatedLab Github Github自动化实验室
- AutomatedLab Wiki AutomatedLab Wiki
- Microsoft’s Eval Center 微软的评估中心
- Windows Server 2016 Evaluation Windows Server 2016评估
- SQL Server 2016 Evaluation SQL Server 2016评估
- AutomatedLab v4.3.1 on GitHub GitHub上的AutomatedLab v4.3.1
- dbaTools dba工具
翻译自: https://www.sqlshack.com/build-sql-server-virtual-lab-automatedlab-hyper-v/


 728
728

 被折叠的 条评论
为什么被折叠?
被折叠的 条评论
为什么被折叠?
 到【灌水乐园】发言


