


In the previously published articles in this series, we have explained how to use Biml to create and manage SQL Server Integration Services (SSIS) packages. In this article, we will talk about the first alternative of this markup language which is the Integration Services managed object model (ManagedDTS and related assemblies) provided by Microsoft.
在本系列以前发布的文章中,我们已经解释了如何使用Biml创建和管理SQL Server Integration Services(SSIS)软件包。 在本文中,我们将讨论这种标记语言的第一种替代方法,即Microsoft提供的Integration Services托管对象模型(ManagedDTS和相关程序集)。
In this article, we will first illustrate how to create, save and execute SSIS packages using ManagedDTS in C#, then we will do a small comparison with Biml.
在本文中,我们将首先说明如何在C#中使用ManagedDTS创建,保存和执行SSIS包,然后将与Biml进行一些比较。
Integration Services对象模型 (Integration Services object model)
To explain the integration services object model, first we have to take a look at the SSIS architecture. As shown in the figure below (Reference: Integration Services Programming Overview)
为了解释集成服务对象模型,首先我们必须看一下SSIS体系结构。 如下图所示(参考: Integration Services编程概述 )
Figure 1 – SSIS architecture
图1 – SSIS体系结构
We can note that the main SSIS components are:
我们可以注意到,主要的SSIS组件是:
- Integration Services Service: It is a windows service that monitors running packages, it also manages the package storage within SQL Server Integration Services服务 :这是Windows服务,用于监视正在运行的程序包,还可以管理SQL Server中的程序包存储
- Integration Services Runtime Engine: It controls the management and execution of packages, by implementing the infrastructure that enables execution order, logging, variables, and event handling Integration Services运行时引擎:它通过实现启用执行顺序,日志记录,变量和事件处理的基础结构来控制软件包的管理和执行
- The Data Flow Engine: It manages the data flow tasks within a package since this task is specialized to move data between different sources and destinations and it can contain additional components 数据流引擎:它管理包中的数据流任务,因为该任务专门用于在不同源和目标之间移动数据,并且可以包含其他组件
As shown in the architecture, both the runtime and data flow engine have an object model that allows them to be fully managed from custom applications, SSIS designer or SQL Server Import and Export wizard. Besides, they are both written in native code and can be accessed using command-line utilities (DTExec) or custom applications.
如该体系结构所示,运行时和数据流引擎都具有对象模型,该模型允许从自定义应用程序,SSIS设计器或SQL Server导入和导出向导对其进行完全管理。 此外,它们都以本机代码编写,并且可以使用命令行实用程序(DTExec)或自定义应用程序进行访问。
The object model allows developers to develop and manages SSIS packages using .NET-compliant languages.
对象模型允许开发人员使用.NET兼容语言开发和管理SSIS包。
SSIS使用托管对象模型打包开发 (SSIS packages development using the managed object model)
SSIS开发程序集 (SSIS development assemblies)
The following assemblies are the one that you may need to develop, manage and execute SSIS packages from .NET applications:
以下程序集是从.NET应用程序开发,管理和执行SSIS包可能需要的程序集:
| Name | Qualified Name | Description |
| ManagedDTS | Microsoft.SqlServer.ManagedDTS.dll | Managed runtime engine |
| PipelineHost | Microsoft.SqlServer.PipelineHost.dll | Managed data flow engine |
| DTSRuntimeWrap | Microsoft.SqlServer.DTSRuntimeWrap.dll | Wrapper for the native runtime engine |
| DTSPipelineWrap | Microsoft.SqlServer.DTSPipelineWrap.dll | Wrapper for native data flow engine |
名称 | 合格名称 | 描述 |
托管DTS | Microsoft.SqlServer.ManagedDTS.dll | 托管运行时引擎 |
管道主机 | Microsoft.SqlServer.PipelineHost.dll | 托管数据流引擎 |
DTSRuntimeWrap | Microsoft.SqlServer.DTSRuntimeWrap.dll | 本机运行时引擎的包装 |
DTSPipelineWrap | Microsoft.SqlServer.DTSPipelineWrap.dll | 本机数据流引擎的包装 |
Before SQL Server 2019, these assemblies were located in “<drive>:\Program Files\Microsoft SQL Server\<SQL Version>\SDK\Assemblies” path. In SQL Server 2019, they are located in the global assembly cache with the .NET framework assemblies.
在SQL Server 2019之前,这些程序集位于`` <驱动器>:\ Program Files \ Microsoft SQL Server \ <SQL版本> \ SDK \ Assemblies ''路径中。 在SQL Server 2019中,它们与.NET Framework程序集一起位于全局程序集缓存中。
使用对象模型创建一个新包 (Creating a new package using the object model)
To create an SSIS package from your .Net code, you have to add the ManagedDTS assembly as a reference in your project. Then you should import the Microsoft.SqlServer.Dts.Runtime assembly as the following:
要从.Net代码创建SSIS包,必须在项目中添加ManagedDTS程序集作为引用。 然后,应按以下方式导入Microsoft.SqlServer.Dts.Runtime程序集:
using Microsoft.SqlServer.Dts.Runtime;
The following code creates an empty package and saves it as .dtsx file:
以下代码创建一个空包,并将其另存为.dtsx文件:
Application app = new Application();
Package p = new Package();
app.SaveToXml(@"D:\test.dtsx",p,null);
Note that you can save the package to SQL Server (Msdb database) using SaveToSqlServer() and SaveToSqlServerAs() methods, or you can save it to an SSIS package store using SaveToDtsServer() method. For more information, you can refer to: Saving a Package Programmatically.
请注意,您可以使用SaveToSqlServer()和SaveToSqlServerAs()方法将包保存到SQL Server(Msdb数据库),也可以使用SaveToDtsServer()方法将包保存到SSIS包存储中。 有关更多信息,请参考: 以编程方式保存程序包 。
从现有文件加载包 (Loading package from an existing file)
To load an existing package, you can use the Application.LoadPackage() method as following:
要加载现有程序包,可以使用Application.LoadPackage()方法,如下所示:
Application app = new Application();
Package p = app.LoadPackage(@"D:\test.dtsx", null);
添加连接管理器 (Adding Connection managers)
To add a connection manager, you must use the Application.ConnectionManager class, then you should specify the connection type and the needed information based on this type. As an example, the following code adds an OLE DB connection manager:
若要添加连接管理器,必须使用Application.ConnectionManager类,然后应指定连接类型以及基于该类型的所需信息。 例如,以下代码添加了一个OLE DB连接管理器:
string ConnectionString = @"Data Source=.;Initial Catalog=tempdb;Integrated Security=SSPI;Provider=SQLNCLI11;Auto Translate=false;";

ConnectionManager DatabaseConnectionManager = p.Connections.Add("OLEDB");
DatabaseConnectionManager.ConnectionString = ConnectionString;
DatabaseConnectionManager.Name = "ConnectionOLEDB";
DatabaseConnectionManager.Description = "SSIS Connection Manager for OLEDB";
添加任务 (Adding Tasks)
Using ManagedDTS, tasks are added within Executables property in the Package class. There are different approaches to add a task within the package control flow:
使用ManagedDTS,可以在Package类的Executables属性中添加任务。 在包控制流中添加任务有多种方法:
Adding the task explicitly by providing the assembly information manually
通过手动提供程序集信息显式添加任务
In this approach, you have to enter the assembly name, qualified name, version, culture, and the public key token into the Add() method. For example:
在这种方法中,必须在Add()方法中输入程序集名称,限定名称,版本,区域性和公共密钥令牌。 例如:
Package p = new Package();
p.Executables.Add("Microsoft.SqlServer.Dts.Tasks.ExecuteSQLTask.ExecuteSQLTask, Microsoft.SqlServer.SQLTask, Version=10.0.000.0, Culture=neutral, PublicKeyToken=89845dcd8080cc91");
Using the AssemblyQualifiedName
使用AssemblyQualifiedName
In this approach, you must add the assembly related to the task as a reference and import it in your code, then you should retrieve the assembly qualified name of the task’s related class (located in “<drive>:\Program Files\Microsoft SQL Server\<SQL version>\DTS\Tasks”). As an example, if you need to add an Execute SQL Task, you should first add Microsoft.SqlServer.SQLTask.dll as reference. Then you should use the following code:
在这种方法中,必须添加与任务相关的程序集作为参考,并将其导入代码中,然后应检索任务相关类的程序集合格名称(位于“ <驱动器>:\ Program Files \ Microsoft SQL”中)。服务器\ <SQL版本> \ DTS \ Tasks” )。 例如,如果需要添加执行SQL任务,则应首先添加Microsoft.SqlServer.SQLTask.dll作为引用。 然后,您应该使用以下代码:
using Microsoft.SqlServer.Dts.Tasks.ExecuteSQLTask;
    …
    p.Executables.Add(typeof(Microsoft.SqlServer.Dts.Tasks.ExecuteSQLTask.ExecuteSQLTask).AssemblyQualifiedName);
Using STOCK moniker
使用STOCK绰号
You can refer to the following documentation for a full list of tasks’ stock monikers. Then you should use it as the following:
您可以参考以下文档以获取任务库存名称的完整列表 。 然后,您应按以下方式使用它:
using Microsoft.SqlServer.Dts.Tasks.ExecuteSQLTask;
    …
    p.Executables.Add("STOCK:SQLTask");
添加数据流任务 (Adding a Data Flow Task)
As we mentioned above, the data flow task is a special SSIS task where we can add components. For this reason, we will talk about it in a separate section. As we mentioned in the first section, You should add PipelineHost and DTSPipelineWrap assemblies besides the ManagedDTS to work with the data flow engine. The following code is to create a package, add an OLE DB connection manager, add a Data Flow Task that contains an OLE DB Source and OLE DB destination and configure them to import data from [Person].[Person] table into [Person].[Person_temp]:
如上所述,数据流任务是一个特殊的SSIS任务,我们可以在其中添加组件。 因此,我们将在单独的部分中讨论它。 正如我们在第一部分中提到的那样,除了ManagedDTS之外,还应该添加PipelineHost和DTSPipelineWrap程序集以使用数据流引擎。 以下代码用于创建程序包,添加OLE DB连接管理器,添加包含OLE DB源和OLE DB目标的数据流任务,并将它们配置为将数据从[Person]。[Person]表导入[Person] 。[Person_temp] :
using Microsoft.SqlServer.Dts.Runtime;
using Microsoft.SqlServer.Dts.Pipeline;
using Microsoft.SqlServer.Dts.Pipeline.Wrapper;
…
Executable e = p.Executables.Add("STOCK:PipelineTask");
TaskHost thMainPipe = (TaskHost)e;
MainPipe dataFlowTask = (MainPipe)thMainPipe.InnerObject;
添加数据流任务组件 (Adding Data Flow Tasks components)
You can add data flow task components using their Creation Name or the assembly qualified name. The second approach requires importing the component related assembly (located in “<drive>:\Program Files\Microsoft SQL Server\<SQL version>\DTS\PipelineComponents”). The following example illustrates how to add an OLE DB Source and destination components and create a mapping between them :
您可以使用其创建名称或程序集限定名称添加数据流任务组件。 第二种方法需要导入与组件相关的程序集(位于“ <驱动器:: \ Program Files \ Microsoft SQL Server \ <SQL版本> \ DTS \ PipelineComponents”中 )。 下面的示例说明了如何添加OLE DB源和目标组件以及如何在它们之间创建映射:
//Creating a new package
Application app = new Application();
Package p = new Package();

//Adding the connection manager
ConnectionManager DatabaseConnectionManager = p.Connections.Add("OLEDB");
DatabaseConnectionManager.ConnectionString = @"Data Source=.;Initial Catalog=tempdb;Integrated Security=SSPI;Provider=SQLNCLI11;Auto Translate=false;"; ;
DatabaseConnectionManager.Name = "ConnectionOLEDB";
DatabaseConnectionManager.Description = "SSIS Connection Manager for OLEDB";

//Adding the data flow task
Executable e = p.Executables.Add("STOCK:PipelineTask");
TaskHost thMainPipe = (TaskHost)e;
MainPipe dataFlowTask = (MainPipe)thMainPipe.InnerObject;
thMainPipe.Name = "Import Person";

IDTSComponentMetaData100 component = dataFlowTask.ComponentMetaDataCollection.New();
component.Name = "OLEDBSource";
component.ComponentClassID = app.PipelineComponentInfos["OLE DB Source"].CreationName;

//Get the design-time instance of the component.
CManagedComponentWrapper instance = component.Instantiate();

//Initialize the component.
instance.ProvideComponentProperties();

//Map the component to a connection manager
component.RuntimeConnectionCollection[0].ConnectionManager = DtsConvert.GetExtendedInterface(p.Connections[0]);
component.RuntimeConnectionCollection[0].ConnectionManagerID = DatabaseConnectionManager.ID;


//Set the OLE DB Source properties
instance.SetComponentProperty("AccessMode", 2);
instance.SetComponentProperty("SqlCommand", "Select * from Person.Person");

// Reinitialize the metadata.
instance.AcquireConnections(null);
instance.ReinitializeMetaData();
instance.ReleaseConnections();

// Create the destination component.
IDTSComponentMetaData100 destination = dataFlowTask.ComponentMetaDataCollection.New();
destination.ComponentClassID = app.PipelineComponentInfos["OLE DB Destination"].CreationName;

var destinationInstance = destination.Instantiate();
destinationInstance.ProvideComponentProperties();

destination.RuntimeConnectionCollection[0].ConnectionManagerID = DatabaseConnectionManager.ID;
destination.RuntimeConnectionCollection[0].ConnectionManager = DtsConvert.GetExtendedInterface(p.Connections[0]);

destinationInstance.SetComponentProperty("AccessMode", 3);
destinationInstance.SetComponentProperty("OpenRowset", "[Person].[Person_temp]");

// Create the path.
IDTSPath100 path = dataFlowTask.PathCollection.New();
path.AttachPathAndPropagateNotifications(component.OutputCollection[0], destination.InputCollection[0]);

//Get the destination's default input and virtual input.
IDTSInput100 input = destination.InputCollection[0];
IDTSVirtualInput100 vInput = input.GetVirtualInput();
IDTSVirtualInputColumnCollection100 vInputColumns = vInput.VirtualInputColumnCollection;

destinationInstance.AcquireConnections(null);
destinationInstance.ReinitializeMetaData();
destinationInstance.ReleaseConnections();

//Iterate through the virtual input column collection.
foreach (IDTSVirtualInputColumn100 vColumn in vInputColumns)
{
    var inputColumn = destinationInstance.SetUsageType(input.ID, vInput, vColumn.LineageID, DTSUsageType.UT_READONLY);
    var externalColumn = input.ExternalMetadataColumnCollection[inputColumn.Name];
    destinationInstance.MapInputColumn(input.ID, inputColumn.ID, externalColumn.ID);

}

app.SaveToXml(@"D:\test.dtsx",p,null);
After executing the application, the package is created successfully. The following screenshots show the package Control Flow and Data Flow Task:
执行应用程序后,将成功创建包。 以下屏幕快照显示了程序包“控制流”和“数据流任务”:
Figure 2 – Created package control flow
图2 –创建的程序包控制流程
Figure 3 – Created data flow task
图3 –创建的数据流任务
以编程方式执行程序包 (Executing package programmatically)
After creating a package, we can execute it using the Execute() method as following:
创建包之后,我们可以使用Execute()方法执行它,如下所示:
Package p = new Package();
...
DTSExecResult result = p.Execute();
在线资源 (Online Resources)
In the previous sections, we briefly explained how to create and execute packages using ManagedDTS, but there are many more instructions you need to know such as mapping tasks, configuring task properties, error handling … For this reason, Microsoft has provided helpful documentation where most of these operations are explained; Integration Services Developer Documentation.
在前面的部分中,我们简要介绍了如何使用ManagedDTS创建和执行程序包,但是您还需要了解更多说明,例如映射任务,配置任务属性,错误处理……因此,Microsoft提供了有用的文档,其中大多数对这些操作进行了解释; Integration Services开发人员文档 。
与Biml比较 (Comparing with Biml)
简单 (Simplicity)
After creating the package using ManagedDTS, we will convert it to a Biml script as we explained in Converting SSIS packages to Biml scripts. You can check how Biml replaces a complex C# script and facilitate the reading and editing process since it is simpler and does not require programming knowledge.
使用ManagedDTS创建程序包后,我们将其转换为Biml脚本,如将SSIS程序包转换为Biml脚本中所述 。 您可以检查Biml如何替换复杂的C#脚本并简化阅读和编辑过程,因为它更简单并且不需要编程知识。
<Biml xmlns="http://schemas.varigence.com/biml.xsd">
    <Connections>
        <Connection Name="ConnectionOLEDB" ConnectionString="Data Source=.;Initial Catalog=tempdb;Integrated Security=SSPI;Provider=SQLNCLI11;Auto Translate=false;" />
    </Connections>
    <Packages>
        <Package Name="{F9205928-FD01-4C5C-B444-52424DB72B88}" Language="None" ConstraintMode="LinearOnCompletion" ProtectionLevel="EncryptSensitiveWithUserKey">
            <Tasks>
                <Dataflow Name="Import Person">
                    <Transformations>
                        <OleDbSource Name="OLE DB Source" ConnectionName="ConnectionOLEDB">
                            <DirectInput>Select * from Person.Person</DirectInput>
                        </OleDbSource>
                        <OleDbDestination Name="OLE DB Destination" ConnectionName="ConnectionOLEDB">
                            <ExternalTableOutput Table="[Person].[Person_temp]" />
                        </OleDbDestination>
                    </Transformations>
                </Dataflow>
            </Tasks>
        </Package>
    </Packages>
</Biml>
语境 (Context)
On the other side, it is more preferable to use ManagedDTS when creating and executing the packages is done within an application and it is related to other tasks since Biml is managed within an SSIS solution and it is not integrated within an application.
另一方面,当在应用程序内创建和执行程序包时,最好使用ManagedDTS,这与其他任务有关,因为Biml是在SSIS解决方案中管理的,并且未集成在应用程序中。
开发中的错误处理 (Error handling in development)
Handling errors is a disaster while using ManagedDTS since it does not show a clear error message as shown in the image below. While in Biml, the “Check Biml for Errors” tool return all errors encountered while validating the script.
使用ManagedDTS时处理错误是一场灾难,因为它没有显示清晰的错误消息,如下图所示。 在Biml中,“检查Biml是否存在错误”工具返回验证脚本时遇到的所有错误。
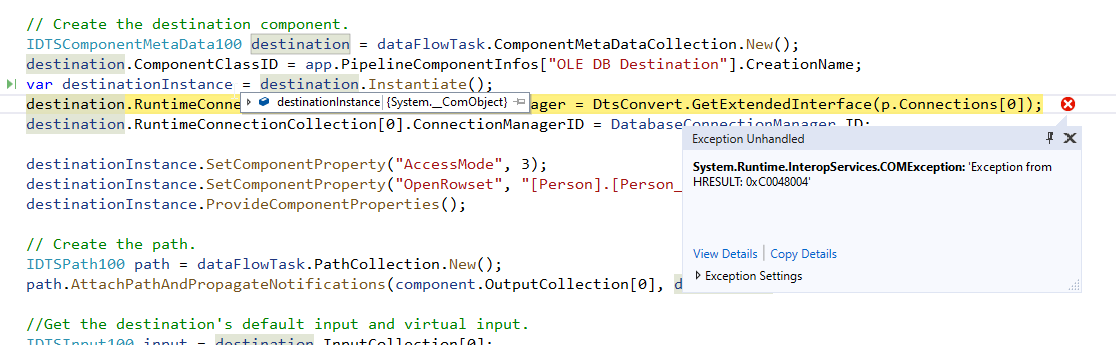
Figure 4 – Threw exception while building SSIS package programmatically
图4 –以编程方式构建SSIS包时引发异常
资源资源 (Resources)
There is a lack of related articles and guides for both technologies. But the ability to Convert SSIS packages to Biml scripts makes it easier to learn since it simplifies the learning process in case you are familiar with SSIS.
缺少两种技术的相关文章和指南。 但是, 将SSIS包转换为Biml脚本的功能使学习变得更容易,因为如果您熟悉SSIS,它将简化学习过程。
结论 (Conclusion)
In this article, we have explained one of the alternatives for creating SSIS packages using Biml which is the managed object model of the integration service runtime engine. Additionally, we made a small comparison between both approaches to illustrate the main difference.
在本文中,我们解释了使用Biml创建SSIS包的替代方法之一,Biml是集成服务运行时引擎的托管对象模型。 此外,我们对这两种方法进行了较小的比较,以说明主要差异。
目录 (Table of contents)
| Getting started with Biml |
| Converting SSIS packages to Biml scripts |
| Using Biml scripts to generate SSIS packages |
| Extending Biml with C# scripts |
| Using external C# script files within Biml |
| Biml alternatives: Building SSIS packages programmatically using ManagedDTS |
| Biml alternatives: Building SSIS packages programmatically using EzAPI |
| Biml入门 |
| 将SSIS包转换为Biml脚本 |
| 使用Biml脚本生成SSIS包 |
| 使用C#脚本扩展Biml |
| 在Biml中使用外部C#脚本文件 |
| Biml替代品:使用ManagedDTS以编程方式构建SSIS包 |
| Biml替代品:使用EzAPI以编程方式构建SSIS包 |
翻译自: https://www.sqlshack.com/biml-alternatives-building-ssis-packages-programmatically-using-manageddts/


 616
616

 被折叠的 条评论
为什么被折叠?
被折叠的 条评论
为什么被折叠?
 到【灌水乐园】发言


