


 本文介绍了如何使用BULK INSERT从本地CSV文件导入数据到SQL Server,以及如何在SQL Server 2017中使用新功能从Azure存储帐户导入数据。文章提供了详细的步骤和示例,包括创建主密钥、数据库凭据和外部数据源。
azure 导入 bak
介绍 (Introduction)
BULK INSERT is a popular method to import data from a local file to SQL Server. This feature is supported by the moment in SQL Server on-premises.
批量插入是一种将数据从本地文件导入SQL Server的流行方法。 目前,SQL Server内部部署中已支持此功能。
However, there is a new feature that is supported only in SQL Server 2017 on-premises. This feature allows importing data from a file stored in an Azure storage account to SQL Server on-premises using BULK INSERT. This feature will be supported in Azure SQL versions in the future.
但是,有一个新功能仅在SQL Server 2017内部部署中受支持。 此功能允许使用大容量插入将数据从存储在Azure存储帐户中的文件导入到本地SQL Server。 将来,Azure SQL版本将支持此功能。
In this article, we will show two examples. The first example will show how to use the traditional BULK INSERT statement from a local CSV file to Azure and the second example will show how to import data from a CSV file stored in Azure to SQL Server on-premises.
在本文中,我们将显示两个示例。 第一个示例将展示如何使用本地CSV文件中的传统BULK INSERT语句到Azure,第二个示例将展示如何将存储在Azure中的CSV文件中的数据导入到SQL Server内部部署。
If you are new in the Azure world, this article don’t worry, as we will include step by step instructions to guide you until the end. If you have experience in Azure and SQL Server, but you do not know much about this particular new feature, this article may also be helpful.
如果您是Azure世界的新手,请不要担心,因为我们将逐步指导您直到最后。 如果您具有Azure和SQL Server的经验,但是对这一特定的新功能了解不多,则本文可能也会有所帮助。
Azure is growing each day and SQL Server is improving the features to connect SQL Server on-premises to Azure. BULK INSERT is a powerful tool to import data because it is fast and it can be easily combined with T-SQL code.
Azure每天都在增长,SQL Server正在改进将SQL Server内部部署连接到Azure的功能。 BULK INSERT是一种强大的数据导入工具,因为它速度快并且可以轻松地与T-SQL代码结合使用。
要求 (Requirements)
- SQL Server 2017 installed. If you have SQL Server 2016 or older you will be able to follow the first example only 已安装SQL Server 2017。 如果您具有SQL Server 2016或更早版本,则只能遵循第一个示例
- An Azure account 一个Azure帐户
开始吧 (Get started)
如何将数据从本地文件导入到本地SQL Server (How to import data from a local file to SQL Server on-premises)
In this first example, we will create a CSV file with customer data and then we will import the CSV file to a SQL Server table using BULK INSERT.
在第一个示例中,我们将使用客户数据创建一个CSV文件,然后使用BULK INSERT将CSV文件导入到SQL Server表中。
First, we will create a file named mycustomers.csv with the following data:
首先,我们将创建一个名为mycustomers.csv的文件, 其中包含以下数据:
1,Peter,Jackson,pjackson@hotmail.com
2,Jason,Smith,jsmith@gmail.com
3,Joe,Raasi,jraasi@hotmail.com
1,Peter,Jackson,pjackson @ hotmail.com
2,杰森,史密斯,jsmith @ gmail.com
3,Joe,Raasi,jraasi @ hotmail.com
Then we will create a SQL Server table where we will load the data:
然后,我们将创建一个SQL Server表,在该表中加载数据:
create table listcustomer
(id int,
firstname varchar(60),
lastname varchar(60),
email varchar(60))
We will load the data using the BULK INSERT statement:
我们将使用BULK INSERT语句加载数据:
BULK
INSERT listcustomer
FROM 'c:\sql\mycustomers.csv'
WITH
(
FIELDTERMINATOR = ',',
ROWTERMINATOR = '\n'
)
GO
The BULK INSERT statement will import the data from the mycustomers.csv file to the table listcustomer. The field terminator in this file is a comma. The row terminator is a new line (\n).
BULK INSERT语句会将数据从mycustomers.csv文件导入表listcustomer。 该文件中的字段终止符是逗号。 行终止符是换行符(\ n)。
If everything is OK, the table will be populated. You can run this query to verify:
如果一切正常,将填充该表。 您可以运行此查询来验证:
SELECT
[id]
      ,[firstname]
      ,[lastname]
      ,[email]
  [dbo].[listcustomer]
The result displayed is the following:
显示的结果如下:
如何将数据从Azure存储帐户中的文件导入到本地SQL Server (How to import data from a file in an Azure storage account to SQL Server on-premises)
The first example can e brun in SQL Server 2017 or older versions. The second example requires SQL Server 2017 and it is a new feature.
第一个示例可以在SQL Server 2017或更早版本中进行。 第二个示例需要SQL Server 2017,这是一个新功能。
We will load the CSV file to an Azure storage account and then we will load the information to SQL Server 2017 on-premises.
我们将CSV文件加载到Azure存储帐户中,然后将信息加载到SQL Server 2017内部部署中。
Open the Azure Portal and go to more services (>) and click on Storage Accounts (you can work with the classic or the new one):
打开Azure门户并转到更多服务(>),然后单击“存储帐户”(您可以使用经典帐户或新帐户):
Press +Add to create a new Storage account:
按+添加以创建一个新的存储帐户:
Specify a name, a deployment model. In this example, we will use the classic deployment and a standard performance. Press create:
指定名称,部署模型。 在此示例中,我们将使用经典部署和标准性能。 按创建:
It will take some minutes to create the storage account. Click the storage account:
创建存储帐户将需要几分钟。 单击存储帐户:
Go to Overview and click on Blobs:
转到概述,然后单击Blob:
Click +Container:
点击+容器:
Specify a name for the container and press OK:
指定容器的名称,然后按OK:
Press Upload to load the file in the container:
按上传将文件加载到容器中:
Upload the file mycustomers created in the first example with CSV data:
使用CSV数据上传在第一个示例中创建的mycustomers文件:
We uploaded data to an Azure storage account in a container. Now, open SSMS in a local machine and connect to a local SQL Server.
我们将数据上传到容器中的Azure存储帐户。 现在,在本地计算机上打开SSMS并连接到本地SQL Server。
We will first create a master key:
我们将首先创建一个主密钥:
CREATE MASTER KEY
ENCRYPTION BY PASSWORD='Mysqlshackpwd¡·#$';
The master key is a symmetric key used to protect certificates, private keys and asymmetric keys.
主密钥是用于保护证书,私钥和非对称密钥的对称密钥。
In the next step, we will create a database credential to access to the Azure Storage. The credential name is azurecred:
在下一步中,我们将创建一个数据库凭据以访问Azure存储。 凭证名称为azurecred:
CREATE DATABASE SCOPED CREDENTIAL azurecred
WITH IDENTITY = 'SHARED ACCESS SIGNATURE',
SECRET =
'+gEu0KY2fznnZ2kY3NwGEgn5AFiN0sAyytm+MNzo+uK/zZlRLFmHddWS5HYPlKL/p9gx7Q5Jsg==';
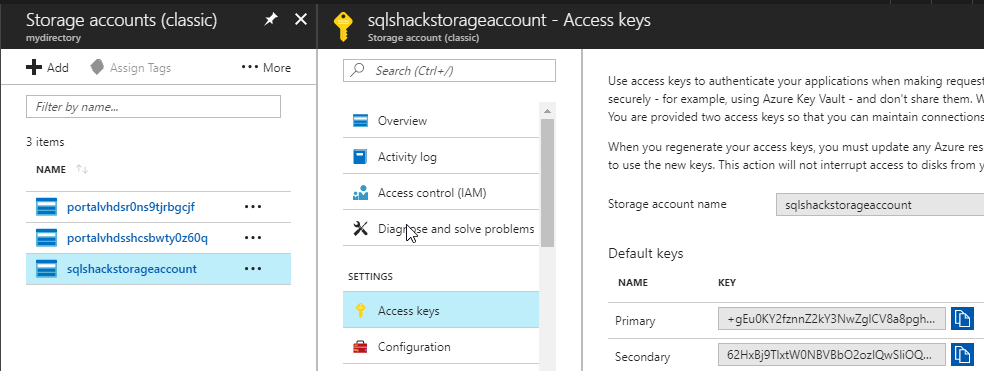
The secret password can be obtained from the Azure Portal>Storage Account in the Access keys section. You can use the primary or secondary key:
可以从“访问密钥”部分中的“ Azure门户”>“存储帐户”获得秘密密码。 您可以使用主键或辅助键:
The next step is to create an external data source. The external data source can be used to access to Hadoop or in this case to an Azure Account. The name of this data source is customer. The type is blob storage. We will use the credential just created before:
下一步是创建一个外部数据源。 外部数据源可用于访问Hadoop或在这种情况下访问Azure帐户。 该数据源的名称为customer。 类型是Blob存储。 我们将使用之前创建的凭证:
CREATE EXTERNAL DATA SOURCE customers
WITH
(
    TYPE = BLOB_STORAGE,
    LOCATION = 'https://sqlshackstorageaccount.blob.core.windows.net/container1',
    CREDENTIAL = azurecred
);
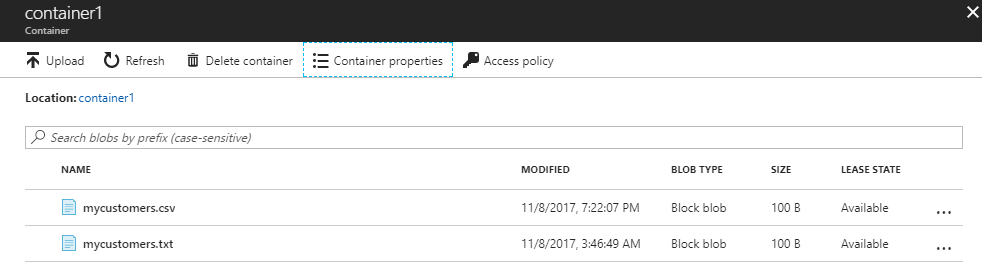
The location can be obtained in Azure Portal>Blob Storage Account>Container properties:
可以在Azure门户> Blob存储帐户>容器属性中获取位置:

If everything is OK, you will be able to see the external data source in SSMS:
如果一切正常,您将能够在SSMS中查看外部数据源:
We will create a table named listcustomerAzure to store the data:
我们将创建一个名为listcustomerAzure的表来存储数据:
create table listcustomerAzure
(id int,
firstname varchar(60),
lastname varchar(60),
email varchar(60))
We will use now the BULK INSERT to insert data into the listcustomerAzure table from the file custmers.csv stored in Azure. We will invoke the external data source just created:
现在,我们将使用大容量插入将数据从存储在Azure中的custmers.csv文件插入到listcustomerAzure表中。 我们将调用刚刚创建的外部数据源:
BULK INSERT listcustomerAzure
FROM 'mycustomers.csv'
WITH (DATA_SOURCE = 'customers',
      FORMAT = 'CSV');
A common problem is the error message ‘Cannot bulk load’. The error message says that you don’t have file access rights:
常见问题是错误消息“无法批量加载”。 错误消息指出您没有文件访问权限:
This problem can be solved by modifying the access to the folder. Go to Azure and go to Azure storage account and select the container. Click the option Access policy:
可以通过修改对文件夹的访问来解决此问题。 转到Azure并转到Azure存储帐户,然后选择容器。 单击选项访问策略:
Change the Public access level to Blob (anonymous read access for blobs only) and save the configuration:
将公共访问级别更改为Blob(仅对blob进行匿名读取访问)并保存配置:
Run the BULK INSERT sentence again. If everything is OK now, you will be able to access to the data:
再次运行BULK INSERT语句。 如果现在一切正常,您将可以访问数据:
结论 (Conclusions)
BULK INSERT is a very fast option to load massive data. It is a popular tool for old versions of SQL Server and new ones. SQL Server 2017 supports the ability to run BULK INSERT statements to load data from Azure storage accounts to SQL Server on-premises.
批量插入是加载大量数据的非常快速的选项。 它是旧版本和新版本SQL Server的流行工具。 SQL Server 2017支持运行BULK INSERT语句以将数据从Azure存储帐户加载到本地SQL Server的功能。
To import data from an Azure storage account, you need to create a master key and then create a credential with a key to the Azure storage account. Finally, you create an external data source with that credential. Once created the external data source, you can use the BULK INSERT. You may need to change the access policies to the container.
若要从Azure存储帐户导入数据,您需要创建一个主密钥,然后创建一个带有Azure存储帐户密钥的凭据。 最后,使用该凭据创建一个外部数据源。 一旦创建了外部数据源,就可以使用BULK INSERT。 您可能需要更改对容器的访问策略。
Note that a Windows account is not used to connect to Azure. That is the most important difference between a local BULK INSERT and a BULK INSERT to an Azure Account. In a local BULK INSERT operation, the local SQL login must have permissions to the external file. In contrast, when you BULK INSERT an Azure file, the credentials are used, and the Windows local login permissions are irrelevant.
请注意,Windows帐户不用于连接到Azure。 这是本地大容量插入和对Azure帐户的大容量插入之间最重要的区别。 在本地BULK INSERT操作中,本地SQL登录名必须具有对外部文件的权限。 相反,当您批量插入一个Azure文件时,将使用凭据,并且Windows本地登录权限无关。
BULK INSERT is not supported in Azure SQL Data Warehouse or Parallel Data Warehouse and the option to import files stored in Azure is by the moment only supported in SQL Server on-premises and not in Azure SQL databases yet.
Azure SQL数据仓库或并行数据仓库中不支持BULK INSERT,并且目前仅在SQL Server内部部署而不是Azure SQL数据库中支持导入存储在Azure中的文件的选项。
翻译自: https://www.sqlshack.com/use-bulk-insert-import-data-locally-azure/
azure 导入 bak


 1260
1260

 被折叠的 条评论
为什么被折叠?
被折叠的 条评论
为什么被折叠?
 到【灌水乐园】发言


