


 本文详述了如何使用Team City搭建数据库的持续集成(CI)服务器,包括安装过程、设置源代码控制仓库集成、构建配置以及各个步骤如构建、测试和同步。文章强调了数据库处于源代码控制下的重要性,并介绍了使用Team City进行自动化构建和测试的机制。
Team City is a Java based continuous integration and deployment server shipped as commercial software but free to use for up to 20 build configurations. It polls the source control repository for any changes providing build reports and statistics to the team.
Team City是作为商业软件提供的基于Java的持续集成和部署服务器,但可免费使用多达20个构建配置。 它会轮询源代码控制存储库,以获取所有更改,从而向团队提供构建报告和统计信息。
设置的先决条件 (Prerequisites for the set up)
Download the latest available version of Team City from the official website download section.
从官方网站下载部分下载 Team City的最新可用版本。
In this article, SQL Server Management Studio will be used. Click here for download links and install instructions. In case you don’t have a SQL Server instance to connect to, download and install the free SQL Server 2014 Express from this link, which includes the above mentioned SQL Server Management Studio, and installs SQL Server on your local machine.
在本文中,将使用SQL Server Management Studio。 单击此处获取下载链接和安装说明。 如果您没有要连接SQL Server实例,请从此链接 (包括上面提到SQL Server Management Studio)下载并安装免费SQL Server 2014 Express,然后在本地计算机上安装SQL Server。
Please note that the necessary pre-requisite to implement the continuous integration (CI) in your database development process is to have a database under source control. For the purpose of this article, we will use the latest version of Visual SVN Server (Standard edition which is free) to manage a Subversion repository used in the CI process.
请注意,在数据库开发过程中实施持续集成(CI)的必要先决条件是使数据库处于源代码控制之下。 就本文而言,我们将使用最新版本的Visual SVN Server (免费的标准版)来管理CI流程中使用的Subversion存储库。
You will also need a web browser to set up and manage the Team City projects.
您还将需要一个Web浏览器来设置和管理Team City项目。
安装Team City持续集成(CI)服务器 (Installing the Team City continuous integration (CI) server)
Start the Team City installation by double-clicking the Team City executable. Click the Next button to advance to the next step:
双击Team City可执行文件开始安装Team City。 单击下一步按钮前进到下一步:
Read the license agreement and click the I Agree button to proceed to the next step:
阅读许可协议,然后单击“ 我同意”按钮以继续下一步:
Choose the location on your hard drive where the Team City will be installed. By default, it will be installed on the C drive, but you can redirect this to Program Files if you like. When the location is et, click the Next button to advance forward:
在您的硬盘驱动器上选择安装Team City的位置。 默认情况下,它将安装在C驱动器上,但是您可以根据需要将其重定向到Program Files。 当位置为et时,单击“ 下一步”按钮前进:
In the next step, the installation offers to install a build agent component (that can run as a Windows service) and the CI server component with the corresponding web service:
在下一步中,安装将提供安装构建代理程序组件(可以作为Windows服务运行)和CI服务器组件以及相应的Web服务:
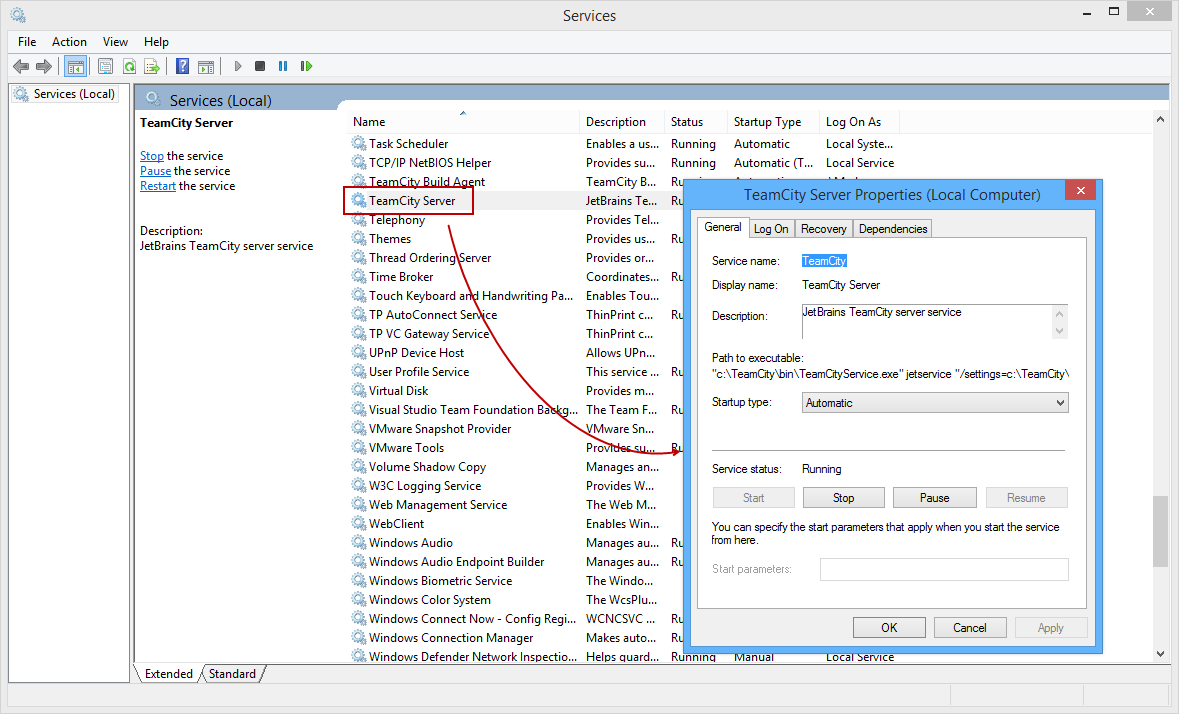
If the appropriate services are included in the installation, they can be managed in the same way as all other Windows services, using the Services management:
如果安装中包含适当的服务,则可以使用“ 服务”管理以与所有其他Windows服务相同的方式来管理它们:
Clicking the Next button will initiate the installation process. Wait until the installation is finished:
单击下一步按钮将启动安装过程。 等待安装完成:
After the selected components are installed, the next step would be to define a port which will be used to access the continuous integration (CI) server. By default, port 80 will be specified:
安装选定的组件之后,下一步将是定义一个端口,该端口将用于访问持续集成(CI)服务器。 默认情况下,将指定端口80:
In case the specified port is busy, and you click the Next button, a warning message pops up with the information that the port should be changed:
如果指定的端口处于繁忙状态,然后单击“ 下一步”按钮,则会弹出一条警告消息,其中包含应该更改端口的信息:
Specify whether the local account or a system one will run the Team City server service. We’ll go with the user account for the purpose of this article:
指定本地帐户或系统帐户将运行Team City服务器服务。 出于本文的目的,我们将使用用户帐户:
Specify a domain and a user account credentials that will run the service:
指定将运行该服务的域和用户帐户凭据:
Leave both checkboxes selected, so both services will be started, build agent and the Team City server:
保留两个复选框都处于选中状态,这样将启动两个服务,构建代理和Team City服务器:
The last step is to finish the installation, and close the installation wizard. You can leave the Open TeamCity Web UI after Setup is completed option checked:
最后一步是完成安装,然后关闭安装向导。 您可以选中“ 安装完成后打开TeamCity Web UI”选项:
By clicking the Finish button, with the above mentioned option checked, web UI of the Team City server will be opened in a web browser.
通过单击完成按钮,并选中上述选项,将在网络浏览器中打开Team City服务器的Web UI。
有关Team City安装的一些注意事项: (Some notes on Team City installation:)
If the default port is assigned to the CI server, you can access its web UI via the following address: http://localhost/. Otherwise, the port must be specified
如果将默认端口分配给CI服务器,则可以通过以下地址访问其Web UI: http:// localhost / 。 否则,必须指定端口
User account specified for the Team City service must have the following:
为Team City服务指定的用户帐户必须具有以下内容:
- how to set this) 如何设置 )
- Team City data directory Team City数据目录的写许可权
- Write permission for the Team City home directory (the one where Team City is installed locally)
- Team City主目录 (本地安装Team City的目录)的写许可权
- Read/Write permissions for the source control repository integrated with the Team City service 与Team City服务集成的源代码控制存储库的读取/写入权限
首次启动Web UI (Starting up a web UI for the first time)
If the option from the previous image remains unchecked, Team City web UI can be started manually from any web browser installed on a local machine.
如果未选中上一张图像中的选项,则可以从本地计算机上安装的任何Web浏览器手动启动Team City Web UI。
To initiate the Team City web UI, follow the steps below:
要启动Team City Web UI,请执行以下步骤:
Specify the following address: http://localhost:<port>/ where the <port> must be the same port that you have specified during the Team City installation process in any web browser (if the default port is used, it does not have to be specified):
指定以下地址: http:// localhost:<port> / ,其中<port>必须与在任何Web浏览器的Team City安装过程中指定的端口相同(如果使用了默认端口,则不会必须指定):
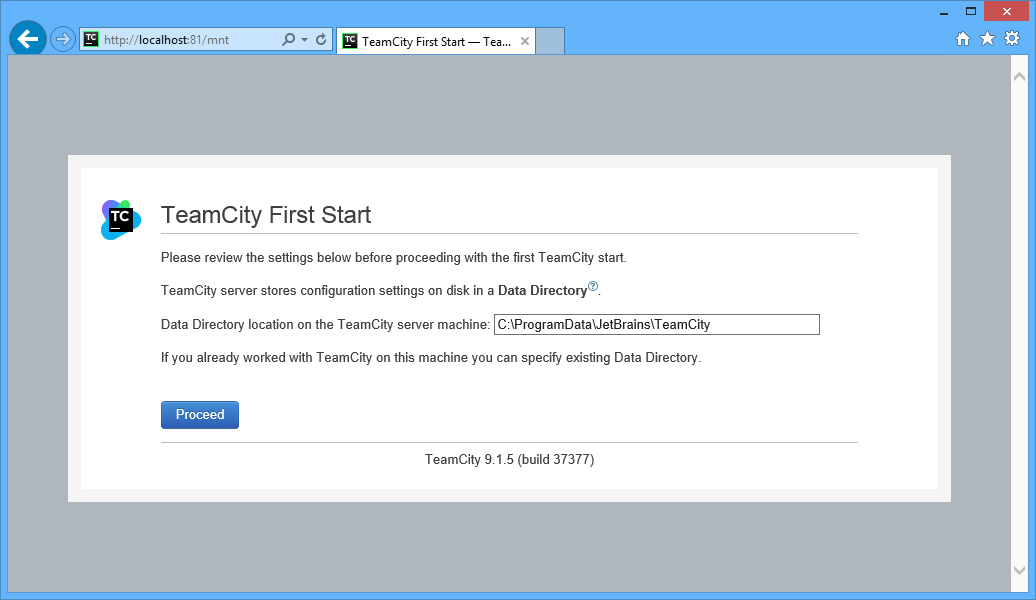
Team City will need to create a folder where intermediary data will be stored. By default, the folder will be created in C:\ProgramData\JetBrains\TeamCity. However, this can be changed directly through the web Interface, before moving forward to the next step.
Team City将需要创建一个文件夹,用于存储中间数据。 默认情况下,该文件夹将在C:\ ProgramData \ JetBrains \ TeamCity中创建 。 但是,在前进到下一步之前,可以直接通过Web界面更改此设置。
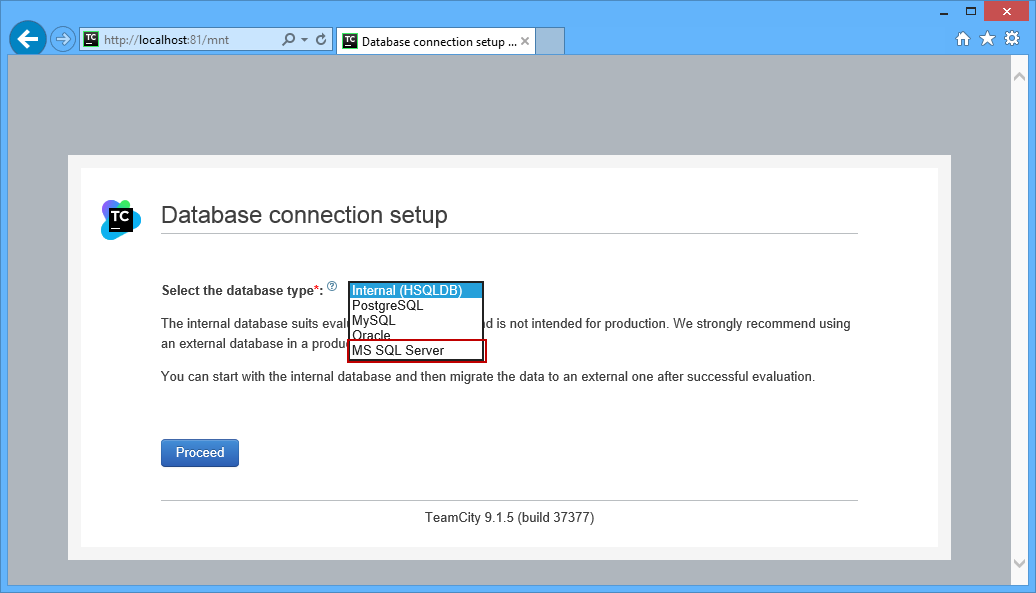
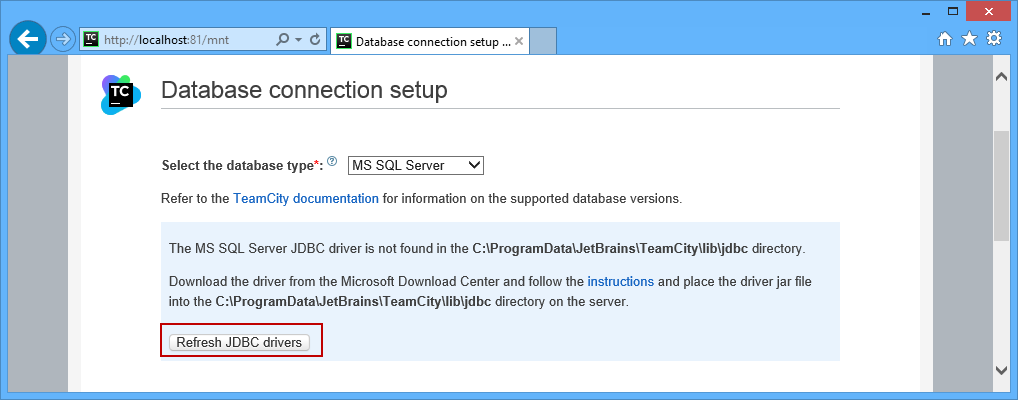
Clicking the Proceed button will create the folder on a specified location and open the next page, presenting the Database connection setup step. From the database type drop down list, we will select the MS SQL Server type.
单击“ 继续”按钮将在指定位置创建文件夹并打开下一页,显示数据库连接设置步骤。 从数据库类型下拉列表中,我们将选择MS SQL Server类型。
If you are missing the MS SQL driver, download it from this link, and follow the instructions on how to set it up
Go back to the Team City web UI and click the Refresh JDBC drivers button:
返回Team City Web UI并单击Refresh JDBC drivers按钮:
The process should recognize the driver and show the following information:
该过程应识别驱动程序并显示以下信息:
Below the information about the loaded drivers, on the same page, host machine, SQL Server Instance and a dedicated database for the Team City service need to be specified. Please note that an empty database that will be used by the Team City service must be created within SQL Server Management Studio, before it is specified in the Database name field.
在同一页面上有关已加载驱动程序的信息下方,需要指定主机,SQL Server实例和Team City服务的专用数据库。 请注意,在“ 数据库名称”字段中指定空数据库之前,必须在SQL Server Management Studio中创建Team City服务将使用的空数据库。
In this case, an empty database called TeamCity is created on a local instance of SQL Server.
在这种情况下,将在SQL Server的本地实例上创建一个名为TeamCity的空数据库。
The Database host [port] and the Database instance name fields are left blank since the service is running on a local machine and on a local instance of SQL Server:
由于该服务在本地计算机和SQL Server的本地实例上运行,因此数据库主机[端口]和数据库实例名称字段保留为空:
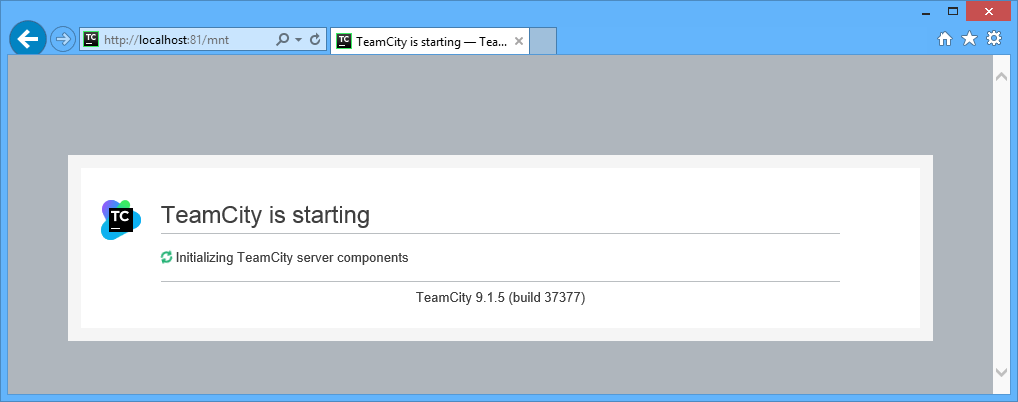
Clicking the Proceed button requires some time for the environment to set up:
单击“ 继续”按钮需要一些时间来设置环境:
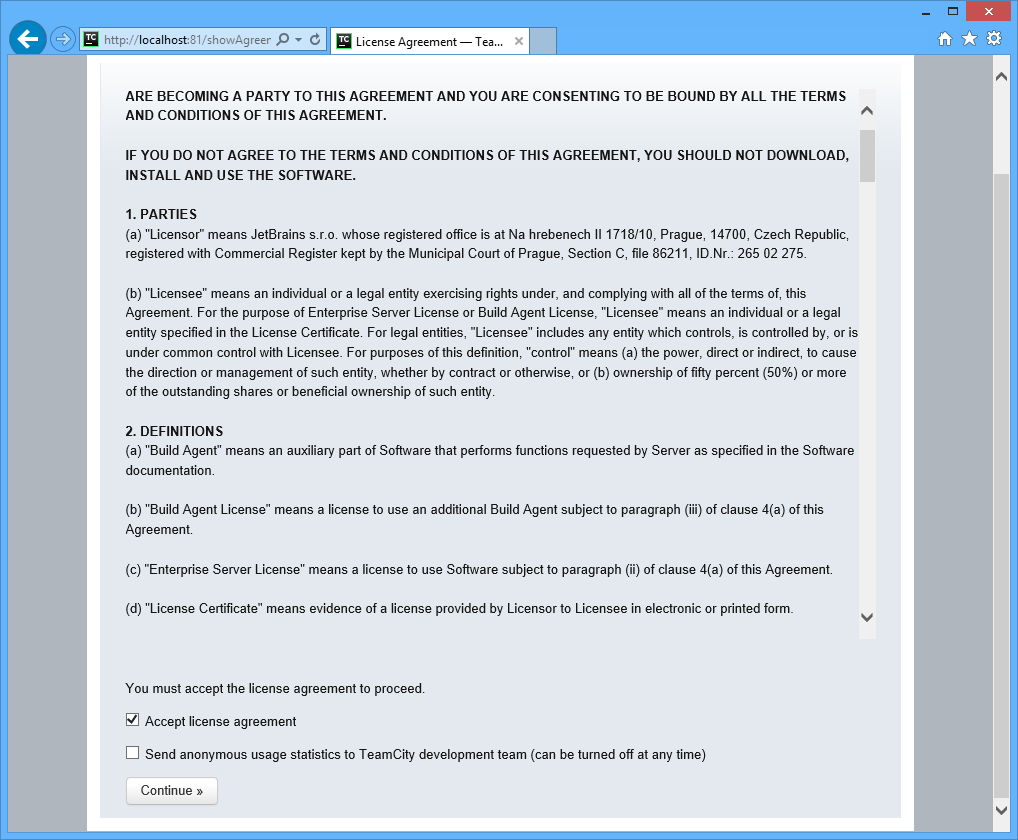
Once the components are set, a license agreement appears. Select the Accept license agreement checkbox, and click the Continue button:
设置组件后,将出现许可协议。 选择接受许可协议复选框,然后单击继续按钮:
Create administrator account which will have access to the projects configuration and management
创建可以访问项目配置和管理的管理员帐户
Once this is done, the admin panel will be shown, where you can add additional information.
完成此操作后,将显示管理面板,您可以在其中添加其他信息。


建立一个项目 (Setting up a project)
The goal of the continuous integration (CI) in Team City is to integrate the source control repository used in the development stage with the CI server that will execute the specified steps (build, test, sync with another environment)
Team City中的持续集成(CI)的目标是将开发阶段使用的源代码控制存储库与将执行指定步骤(构建,测试,与另一个环境同步)的CI服务器进行集成。
After the initial setup, the next thing would be to create a Team City project. Each project contains the following:
初始设置后,下一步是创建一个Team City项目。 每个项目包含以下内容:
- Integration with the source control repository where developers are pushing changes, while working on a database in the development stage 与源代码控制库的集成,开发人员在开发阶段处理数据库的同时在其中推动更改
- Steps that will be executed (build, test, sync, publish) 将要执行的步骤(构建,测试,同步,发布)
- Trigger that will be fired based on the specified settings (in this case, we want a trigger to fire on each committed change) 将根据指定设置触发的触发器(在这种情况下,我们希望触发器在每个已提交的更改上触发)
To create the project, click the Create project button under the Projects tab:
要创建项目,请单击“ 项目”选项卡下的“ 创建项目”按钮:
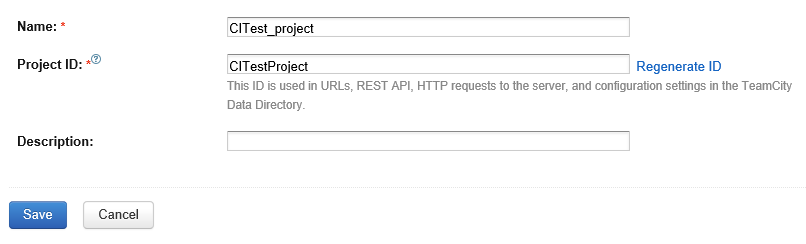
Specify a name of the project and click the Save button:
指定项目的名称,然后单击“ 保存”按钮:
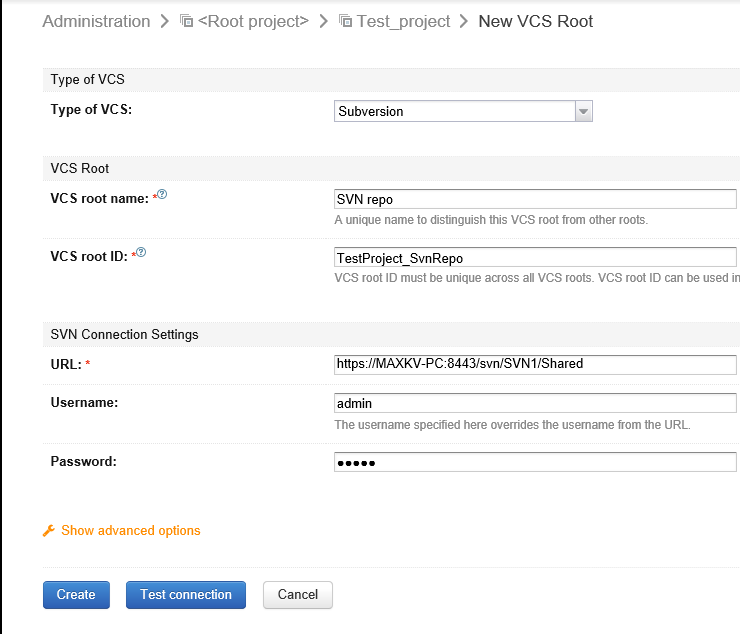
Next, you will need to integrate the previously created project with the repository where a development database is linked. To do so, switch to the VCS Roots tab, and click the Create VCS root button:
接下来,您将需要将先前创建的项目与链接开发数据库的存储库进行集成。 为此,请切换到“ VCS根”选项卡,然后单击“ 创建VCS根”按钮:

Specify the source control system, in our case Subversion:
指定源代码控制系统,在本例中为Subversion :
在持续集成(CI)项目下进行构建配置 (Build configuration under the continuous integration (CI) project)
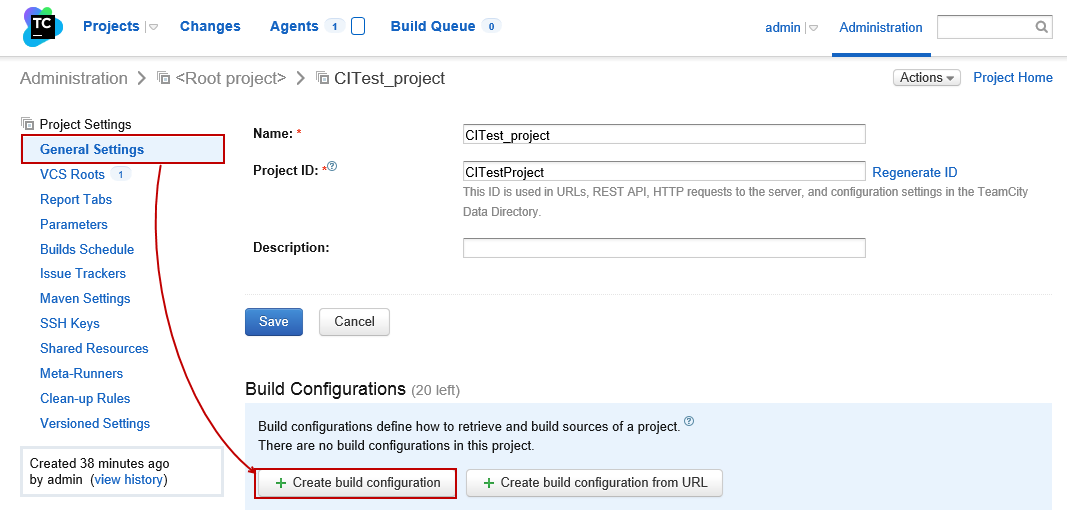
In order to configure the CI project, a build configuration must be created. This can be done from the project settings, under the General settings tab, by clicking the Create build configuration button:
为了配置CI项目,必须创建构建配置。 这可以通过在“ 常规设置”选项卡下的项目设置中,单击“ 创建构建配置”按钮来完成:
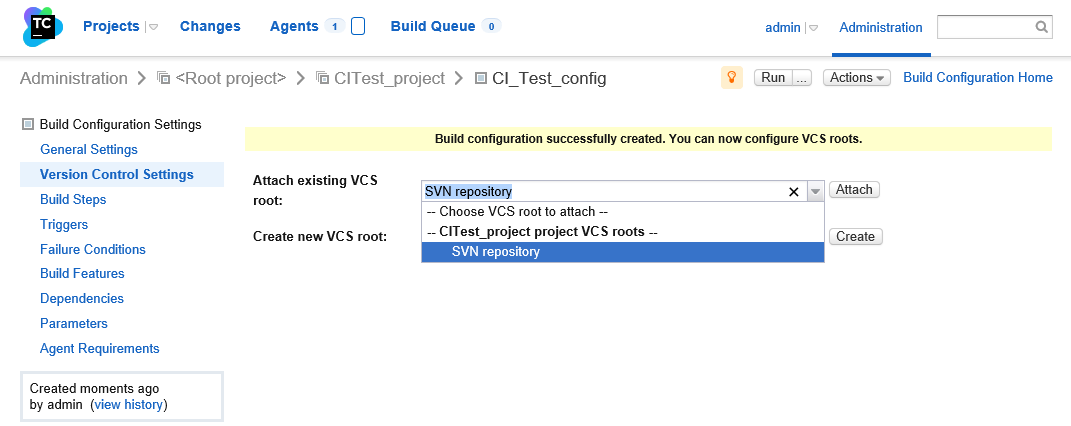
After specifying a name for the build configuration, assign previously created VCS (version control settings), by selecting it from the Attach existing VCS root drop down list, under the Version Control Settings tab, and clicking the Attach button:
为构建配置指定名称后,通过从“ 版本控制设置”选项卡下的“ 附加现有VCS根目录”下拉列表中选择它,来分配先前创建的VCS(版本控制设置),然后单击“ 附加”按钮:
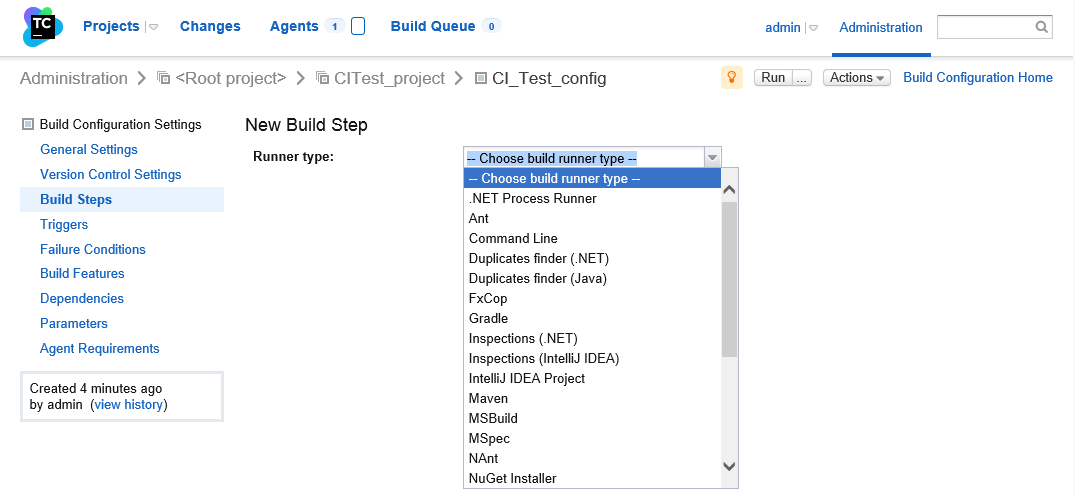
From the Build Steps tab, specify the type of runner, that will perform the build process:
在“构建步骤”选项卡中,指定将执行构建过程的流道类型:
什么是跑步者? (What is a runner?)
Build runner is a part of Team City that allows integration with a specific build tool. Team City offers several built-in runners, but variety of 3rd party tools have Team City integration shipped as a plug-in. Find more about runners on this link.
BuildRunner是Team City的一部分,允许与特定的构建工具集成。 团队市提供了几个内置的选手,但各种第三方工具已经发运作为一个插件团队市一体化。 在此链接上找到有关跑步者的更多信息。
For each of the steps we need to define (build, test, sync with another environment), the appropriate runner should be specified along with the corresponding settings. For example, one step should be to build a database using the “latest state“ from the repository, another step would be to specify unit tests to be executed against the built database, and another step to synchronize built database with another environment (e.g. QA) once all unit tests are passed.
对于我们需要定义的每个步骤(构建,测试,与另一个环境同步),应指定适当的运行程序以及相应的设置。 例如,一个步骤应该是使用存储库中的“最新状态”来构建数据库,另一步骤将是要针对已构建的数据库指定要执行的单元测试,另一步骤是将已构建的数据库与另一个环境(例如QA)进行同步),一旦所有单元测试都通过。
Each of the above mentioned steps can be executed manually, by clicking the Run button:
通过单击“ 运行”按钮,可以手动执行上述每个步骤:
However, to automate the process (since it should be initiated on each commit), there are several types of build triggers.
但是,要使该过程自动化(因为它应在每次提交时启动),有几种类型的构建触发器。
Build trigger represents a rule which initiates a new build on certain events. More about triggers can be found on this link.
构建触发器表示一个规则,该规则可在某些事件上启动新的构建。 可以在此链接上找到有关触发器的更多信息。
For the purpose of this article, and for the purpose of implementing the continuous integration (CI) process in the database development we’ll add a VCS trigger by selecting it from the drop down list, under the Triggers tab:
出于本文的目的,并且为了在数据库开发中实现持续集成(CI)流程,我们将通过从“ 触发器”选项卡下的下拉列表中选择VCS触发器来添加它:
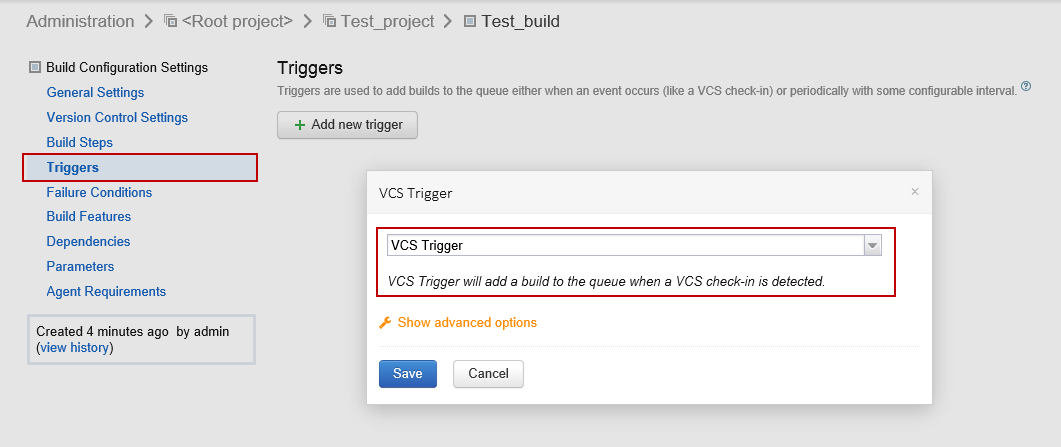
A VCS trigger is a mechanism used when the CI process is monitoring changes on the specified source control repository, set to be fired on each committed change.
VCS触发器是CI流程监视指定源控制存储库上的更改时使用的一种机制,该机制设置为在每次提交的更改时触发。
Only one VCS trigger is available for a single project. This means that if you have already set a VCS trigger and assigned it to a process, it won’t be available in the trigger list anymore. However, you can still specify other available type.
一个项目只有一个VCS触发器可用。 这意味着,如果您已经设置了VCS触发器并将其分配给进程,则它将不再在触发器列表中可用。 但是,您仍然可以指定其他可用类型。
建立步骤 (Build step)
After specifying the trigger, the build step will be initiated on each committed change to the specified source control repository. This means that the build process will use the latest state of each database object on the repository to build a database (this includes the committed change that fires the trigger).
在指定触发器之后,将在对指定的源代码控制存储库的每个提交的更改上启动构建步骤。 这意味着构建过程将使用存储库中每个数据库对象的最新状态来构建数据库(这包括触发触发器的已提交更改)。
Please note that a new database will be built on each committed change to the repository. This means that a runner (plug-in) previously mentioned, that is selected to build a database, should be able to pull the latest state from the repository and build a database without breaking the referential integrity and taking care of the database object dependencies. Also, if there is any static data committed to the repository it should be properly inserted into a built database. The goal is to have a database where unit tests can be run against, and that can be synchronized in later step with the QA.
请注意,将在每次对存储库的所有提交更改的基础上建立一个新数据库。 这意味着前面提到的运行程序(插件)被选择用来构建数据库,它应该能够从存储库中获取最新状态并构建数据库,而不会破坏参照完整性并照顾数据库对象的依赖性。 另外,如果有任何静态数据提交到存储库,则应将其正确插入到内置数据库中。 我们的目标是要有一个数据库,可以在其中运行单元测试,并且可以在以后的步骤中与QA进行同步。
On other side, if, for any reason database is not built successfully, an error should appear informing the user about the failure, and not moving to the next step.
另一方面,如果由于某种原因未成功构建数据库,则将出现错误,通知用户有关该失败的信息,并且不进行下一步。
The runner builds a database on a previously specified server (e.g. test server). This server needs to be specified within the runner settings selected for building a database.
运行程序在先前指定的服务器(例如测试服务器)上建立数据库。 需要在为构建数据库而选择的运行器设置中指定此服务器。
测试步骤 (Test step)
Once a database is built successfully, the process will move to the next step where unit tests can be executed against the database.
成功建立数据库后,该过程将转到下一步,可以在该步骤对数据库执行单元测试。
This is also handled by a runner (specified in a new step – test step). In this step, the user should be able to provide a set of tests that will run against the database, eventually to populate a database with a random test data, and to provide a mechanism to show test results or to send them to the development team.
这也由跑步者处理(在新步骤-测试步骤中指定)。 在这一步中,用户应该能够提供一组针对数据库运行的测试,最终用随机测试数据填充数据库,并提供一种机制来显示测试结果或将其发送给开发团队。
同步步骤 (Sync step)
After unit tests are passed, a database can be synchronized with another environment (QA).
通过单元测试后,数据库可以与另一个环境(QA)同步。
Again, a runner that is selected should be able to synchronize schema and data of the tested database with a database in another environment (QA).
同样,选择的运行程序应该能够将测试数据库的架构和数据与另一个环境(QA)中的数据库同步。
The core use case presented in this article covers the basics of the continuous integration (CI) and that means to build a new database whenever a new change is detected on the source control repository, run specified unit tests against the database, and synchronize tested database to QA environment.
本文介绍的核心用例涵盖了持续集成(CI)的基础,这意味着每当在源代码控制存储库中检测到新更改时就建立一个新数据库,对数据库运行指定的单元测试,并同步经过测试的数据库进入质量检查环境。
This allows continuous integration of SQL database changes with the CI server using the specified mechanism (runners or plug-ins) in each step, that are configurable and can be set according to the user needs, to run in a specified order.
这允许在每个步骤中使用指定的机制(运行程序或插件)将SQL数据库更改与CI服务器进行持续集成,这些机制是可配置的,并且可以根据用户需要进行设置,以指定顺序运行。
翻译自: https://www.sqlshack.com/sql-database-continuous-integration-with-team-city/


 1493
1493

 被折叠的 条评论
为什么被折叠?
被折叠的 条评论
为什么被折叠?
 到【灌水乐园】发言


