


ssis 数据转换
This article explores an SSIS Pivot transformation and SSIS Unpivot transformation for creating Pivot and Unpivot data tables.
本文探讨了用于创建数据透视表和数据透视表的SSIS数据透视转换和SSIS数据透视转换。
介绍 (Introduction)
Pivot tables are an accessible and useful feature for data analytics purposes in Microsoft Excel. It is a reporting tool in the Excel sheets to calculate, analyze and summarize data. You also get data comparisons, trends of source data.
数据透视表是Microsoft Excel中用于数据分析目的的可访问且有用的功能。 它是Excel工作表中的报告工具,用于计算,分析和汇总数据。 您还将获得数据比较,源数据趋势。
In the following image, we can see Pivot and Unpivot data conversions:
在下图中,我们可以看到数据透视图和取消数据透视图转换:
- Pivot – It converts individual row data into separate column data 数据透视 -将单个行数据转换为单独的列数据
- Unpivot – It performs reverse data conversion of Pivot data. We get the actual data after Unpivot Unpivot –执行Pivot数据的反向数据转换。 取消透视后,我们将获得实际数据
SQL Server provides SQL PIVOT and SQL UNPIVOT functions in T-SQL. You can read more about these functions in Static and Dynamic SQL Pivot and Unpivot relational operator overview.
SQL Server在T-SQL中提供SQL PIVOT和SQL UNPIVOT函数。 您可以在《 静态和动态SQL Pivot和Unpivot关系运算符概述》中阅读有关这些功能的更多信息。
As explained in previous SSIS articles on SQLShack, SSIS is a friendly component that you can use in performing complex transformations with few steps. It does not require extensive programming knowledge. In this article, we will learn Pivot and Unpivot transformations using the SSIS package.
如先前有关SQLShack的SSIS文章中所述,SSIS是一个友好的组件,您只需执行几步即可执行复杂的转换。 它不需要广泛的编程知识。 在本文中,我们将学习使用SSIS包进行的数据透视和反透视转换。
SSIS数据透视转换的先决条件 (Pre-requisite for SSIS Pivot Transformation)
示例数据库– AdventureWorks (Sample Database – AdventureWorks)
For this article, I am using following AdventureWorks sample database.
对于本文,我正在使用以下AdventureWorks示例数据库。
SELECT PROD.Name,
       YEAR(OrdHead.OrderDate) AS OrderYear,
       SUM(Details.OrderQty) AS OrderQuantity
FROM Sales.SalesOrderDetail AS Details
     INNER JOIN Production.Product AS PROD ON Details.ProductID = PROD.ProductID
     INNER JOIN Sales.SalesOrderHeader AS OrdHead ON Details.SalesOrderID = OrdHead.SalesOrderID
GROUP BY PROD.ProductID,
         PROD.Name,
         YEAR(OrdHead.OrderDate)
ORDER BY PROD.Name,
         YEAR(OrdHead.OrderDate);
Visual Studio 2019 (Visual Studio 2019)
In this article, I am using SQL Server Data Tools in Visual Studio 2019. It is a new version of Visual Studio and undergone many changes. You can refer to Microsoft docs for changes in SSDT and downloading the installer.
在本文中,我正在Visual Studio 2019中使用SQL Server数据工具。它是Visual Studio的新版本,并进行了许多更改。 您可以参考Microsoft文档以获取SSDT中的更改并下载安装程序。
用于Integration Service项目的Visual Studio 2019配置 (Visual Studio 2019 configuration for Integration Service projects)

Let’s have a quick summary of creating an SSIS package in Visual Studio 2019. Click on Continue without code:
让我们快速总结一下如何在Visual Studio 2019中创建SSIS包。单击继续,无需代码 :
It launches the Microsoft Visual Studio. Click on Extensions followed by Manage Extensions:
它启动Microsoft Visual Studio。 单击扩展,然后单击管理扩展 :
Search for Integration Services, and it shows available extensions:
搜索Integration Services,它显示可用的扩展:
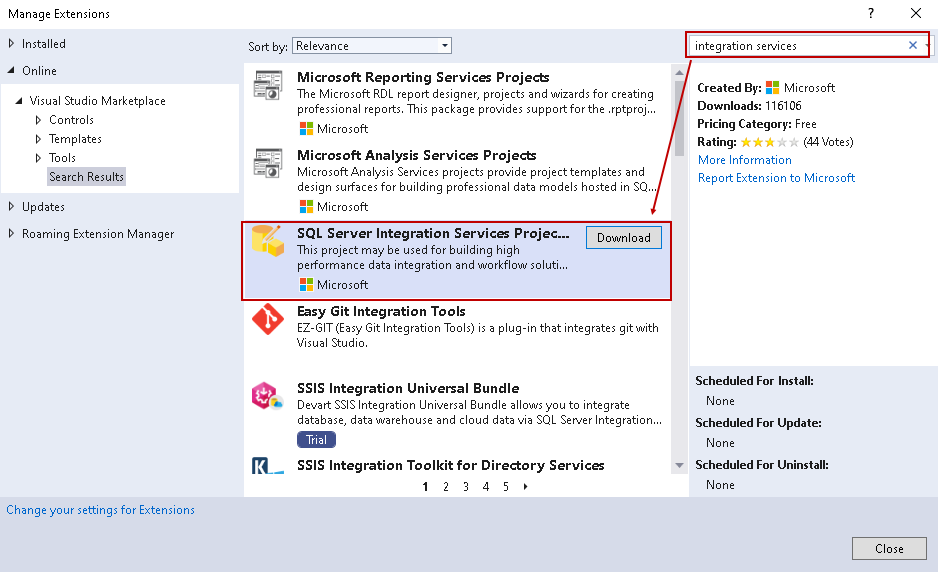
Click on Download in front of SQL Server Integration Services Projects. It starts downloading required packages in the default web browser:
单击“ SQL Server Integration Services项目”前面的“ 下载” 。 它开始在默认的Web浏览器中下载所需的软件包:
Run the executable installer and it starts the configuration of SSDT for Visual Studio. Select the language of the installer:
运行可执行安装程序,它将启动用于Visual Studio的SSDT的配置。 选择安装程序的语言:
Click OK and select the Visual Studio version. If you have multiple versions of Visual Studio installed, select the appropriate version:
单击确定,然后选择Visual Studio版本。 如果安装了多个版本的Visual Studio,请选择适当的版本:
Click on Install, and it completes the SQL Server Integration Service projects within a few minutes depending on machine specs. A system restart is required after a successful installation.
单击Install ,它会在几分钟之内完成SQL Server Integration Service项目,具体取决于计算机规格。 成功安装后,需要重新启动系统。
配置SSIS包以进行SSIS数据透视转换 (Configure an SSIS package for SSIS Pivot Transformation)
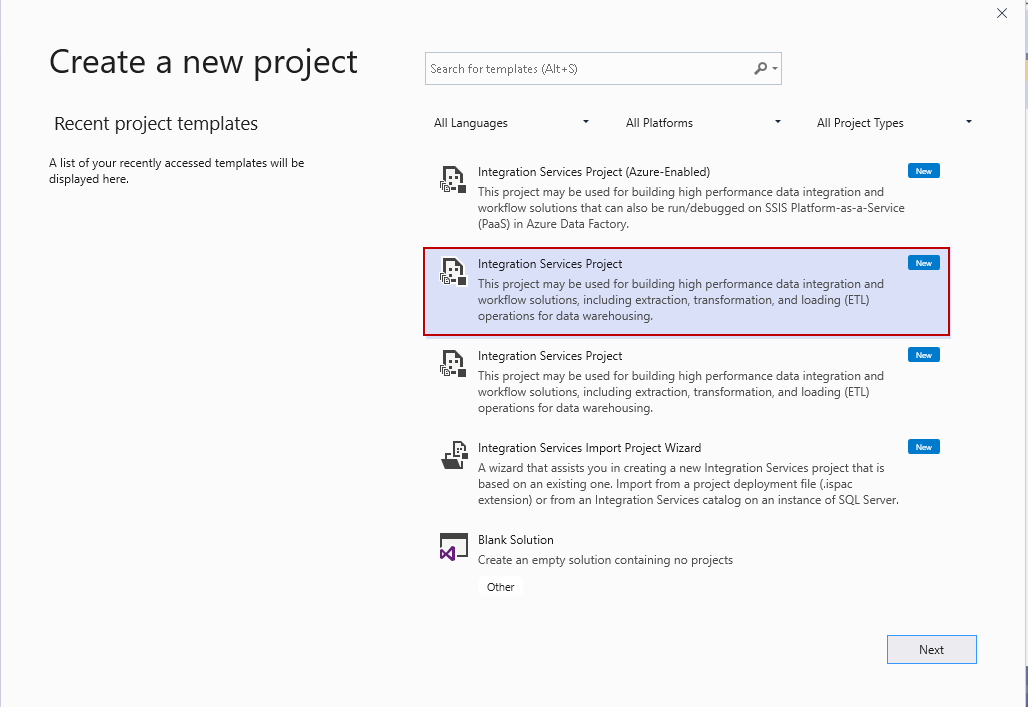
Launch Visual Studio 2019 and click on File > New > Project on the menu bar or by clicking the New Project button on the toolbar. It opens project templates. Click on Integration Service Project:
启动Visual Studio 2019,然后在菜单栏上单击文件 > 新建 > 项目 ,或者单击工具栏上的新建项目按钮。 它打开项目模板。 单击集成服务项目 :
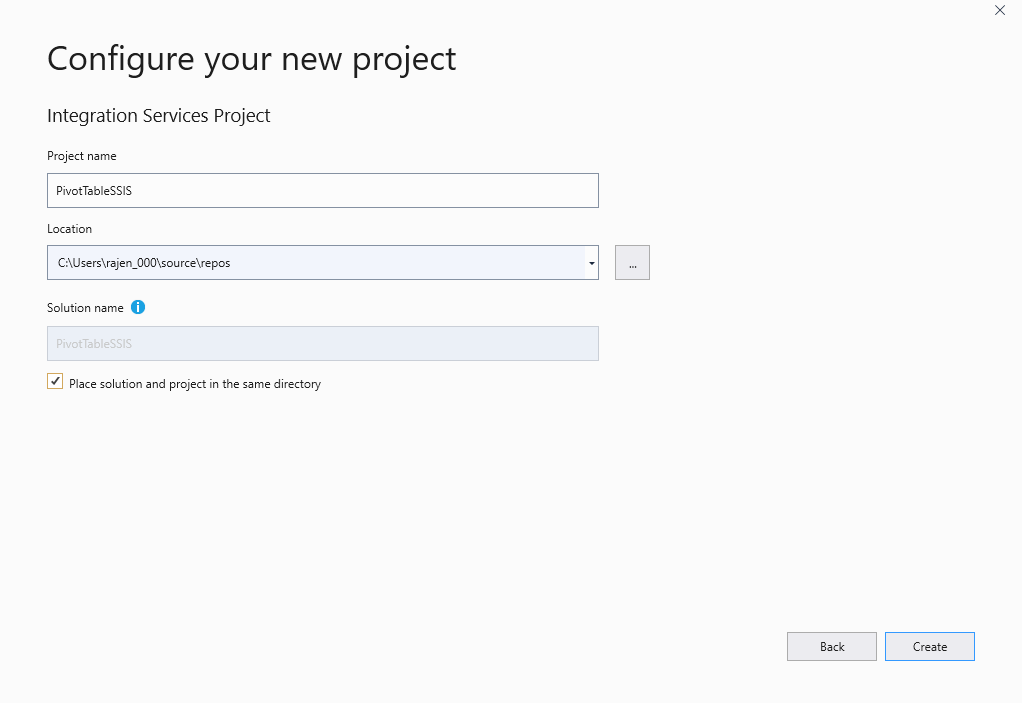
Specify the project name and storage location. Click on checkbox Place solution and project in the same directory and Create:
指定项目名称和存储位置。 单击复选框, 将解决方案和项目放在同一目录中并创建 :
It creates the project solution for SSIS Pivot Transformation and launches the default page of Visual Studio 2019:
它为SSIS数据透视转换创建项目解决方案,并启动Visual Studio 2019的默认页面:
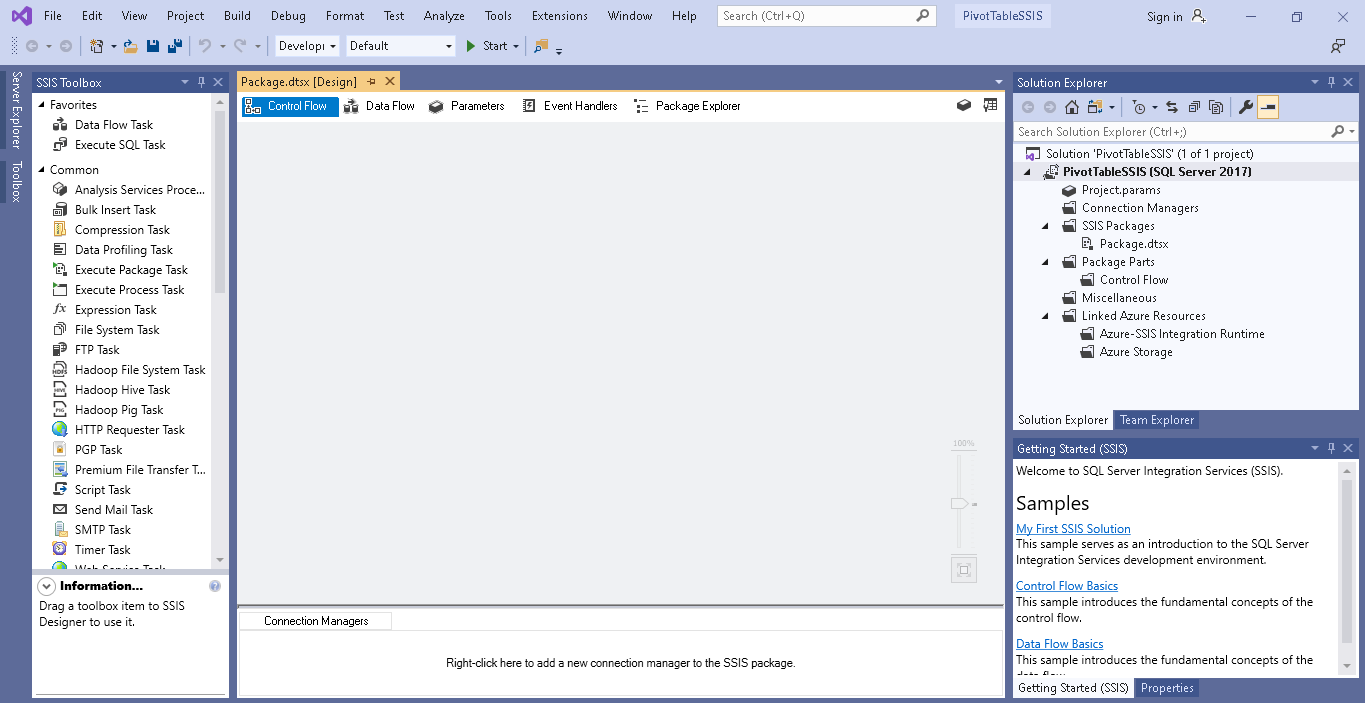
Drag and drop Data Flow Task from SSIS toolbox, as shown below:
从SSIS工具箱中拖放数据流任务 ,如下所示:
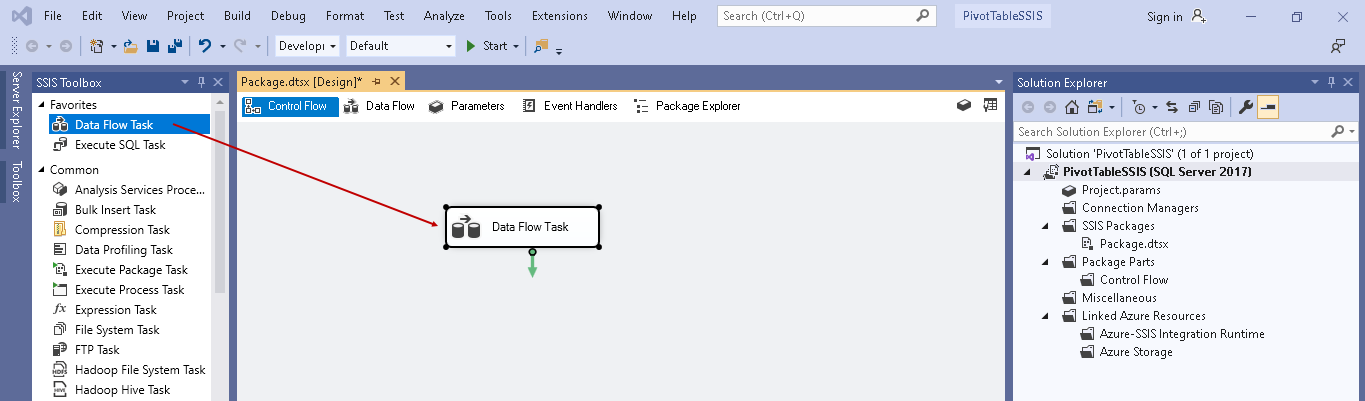
Right-click on Data Flow Task and rename it to PIVOT Transformations:
右键单击“ 数据流任务”,然后将其重命名为PIVOT Transformations:
Double-click on it, and it opens the data flow tab.
双击它,它会打开“数据流”选项卡。
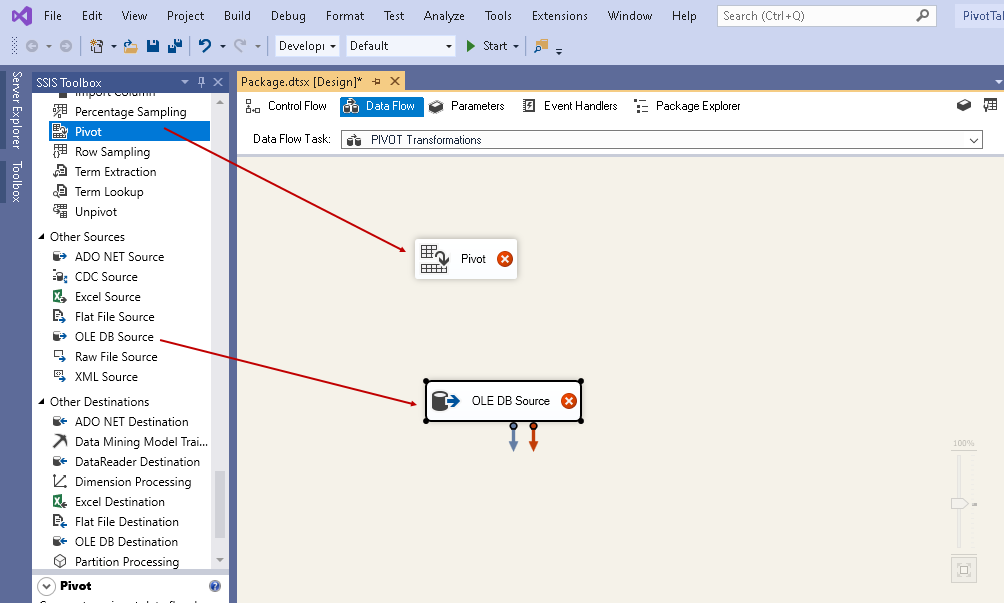
Drag and drop the following components from SSIS toolbox in the data flow area:
将以下组件从SSIS工具箱拖放到数据流区域中:
- OLE DB Source OLE DB源
- Pivot Transformation 枢轴转换
Double-click on OLE DB Source and in the editor window, do following configurations:
双击OLE DB Source,然后在编辑器窗口中进行以下配置:
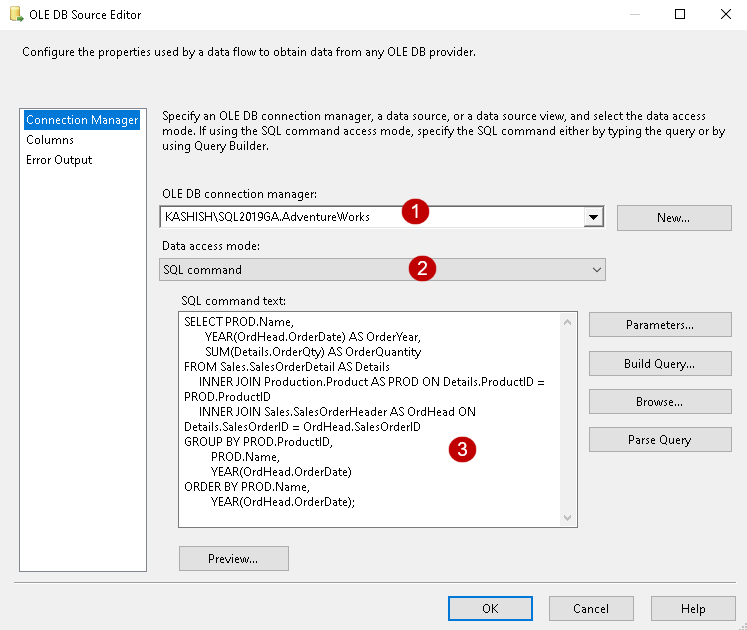
- OLE DB connection managers: Specify a new connection or select from existing connection to SQL instance OLE DB连接管理器 :指定新连接或从现有连接中选择SQL实例
- Data access mode: Select the data access mode as SQL command as we will use the select statement specified previously 数据访问模式 :选择数据访问模式作为SQL命令,因为我们将使用前面指定的select语句
- SQL command text: Specify the select statement for retrieving the records. We will use the output from this query in Pivot operation SQL命令文本 :指定用于检索记录的select语句。 我们将在Pivot操作中使用此查询的输出
Now, drag the arrow from the OLE DB Source to the SSIS Pivot Transformation:
现在,将箭头从OLE DB源拖动到SSIS数据透视转换 :
Double-click on Pivot and it opens the edit the pivot transformation editor:
双击“ Pivot” ,它将打开编辑“ Pivot转换”编辑器:
Note: You might get a slightly different pivot transformation in a different version of SSIS. I always prefer to use the latest version
注意 :在其他版本的SSIS中,您可能会得到略有不同的数据透视转换。 我总是喜欢使用最新版本
- Set key: In this section, we specify the column for left column values. Use [Name] column in the sort key from our sample data 设置键 :在本节中,我们为左列值指定列。 使用示例数据中排序键中的[名称]列
- Pivot key: It specifies the column that we use for the header row in the Pivot table. We use [OrderYear] column in the Pivotkey 数据透视键 :它指定我们用于数据透视表中标题行的列。 我们使用数据透视键中的[OrderYear]列
- Pivot Value : It specifies the column for table values apart from the header and left the column. Use [OrderQuantity] column in the Pivot value 数据点值 :它指定表值的列(标题除外),并离开列。 在数据透视值中使用[OrderQuantity]列
- Ignore un-matched Pivot Key values and report them after DataFlow execution: We can use this option for ignoring un-matched pivot key values. It reports all such pivot key values in the logs 忽略不匹配的数据透视键值,并在执行DataFlow之后报告它们 :我们可以使用此选项来忽略不匹配的数据透视键值。 它在日志中报告所有此类枢轴键值
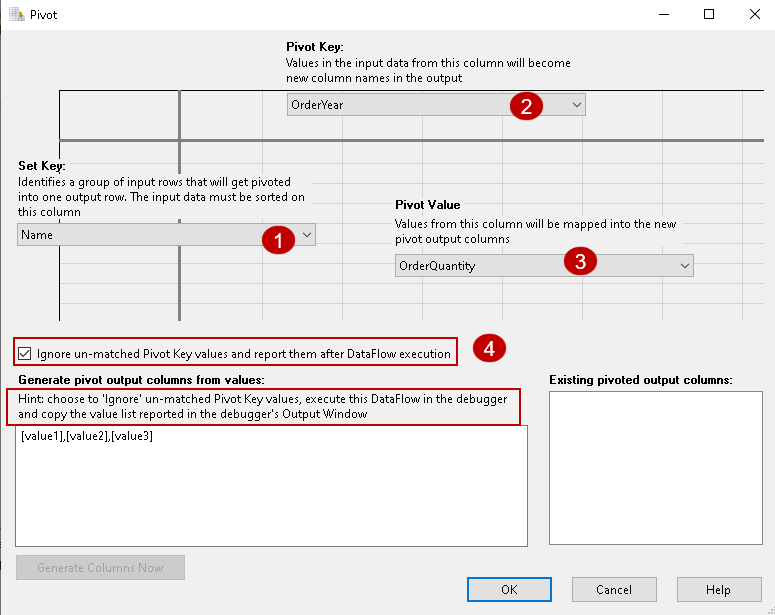
As highlighted in the above screenshot, it provides a hint to execute the data flow in the debugger and copy the values in this window.
如以上屏幕快照中突出显示的那样,它提供了在调试器中执行数据流并在此窗口中复制值的提示。
Click OK and add an SSIS multicast operator. We can add an OLE DB destination as well, but for this demonstration, we will add a multicast operator and view the Pivot data:
单击确定,然后添加一个SSIS多播操作符。 我们也可以添加OLE DB目标,但是在本演示中,我们将添加多播运算符并查看Pivot数据:
Right-click on the connector between Pivot and Multicast operator. Click on Enable Data Viewer so that we can view the Pivot data:
右键单击“ 数据透视”和“ 多播”运算符之间的连接器。 单击启用数据查看器,以便我们可以查看数据透视表数据:
Execute the SSIS Pivot Transformation package. In the progress bar, you can see Pivot values [2005],[2006],[2007],[2008] as shown below:
执行SSIS数据透视转换包。 在进度栏中,您可以看到数据透视值[2005],[2006],[2007],[2008],如下所示:
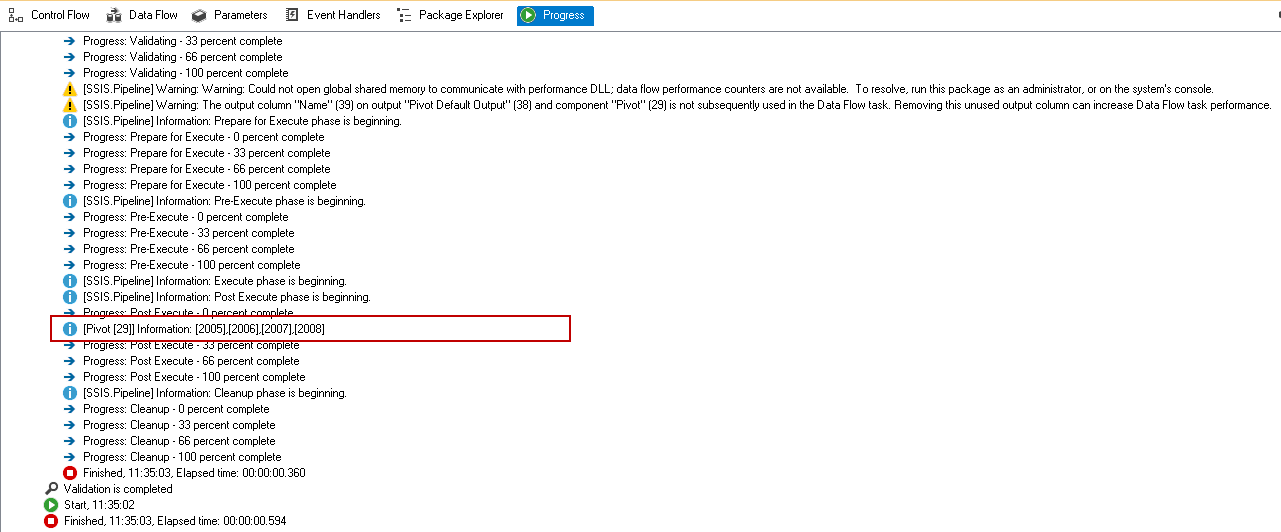
Right-click on this line and copy message:
右键单击此行并复制消息:
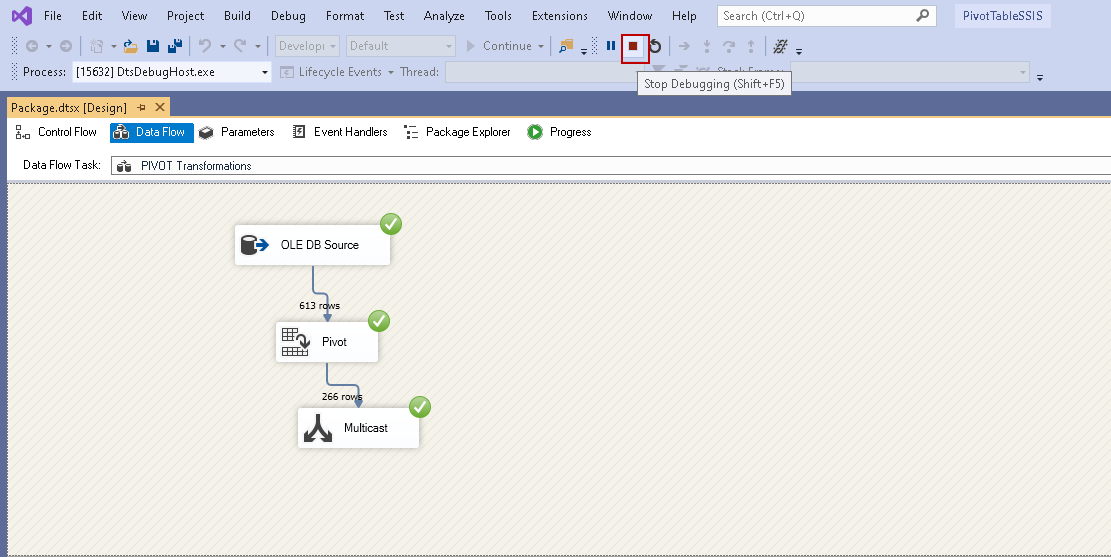
Stop package debugging (Shift+F5):
停止软件包调试(Shift + F5):
Paste the message values in the highlighted section. We can also type in this box, but if we have a large number of values, it is a good idea to copy them from the progress bar. It saves manual efforts and time as well:
将消息值粘贴到突出显示的部分中。 我们也可以在此框中键入内容,但是如果我们有大量的值,则最好从进度栏中复制它们。 它还节省了人工和时间:
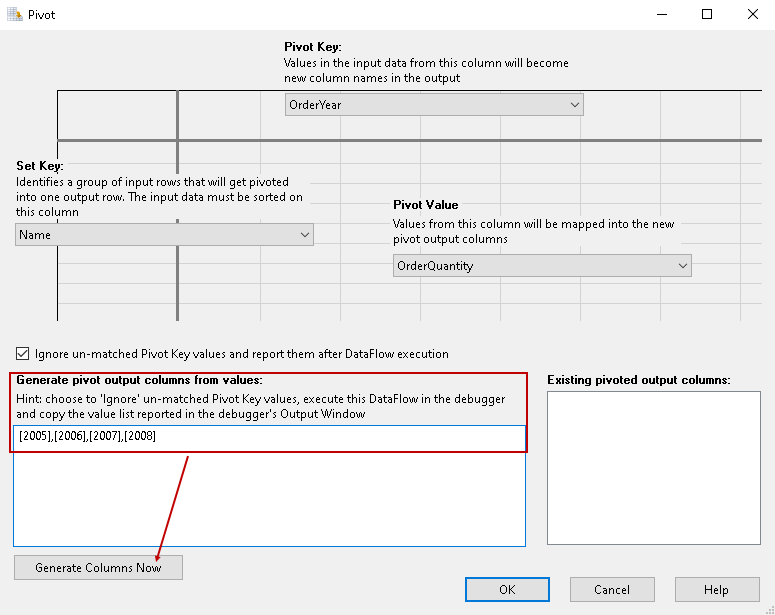
Click on Generate Columns Now, and it gives following message about the output column results:
单击立即生成列 ,它给出有关输出列结果的以下消息:
Click OK, and you can see these columns in the existing pivoted output columns as shown below:
点击OK ,您可以在现有的透视输出列中看到这些列,如下所示:
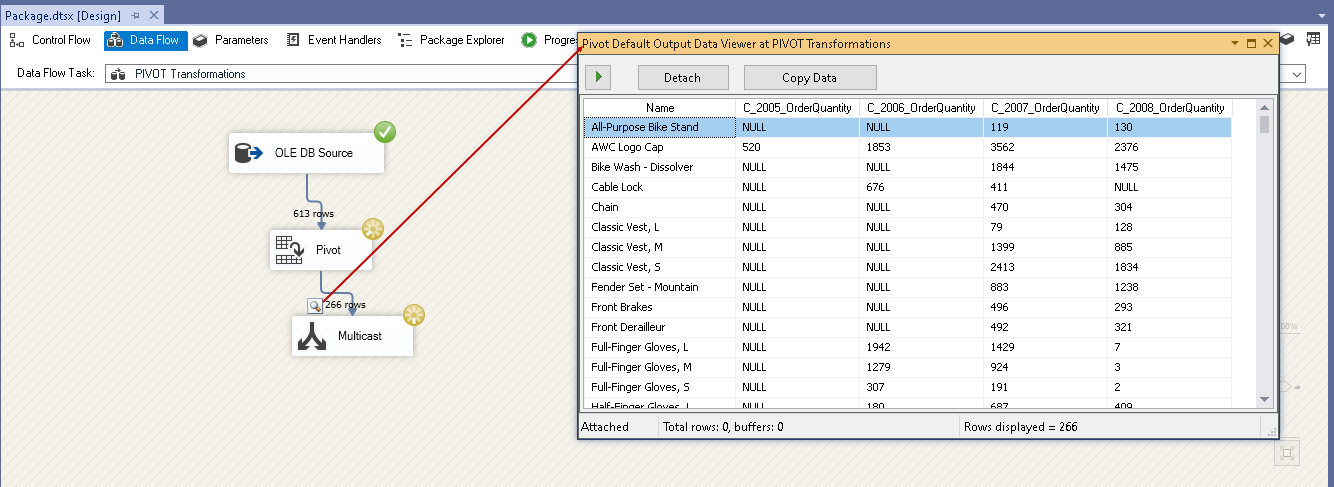
Execute the package, and you can see Pivot data from the data viewer window:
执行该程序包,您可以从数据查看器窗口中查看数据透视表:
In the next section, we will use SSIS Unpivot transformation as well. Let’s use an OLE DB destination and add the Pivot data in a SQL table.
在下一节中,我们还将使用SSIS Unpivot转换。 让我们使用OLE DB目标并将数据透视表数据添加到SQL表中。
Drag OLE DB Destination from SSIS toolbox:
从SSIS工具箱中拖动OLE DB目标 :
In the destination, specify the table name for Pivot data along with SQL instance connection:
在目标中,指定数据透视表数据的表名以及SQL实例连接:
Click on Mappings and verify mapping between source and destination columns:
单击映射,然后验证源列和目标列之间的映射:
Click OK and execute the package. Verify the Pivot data in the SQL table:
单击“ 确定”并执行程序包。 验证SQL表中的数据透视表数据:
SELECT [Name],
       [C_2005_OrderQuantity],
       [C_2006_OrderQuantity],
       [C_2007_OrderQuantity],
       [C_2008_OrderQuantity]
FROM [AdventureWorks].[dbo].[PivotData];
SSIS透视转换 (SSIS Unpivot Transformation)
Sometimes we get Pivot data, and we require to get the original data. We require performing reverse Pivot transformation. We also call it an Unpivot transformation.
有时我们会获得数据透视数据,而我们需要获取原始数据。 我们需要执行反向数据透视转换。 我们也称其为Unpivot转换。
In the new SSIS package, drag OLE DB Source and Unpivot transformation.
在新的SSIS程序包中,拖动OLE DB Source和Unpivot转换。
Configure the OLE DB source for the SQL table in which we inserted Pivot data in the above section:
在上一节中为我们在其中插入数据透视表数据SQL表配置OLE DB源:
Double-click on Unpivot and configure it:
双击Unpivot并进行配置:
Available Input columns: In this column, we select the columns to Unpivot. You can also notice a column Pass-Through. Click on Pass-Through for remaining columns. If we do not click on the checkbox for Pass-through, that column will not be available in the destination.
可用的输入列:在此列中,我们选择要取消透视的列。 您还会注意到“通过”列。 单击直通以获得剩余的列。 如果我们不单击“传递”复选框,则该列在目标位置将不可用。
In this example, we select the C_2005_OrderQuantity, C_2006_OrderQuantity, C_2007_OrderQuantity, C_2008_OrderQuantity as available input columns, and Name as a pass-through column
在此示例中,我们选择C_2005_OrderQuantity,C_2006_OrderQuantity,C_2007_OrderQuantity,C_2008_OrderQuantity作为可用输入列,并选择Name作为传递列
- Input Column: Once we select any column in the available input columns, it automatically appears as an input column 输入列:一旦我们在可用输入列中选择了任何列,它就会自动显示为输入列
- Destination Column: Specify the destination column that will store the values 目标列:指定将存储值的目标列
- Pivot Key Value: Here, we specify the Pivot key value. It should be similar to the Pivot key we used in the Pivot transformation. By default, it takes a similar value of input and pivot key columns 数据透视键值:在这里,我们指定数据透视键值。 它应该类似于我们在数据透视转换中使用的数据透视键。 默认情况下,它采用与输入和数据透视键列相似的值
- Pivot Key-value column name: We can specify the column name for the pivot key as per our requirement
- 数据透视键值列名称:我们可以根据需要指定数据透视键的列名称
In the following screenshot, we can see input and pivot key-value columns:
在以下屏幕截图中,我们可以看到输入和数据透视键值列:
Make the changes as per the following screenshot:
根据以下屏幕截图进行更改:
Pivot key value column name: In our original data, it should appear as the year, therefore, changes it to the respective year. For example, change c_2005_OrderQuantity to 2005.
数据透视键值列名称:在我们的原始数据中,它应显示为年份,因此将其更改为相应的年份。 例如,将c_2005_OrderQuantity更改为2005。
Add an SSIS multicast transformation and enable data viewer between Unpivot and multicast connection. SSIS Upivot transformation SSIS package looks like the following screenshot:
添加SSIS多播转换,并在Unpivot和多播连接之间启用数据查看器。 SSIS Upivot转换SSIS包如下图所示:
Execute the SSIS package and verify the data. We can see the original data (Unpivot) in the data viewer:
执行SSIS包并验证数据。 我们可以在数据查看器中看到原始数据(Unpivot):
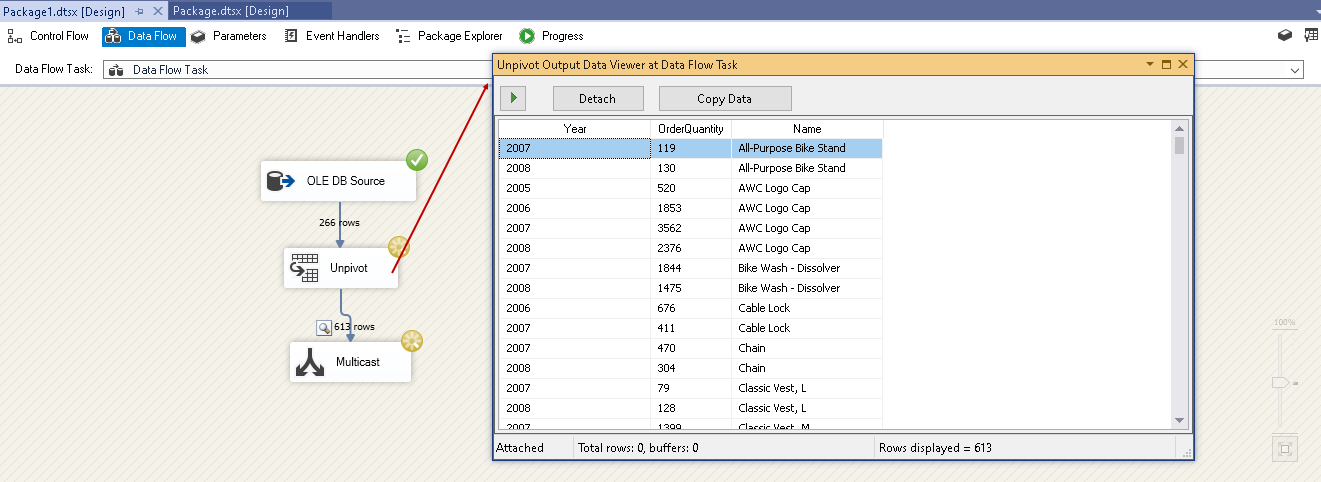
You can notice the Unpivot converts 266 rows to 613 rows. It is opposite to the pivot transformation in which we saw 613 rows conversion into 266 rows.
您会注意到Unpivot将266行转换为613行。 它与透视转换相反,在透视转换中,我们看到613行转换为266行。
结论 (Conclusion)
In this article, we explored SSIS Pivot transformation and SSIS Unpivot transformations for preparing Pivot and Unpivot data. We can easily use these transformations without any complex T-SQL knowledge.
在本文中,我们探讨了用于准备数据透视和数据透视的SSIS数据透视转换和SSIS数据透视转换。 我们无需任何复杂的T-SQL知识即可轻松使用这些转换。
翻译自: https://www.sqlshack.com/an-overview-of-ssis-pivot-and-ssis-unpivot-transformation/
ssis 数据转换


 578
578

 被折叠的 条评论
为什么被折叠?
被折叠的 条评论
为什么被折叠?
 到【灌水乐园】发言


