


 本文介绍了如何使用Mac的Automator工具为Finder创建自定义上下文菜单项,以实现例如解压RAR文件等功能。通过选择服务类型,设置运行Shell脚本的动作,并编写简单的Shell脚本来处理文件,用户可以方便地为Finder添加实用的操作选项。在完成创建后,可以通过右键点击文件,在服务菜单中找到并使用这个新功能。

As much as I like exercising my command line skills, for many tasks I'd rather click a time or two. The problem is that yarn install, brew install, and other package managers don't come with UI extending capabilities...so knowledgable people like us need to find a way to shoehorn those functionality into a UI. That UI on Mac is Automator; let's explore how we can add custom context menu items within macOS Finder!
尽管我喜欢锻炼命令行技能,但对于许多任务,我宁愿单击一两个时间。 问题是yarn install , brew install和其他程序包管理器没有UI扩展功能...因此,像我们这样的知识渊博的人需要找到一种将这些功能塞入UI的方法。 Mac上的UI是Automator; 让我们探讨如何在macOS Finder中添加自定义上下文菜单项!
使用Automator创建上下文菜单项 (Creating a Context Menu Item with Automator)
The example we'll use is creating a context menu to unrar rar archives. The following steps will have you on your way to adding a context menu within macOS Finder:
我们将使用的示例是创建一个上下文菜单来解压缩rar档案。 以下步骤将带您在macOS Finder中添加上下文菜单的方式:
Open Applications -> Automator
打开应用程序->自动化器
File -> New in the menu bar
菜单栏中的文件->新建
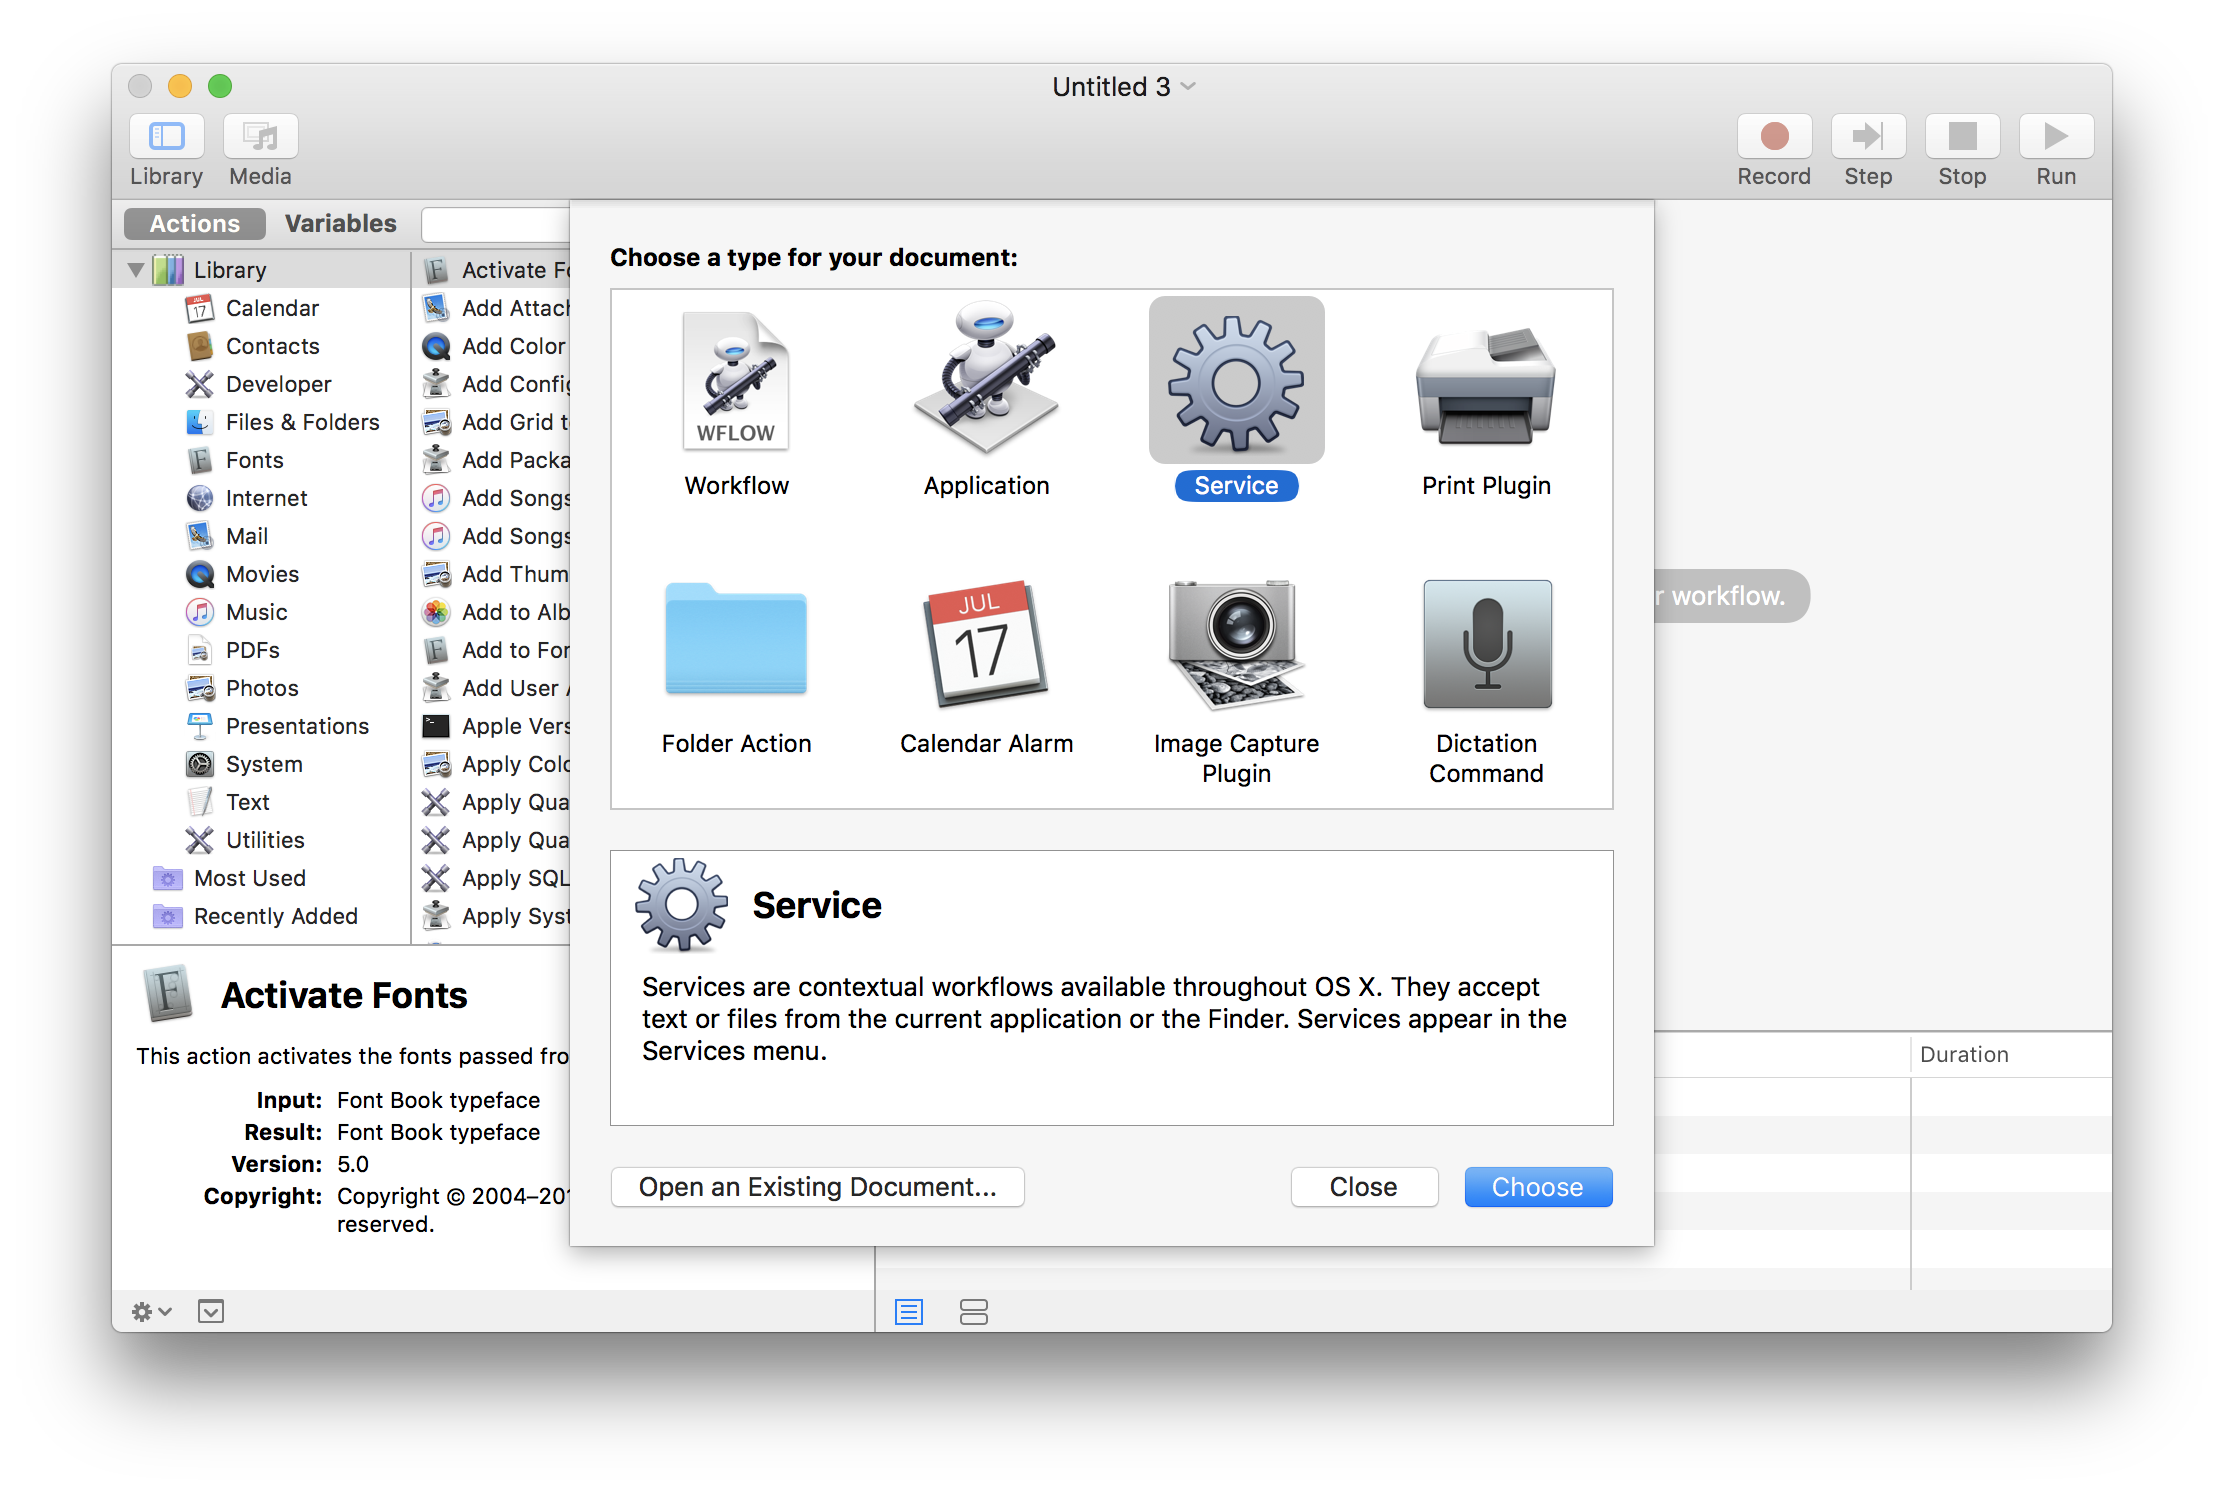
Chose a document type of Service
选择服务的文件类型
Within the right pane's top panel, choose files or folders from the first dropdown and then Finder.app from the second dropdown.
在右窗格的顶部面板中,从第一个下拉列表中选择文件或文件夹 ,然后从第二个下拉列表中选择Finder.app 。
Within the left actions pane, select Run Shell Script
在左侧操作窗格中,选择“运行Shell脚本”
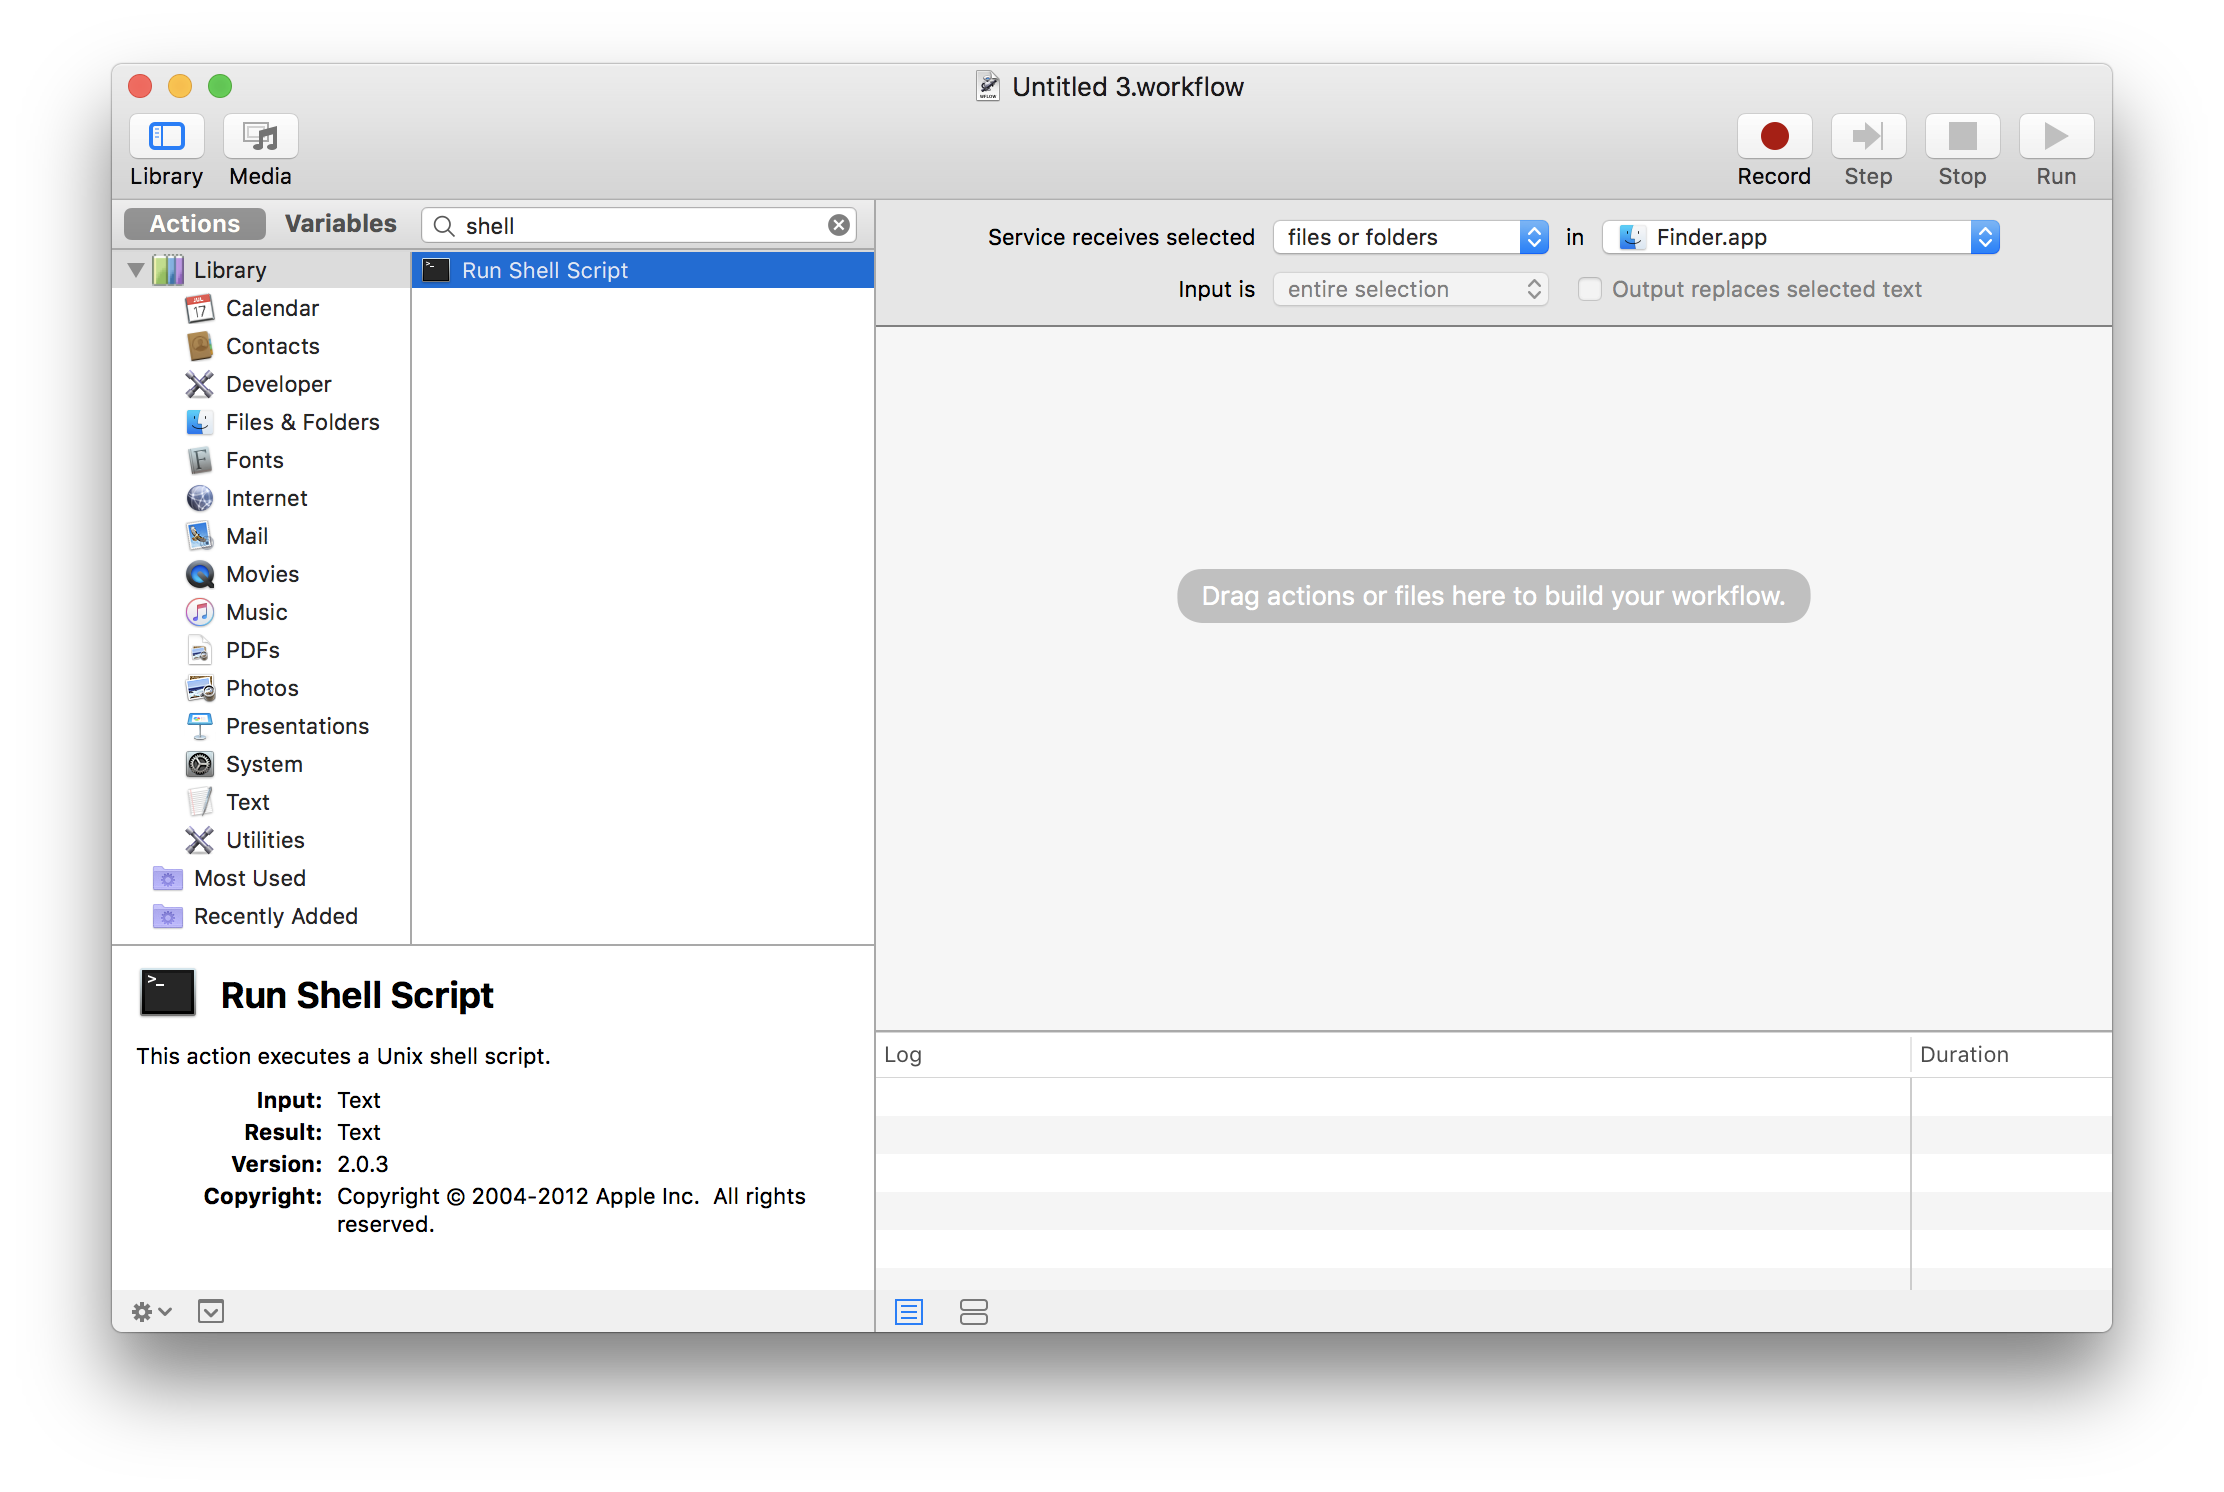
When the Run Shell Script box appears in the right pane, change the Pass input value to to arguments.
当“ 运行Shell脚本”框出现在右窗格中时,将“ 传递”输入值更改为arguments 。
Now you can write whatever shell scripting you'd like, receiving the file arguments as
$@. My script to unrar'ing files is overly simple:现在,您可以编写所需的任何Shell脚本,将文件参数作为
$@接收。 我的解压缩文件脚本非常简单:# Enter the first file's directory current_path=$(dirname "$1") cd "$current_path" # For every file, unrar it to the current directory for f in "$@" do /usr/local/bin/unrar x "$f" done # Exit 0 so annoying errors don't popup exit 0You can add additional checks to ensure the file is of the correct extension and other validation using a bit more scripting. 您可以使用更多脚本来添加其他检查,以确保文件具有正确的扩展名和其他验证。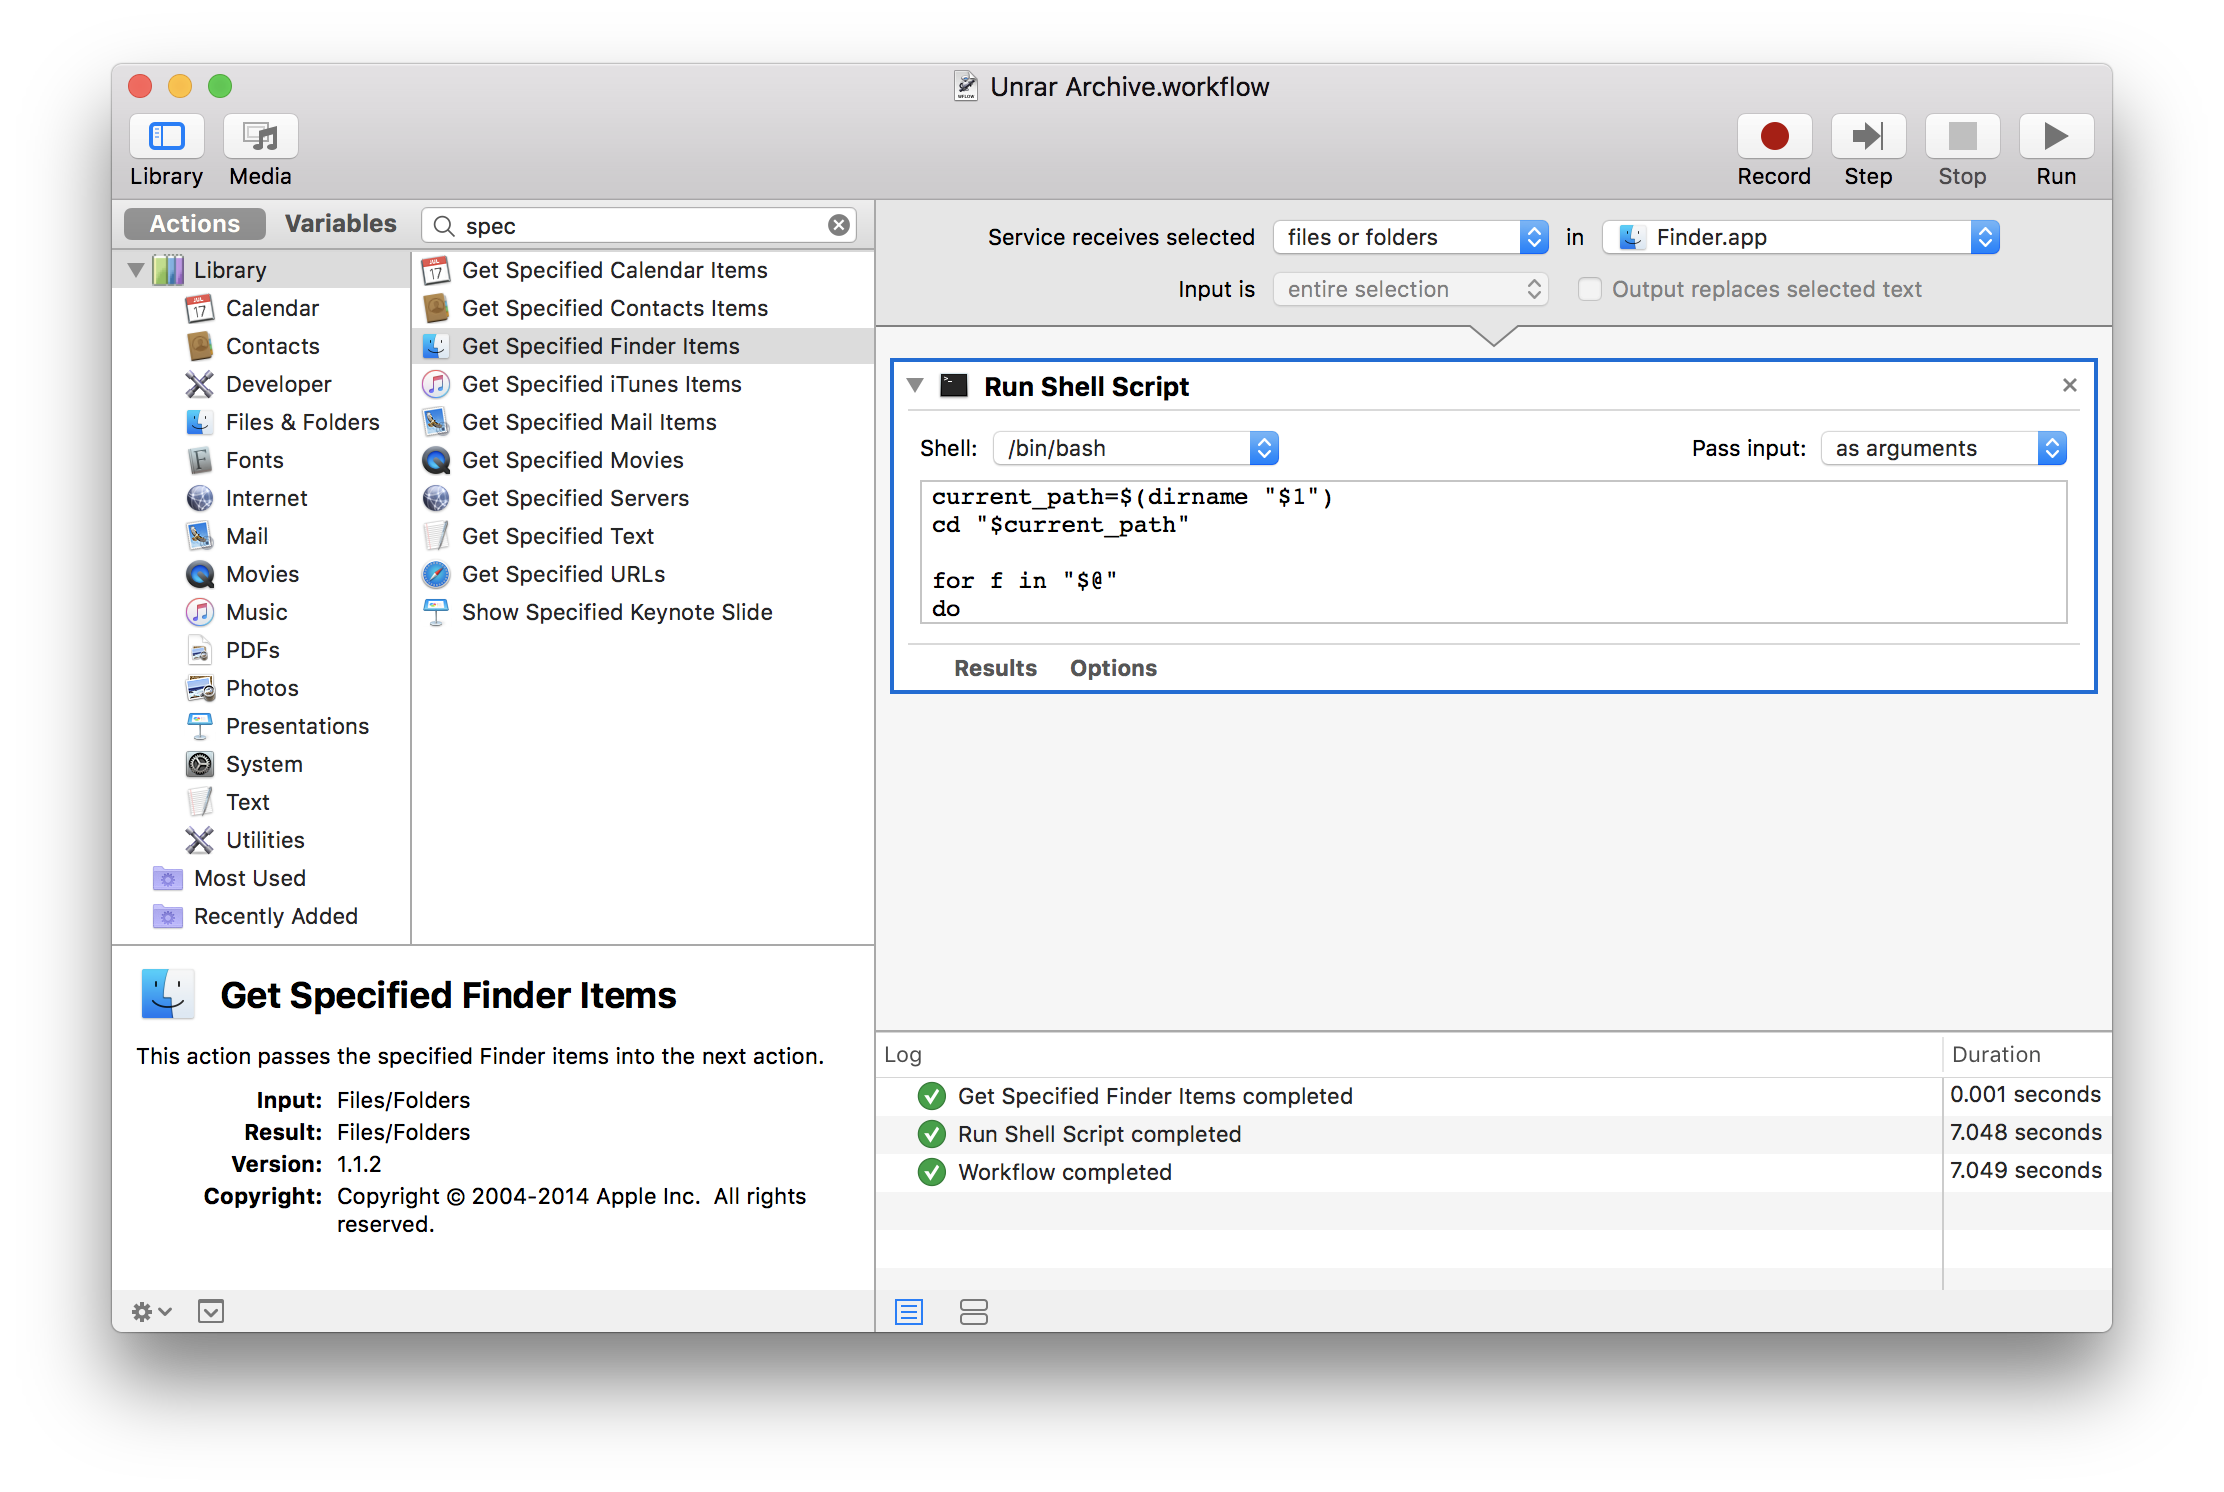
File -> Save in the menu bar to save the Automator task. The name you save the task as is what will display as the context menu name.
菜单栏中的文件->保存以保存Automator任务。 将任务另存为的名称将显示为上下文菜单名称。
调试和测试上下文菜单项 (Debugging and Testing the Context Menu Item)
The best method for testing and debugging an Automator task is by adding additional actions to the task to simulate real usage. In our case, adding a Get Specified Finder Items action allows us to choose a valid file and test the outcome of the action:
测试和调试Automator任务的最佳方法是在任务中添加其他操作以模拟实际使用情况。 在本例中,添加“ 获取指定的查找器项目”操作使我们能够选择有效文件并测试该操作的结果:
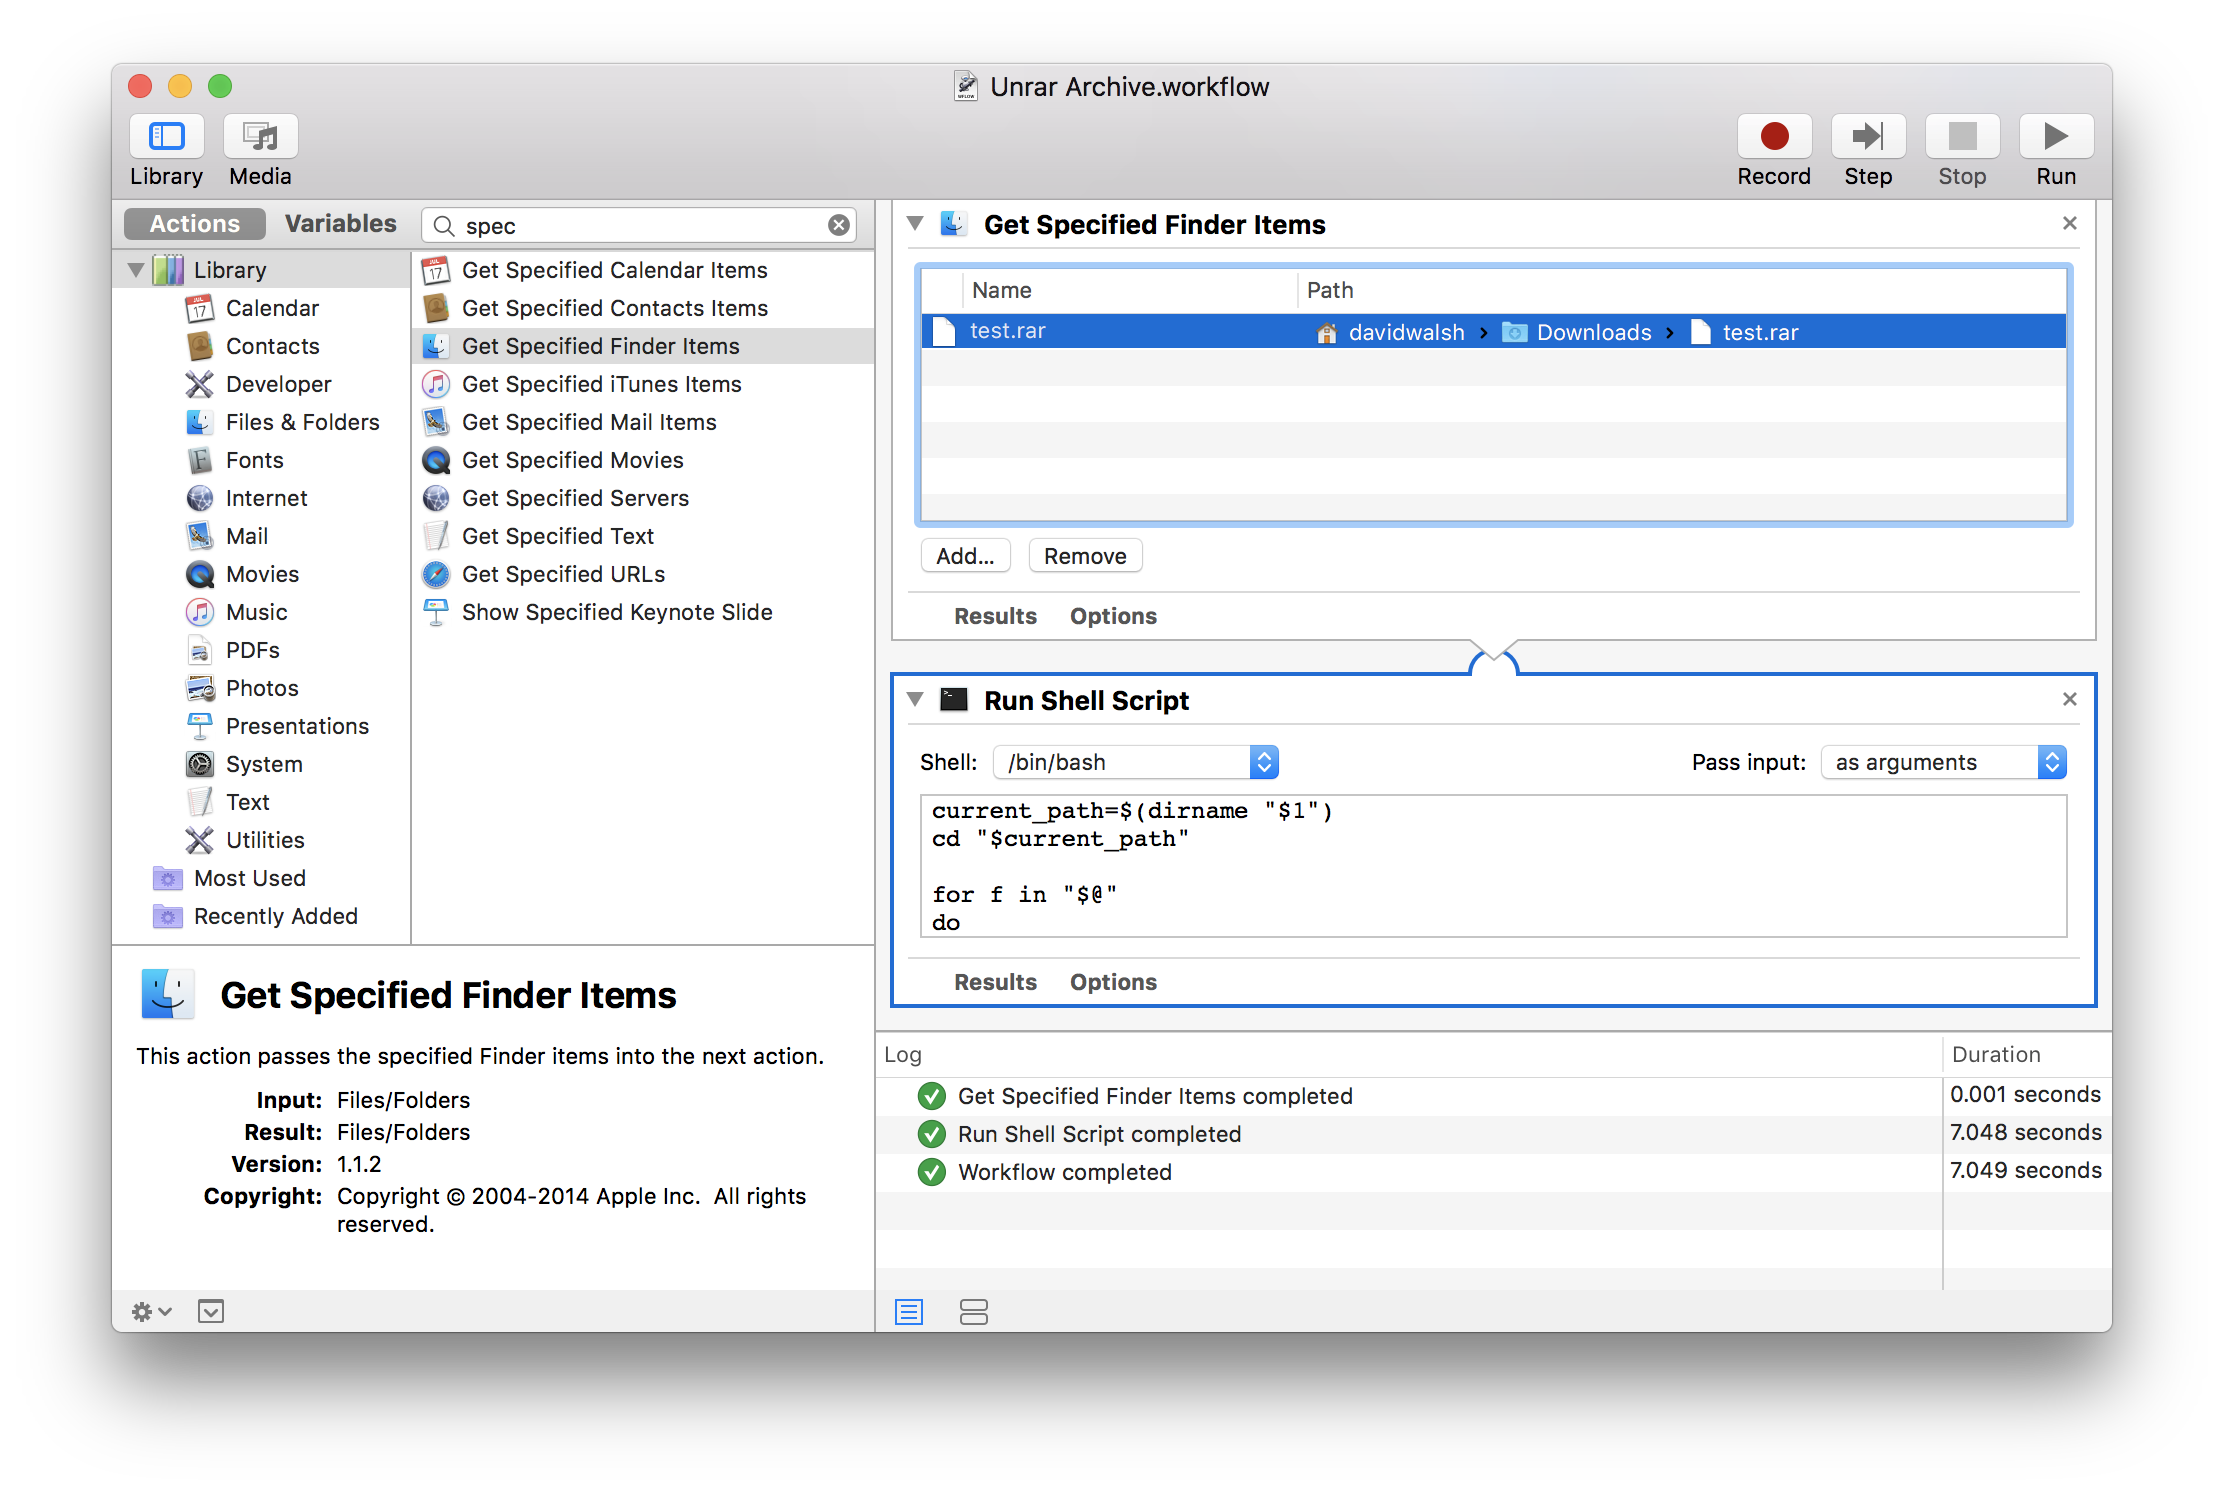
Automator provides error and success messages in when running tasks, a luxury that using the context menu may not provide you. When you're satisfied that your Automator task is working properly, delete any temporary debugging actions you created.
Automator在运行任务时会提供错误和成功消息,这是使用上下文菜单可能无法为您提供的一种奢侈。 当您对Automator任务正常工作感到满意时,请删除您创建的所有临时调试操作。
使用上下文菜单项 (Using the Context Menu Item)
Right-click any files or folders in Finder (in our case, just .rar files) and choose Services -> (Your Task Name Here):
右键单击Finder中的任何文件或文件夹(在本例中为.rar文件),然后选择“ 服务”->(“此处为您的任务名称” ):
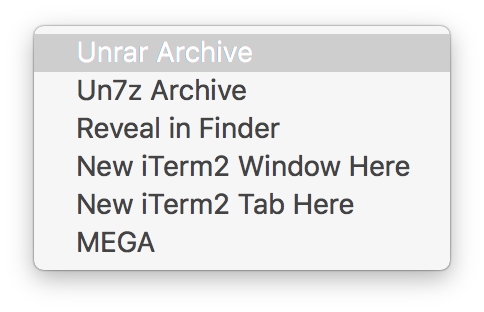
Your task will execute in the background.
您的任务将在后台执行。
While I pride myself on improving my command line skills, I wish I had researched Automator task creation years ago. Downloading a file to finder and then jumping over to command line is sometimes inconvenient -- sometimes it's just nice to perform a few clicks instead of remembering commands and argument formats.
虽然我以提高命令行技能为荣,但我希望几年前研究过Automator任务创建。 将文件下载到查找程序,然后跳转到命令行有时会很不方便-有时单击几次而不是记住命令和参数格式会很好。


 342
342

 被折叠的 条评论
为什么被折叠?
被折叠的 条评论
为什么被折叠?
 到【灌水乐园】发言


