


When writing JavaScript, I spend a lot of time fixing basic mistakes. I often rename a variable and test my app, and then find I didn’t rename the variable in one spot. I rename functions, same thing. I type things wrong, and again waste time clicking around in the browser.
在编写JavaScript时,我花费了大量时间来解决基本错误。 我经常重命名变量并测试我的应用程序,然后发现我没有一次重命名该变量。 我重命名功能,同样的事情。 我输入错误的内容,再次浪费时间在浏览器中单击。
The feeling is always the same – Why did I make this mistake again? I’ve been programming for over 15 years, and I still keep doing this.
感觉总是一样–为什么我又犯了这个错误? 我从事编程已有15年以上,但我仍然坚持这样做。
This is why I love ESLint. It’s like programming together with someone else who pays better attention to this than I do. “Hey, you forgot to rename that”. “Hey, you shouldn’t do that”.
这就是为什么我喜欢ESLint。 就像和其他比我更关注此问题的人一起编程。 “嘿,您忘记了重命名”。 “嘿,你不应该那样做”。
ESLint is a tool that analyses your code and points out any issues it finds. It can find bugs, potential problem areas, poor coding styles and stylistic issues. Best of all it’s highly configurable, so if you don’t agree with it on something, you can tell it to shut up about it.
ESLint是一种工具,可以分析您的代码并指出发现的所有问题。 它可以发现错误,潜在的问题区域,不良的编码样式和风格问题。 最棒的是它是高度可配置的,因此,如果您不同意它,可以告诉它关闭它。
Let me show you a real-life example of how using ESLint will benefit you.
让我向您展示一个使用ESLint如何使您受益的真实示例。
安装和配置 (Install and configuration)
Before going further, we must install ESLint. As with most JS tools today, you need nodejs to do so. Once you have it set up, run…
在继续之前,我们必须安装ESLint。 与当今大多数JS工具一样,您需要nodejs来这样做。 设置完成后,运行…
npm install -g eslint
npm install -g eslint
This will make the program eslint available from command line.
这将使程序eslint提供命令行。
一个真实的例子 (A real-life example)
To explain ESLint’s benefits, I’ll show you a real-life example from a codebase I worked on. We’ll go through the code, and we can look at what ESLint does with it to make our lives easier.
为了解释ESLint的好处,我将向您展示我所研究的代码库中的真实示例。 我们将遍历代码,然后看看ESLint对其进行了哪些处理,以使我们的生活更轻松。
The example JavaScript file is shown below. Don’t worry about the use of AngularJS in it – you will be able to use these techniques with any library or framework.
示例JavaScript文件如下所示。 不用担心在其中使用AngularJS –您将能够在任何库或框架中使用这些技术。
var module = angular.module('uploader', []);
/**
 * XMLHttpRequest wrapper that supports file upload progress since $http doesn't
 *
 * Usage similar to $http, returns a promise from the send method
 */
module.service('uploader', ['$q', function($q) {
  function readyStateChange(deferred, xhr) {
    if(xhr.readyState == 4) {
      if(xhr.status == 200) {
        deferred.resolve(JSON.parse(xhr.responseText));
      }
      else {
        deferred.reject('HTTP status ' + xhr.status);
      }
    }
  }

  function onProgress(deferred, xhr, ev) {
    if(ev.lengthComputable) {
      deferred.notify({ loaded: ev.loaded, total: ev.total });
    }
  }

  return {
    send: function(url, data) {
      var fd = new FormData();
      for(var k in data) {
        fd.append(k, data[k]);
      }

      var d = $q.defer();

      var xhr = new XMLHttpRequest();

      xhr.open('POST', url, true);
      xhr.onreadystatechange = readyStateChange.bind({}, d, xhr);
      xhr.upload.onprogress = onProgress.bind({}, d, xhr);
      xhr.send(fd);

      return d.promise;
    }
  };
}]);
This is a basic component for uploading files. The code is functional, but let’s see what happens when we let ESLint have a go at it.
这是上传文件的基本组件。 该代码具有功能,但是让我们看看让ESLint尝试一下会发生什么。
A typical starting point with ESLint is to first analyse your code with it and look at the output. Below is the ESLint output for the example module.
使用ESLint的典型起点是首先使用它分析您的代码并查看输出。 以下是示例模块的ESLint输出。
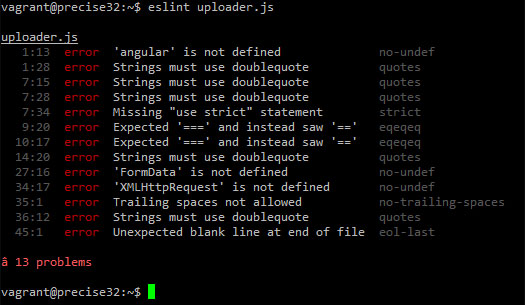
At this point, the output contains errors that shouldn’t be there, such as Angular is not defined, and XMLHttpRequest is not defined.
此时,输出包含不应出现的错误,例如未定义Angular和未定义XMLHttpRequest。
Why is ESLint complaining about XMLHttpRequest? Surely it should not do that, because XMLHttpRequest is standard. Well, XMLHttpRequest is only standard in the browser. Other environments, such as NodeJS, might not have it. Therefore the first step is to tell ESLint our code is going to run in the browser.
为什么ESLint抱怨XMLHttpRequest? 当然,它不应该这样做,因为XMLHttpRequest是标准的。 好吧,XMLHttpRequest仅是浏览器中的标准。 其他环境(例如NodeJS)可能没有它。 因此,第一步是告诉ESLint我们的代码将在浏览器中运行。
To do that, we’ll create a configuration file called .eslintrc, which we can use to tell ESLint what to do. Below you’ll see our first version of the .eslintrc file.
为此,我们将创建一个名为.eslintrc的配置文件,该文件可用于告诉ESLint该做什么。 在下面,您将看到我们的.eslintrc文件的第一个版本。
{
  "env": {
    "browser": 1
  }
}
ESLint can be configured using JSON. Here, we are telling it that the environment is browser. The browser environment stops ESLint from giving errors about things like XMLHttpRequest or window. If you wanted to run this in NodeJS, you would include "node": 1 in addition, which does the same except for Node-builtins.
可以使用JSON配置ESLint。 在这里,我们告诉它环境是浏览器。 browser环境阻止ESLint提供有关XMLHttpRequest或window类的错误。 如果要在NodeJS中运行此程序,则还应包括"node": 1 ,除了Node-builtins以外,它的功能相同。
Let’s re-run eslint and find out what it says now.
让我们重新运行eslint ,看看它现在说什么。
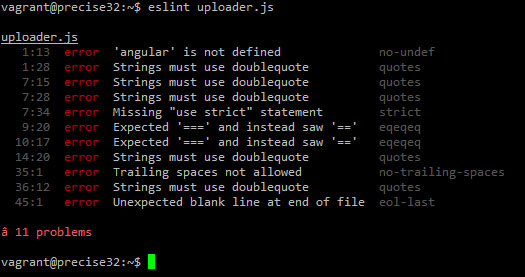
The errors about the browser environment are gone, but there’s another that we don’t want: ‘angular’ is not defined . In a typical application, we would include libraries like Angular as script tags, which makes it available globally. To tell ESLint about this, we need some additional options in configuration file:
有关浏览器环境的错误已消失,但是我们不希望出现其他错误: 未定义“角度” 。 在典型的应用程序中,我们会将像Angular这样的库包含为脚本标签,从而使其在全球范围内可用。 为了告诉ESLint,我们在配置文件中需要一些其他选项:
{
  "env": {
    "browser": 1
  },

  "globals": {
    "angular": 1
  }
}
The globals field configures global variables. In this case, we define angular, but if you’re using jQuery or Backbone or Underscore or anything else, you can add $ or Backbone or _ in the same way.
globals字段配置全局变量。 在这种情况下,我们定义angular ,但是如果您使用的是jQuery或Backbone或Underscore或其他任何内容,则可以用相同的方式添加$或Backbone或_ 。
Re-run eslint, and the error is gone.
重新运行eslint ,错误消失了。
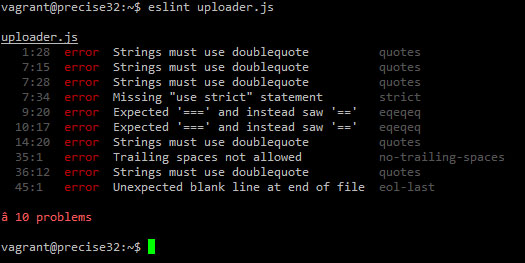
There’s still some things I want to change. I prefer using single-quotes for strings, so I’m going to add a rule to fix that.
还有一些我想改变的事情。 我更喜欢对字符串使用单引号,因此我将添加一条规则来解决该问题。
{
  "env": {
    "browser": 1
  },

  "globals": {
    "angular": 1
  },

  "rules": {
    "quotes": [2, "single"]
  }
}
The rules property configures ESLint’s rules. The quotes rule defines if ESLint gives an error for quote style, and which style is allowed. The number 2 makes it an error. Setting it to 1 would make it a warning, which appears differently in the output. "single" tells ESLint I want to allow single quotes only.
rules属性配置ESLint的规则。 quotes规则定义ESLint是否为引号样式给出错误,以及允许哪种样式。 数字2导致错误。 将其设置为1会发出警告,警告在输出中的显示方式有所不同。 "single"告诉ESLint我只允许单引号。
The codebase for this example doesn’t use strict mode or require triple-equals, so I’ll add those rules in as well.
此示例的代码库不使用严格模式或要求三等号,因此我还将添加这些规则。
In order to know which rule to configure, you can look at the output.
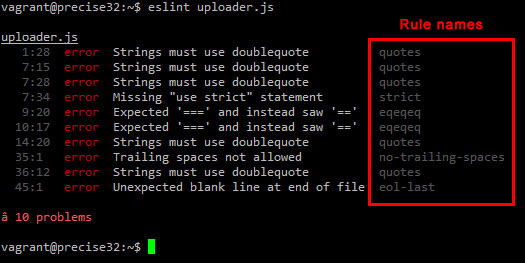
为了知道要配置哪个规则,您可以查看输出。
From this we can see for “use strict” the rule is “strict”, and for === the rule is “eqeqeq”. We can add those two into the configuration:
从中我们可以看到,对于“使用严格”,规则为“严格”,对于=== ,规则为“ eqeqeq”。 我们可以将这两个添加到配置中:
{
  "env": {
    "browser": 1
  },

  "globals": {
    "angular": 1
  },

  "rules": {
    "quotes": [2, "single"],
    "eqeqeq": 0,
    "strict": 0
  }
}
Setting a rule to 0 makes ESLint ignore it.
将规则设置为0会使ESLint忽略它。
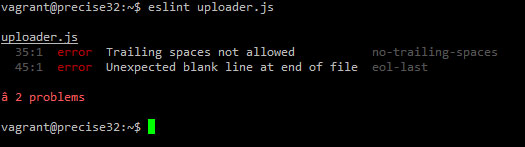
The remaining errors are easy to fix. We’ll remove the trailing spaces from line 35 and remove the blank line from the end of file.
其余错误很容易解决。 我们将从第35行删除尾随空格,并从文件末尾删除空白行。
捕捉错误 (Catching errors)
The example code now passes ESLint without errors. Let’s introduce some changes to make things more interesting.
现在,示例代码顺利通过了ESLint。 让我们介绍一些更改,使事情变得更加有趣。
Remember I said I often rename a variable and then forget to rename it everywhere? Let’s see how ESLint deals with that. I’ll rename xhr into request…
还记得我说过我经常重命名变量,然后忘记在各处重命名吗? 让我们看看ESLint是如何处理的。 我将xhr重命名为request …
var request = new XMLHttpRequest();

request.open('POST', url, true);
request.onreadystatechange = readyStateChange.bind({}, d, xhr);
request.upload.onprogress = onProgress.bind({}, d, xhr);
request.send(fd);
Did you notice a bug at a glance? I left in two cases of xhr. Let’s see what happens when we run ESLint.
您一眼就注意到了一个错误吗? 我在xhr两个案例中离开了。 让我们看看运行ESLint时会发生什么。
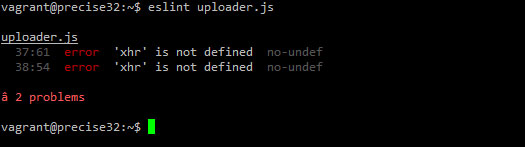
ESLint points out two undefined variables, which in this case are caused by the rename. Now we can now spot this easily without spending time clicking around in the browser.
ESLint指出了两个未定义的变量,在这种情况下,它们是由重命名引起的。 现在,我们现在可以很容易地发现这一点,而无需花费时间在浏览器中四处点击。
We can also throw in a syntax error just for fun:
我们也可以出于娱乐目的而抛出语法错误:
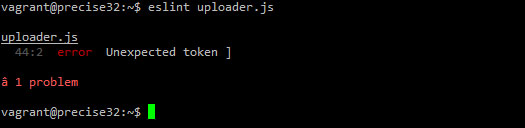
These are just two examples of what ESLint can catch. The list of built-in rules is very long, and you can even write custom rules or install plugins.
这些只是ESLint可以捕获的两个示例。 内置规则列表很长,您甚至可以编写自定义规则或安装插件。
推荐建议 (Recommendations)
ESLint can be a very valuable tool, but like any tool, you need to use it to get the benefits.
ESLint可能是非常有价值的工具,但是像任何其他工具一样,您需要使用它才能获得好处。
My five recommendations for you to get most out of ESLint are:
为您充分利用ESLint的五个建议是:
- Check the documentation for more information 查看文档以获取更多信息
- Run it against your project and configure it to suit your coding style 针对您的项目运行并配置它以适合您的编码风格
- Install additional plugins for the libraries you use to make ESLint even more useful 为使ESLint更加有用的库安装其他插件
- Automate ESLint so you’ll never forget to run it 自动化ESLint,因此您将永远不会忘记运行它
- Get instant feedback by integrating it into your editor or IDE 通过将其集成到编辑器或IDE中获得即时反馈
To make things really easy for you, I’ve created a 5-step guide for these steps. You can get the 5-step guide from my website.
为了让您真正轻松地完成工作,我为这些步骤创建了一个五步指南。 您可以从我的网站上获得5步指南 。
ESLint gives us a basic safety-net. It will catch many easy to make mistakes, and it’s very helpful when working in teams to enforce a coding style. But for a tighter safety-net, you should invest in unit tests. That, however, is a topic for another time.
ESLint为我们提供了基本的安全网。 它会捕获许多容易犯的错误,并且在团队合作中实施编码风格时非常有帮助。 但是,为了获得更紧密的安全网,您应该在单元测试上进行投资。 但是,这是另一个话题。


 1021
1021

 被折叠的 条评论
为什么被折叠?
被折叠的 条评论
为什么被折叠?
 到【灌水乐园】发言


