


mac os x 使用教程

Scanning a document in Mac OS X is extremely simple, but for those who might not be familiar, or are coming from Windows, it’s useful to take a quick tour through how it works.
在Mac OS X中扫描文档非常简单,但是对于那些可能不熟悉或来自Windows的人来说,快速浏览文档的工作方式很有用。
It’s worth noting that a good percentage of the time you can just use your smartphone’s camera and scan it to PDF easily. For most common scanning tasks, that option will work really well, and it’s an especially great option for scanning a picture of a receipt to save into your digital archive.
值得注意的是,大部分时间您可以只使用智能手机的相机并将其轻松扫描为PDF 。 对于大多数常见的扫描任务,该选项将非常有效,对于扫描收据的图片以保存到数字档案中来说,这是一个特别好的选择。
在OS X中进行扫描很容易 (Scanning in OS X is Easy)
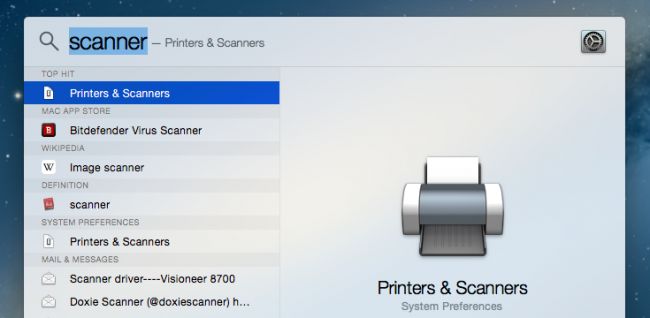
You can open the Printers & Scanners app through System Preferences, but it’s easier to use CMD + SPACE to pull up Spotlight and type in “Scanner” to bring it up.
您可以通过“系统偏好设置”打开“打印机和扫描仪”应用程序,但是使用CMD + SPACE调出Spotlight并键入“ Scanner”来调出它更容易。
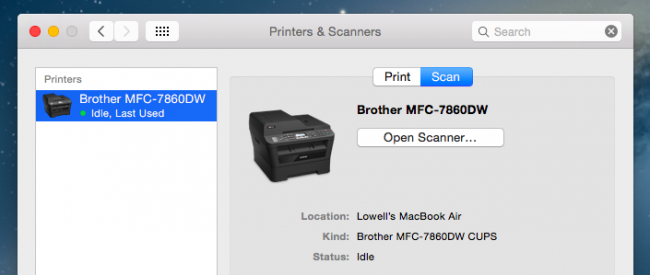
Once you’ve opened the preferences panel, you’ll see your printer, and you’ll want to click on Scan, and then Open Scanner.
打开“首选项”面板后,您将看到您的打印机,并且想要单击“扫描”,然后单击“打开扫描仪”。
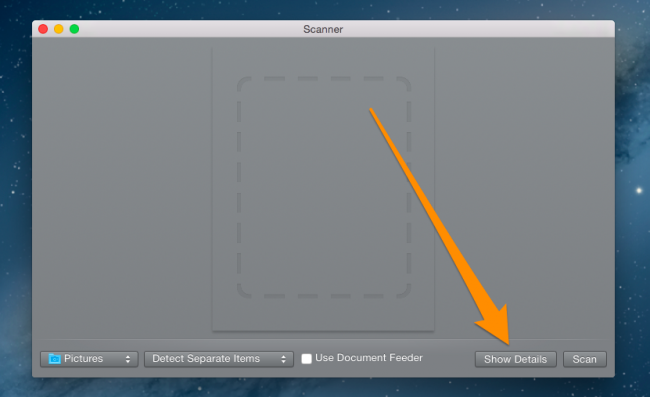
At this point you’ll see the Scanner window, and you can click the Scan button, but we’d recommend using the Show Details option to get into the settings for the scanner. If you have a sheet feeder, you could select that checkbox, and change the drop-down from Pictures to something else before scanning, but it’s easier to just get into the details first.
此时,您将看到“扫描仪”窗口,并且可以单击“扫描”按钮,但是我们建议使用“显示详细信息”选项进入扫描仪的设置。 如果您有供纸器,则可以选择该复选框,然后在扫描前将下拉列表从“图片”更改为其他内容,但是先进入详细信息会更容易。
Once you’ve arrived at the Details screen, your scanner will usually warm up and take a preview scan before you select the options for the actual scan, although this will load from the flatbed.
到达“详细信息”屏幕后,您的扫描仪通常会预热并进行预览扫描,然后再选择实际扫描的选项,尽管这将从平板电脑上加载。
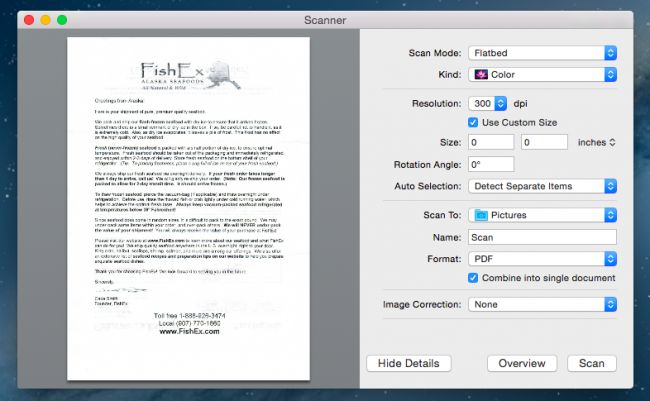
Most of the options make sense and are straight-forward, but we’ll list out the important ones just in case.
大多数选项都很有意义,而且很简单,但是为了以防万一,我们将列出重要的选项。
Scan Mode – If your scanner has a sheet feeder, you can use this to select that instead of the flatbed.
扫描模式–如果您的扫描仪具有进纸器,则可以使用它来选择而不是平板进纸器。
Kind – If you only want black and white you can change to that mode for documents, although the default Color option is probably just fine.
种类–如果只希望使用黑白,则可以将文档更改为该模式,尽管默认的“颜色”选项可能还不错。
Resolution – You can almost always leave this at default for documents, unless you are trying to scan photographs, in which case you would want to use a higher resolution. 300 dpi will be just fine for a document.
分辨率–几乎总是可以将默认设置为文档分辨率,除非您尝试扫描照片,在这种情况下,您希望使用更高的分辨率。 300 dpi对于文档来说就很好了。
Scan To – You can choose a different folder than the default, which is your Pictures folder for some reason, even though the default format is PDF. It would make more sense to have Documents as your default folder, but whatever.
扫描到–由于默认原因,您可以选择一个不同于默认文件夹的文件夹,即“图片”文件夹,即使默认格式为PDF。 将“文档”作为默认文件夹会更有意义,但无论如何。
Name – This is what the file is actually going to be saved as. Change this to something descriptive.
名称–这是文件实际要保存为的名称。 将此更改为描述性内容。
Format – The default is PDF, but you can change it to an image format instead if you are scanning pictures. You can also use the “Combine into single document” checkbox to take everything off the sheet feeder and put it into a single document.
格式–默认为PDF,但是如果要扫描图片,则可以将其更改为图像格式。 您还可以使用“合并到单个文档中”复选框将所有进纸器中的内容取走并放入单个文档中。
Once you’ve selected your options, which mostly consists of selecting between sheet feeder or flatbed, picking the folder, and changing the name of the document, you can simply click Scan to start the scanning process.
选择选项(主要包括在进纸器或平板机之间进行选择,选择文件夹并更改文档名称)后,只需单击“扫描”即可开始扫描过程。
翻译自: https://www.howtogeek.com/206141/how-to-use-a-scanner-on-your-mac-os-x-computer/
mac os x 使用教程


 被折叠的 条评论
为什么被折叠?
被折叠的 条评论
为什么被折叠?
 到【灌水乐园】发言


