


 本文介绍了如何在Windows 7中利用内置功能创建软件RAID(廉价磁盘冗余阵列),包括设置磁盘和创建RAID的具体步骤。虽然RAID-5因许可问题不可用,但可以选择跨区、带区或镜像卷。文章以创建跨区卷为例,强调无论选择哪种方式,重要的是先备份数据,因为RAID阵列没有冗余,需要手动备份。

创建raid磁盘阵列的作用
Instead of having a bunch of separate drives to deal with, why not put them together into one big drive? You can use software RAID to accomplish this, and here’s how to do it.
与其将一堆单独的驱动器进行处理,不如将它们组合成一个大驱动器? 您可以使用软件RAID来完成此操作,这是完成操作的方法。
Windows 8 or 10? Use the new Storage Spaces feature instead.
Windows 8或10? 请改用新的存储空间功能。
Windows has built in functionality to set up a software RAID (Redundant Array of Inexpensive Disks) without any additional tools. This makes it easy to turn your existing spare hard drives into massive storage or even redundant backups. In this example we are going to set up a spanned disk that takes three 2 GB disks and creates one 6 GB disk using Windows 7 Professional.
Windows具有内置功能,无需任何其他工具即可设置软件RAID(廉价磁盘冗余阵列)。 这样就可以轻松地将现有的备用硬盘驱动器转变为大容量存储甚至是冗余备份。 在此示例中,我们将设置一个跨区磁盘,该磁盘占用三个2 GB磁盘,并使用Windows 7 Professional创建一个6 GB磁盘。
Editor’s Note: For the example in the article, we’re showing how to create a spanned drive, which isn’t technically RAID, but it works similarly and creating a RAID array is exactly the same—you can choose your preferred RAID option from the context menu.
编者注:对于本文中的示例,我们将展示如何创建跨接驱动器,该驱动器在技术上不是RAID,但工作原理类似,并且创建RAID阵列也完全相同-您可以从以下选项中选择首选的RAID选项:上下文菜单。
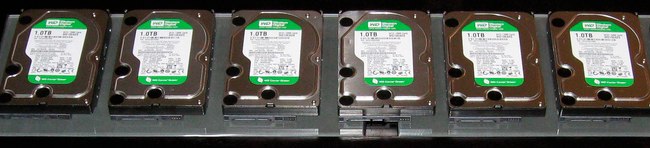
Image by carlosgomez
图片来自carlosgomez
设置磁盘 (Set Up Your Disks)

The first step you need to do is backup your information on the disks you want to use in the RAID. While it is not required that you format your disks for some of the RAID options, don’t take the chance and make a backup.
您需要做的第一步是将信息备份到要在RAID中使用的磁盘上。 虽然不需要为某些RAID选项格式化磁盘,但不要趁机进行备份。
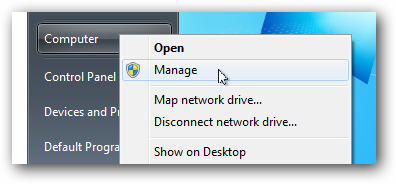
Once all of your information is backed up, open your start menu, right click on computer and open manage.
备份完所有信息后,打开“开始”菜单,右键单击计算机并打开“管理”。
When computer management opens click on disk management on the left side. Any disk you want included in your RAID you need to delete them from the top area of disk management.
打开计算机管理后,单击左侧的磁盘管理。 您要包括在RAID中的任何磁盘都需要从磁盘管理的顶部区域中删除。
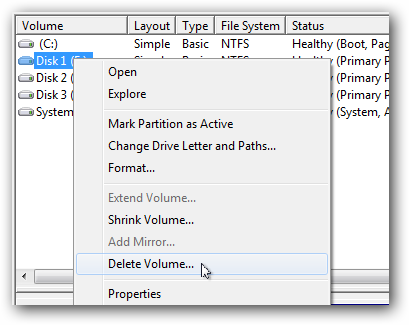
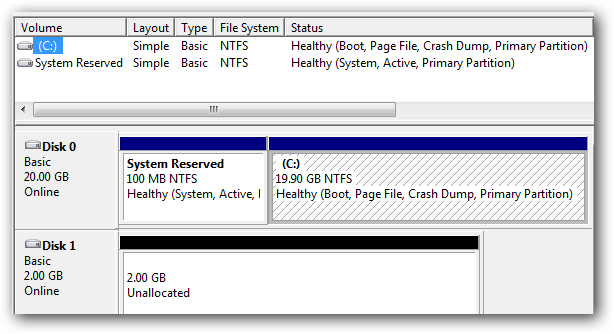
Once they are deleted you should only be left with disks you do not want included in the RAID. The other disks will still be there but they will show up in the lower pane and show their spaces as unallocated.
删除磁盘后,只应保留不希望包含在RAID中的磁盘。 其他磁盘仍将保留在其中,但它们将显示在下部窗格中,并将其空间显示为未分配。
创建您的RAID (Create Your RAID)
In Windows they don’t call their RAID options by the traditional 0, 1, 5, 10 etc. Instead they use spanned, striped, and mirrored as the options for creating software RAIDs.
在Windows中,它们不使用传统的0、1、5、10等来调用RAID选项。相反,它们使用跨区,带区和镜像作为创建软件RAID的选项。
Note: RAID-5, although one of the options, isn’t actually available in Windows 7 due to licensing issues. Thanks to the commenters for pointing that out.
注意:RAID-5尽管是其中一种选择,但由于许可问题,在Windows 7中实际上不可用。 感谢评论者指出这一点。
A spanned volume will create a single partition that will literally span all of the included disks whereas a striped volume will deliberately break up files across multiple disks in an attempt to improve read and write performance. In both cases there is no redundancy so you need to create your own backups.
跨区卷将创建一个单个分区,该分区将实际跨所有包含的磁盘,而带区卷将故意将文件分散到多个磁盘上,以提高读取和写入性能。 两种情况都没有冗余,因此您需要创建自己的备份。
A mirrored volume and RAID 5 both have some redundancy but you lose storage space to create the parity files needed for recovery. For this example we are going to go with the simplest volume type and create a spanned volume even though it isn’t technically RAID.
镜像卷和RAID 5都具有一定的冗余性,但是您会丢失存储空间来创建恢复所需的奇偶校验文件。 对于此示例,即使技术上不是RAID,我们也将使用最简单的卷类型并创建跨接卷。
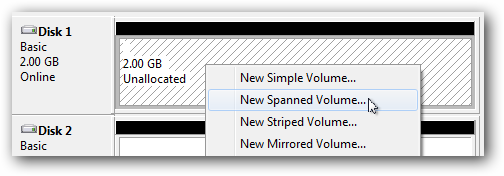
Right click on the first disk you want included in your RAID and select new spanned volume.
右键单击要包含在RAID中的第一个磁盘,然后选择新的跨接卷。
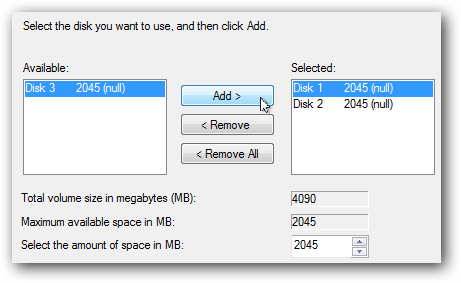
This will open up the New Spanned Volume Wizard in Windows. Click next and then select which disks you want included in your new volume (a.k.a. software RAID).
这将在Windows中打开“新建跨区卷向导”。 单击“下一步”,然后选择要包含在新卷(也称为软件RAID)中的磁盘。
Assign the new volume a mount letter or mount point.
为新卷分配一个挂载号或挂载点。

Name and format the volume and click next.
命名并格式化该卷,然后单击下一步。

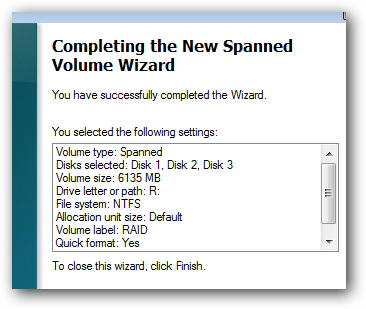
The final step just reviews all of your settings before the disks are formatted and the new volume is mounted.
最后一步只是在格式化磁盘和装入新卷之前检查所有设置。
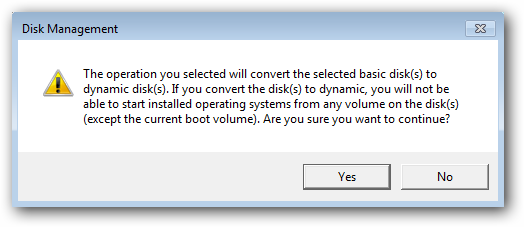
You should also receive a warning letting you know that if your operating system is on one of these volumes you won’t be able to use it because the volume is now a dynamic volume instead of a logical volume.
您还应该收到一条警告,告知您如果操作系统在这些卷之一上,则将无法使用它,因为该卷现在是动态卷而不是逻辑卷。
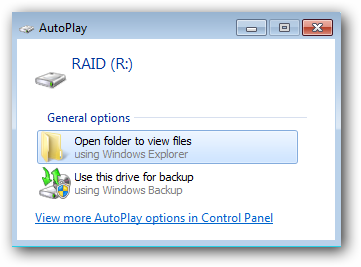
Finally the disks will be formatted and once the drive is mounted you should be welcomed with the familiar AutoPlay prompt.
最后,磁盘将被格式化,一旦安装了驱动器,就会以熟悉的自动播放提示欢迎您。
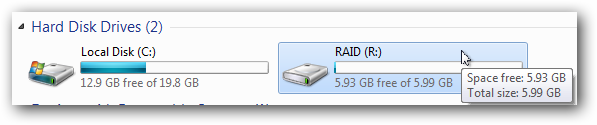
If you browse to Windows explorer you should also see that the new volume has the combined storage space of the three individual disks used to create it.
如果浏览到Windows资源管理器,您还将看到新卷具有用于创建它的三个单独磁盘的组合存储空间。
翻译自: https://www.howtogeek.com/howto/36504/how-to-create-a-software-raid-array-in-windows-7/
创建raid磁盘阵列的作用


 1692
1692

 被折叠的 条评论
为什么被折叠?
被折叠的 条评论
为什么被折叠?
 到【灌水乐园】发言


