
home主文件夹下文件整理
Windows Home Server comes with some shared folders in different categories by default, and chances are you’ll want to create your own as well. Today we show you how to create your own shared folders, manage permissions, enable folder duplication, and more.
Windows Home Server默认情况下在某些类别中带有一些共享文件夹,并且您可能也想创建自己的文件夹。 今天,我们向您展示如何创建自己的共享文件夹,管理权限,启用文件夹复制等。
Note: For this article we’re accessing the Home Server Shared Folders from Windows 7.
注意:对于本文,我们将从Windows 7访问Home Server共享文件夹。
Default Shared Folders
默认共享文件夹
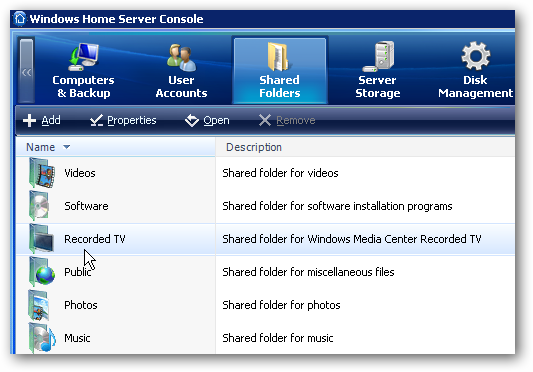
After installing Windows Home Server you’ll notice that the default shared folders are Music, Photos, Public, Recorded TV, Software, and Videos. These folders cannot be deleted, but we can create our own folders if needed. We can also go through and change permissions and view folder histories.
安装Windows Home Server之后,您会注意到默认的共享文件夹是“音乐”,“照片”,“公共”,“录制的电视”,“软件”和“视频”。 这些文件夹无法删除,但是我们可以根据需要创建自己的文件夹。 我们还可以查看和更改权限并查看文件夹历史记录。
Accessing Shared Folders
访问共享文件夹
You can access your shared folders on the server a few different ways. One is to double-click the Shared Folders on Server icon that was created on the Desktop when you installed WHS Console.
您可以通过几种不同的方式访问服务器上的共享文件夹。 一种是双击安装WHS控制台时在桌面上创建的“服务器上的共享文件夹”图标。
![sshot-2010-02-24-[18-39-16] sshot-2010-02-24-[18-39-16]](https://i-blog.csdnimg.cn/blog_migrate/f60b726fcdadcb74ef2dd06282287990.png)
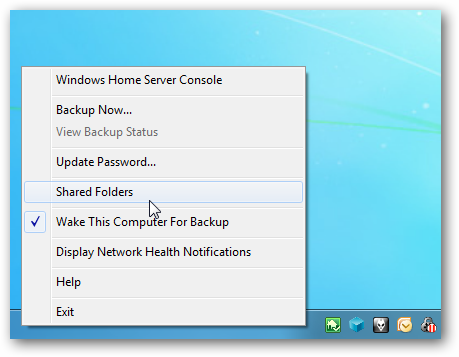
Or right-click on the WHS Console icon in the tray and select Shared Folders.
或右键点击任务栏中的WHS控制台图标,然后选择共享文件夹。
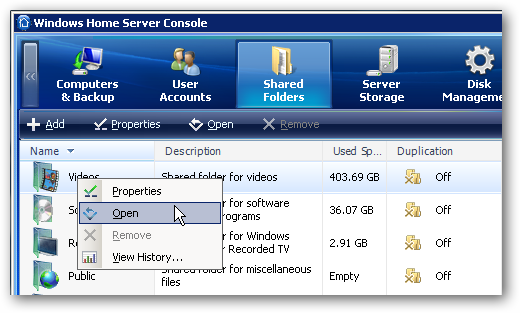
Open WHS Console and under Shared Folders right-click and Open the folder you want.
打开WHS控制台,在“共享文件夹”下,右键单击并打开所需的文件夹。
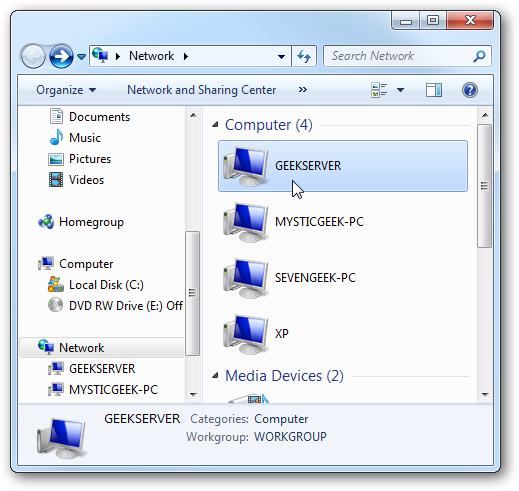
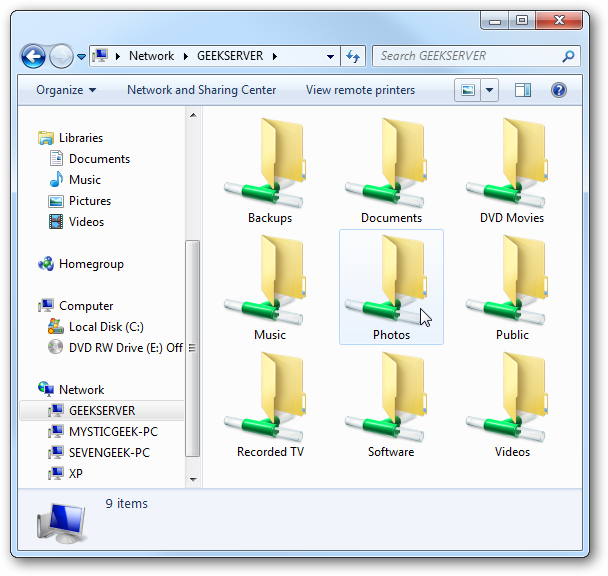
You can also go into Network and double-click on the Home Server icon…
您也可以进入网络并双击“本地服务器”图标...
Which ever method you use, it’ll open the Shared Folders directory and you can begin browsing through your data.
无论使用哪种方法,它都会打开“共享文件夹”目录,您可以开始浏览数据。
Add New Folder
新增资料夹
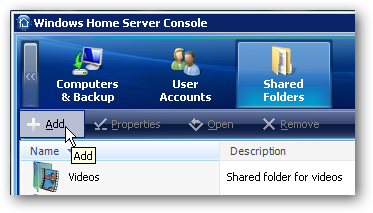
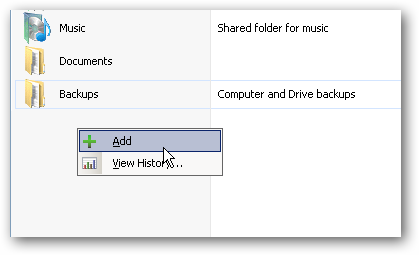
Adding a new folder is pretty straight-forward. Open Windows Home Server Console and under Shared Folders click Add from the toolbar or right-click an empty area in Shared Folders and select Add from the context menu.
添加一个新文件夹非常简单。 打开Windows Home Server控制台,在“共享文件夹”下,从工具栏中单击“添加” ,或右键单击“共享文件夹”中的空白区域,然后从上下文菜单中选择“添加”。
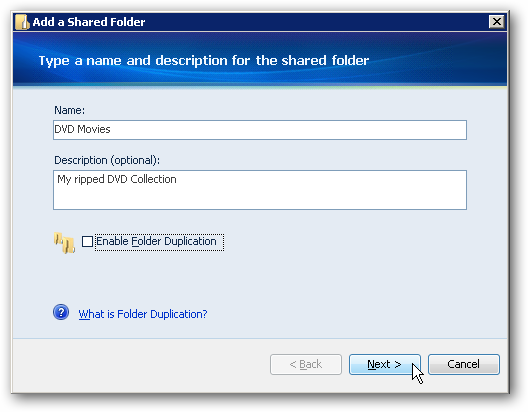
Either way it will pop up the Add a Shared Folder wizard where you type in the name for the folder and give it a description if you want to. You’ll need to decide if you want to enable folder duplication or not. With it enabled, it duplicates the folder and files contained in it across multiple drives on the server. It will take twice as much space on the total storage of your server and can take a while for the process to complete. In this example…these files are going to be large video files, and we don’t need to create a duplicate.
无论哪种方式,它都会弹出“添加共享文件夹”向导,在其中键入文件夹名称,并根据需要提供描述。 您需要确定是否要启用文件夹复制。 启用该功能后,它将跨服务器上的多个驱动器复制其中的文件夹和文件。 这将占用服务器总存储空间的两倍,并且可能需要一段时间才能完成该过程。 在此示例中……这些文件将是大型视频文件,我们不需要创建重复的文件。
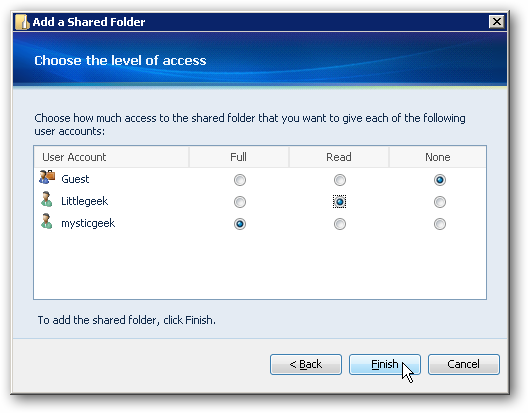
Next we need to select the type of access each user will have for the new folder. The types of access are as follows…
接下来,我们需要选择每个用户对新文件夹的访问类型。 访问类型如下……
Full – The user can view, add,.modify, and delete files in the shared folder.
完整–用户可以查看,添加,。修改和删除共享文件夹中的文件。
Read – The user can view files in the shared folder, but cannot add, modify, or delete files.
读取–用户可以查看共享文件夹中的文件,但不能添加,修改或删除文件。
None – The user can’t view, modify, or delete anything in the shared folder…they have no access.
无–用户无法查看,修改或删除共享文件夹中的任何内容……他们无权访问。
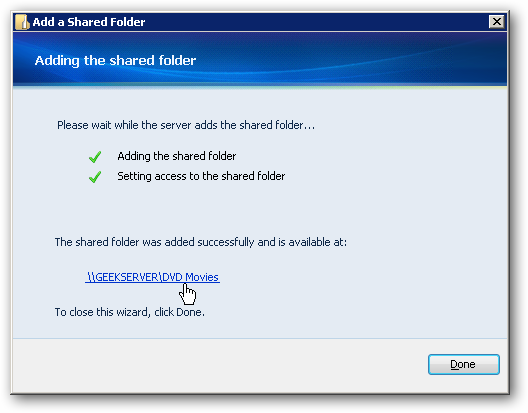
The folder has been successfully created and you can close out of the wizard and start adding files.
该文件夹已成功创建,您可以退出向导并开始添加文件。
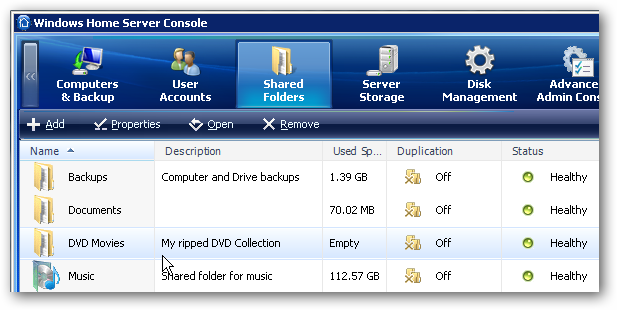
Now in Windows Home Server Console we can see the created folder named DVD Movies. We also see the Description, it’s currently empty, Duplication is off, and a status of Healthy.
现在,在Windows Home Server控制台中,我们可以看到名为DVD Movies的已创建文件夹。 我们还看到“说明”,该说明当前为空,“重复”已关闭,状态为“健康”。
Delete a Shared Folder
删除共享文件夹
If you ever find that you need to delete a shared folder you created, right-click the folder and select Remove from the menu.
如果发现需要删除创建的共享文件夹,请右键单击该文件夹,然后从菜单中选择“删除”。
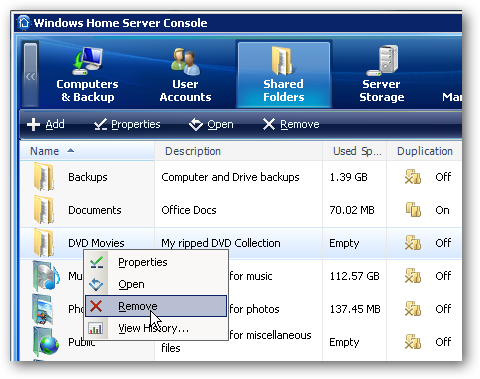
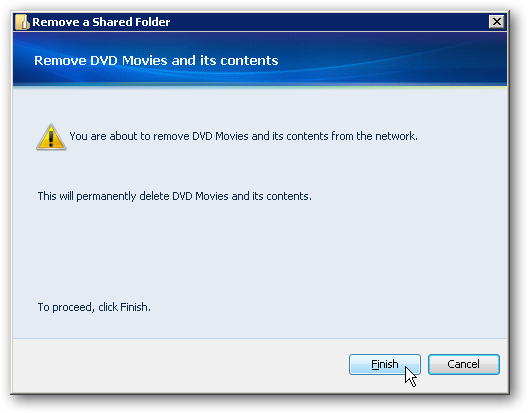
Then click finish on the warning message if you’re sure you want to delete it. Remember that if a folder is duplicated, that will be deleted as well. Also you can’t delete the folders that were included by default by WHS.
如果确定要删除它,请在警告消息上单击“完成”。 请记住,如果文件夹重复,则该文件夹也会被删除。 同样,您也无法删除WHS默认包含的文件夹。
Change Folder Properties
更改文件夹属性
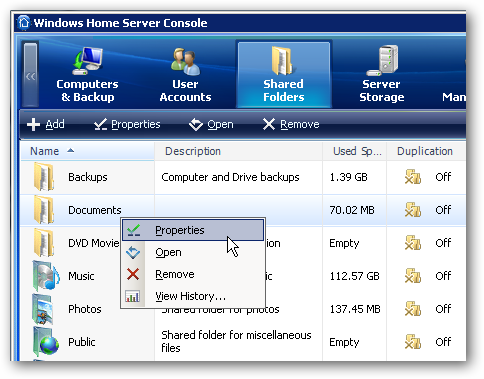
We can also go back and change the properties and user access to the folders at any time. In this example we created a Documents shared folder and want to enable Folder Duplication and change user access. Just right-click the folder and select Properties.
我们还可以随时返回并更改属性和用户对文件夹的访问权限。 在此示例中,我们创建了一个文档共享文件夹,并希望启用文件夹复制并更改用户访问权限。 只需右键单击该文件夹,然后选择“属性”。
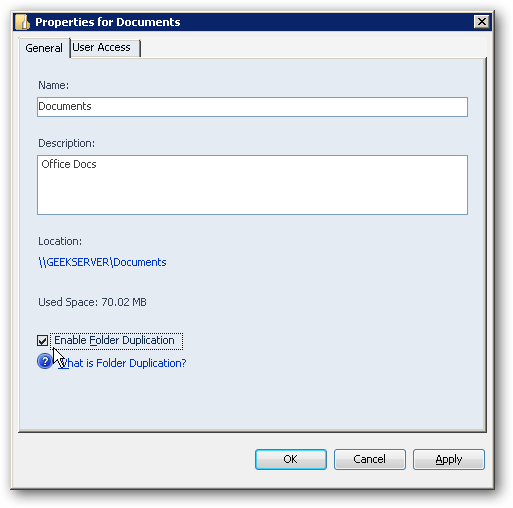
The Properties window appears and under the General tab we want to mark the box next to Enable Folder Duplication. You need at least 2 drives on your server to enable folder duplication. What it does is automatically duplicate the folder and its contents over to another drive. It also syncs the folder with the duplicate. So for example if you take a file out of the folder, that is updated in the duplicate as well.
出现“属性”窗口,在“常规”选项卡下,我们要标记“启用文件夹复制”旁边的框。 您的服务器上至少需要2个驱动器才能启用文件夹复制。 它所做的是自动将文件夹及其内容复制到另一个驱动器。 它还会将文件夹与重复文件夹同步。 因此,例如,如果您从文件夹中取出文件,则该文件也会在重复文件中更新。
This is very handy incase one of the server drives fail, you’ll still have access to the folder contents. Remember that duplication takes twice the amount of space of total storage space. You might want to use this feature for your most important files and documents.
万一其中一个服务器驱动器发生故障,这非常方便,您仍然可以访问文件夹内容。 请记住,复制占用的空间是总存储空间的两倍。 您可能要对最重要的文件和文档使用此功能。
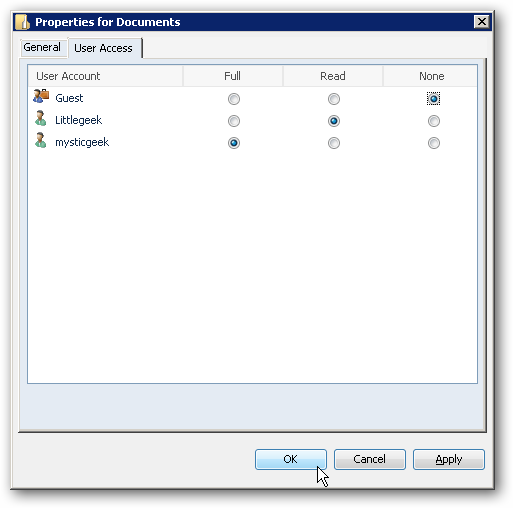
Click on the User Access tab to change the type of access each user has to the folder.
单击用户访问选项卡,以更改每个用户对该文件夹的访问类型。
You’ll get a message reminding you that the new permissions won’t go into effect until the user logs off then back on to the machine.
您将收到一条消息,提醒您新的权限要等到用户注销然后再重新登录计算机后才会生效。

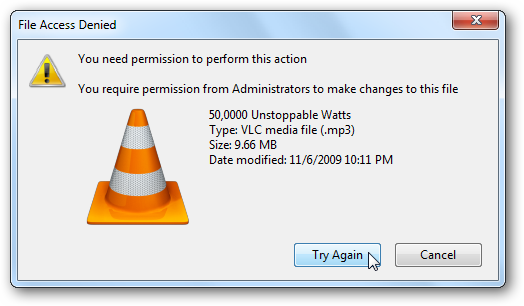
If a user tries to access a file that you haven’t assigned rights to, they’ll get a File Access Denied error message.
如果用户尝试访问您尚未分配权限的文件,他们将收到“文件访问被拒绝”错误消息。
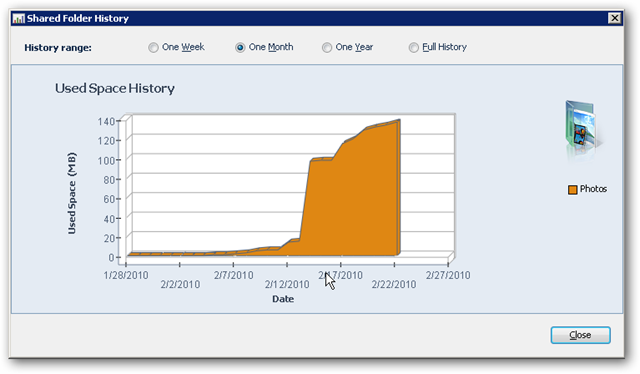
You can also check out folder history and see how it has grown over time. Right-click a particular and select History…which brings up a screen showing what’s been going on. You can choose to display week, month, year, or a full history.
您还可以查看文件夹历史记录,并查看其历史记录。 右键单击特定内容,然后选择“历史记录...”,这将显示一个屏幕,显示正在发生的事情。 您可以选择显示周,月,年或完整的历史记录。
If you try to view the history of a folder that hasn’t had enough time to accumulate any, you’ll get the following error. A folder needs to be in operation for a minimum of one week.
如果您尝试查看没有足够时间来存储文件夹的历史记录,则会收到以下错误消息。 文件夹需要运行至少一周。

Conclusion
结论
Windows Home Server is an excellent way to centralize all of your data, and access it from different machines throughout the house or small office. Managing the shared folders on the server will be one of the main administrative functions you’ll need to do. You’ll be able to administer user account access to the folders on the network and over the web. The Folder Duplication feature is a great way to ensure there is redundant backup of your most important files.
Windows Home Server是集中所有数据并从房屋或小型办公室中的不同计算机访问数据的一种极好的方法。 管理服务器上的共享文件夹将是您需要执行的主要管理功能之一。 您将能够管理用户帐户对网络和网络上文件夹的访问。 文件夹复制功能是确保对最重要文件进行冗余备份的好方法。
This guide should help get you started with using and understanding shared folders on your home server. You might want to also check out our articles on how to manage user accounts in WHS, and how to backup WHS folders to an external drive.
本指南应帮助您开始使用和了解家庭服务器上的共享文件夹。 您可能还需要查看有关如何在WHS中管理用户帐户以及如何将WHS文件夹备份到外部驱动器的文章。
翻译自: https://www.howtogeek.com/howto/11524/how-to-add-and-manage-shared-folders-on-windows-home-server/
home主文件夹下文件整理


 777
777

 被折叠的 条评论
为什么被折叠?


