


raspberry pi
Raspberry Pis can be fickle. If you’ve ever gotten a corrupt SD card from a power outage, bad cable, overclocking, or other issue, you know how annoying it can be to start from scratch. But we can fix that.
树莓派可能会变幻无常。 如果您因断电,电缆故障,超频或其他问题而损坏了SD卡,那么从头开始可能会很烦人。 但是我们可以解决这个问题。
运作方式 (How This Works)
I’ve had this happen all too often, and I eventually figured out a good solution. Once I set up my Pi project exactly how I want it, I just use Win32 Disk Imager on Windows to clone an image of its SD card onto my PC. There I keep it, safely, until something goes wrong with my Pi. When that happens, I can just re-clone that image to the SD card, overwriting the broken or corrupt version, and I’m be back up and running in no time. (If you don’t use Windows, you can do something similar on Linux with the dd command.) It’s so simple, every Raspberry Pi user should do it.
我经常发生这种情况,最终我找到了一个好的解决方案。 一旦按照我的需要完全设置了Pi项目,就可以在Windows上使用Win32 Disk Imager将其SD卡的映像克隆到PC上。 我在那里安全地保存它,直到Pi出问题为止。 发生这种情况时,我可以将该映像重新克隆到SD卡,覆盖损坏或损坏的版本,并且可以立即备份并运行。 (如果您不使用Windows,则可以使用dd命令在Linux上执行类似的操作。)非常简单,每个Raspberry Pi用户都应该这样做。
This works best with those Pi projects that require initial setup and then just run in the background, doing their thing. If you ever make changes to the Pi project, you’ll need to re-clone the image, but with a lot of projects, this is perfect. For example, I use this technique for my two Raspberry Pis running Kodi—if either ever goes down, I can just re-clone my personal image, and the boxes are back up and running in no time, grabbing up-to-date library data from my home server and MySQL database as if nothing ever happened.
这对于需要初始设置然后仅在后台运行并完成其工作的Pi项目最有效。 如果您曾经对Pi项目进行过更改,则需要重新克隆图像,但是对于许多项目而言,这是完美的。 例如,我对运行Kodi的两个Raspberry Pi都使用了这种技术-如果其中任何一个发生故障,我都可以重新克隆我的个人图像,并且盒子可以立即备份并运行,获取最新的库来自我的家庭服务器和MySQL数据库的数据,好像什么也没发生。
And as a bonus, you can more easily share your Raspberry Pi projects by just writing your cloned image out to a new SD card (or sharing the image itself).
另外,只需将克隆的映像写到新的SD卡中(或共享映像本身),您就可以更轻松地共享Raspberry Pi项目。
Here’s how to do it.
这是操作方法。
如何备份Raspberry Pi项目 (How to Back Up Your Raspberry Pi Project)
When your Pi is set up exactly as you want, shut it down and remove its SD card. Plug the SD card into your computer, download Win32 Disk Imager (if you haven’t already), and start it up. If you don’t have a reader built in to your PC, you’ll need to buy one. We recommend something like this Anker 8-in-1 reader ($10) because you can also use it for different SD formats.
完全按照您的要求设置树莓派后,将其关闭并取出其SD卡。 将SD卡插入计算机,下载Win32 Disk Imager (如果尚未安装),然后启动它。 如果您的电脑没有内置阅读器,则需要购买一个。 我们建议您使用类似Anker的8合1读卡器(10美元),因为您也可以将其用于不同的SD格式。
Note: If your Pi project is Linux-based (as many are), you may get a warning that the SD card is unreadable by Windows, and needs to be formatted. That’s okay, don’t format it! Just close the window and move on with the process.
注意:如果您的Pi项目是基于Linux的(很多),您可能会收到一条警告,指出Windows无法读取SD卡,需要对其进行格式化。 没关系,请不要格式化! 只需关闭窗口并继续进行即可。
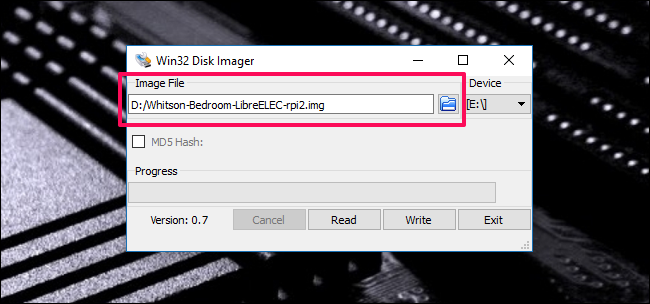
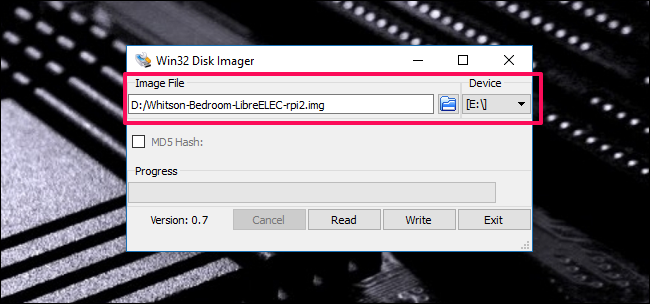
In Win32 Disk Imager, click the blue folder button to select the location for the image you’re going to create. I’ve given mine a name that lets me know which project and Pi in my house it’s for.
在Win32 Disk Imager中,单击蓝色文件夹按钮以选择要创建的图像的位置。 我给我的名字取了个名字,让我知道这是我家中的哪个项目和Pi。
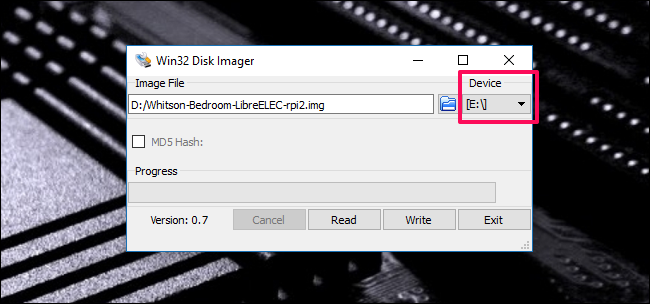
Next, choose your Pi from the “Device” dropdown. If your Pi has multiple partitions, choose the first one—but don’t worry, this process will clone the entire card, not just the individual partition.
接下来,从“设备”下拉列表中选择您的Pi。 如果您的Pi有多个分区,请选择第一个分区,但是不用担心,此过程将克隆整个卡,而不仅仅是单个分区。
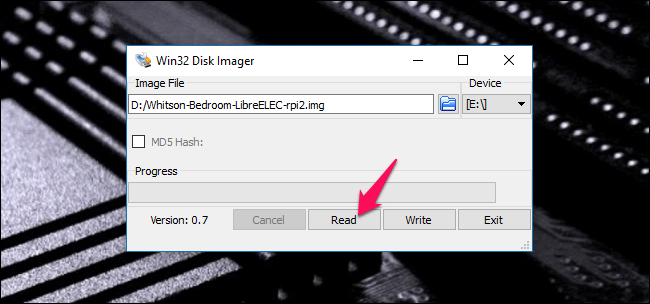
When you’re done, click the “Read” button. This reads the SD card’s data, turns it into an image, and saves that image at the specified location. Note that this process can take a while. As in, up to an hour or more depending on the size of your SD card.
完成后,单击“读取”按钮。 这将读取SD卡的数据,将其转换为图像,然后将该图像保存在指定位置。 请注意,此过程可能需要一段时间。 在这种情况下,最多需要一个小时或更长时间,具体取决于SD卡的大小。
When that’s finished, pop the card back into your Pi and continue as normal! That project is now backed up to your PC.
完成后,将卡弹回到您的Pi中,然后继续正常操作! 现在,该项目已备份到您的PC。
如何还原您的Raspberry Pi项目 (How to Restore Your Raspberry Pi Project)
Now, if something goes wrong with your card, you can restore it just as easily. First, erase your SD card using these instructions.
现在,如果您的卡出了问题,您可以轻松恢复它。 首先,请按照以下说明擦除SD卡。
With your erased card still inserted into your PC, open Win32 Disk Imager again. This time, click the blue folder and navigate to your saved image. Choose your SD card from the dropdown the same way you did before.
在您的擦除卡仍插入PC的情况下,再次打开Win32 Disk Imager。 这次,单击蓝色文件夹并导航到保存的图像。 与以前一样,从下拉菜单中选择SD卡。
When you’ve got it set up, click the “Write” button. This overwrites the SD card’s data with data from the cloned image.
设置完成后,点击“写入”按钮。 这将用克隆映像中的数据覆盖SD卡的数据。

Note that you’ll probably need to use the same SD card—or at least the same model of SD card—for best results. One brand’s 8GB card may be a slightly different size than another brand’s 8GB card, and if the destination card is smaller than the card the image was created from, it won’t work. (Cloning to a larger card should work fine, though.)
请注意,您可能需要使用相同的SD卡-或至少使用相同型号的SD卡-以获得最佳效果。 一个品牌的8GB卡的大小可能会与另一个品牌的8GB卡的大小略有不同,并且如果目标卡小于创建图像的卡,则它将不起作用。 (不过,克隆到较大的卡应该可以。)
Photo credit: Zoltan Kiraly/Shutterstock.com.
图片来源: Zoltan Kiraly /Shutterstock.com。
翻译自: https://www.howtogeek.com/341944/how-to-clone-your-raspberry-pi-sd-card-for-foolproof-backup/
raspberry pi


 7786
7786


 被折叠的 条评论
为什么被折叠?
被折叠的 条评论
为什么被折叠?
 到【灌水乐园】发言


