


angular mvc
In this post, asp.net development India based professionals will explain the best way to manage the Restful service using AngularJS. They are explaining the push and pull functionality available in Rest service in simple steps. Read the article to know more.
在这篇文章中,印度asp.net开发人员将解释使用AngularJS管理Restful服务的最佳方法。 他们通过简单的步骤说明了Rest服务中可用的推和拉功能。 阅读文章以了解更多信息。
In this Post I am going explain how we can manage the Restful service using AngularJS. Push and Pull functionality of Rest service Json data in MVC View in easy steps.
在这篇文章中,我将解释我们如何使用AngularJS管理Restful服务。 通过简单的步骤即可在MVC View中提供Rest服务Json数据的推和拉功能。

Most of the Pull and Push Services will be happened in Serve side. Each server round trips the user has to wait until unless the data will be loaded in the UI. To avoid this we can use the client side scripting like AngularJS.
AngularJS is the JavaScript framework. It is a structural framework which make use of Html as a template language and make you application is dynamic.
We are going touch the below points in this Article.
1. Adding AngularJS scripts from NuGet Packages
2. Creating JSon Service through Entity Framework
3. Reading JSon Rest Service and Displayed in MVC View
4. Implementing Paging in AngularJS
大部分的推拉服务将在服务端进行。 每次服务器往返行程,用户都必须等待,直到将数据加载到UI中为止。 为了避免这种情况,我们可以使用AngularJS之类的客户端脚本。
AngularJS是JavaScript框架。 它是一个结构框架,利用HTML作为模板语言,使您的应用程序具有动态性。
我们将触摸本文中的以下几点。
1.从NuGet包中添加AngularJS脚本
2.通过实体框架创建JSon服务
3.读取JSon Rest服务并显示在MVC视图中
4.在AngularJS中实现分页
Adding AngularJS Script files
First we need to add the AngularJS reference scripts from Visual Studio through Mange NuGet Packages.
添加AngularJS脚本文件
首先,我们需要通过Mange NuGet包从Visual Studio添加AngularJS参考脚本。

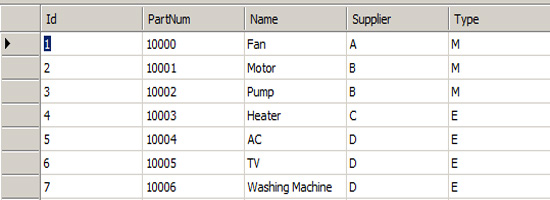
Create Table and fill data for Rest service.
Create PartMaster table using below SQL script.
创建表并填充Rest服务的数据。
使用下面SQL脚本创建PartMaster表。
CREATE TABLE [dbo].[PartMaster] (
[Id] INT NOT NULL,
[PartNum] NVARCHAR (50) NULL,
[Name] NVARCHAR (MAX) NULL,
[Supplier] NVARCHAR (50) NULL,
[Type] NCHAR (10) NULL,
PRIMARY KEY CLUSTERED ([Id] ASC)
);
Fill the bellow data in PartMaster table.
将波纹管数据填写在PartMaster表中。
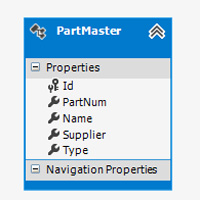
Create the Entity data model for the above Table.
为上表创建实体数据模型。
Create MVC controller PartJsonController class under App_Start folder. Copy and paste the below code in Controller class.
在App_Start文件夹下创建MVC控制器PartJsonController类。 将以下代码复制并粘贴到Controller类中。
using System;
using System.Collections.Generic;
using System.Linq;
using System.Web;
using System.Web.Mvc;
namespace MvcApplication3.App_Start
{
public class PartJsonController : Controller
{
//
// GET: /PartJson/
public ActionResult Index()
{
return View();
}
public JsonResult GetParts()
{
Entities2 PartEntity = new Entities2();
var result = PartEntity.PartMasters.ToList();
return Json(result, JsonRequestBehavior.AllowGet);
}
}
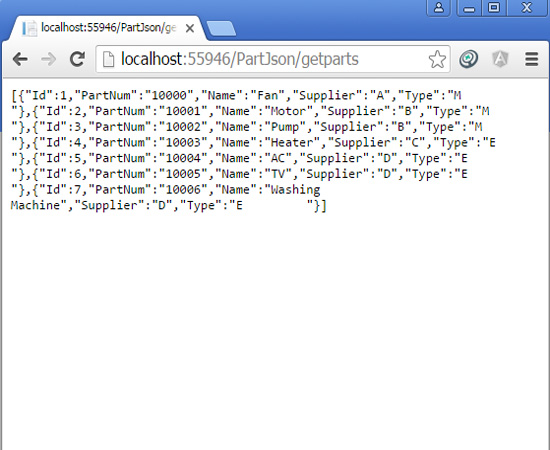
}GetParts method will read the data from Entity and return JSon Data. Right click on the method and create a New MVC View page using Add View context menu.
The output of Rest service as shown below.
GetParts方法将从Entity读取数据并返回JSon Data。 右键单击该方法,然后使用“添加视图”上下文菜单创建“新建MVC视图”页面。
Rest服务的输出如下所示。
Create JavaScript file “ShowParts.JS” under Script folder.
Copy the below code and paste in ShowPart JS file.
在脚本文件夹下创建JavaScript文件“ ShowParts.JS”。
复制以下代码并粘贴到ShowPart JS文件中。
var PartModule = angular.module('PartMaintenace', ['ui.bootstrap', 'ngResource']);
PartModule.controller('PartController', function ($scope, getpartSvc) {
$scope.reverse = true;
$scope.predicate = 'name';
$scope.currentPage = 1;
$scope.totalItems = 0;
$scope.numPerPage = 0;
$scope.order = function (predicate) {
$scope.reverse = ($scope.predicate === predicate) ? !$scope.reverse : false;
$scope.predicate = predicate;
};
GetPartInfos();
function GetPartInfos() {

getpartSvc.GetPartInfos()
.success(function (parts) {

$scope.GetParts = parts;

$scope.totalItems = $scope.GetParts.length;
$scope.numPerPage =5;
$scope.paginate = function (value) {
var begin, end, index;
begin = ($scope.currentPage - 1) * $scope.numPerPage;
end = begin + $scope.numPerPage;
index = $scope.GetParts.indexOf(value);
return (begin <= index && index < end);
};
console.log($scope.parts);
})
.error(function (error) {
$scope.status = error.message;
console.log($scope.status);
});

}

});

PartModule.factory('getpartSvc', ['$http', function ($http) {

var GetpartSvc = {};
GetpartSvc.GetPartInfos = function () {
return $http.get('/PartJson/getparts');
};

return GetpartSvc;

}]);
The bellow portion is used for read the JSon data from Rest service “getParts”.
波纹管部分用于从Rest服务“ getParts”读取JSon数据。
PartModule.factory('getpartSvc', ['$http', function ($http) {

var GetpartSvc = {};
GetpartSvc.GetPartInfos = function () {
return $http.get('/PartJson/getparts');
};

return GetpartSvc;

}]);
Next we have to create the new MVC View to display the Restful service data.
Refer the above Script file for fetching the Rest service data and also refer the AngularJS and Bootstrap css file in Script section of MVC View.
接下来,我们必须创建新的MVC视图以显示Restful服务数据。
请参考上面的脚本文件以获取Rest服务数据,还请参考MVC视图的“脚本”部分中的AngularJS和Bootstrap css文件。
@section scripts{
<script src=”~/Scripts/angular.js”></script>
<link rel=”stylesheet” href=”~/Scripts/bootstrap.min.css”>

<script src=”~/Scripts/angular-ui/ui-bootstrap-tpls.js”></script>

<script src=”~/Scripts/angular-resource.js”></script>
<script src=”~/Scripts/ShowParts.js”></script>

}
Copy the below code and Paste on your Index View Page under Views/PartJson
将以下代码复制并粘贴到Views / PartJson下的Index View页面上
@{
ViewBag.Title = “Index”;
}

<h2>Index</h2>

@section scripts{
<script src=”~/Scripts/angular.js”></script>
<link rel=”stylesheet” href=”~/Scripts/bootstrap.min.css”>

<script src=”~/Scripts/angular-ui/ui-bootstrap-tpls.js”></script>

<script src=”~/Scripts/angular-resource.js”></script>
<script src=”~/Scripts/ShowParts.js”></script>

}
<div>

<style>
.odd {
background-color:palegreen;
color: #008b8b;
}
td th {
height: 30px;
min-width: 100px;
}
thead {
background-color:aqua;
color: white;
height: 30px;
}
</style>
</div>
<div ng-app=”PartMaintenace” >
<br/>
<br/>
@*<input type=”text” placeholder=”Part Search” ng-model=”PartSearch” />*@
<br />
<div ng-controller=”PartController” class=”container-fluid”>

<table class=”table table-striped” >
<thead>
<tr>
<th></th>
<th>
<a href=”” ng-click=”order(‘Id’)”>ID</a>
</th>
<th><a href=”” ng-click=”order(‘PartNum’)”> PartNum</a> </th>
<th><a href=”” ng-click=”order(‘Name’)”>Name</a> </th>
<th><a href=”” ng-click=”order(‘Supplier’)”>Supplier</a> </th>
<th><a href=”” ng-click=”order(‘Type’)”>Type</a> </th>
</tr>
</thead>
<tbody>
<tr>
<td>Search Filter =>></td>
<td > <input style=”width:100px;height:25px” type=”text” ng-model=”PartSearch.Id” /></td>
<td> <input style=”width:100px;height:25px” type=”text” ng-model=”PartSearch.PartNum” /> </td>
<td><input style=”width:100px;height:25px” type=”text” ng-model=”PartSearch.Name” /> </td>
<td><input style=”width:100px;height:25px” type=”text” ng-model=”PartSearch.Supplier” /> </td>
<td><input style=”width:100px;height:25px” type=”text” ng-model=”PartSearch.Type” /> </td>
</tr>
<tr ng-repeat=”p in GetParts| orderBy:predicate:reverse | filter:paginate | filter : PartSearch” ng-class-odd=”‘odd'”>
<td></td>
<td>{{p.Id}}</td>
<td>{{p.PartNum}}</td>
<td>{{p.Name}}</td>
<td>{{p.Supplier}}</td>
<td>{{p.Type}}</td>
</tr>
</tbody>
</table>
<pagination total-items=”totalItems” ng-model=”currentPage”
max-size=”1″ boundary-links=”true”
items-per-page=”numPerPage” class=”pagination-sm”>
</pagination>

</div>

</div>
Output screen as shown bellow
输出画面如下图所示

Conclusion
结论
This Article is explained about the Rest service JSon data manipulation through AngularJS. AngularJS is the latest scripting framework, which is used to interact with server side data and displayed in UI without any Post back.
本文介绍了有关通过AngularJS处理Rest服务JSon数据的信息。 AngularJS是最新的脚本框架,可用于与服务器端数据进行交互并显示在UI中,而无需任何回发。
This Article contains 4 steps as below
本文包含以下四个步骤
- Read the data from database through Entity Framework 通过实体框架从数据库读取数据
- Returning Json Data from MVC Controller 从MVC控制器返回Json数据
- AngularJS Service for fetch the JSon data AngularJS服务,用于获取JSon数据
This post will help you to get basic idea about AngularJS in Asp.net MVC application. Thanks for reading this article.
这篇文章将帮助您获得有关Asp.net MVC应用程序中AngularJS的基本思想。 感谢您阅读本文。
We hope you have read all the points shared by
我们希望您已阅读asp.net development India based experts. If there is anything that is not clear or confusing you, then let us know in the comments.asp.net开发印度专家分享的所有观点。 如果有任何不清楚或困扰您的事情,请在评论中告知我们。
angular mvc


 300
300


 被折叠的 条评论
为什么被折叠?
被折叠的 条评论
为什么被折叠?
 到【灌水乐园】发言


