


asp.net mvc路由
In this post, asp.net development India based professionals will brief you about the interesting feature of AngularJS, that I Routing. You will learn the method to split the single page into multiple views. For more info, read the article. In this article we are going to see one of the most useful feature of AngularJS called routing.
在这篇文章中,印度asp.net开发人员将向您简要介绍AngularJS的有趣功能,即I Routing。 您将学习将单个页面拆分为多个视图的方法。 有关更多信息,请阅读文章。 在本文中,我们将看到AngularJS最有用的功能之一,即路由。
I am going to explain how we can split the single page into multiple views though ng-View and each views will be loaded by using the routing logic.
我将解释如何通过ng-View将单个页面拆分为多个视图,并且将使用路由逻辑来加载每个视图。
Basically routing in MVC is the pattern which monitor the incoming URL pattern against the Url defined in the Route table. This will be written in Route Config file in Asp.net. In this article how we can achieve this routing in AngularJS and also spit the single page into multiple views. If we add more logic into our application this will make our application complex. This will divide the views using routing to load different part. This will make it your application more manageable.
基本上,MVC中的路由是一种模式,它根据Route表中定义的Url监视传入的URL模式。 这将被写入Asp.net中的Route Config文件中。 在本文中,我们如何在AngularJS中实现此路由,以及如何将单个页面吐到多个视图中。 如果我们在应用程序中添加更多逻辑,这将使我们的应用程序变得复杂。 这将使用路由划分视图以加载不同的部分。 这将使您的应用程序更易于管理。
If you add more logic into a single page, page weight will increase and it will take huge time to load. Instead of that we can split the single page into multiple views and each view will have different information based on the routing logic and routing parameter value the respective views will be displayed.
如果在单个页面中添加更多逻辑,页面权重将会增加,并且将花费大量时间来加载。 取而代之的是,我们可以将单个页面分为多个视图,并且每个视图将基于路由逻辑和路由参数值而具有不同的信息,将显示相应的视图。
Here I am going to explain the Part master screen, which will display all the part information. Using AngularJS routing part information will be shown based on the parameter passed.
First step is to add the AngularJS into your Asp.Net MVC application.
在这里,我将解释零件主屏幕,它将显示所有零件信息。 使用AngularJS时,将根据传递的参数显示零件信息。
第一步是将AngularJS添加到Asp.Net MVC应用程序中。
Go to Nuget Packages and search angularJS , Install the below packages if you need Bootstrap design you can install the AngularJS UI Bootstrap packages.
转到Nuget软件包并搜索angularJS,如果需要Bootstrap设计,请安装以下软件包,可以安装AngularJS UI Bootstrap软件包。

Second step is, register the AngularJS routing script in Asp.net MVC application.
Add the below Scripts in the BundleConfig.cs file.
第二步是在Asp.net MVC应用程序中注册AngularJS路由脚本。
在BundleConfig.cs文件中添加以下脚本。
bundles.Add(new ScriptBundle("~/bundles/CustomRouteJS").Include(
"~/Scripts/angular.min.js",
"~/Scripts/angular-route.min.js"
));
Add the CustomRouteJS file in the _layout.cshtml page
在_layout.cshtml页面中添加CustomRouteJS文件
@Scripts.Render("~/bundles/ CustomRouteJS ")Create a JavaScript file under Scripts folder called angularRoute.js copy the below code and paste it
在Scripts文件夹下创建一个名为angularRoute.jsJavaScript文件,复制以下代码并将其粘贴
var MVCAngAPP = angular.module('mvcAngApp', ['ngRoute']);

MVCAngAPP.controller('PartController', PartController);

var config = function ($routeProvider) {
$routeProvider.
when('/PartMaster/CPart', {
templateUrl: '/PartMaster/Part/CustomerPart'
})
.when('/PartMaster/SPart', {
templateUrl: '/PartMaster/Part/SupplierPart'
})
.when('/PartMaster/SPart:vendID', {
templateUrl: function (params) { return '/routesDemo/Part/SupplierPart?vendID=' + params.vendIF; }
});

}
config.$inject = ['$routeProvider'];

MVCAngAPP.config(config);
Add this Script into bundle config file.
将此脚本添加到捆绑包配置文件中。
bundles.Add(new ScriptBundle("~/bundles/CustomRouteJS").Include(
"~/Scripts/angular.min.js",
"~/Scripts/angular-route.min.js"
"~/Scripts/AngularRoute.js"
));
Create the new table for Part information.
为零件信息创建新表。
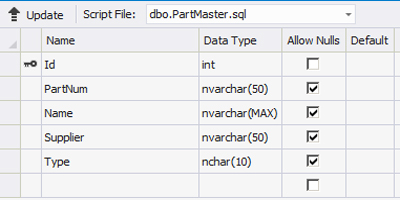
Create the Entity data model for the table.
为表创建实体数据模型。

Create the Controller for Part Mater Entity model.
创建零件实体实体模型的控制器。
I have created 3 Action Result method.
1. CPart this will display customer part information.
2. SPart this will display Supplier Part Information
3. SPart with Supplier parameter .
我创建了3操作结果方法。
1. CPart将显示客户零件信息。
2. SPart将显示供应商零件信息
3.带有Supplier参数的SPart。
public ActionResult CPart()
{
    var vPart = DbPart.PartMasters.Where(x => x.Type == "CPart");
    return View(vPart.ToList<PartMaster>());
}
public ActionResult SPart()
{
    var vPart = DbPart.PartMasters.Where(x => x.Type == "SPart");
    return View(vPart.ToList<PartMaster>());
}

public ActionResult SPart(string _supplier,string _type)
{
    var vPart = DbPart.PartMasters.Where(x => x.Supplier == _supplier && x.Type == "SPart");
    return View(vPart.ToList<PartMaster>());
}
Create the respective Views, those views will be mapped in our html page. Based on the navigation those urls will be routed to the respective paths mentioned in Angular route script.
创建相应的视图,这些视图将映射到我们的html页面中。 基于导航,这些URL将被路由到Angular路由脚本中提到的相应路径。
For example when you navigate to “/PartMaster/CPart” this will routed to “/PartMaster/Part/CustomerPart”.
The below screen will display the Customer part for the supplier “A”.
例如,当您导航到“ / PartMaster / CPart”时,它将被路由到“ / PartMaster / Part / CustomerPart”。
以下屏幕将显示供应商“ A”的客户零件。

The below screen will display the Supplier part for the supplier “C”.
以下屏幕将显示供应商“ C”的供应商零件。

Asp.net development India based experts have shared their experience of using AngularJS routing in asp.net mvc project. If there is anything left or you have not understand any point, ask asp.net professionals directly in comments.
Asp.net开发印度的专家分享了他们在asp.net mvc 项目中使用AngularJS路由的经验。 如果还剩下什么,或者您不了解任何要点 ,请直接在注释中询问asp.net专业人员。
Conclusion
结论
In this post I have explained how we can achieve the routing concept through AngularJS. I have created 3 controllers and views with parameter. Parameter will be passed as a router parameter in Angular script, those value will be captured in Views and filter the records.
在这篇文章中,我解释了如何通过AngularJS实现路由概念。 我创建了3个带有参数的控制器和视图。 参数将作为Angular脚本中的路由器参数传递,这些值将在Views中捕获并过滤记录。
This is very similar to our routing config in Asp.Net MVC. But if you do it through AngularJS, those routing will be happened in client side. So it will be very fast and user will not see any post back action.
这与Asp.Net MVC中的路由配置非常相似。 但是,如果您通过AngularJS进行操作,则这些路由将在客户端进行。 因此,它将非常快,用户将看不到任何回发操作。
Hope it helps you. Thanks for reading this article.
希望对您有帮助。 感谢您阅读本文。
翻译自: https://www.systutorials.com/parameterised-angularjs-routing-asp-net-mvc-using-routeprovider/
asp.net mvc路由


 7337
7337

 被折叠的 条评论
为什么被折叠?
被折叠的 条评论
为什么被折叠?
 到【灌水乐园】发言


