


winforms教程
您在C#中的第一个Winform ( Your First Winform in C# )
When you create a new project in Visual C# (or Visual Studio 2003, 2005 or 2008) and select Visual C# Project and Windows Application, you select a path to put the project somewhere, give it a name such as "ex1" and click OK. You should see something like the accompanying graphic. If you can't see the Toolbox on the left, click View, then Toolbox on the menu or Ctrl-Alt-X on the keyboard. If you want the toolbox to remain open, click the pushpin, just to the left of the Close Toolbox X.
当您在Visual C#(或Visual Studio 2003、2005或2008)中创建一个新项目并选择Visual C# Project和Windows Application时,您将选择一个路径以将该项目放置在某处,并为其命名,例如“ ex1”,然后单击“ 确定”。 。 您应该看到类似随附图形的内容。 如果看不到左侧的工具箱,请单击查看,然后单击菜单上的工具箱或键盘上的Ctrl-Alt-X 。 如果希望工具箱保持打开状态,请单击“关闭工具箱X”左侧的图钉 。
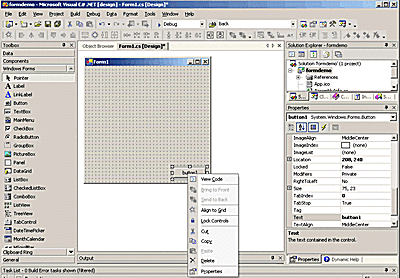
Resize the form by clicking and dragging the right or bottom handles. Now click on Button in the toolbox and drag it onto the form in the bottom right corner. Resize it as you wish. In the bottom right of the Visual C#/Visual Studio IDE, you should see a docked window called Properties. If you can't see it, right-click the button on the form (it will say button1) and click properties at the bottom of the pop-up menu that appears. This window has a push-pin on it so you can close or keep it open as you wish.
通过单击并拖动右侧或底部手柄来调整窗体的大小。 现在,单击工具箱中的“ 按钮 ”并将其拖动到右下角的表单上。 根据需要调整大小。 在Visual C#/ Visual Studio IDE的右下角,您应该看到一个名为Properties的停靠窗口。 如果你不能看到它,用鼠标右键单击窗体上的按钮(它会说按钮1),在弹出菜单的底部出现单击属性。 该窗口上有一个图钉,因此您可以根据需要关闭或保持打开状态。
In the Properties window, you should see a line that says:
在“属性”窗口中,您应该看到一行显示:
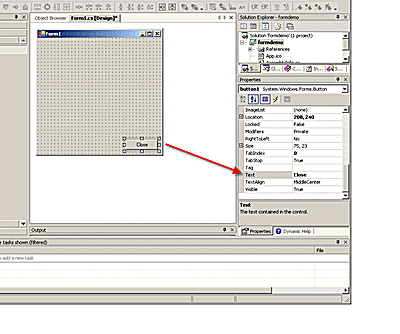
(Name) button1If it says "Form1" instead of "button1," then you accidentally clicked the form. Just click on the button. Now, double-click where it says button1 in the Inspector and type btnClose. Scroll to the bottom of the Property Inspector and you should see:
如果显示的是“ Form1”而不是“ button1”,则表示您不小心单击了表单。 只需单击按钮。 现在,并双击它说,在检查BUTTON1键入btnClose。 滚动到“属性”检查器的底部,您应该看到:
Text button1Double click button1, type "Close" and press Enter. You should now see the button has the word Close on it.
双击button1 ,键入“关闭”,然后按Enter 。 现在,您应该看到该按钮上有单词Close。
添加表单事件 ( Adding a Form Event )
Click on the form and in the Property Inspector and change Text to My First App! You'll see that the form caption now displays this. Double-click on the Close button and you'll see C# code that looks like this:
单击表单,然后在“属性”检查器中,将“文本”更改为“我的第一个应用程序”! 您将看到表单标题现在显示出来。 关闭按钮双击,你会看到C#代码如下所示:
privatevoid btnClose_Click(object sender, System.EventArgs e) {
}
In between the two braces add:
在两个大括号之间添加:
Close();
Click Build on the top menu followed by Build Solution. If it compiles properly (which it should), you see the words "Build Succeeded" on the IDE bottom status line. Click F5 to run the application and show you an open form. Click the Close button to close it.
单击顶部菜单上的“ 构建 ”,然后单击“ 构建解决方案” 。 如果可以正确编译(应该编译),则在IDE底部状态行上会看到“ Build Succeeded”一词。 单击F5运行该应用程序,并显示一个打开的表单。 单击关闭按钮将其关闭。
Use Windows Explorer to find your project. If you called the Project Name and New Solution Name "ex1," you'll be looking in ex1\ex1. Double-click it and you'll see the application run again.
使用Windows资源管理器找到您的项目。 如果您将“项目名称”和“新解决方案名称”称为“ ex1”,则将查找ex1 \ ex1。 双击它,您将看到该应用程序再次运行。
You've created your first application. Now, add functionality.
您已经创建了第一个应用程序。 现在,添加功能。
向C#应用程序添加功能 ( Adding Functionality to the C# Application )
Every form you create has two parts to it:
您创建的每个表单都有两个部分:
Design view, where you drop controls on the form, set properties and add event handling code
设计视图,您可以在其中放置表单上的控件,设置属性并添加事件处理代码
Code view, where you write code. If you can't see the code part, click View then Code on the top menu. You should see Form1.cs [design] and Form1.cs tabs.
代码视图,您可以在其中编写代码。 如果看不到代码部分,请单击顶部菜单上的查看,然后单击代码 。 您应该看到Form1.cs [design]和Form1.cs选项卡。
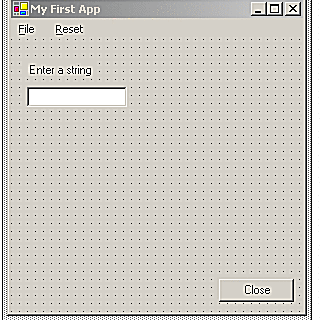
Your first form is a simple application that lets you enter a string and then display it. To add a simple menu, select the Form1 [design] tab, click MainMenu on the toolbox and drag it to the form. You'll see a menu bar appear on the form, but the control is displayed on a yellow panel beneath the form. Use this to select the menu control.
您的第一种形式是一个简单的应用程序,可让您输入一个字符串然后显示它。 要添加一个简单的菜单,请选择Form1 [design]选项卡,单击工具箱上的MainMenu并将其拖动到窗体。 您会看到一个菜单栏出现在窗体上,但是控件显示在窗体下方的黄色面板上。 使用它来选择菜单控件。
Click the menu bar on the form where it says "Type Here" and type "File." You'll see two Type Heres. One to the right for adding further top-level menu items and one below for adding sub-menu items. Type "Reset" on the top menu and exit to the File sub-menu.
单击窗体上显示“在此处键入”的菜单栏,然后键入“文件”。 您会看到两个Type Heres。 右边的一个用于添加更多的顶层菜单项,下面的一个用于添加子菜单项。 在顶部菜单上键入“重置”,然后退出到“文件”子菜单。
Add a label on the form near the top left and set the text to "Enter A String." Under this, drag a TextBox and change its name to "EdEntry" and clear the text so it looks blank. Set its locked property to "True" to stop you from accidentally moving it.
在左上角附近的表单上添加标签,并将文本设置为“输入字符串”。 在此下,拖动一个TextBox并将其名称更改为“ EdEntry”,然后清除文本,使其看起来为空白。 将其锁定属性设置为“ True”,以防止您意外移动它。
添加一个StatusBar和事件处理程序 ( Adding a StatusBar and Event Handler )
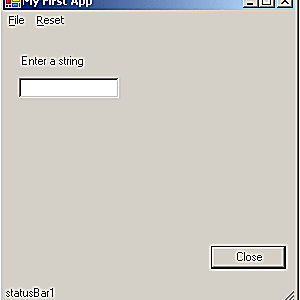
Drag a StatusBar onto the form, set Locked to "True" and clear its Text property. If this hides the Close button, move it up until it is visible. The StatusBar has a resize grip in the bottom right corner, but if you compile and run this, the Close button does not move when you resize the form. This is easily fixed by changing the anchor property of the form so that the bottom and right anchors are set. When you change the anchor property, you'll see four bars at the top, left, bottom and right. Click the ones you want to use. For this example, we want the bottom and right set, so clear the other two, which is set by default. If you have all four set, then the button stretches.
将StatusBar拖到窗体上,将Locked设置为“ True”,然后清除其Text属性。 如果这隐藏了“关闭”按钮,则将其向上移动直到可见。 StatusBar在右下角具有调整大小的夹点,但是如果您编译并运行此控件,则在调整窗体的大小时“关闭”按钮不会移动。 通过更改表单的锚点属性可以轻松地解决此问题,从而设置底部和右侧锚点。 更改锚属性后,您将在顶部,左侧,底部和右侧看到四个条。 单击您要使用的。 对于此示例,我们需要设置底部和右侧,因此清除默认设置的其他两个。 如果同时设置了四个,则按钮会拉伸。
Add one more label beneath the TextBox and name it labelData. Now select the TextBox and on the property Inspector, click the Lightning Icon. This shows all the events that a TextBox can do. The default is "TextChanged," and that's what you use. Select the TextBox and double-click it. This creates an empty event handler, so add these two lines of code between the curly braces { } and compile and run the application.
在TextBox下面再添加一个标签,并将其命名为labelData 。 现在选择TextBox,然后在属性Inspector上单击Lightning Icon。 这显示了TextBox可以执行的所有事件。 默认值为“ TextChanged”,这就是您所使用的。 选择文本框,然后双击它。 这将创建一个空的事件处理程序,因此请在花括号{}之间添加这两行代码,然后编译并运行该应用程序。
labelData.Text = EdEntry.Text;
statusBar1.Text = EdEntry.Text;
When the application is running, click in the TextBox and start typing. You'll see the characters you type appear twice, once below the box and once in the StatusBar. The code that does that is in an event handler (it's known as a delegate in C#).
当应用程序运行时,在TextBox中单击并开始键入。 您会看到键入的字符出现两次,一次出现在框下方,一次出现在StatusBar中。 做到这一点的代码在事件处理程序中(在C#中称为委托)。
private void EdEntry_TextChanged(object sender, System.EventArgs e)
  {
    labelData.Text = EdEntry.Text;
    statusBar1.Text = EdEntry.Text;
   }
查看已涵盖的内容 ( Reviewing What Has been Covered )

This article demonstrates a fundamental part of working with WinForms. Every form or control on it is an instance of a class. When you drop a control on a form and set its properties in the Property Editor, the designer generates code behind the scenes.
本文演示了使用WinForms的基本部分。 它上的每种形式或控件都是类的实例。 当您将控件放到窗体上并在“属性编辑器”中设置其属性时,设计器将在后台生成代码。
Every control on a form is an instance of a System.Windows.Forms class and is created in the InitializeComponent() method. You can add or edit code here. For instance, in the // menuItem2 section, add this on the end and compile/run.
窗体上的每个控件都是System.Windows.Forms类的实例,并在InitializeComponent()方法中创建。 您可以在此处添加或编辑代码。 例如,在// menuItem2部分中,最后添加此内容并进行编译/运行。
this.menuItem2.Visible = false;It should now look like:
现在应该看起来像:
...
// menuItem2
//
this.menuItem2.Index = 1;
this.menuItem2.Text = "&Reset";
this.menuItem2.Visible = false;
...
The Reset Menu item is now missing. Exit the program, and in the properties for this menu item, you'll see that the Visible property is false. Toggle this property in the designer, and the code in the Form1.cs will add then remove the line. The Form Editor is great for easily creating sophisticated GUIs, but all it is doing is manipulating your source code.
重置菜单项现在丢失。 退出程序,并在此菜单项的属性中,您将看到Visible属性为false。 在设计器中切换此属性,Form1.cs中的代码将添加,然后删除该行。 表单编辑器非常适合轻松创建复杂的GUI,但是它所做的只是操作源代码。
动态添加代表 ( Adding a Delegate Dynamically )
Set the Reset Menu visible but set Enabled to false. When you run the app, you'll see it disabled. Now add a CheckBox, call it cbAllowReset and set the text to "Allow Reset." Double-click the check box to create a dummy event handler and enter this:
将“重置菜单”设置为可见,但将“启用”设置为false。 运行该应用程序时,您将看到它已禁用。 现在添加一个CheckBox,将其命名为cbAllowReset并将文本设置为“ Allow Reset”。 双击复选框以创建虚拟事件处理程序,然后输入以下内容:
menuItem2.Enabled = cbAllowReset.Checked;When you run the application, you can enable the Reset Menu item by clicking the checkbox. It still doesn't actually do anything, so add this function by typing it in. Don't double-click the Reset Menu item.
运行应用程序时,可以通过单击复选框启用“重置菜单”项。 它实际上仍然没有执行任何操作,因此请通过键入它来添加此功能 。 不要双击 “重置菜单”项。
private void EdEntry_ResetClicked(object sender, System.EventArgs e)
{
EdEntry.Text = "";
}
If you run the app, when Reset is clicked nothing happens, because the Reset event isn't joined up to the ResetClick. Add this if statement to the cbAllow_ResetCheckedChanged() just after the line that starts:
如果运行该应用程序,则单击“重置”时,将不会发生任何事情,因为Reset事件没有加入到ResetClick中。 在开始的行之后,将此if语句添加到cbAllow_ResetCheckedChanged():
menuItem2.Enabled = cbAllowReset.Checked;
if (menuItem2.Enabled)
{
this.menuItem2.Click += new System.EventHandler(this.EdEntry_ResetClicked) ;
}
The function should now look like this:
该函数现在应如下所示:
private void cbAllowReset_CheckedChanged(object sender, System.EventArgs e)
{
  menuItem2.Enabled = cbAllowReset.Checked;
  if (menuItem2.Enabled)
    {
     this.menuItem2.Click += new System.EventHandler(this.EdEntry_ResetClicked) ;
  }
}
When you run it now, type some text in the box, click the checkbox and click Reset. The text is cleared. This added the code to wire up an event at run-time.
立即运行时,在框中键入一些文本,单击复选框,然后单击“ 重置” 。 文本被清除。 这添加了代码以在运行时连接事件。
翻译自: https://www.thoughtco.com/programming-winforms-in-c-958381
winforms教程


 4514
4514

 被折叠的 条评论
为什么被折叠?
被折叠的 条评论
为什么被折叠?
 到【灌水乐园】发言


