


python 套接字
Sockets and the socket API are used to send messages across a network. They provide a form of inter-process communication (IPC). The network can be a logical, local network to the computer, or one that’s physically connected to an external network, with its own connections to other networks. The obvious example is the Internet, which you connect to via your ISP.
套接字和套接字API用于通过网络发送消息。 它们提供了一种进程间通信(IPC)的形式 。 该网络可以是计算机的逻辑本地网络,也可以是物理连接到外部网络的计算机,并且可以自己连接到其他网络。 显而易见的示例是Internet,您可以通过ISP连接到Internet。
This tutorial has three different iterations of building a socket server and client with Python:
本教程具有使用Python构建套接字服务器和客户端的三个不同的迭代:
- We’ll start the tutorial by looking at a simple socket server and client.
- Once you’ve seen the API and how things work in this initial example, we’ll look at an improved version that handles multiple connections simultaneously.
- Finally, we’ll progress to building an example server and client that functions like a full-fledged socket application, complete with its own custom header and content.
- 我们将通过看一个简单的套接字服务器和客户端来开始本教程。
- 在最初的示例中,您已经了解了API以及它们如何工作后,我们将看一下同时处理多个连接的改进版本。
- 最后,我们将继续构建一个示例服务器和客户端,其功能类似于完整的套接字应用程序,并带有自己的自定义标头和内容。
By the end of this tutorial, you’ll understand how to use the main functions and methods in Python’s socket module to write your own client-server applications. This includes showing you how to use a custom class to send messages and data between endpoints that you can build upon and utilize for your own applications.
在本教程结束时,您将了解如何使用Python 套接字模块中的主要功能和方法来编写自己的客户端-服务器应用程序。 这包括向您展示如何使用自定义类在可构建并用于自己的应用程序的端点之间发送消息和数据。
The examples in this tutorial use Python 3.6. You can find the source code on GitHub.
本教程中的示例使用Python 3.6。 您可以在GitHub上找到源代码 。
Networking and sockets are large subjects. Literal volumes have been written about them. If you’re new to sockets or networking, it’s completely normal if you feel overwhelmed with all of the terms and pieces. I know I did!
网络和套接字是大问题。 关于它们的文字量已经有记载。 如果您不熟悉套接字或网络,则对所有条款和条件不知所措是完全正常的。 我知道我做到了!
Don’t be discouraged though. I’ve written this tutorial for you. As we did with Python, we can learn a little bit at a time. Use your browser’s bookmark feature and come back when you’re ready for the next section.
不过不要气our。 我已经为您编写了本教程。 就像使用Python一样,我们可以一次学习一些知识。 使用浏览器的书签功能,并在准备下一部分时返回。
Let’s get started!
让我们开始吧!
背景 (Background)
Sockets have a long history. Their use originated with ARPANET in 1971 and later became an API in the Berkeley Software Distribution (BSD) operating system released in 1983 called Berkeley sockets.
套接字历史悠久。 它们的使用始于 1971年的ARPANET ,后来成为1983年发布的称为Berkeley套接字的Berkeley软件分发(BSD)操作系统中的API。
When the Internet took off in the 1990s with the World Wide Web, so did network programming. Web servers and browsers weren’t the only applications taking advantage of newly connected networks and using sockets. Client-server applications of all types and sizes came into widespread use.
当Internet在1990年代随着万维网兴起时,网络编程也开始兴起。 并非只有Web服务器和浏览器才能利用新连接的网络并使用套接字。 各种类型和大小的客户端-服务器应用程序已广泛使用。
Today, although the underlying protocols used by the socket API have evolved over the years, and we’ve seen new ones, the low-level API has remained the same.
如今,尽管套接字API使用的底层协议已经发展了许多年,并且我们已经看到了新的协议,但底层API仍然保持不变。
The most common type of socket applications are client-server applications, where one side acts as the server and waits for connections from clients. This is the type of application that I’ll be covering in this tutorial. More specifically, we’ll look at the socket API for Internet sockets, sometimes called Berkeley or BSD sockets. There are also Unix domain sockets, which can only be used to communicate between processes on the same host.
套接字应用程序最常见的类型是客户端服务器应用程序,其中一侧充当服务器并等待来自客户端的连接。 这是本教程将介绍的应用程序类型。 更具体地说,我们将研究Internet套接字 (有时称为Berkeley或BSD套接字)的套接字API。 还有Unix域套接字 ,只能用于在同一主机上的进程之间进行通信。
套接字API概述 (Socket API Overview)
Python’s socket module provides an interface to the Berkeley sockets API. This is the module that we’ll use and discuss in this tutorial.
Python的套接字模块提供了与Berkeley套接字API的接口 。 这是我们将在本教程中使用和讨论的模块。
The primary socket API functions and methods in this module are:
此模块中的主要套接字API功能和方法是:
socket()bind()listen()accept()connect()connect_ex()send()recv()close()
-
socket() -
bind() -
listen() -
accept() -
connect() -
connect_ex() -
send() -
recv() -
close()
Python provides a convenient and consistent API that maps directly to these system calls, their C counterparts. We’ll look at how these are used together in the next section.
Python提供了一个方便且一致的API,可直接映射到这些系统调用(与C对应)。 在下一节中,我们将研究如何将它们一起使用。
As part of its standard library, Python also has classes that make using these low-level socket functions easier. Although it’s not covered in this tutorial, see the socketserver module, a framework for network servers. There are also many modules available that implement higher-level Internet protocols like HTTP and SMTP. For an overview, see Internet Protocols and Support.
作为其标准库的一部分,Python还具有一些类,这些类使使用这些低级套接字函数更加容易。 尽管本教程未涵盖它,但请参阅socketserver模块 (用于网络服务器的框架)。 还有许多模块可以实现更高级别的Internet协议,例如HTTP和SMTP。 有关概述,请参见Internet协议和支持 。
TCP套接字 (TCP Sockets)
As you’ll see shortly, we’ll create a socket object using socket.socket() and specify the socket type as socket.SOCK_STREAM. When you do that, the default protocol that’s used is the Transmission Control Protocol (TCP). This is a good default and probably what you want.
稍后您将看到,我们将使用socket.socket()创建一个套接字对象,并将套接字类型指定为socket.SOCK_STREAM 。 当您这样做时,使用的默认协议是传输控制协议(TCP) 。 这是一个很好的默认值,可能也是您想要的。
Why should you use TCP? The Transmission Control Protocol (TCP):
为什么要使用TCP? 传输控制协议(TCP):
- Is reliable: packets dropped in the network are detected and retransmitted by the sender.
- Has in-order data delivery: data is read by your application in the order it was written by the sender.
- 可靠:丢弃在网络中的数据包由发送方检测并重新传输。
- 具有按顺序传送数据:应用程序按照发送方写入的顺序读取数据。
In contrast, User Datagram Protocol (UDP) sockets created with socket.SOCK_DGRAM aren’t reliable, and data read by the receiver can be out-of-order from the sender’s writes.
相反, 使用 socket.SOCK_DGRAM创建的用户数据报协议(UDP)套接字不可靠,并且接收方读取的数据可能与发送方的写入乱序。
Why is this important? Networks are a best-effort delivery system. There’s no guarantee that your data will reach its destination or that you’ll receive what’s been sent to you.
为什么这很重要? 网络是尽力而为的交付系统。 不能保证您的数据将到达目的地,也不保证您会收到发送给您的信息。
Network devices (for example, routers and switches), have finite bandwidth available and their own inherent system limitations. They have CPUs, memory, buses, and interface packet buffers, just like our clients and servers. TCP relieves you from having to worry about packet loss, data arriving out-of-order, and many other things that invariably happen when you’re communicating across a network.
网络设备(例如,路由器和交换机)具有有限的可用带宽及其自身固有的系统限制。 它们具有CPU,内存,总线和接口数据包缓冲区,就像我们的客户端和服务器一样。 TCP使您不必担心数据包丢失 ,数据乱序到达以及在通过网络进行通信时总是发生的许多其他事情。
In the diagram below, let’s look at the sequence of socket API calls and data flow for TCP:
在下图中,让我们看一下套接字API调用和TCP数据流的顺序:

The left-hand column represents the server. On the right-hand side is the client.
左列代表服务器。 右边是客户。
Starting in the top left-hand column, note the API calls the server makes to setup a “listening” socket:
从左上角的列开始,请注意服务器调用以设置“侦听”套接字的API:
socket()bind()listen()accept()
-
socket() -
bind() -
listen() -
accept()
A listening socket does just what it sounds like. It listens for connections from clients. When a client connects, the server calls accept() to accept, or complete, the connection.
监听套接字确实可以听起来像。 它侦听来自客户端的连接。 当客户端连接时,服务器调用accept()接受或完成连接。
The client calls connect() to establish a connection to the server and initiate the three-way handshake. The handshake step is important since it ensures that each side of the connection is reachable in the network, in other words that the client can reach the server and vice-versa. It may be that only one host, client or server, can reach the other.
客户端调用connect()建立与服务器的连接并启动三向握手。 握手步骤很重要,因为它可以确保连接的每一端在网络中都可以访问,换句话说,客户端可以访问服务器,反之亦然。 可能只有一台主机,客户端或服务器可以访问另一台。
In the middle is the round-trip section, where data is exchanged between the client and server using calls to send() and recv().
中间是往返部分,其中使用send()和recv()调用在客户端和服务器之间交换数据。
At the bottom, the client and server close() their respective sockets.
在底部,客户端和服务器close()各自的套接字。
Echo客户端和服务器 (Echo Client and Server)
Now that you’ve seen an overview of the socket API and how the client and server communicate, let’s create our first client and server. We’ll begin with a simple implementation. The server will simply echo whatever it receives back to the client.
既然您已经了解了套接字API以及客户端和服务器如何通信的概述,那么让我们创建第一个客户端和服务器。 我们将从一个简单的实现开始。 服务器将简单地将收到的任何内容回显给客户端。
回声服务器 (Echo Server)
Here’s the server, echo-server.py:
这是服务器echo-server.py :
 #!/usr/bin/env python3

#!/usr/bin/env python3

import import socket

socket

HOST HOST = = '127.0.0.1'  '127.0.0.1'  # Standard loopback interface address (localhost)
# Standard loopback interface address (localhost)
PORT PORT = = 65432        65432        # Port to listen on (non-privileged ports are > 1023)

# Port to listen on (non-privileged ports are > 1023)

with with socketsocket .. socketsocket (( socketsocket .. AF_INETAF_INET , , socketsocket .. SOCK_STREAMSOCK_STREAM ) ) as as ss :
    :
    ss .. bindbind (((( HOSTHOST , , PORTPORT ))
    ))
    ss .. listenlisten ()
    ()
    connconn , , addr addr = = ss .. acceptaccept ()
    ()
    with with connconn :
        :
        printprint (( 'Connected by''Connected by' , , addraddr )
        )
        while while TrueTrue :
            :
            data data = = connconn .. recvrecv (( 10241024 )
            )
            if if not not datadata :
                :
                break
            break
            connconn .. sendallsendall (( datadata )
)
Note: Don’t worry about understanding everything above right now. There’s a lot going on in these few lines of code. This is just a starting point so you can see a basic server in action.
注意:不必担心现在就了解以上内容。 这几行代码中发生了很多事情。 这只是一个起点,因此您可以看到运行中的基本服务器。
There’s a reference section at the end of this tutorial that has more information and links to additional resources. I’ll link to these and other resources throughout the tutorial.
本教程末尾有一个参考部分 ,其中包含更多信息以及指向其他资源的链接。 在整个教程中,我将链接到这些资源和其他资源。
Let’s walk through each API call and see what’s happening.
让我们遍历每个API调用,看看发生了什么。
socket.socket() creates a socket object that supports the context manager type, so you can use it in a with statement. There’s no need to call s.close():
socket.socket()创建一个支持上下文管理器类型的套接字对象,因此可以在with语句中使用它。 无需调用s.close() :
The arguments passed to socket() specify the address family and socket type. AF_INET is the Internet address family for IPv4. SOCK_STREAM is the socket type for TCP, the protocol that will be used to transport our messages in the network.
传递给socket()的参数指定地址族和套接字类型。 AF_INET是IPv4的Internet地址族。 SOCK_STREAM是TCP的套接字类型,该协议将用于在网络中传输消息。
bind() is used to associate the socket with a specific network interface and port number:
bind()用于将套接字与特定的网络接口和端口号关联:
 HOST HOST = = '127.0.0.1'  '127.0.0.1'  # Standard loopback interface address (localhost)
# Standard loopback interface address (localhost)
PORT PORT = = 65432        65432        # Port to listen on (non-privileged ports are > 1023)

# Port to listen on (non-privileged ports are > 1023)

# ...

# ...

ss .. bindbind (((( HOSTHOST , , PORTPORT ))
))
The values passed to bind() depend on the address family of the socket. In this example, we’re using socket.AF_INET (IPv4). So it expects a 2-tuple: (host, port).
传递给bind()的值取决于套接字的地址族 。 在此示例中,我们使用socket.AF_INET (IPv4)。 因此,它需要一个2元组: (host, port) 。
host can be a hostname, IP address, or empty string. If an IP address is used, host should be an IPv4-formatted address string. The IP address 127.0.0.1 is the standard IPv4 address for the loopback interface, so only processes on the host will be able to connect to the server. If you pass an empty string, the server will accept connections on all available IPv4 interfaces.
host可以是主机名,IP地址或空字符串。 如果使用IP地址,则host应为IPv4格式的地址字符串。 IP地址127.0.0.1是回送接口的标准IPv4地址,因此只有主机上的进程才能连接到服务器。 如果传递空字符串,则服务器将接受所有可用IPv4接口上的连接。
port should be an integer from 1–65535 (0 is reserved). It’s the TCP port number to accept connections on from clients. Some systems may require superuser privileges if the port is < 1024.
port应该是1到65535的整数(保留0 )。 这是接受客户端连接的TCP端口号。 如果端口< 1024则某些系统可能需要超级用户特权。
Here’s a note on using hostnames with bind():
这是关于将主机名与bind()一起使用的说明:
“If you use a hostname in the host portion of IPv4/v6 socket address, the program may show a non-deterministic behavior, as Python uses the first address returned from the DNS resolution. The socket address will be resolved differently into an actual IPv4/v6 address, depending on the results from DNS resolution and/or the host configuration. For deterministic behavior use a numeric address in host portion.” (Source)
“如果您在IPv4 / v6套接字地址的主机部分中使用主机名,则该程序可能会显示不确定的行为,因为Python使用从DNS解析返回的第一个地址。 套接字地址将根据DNS解析和/或主机配置的结果不同地解析为实际的IPv4 / v6地址。 对于确定性行为,请在主机部分使用数字地址。” (资源)
I’ll discuss this more later in Using Hostnames, but it’s worth mentioning here. For now, just understand that when using a hostname, you could see different results depending on what’s returned from the name resolution process.
我将在稍后的“ 使用主机名”中进行更多讨论,但是这里值得一提。 现在,仅了解使用主机名时,您会看到不同的结果,具体取决于名称解析过程返回的内容。
It could be anything. The first time you run your application, it might be the address 10.1.2.3. The next time it’s a different address, 192.168.0.1. The third time, it could be 172.16.7.8, and so on.
可能是任何东西。 第一次运行应用程序时,它的地址可能是10.1.2.3 。 下次是另一个地址192.168.0.1 。 第三次,可能是172.16.7.8 ,依此类推。
Continuing with the server example, listen() enables a server to accept() connections. It makes it a “listening” socket:
继续服务器示例, listen()使服务器能够accept()连接。 它使其成为“监听”套接字:
listen() has a backlog parameter. It specifies the number of unaccepted connections that the system will allow before refusing new connections. Starting in Python 3.5, it’s optional. If not specified, a default backlog value is chosen.
listen()有一个backlog参数。 它指定系统在拒绝新连接之前允许的不可接受的连接数。 从Python 3.5开始,它是可选的。 如果未指定,则选择默认的backlog值。
If your server receives a lot of connection requests simultaneously, increasing the backlog value may help by setting the maximum length of the queue for pending connections. The maximum value is system dependent. For example, on Linux, see /proc/sys/net/ipv4/tcp_max_syn_backlog.
如果您的服务器同时接收到许多连接请求,则通过设置待处理连接的队列的最大长度,增加backlog值可能会有所帮助。 最大值取决于系统。 例如,在Linux上,请参阅/proc/sys/net/ipv4/tcp_max_syn_backlog 。
accept() blocks and waits for an incoming connection. When a client connects, it returns a new socket object representing the connection and a tuple holding the address of the client. The tuple will contain (host, port) for IPv4 connections or (host, port, flowinfo, scopeid) for IPv6. See Socket Address Families in the reference section for details on the tuple values.
accept() 阻止并等待传入连接。 客户端连接时,它将返回一个表示连接的新套接字对象和一个保存客户端地址的元组。 该元组将包含用于IPv4连接的(host, port)或用于IPv6的(host, port, flowinfo, scopeid) 。 有关元组值的详细信息,请参见参考部分中的套接字地址系列 。
One thing that’s imperative to understand is that we now have a new socket object from accept(). This is important since it’s the socket that you’ll use to communicate with the client. It’s distinct from the listening socket that the server is using to accept new connections:
必须了解的一件事是,我们现在从accept()获得了一个新的套接字对象。 这很重要,因为它是您用来与客户端通信的套接字。 它与服务器用来接受新连接的侦听套接字不同:
 connconn , , addr addr = = ss .. acceptaccept ()
()
with with connconn :
    :
    printprint (( 'Connected by''Connected by' , , addraddr )
    )
    while while TrueTrue :
        :
        data data = = connconn .. recvrecv (( 10241024 )
        )
        if if not not datadata :
            :
            break
        break
        connconn .. sendallsendall (( datadata )
)
After getting the client socket object conn from accept(), an infinite while loop is used to loop over blocking calls to conn.recv(). This reads whatever data the client sends and echoes it back using conn.sendall().
从accept()获得客户端套接字对象conn之后,将使用无限while循环来循环阻塞对conn.recv() 调用 。 这将读取客户端发送的所有数据,并使用conn.sendall()将其回conn.sendall() 。
If conn.recv() returns an empty bytes object, b'', then the client closed the connection and the loop is terminated. The with statement is used with conn to automatically close the socket at the end of the block.
如果conn.recv()返回一个空bytes对象b'' ,则客户端关闭连接并终止循环。 with语句与conn一起使用,以自动关闭该块末尾的套接字。
回声客户端 (Echo Client)
Now let’s look at the client, echo-client.py:
现在让我们看一下客户端echo-client.py :
In comparison to the server, the client is pretty simple. It creates a socket object, connects to the server and calls s.sendall() to send its message. Lastly, it calls s.recv() to read the server’s reply and then prints it.
与服务器相比,客户端非常简单。 它创建一个套接字对象,连接到服务器并调用s.sendall()发送其消息。 最后,它调用s.recv()读取服务器的回复,然后打印出来。
运行Echo客户端和服务器 (Running the Echo Client and Server)
Let’s run the client and server to see how they behave and inspect what’s happening.
让我们运行客户端和服务器,看看它们的行为并检查发生了什么。
Note: If you’re having trouble getting the examples or your own code to run from the command line, read How Do I Make My Own Command-Line Commands Using Python? If you’re on Windows, check the Python Windows FAQ.
注意:如果您无法从命令行运行示例或自己的代码,请阅读如何使用Python编写自己的命令行命令? 如果您使用的是Windows,请查看Python Windows常见问题解答 。
Open a terminal or command prompt, navigate to the directory that contains your scripts, and run the server:
打开终端或命令提示符,导航到包含脚本的目录,然后运行服务器:
 $ ./echo-server.py
$ ./echo-server.py
Your terminal will appear to hang. That’s because the server is blocked (suspended) in a call:
您的终端将似乎挂起。 这是因为服务器在呼叫中被阻止 (挂起):
It’s waiting for a client connection. Now open another terminal window or command prompt and run the client:
它正在等待客户端连接。 现在打开另一个终端窗口或命令提示符并运行客户端:
 $ ./echo-client.py
$ ./echo-client.py
Received b'Hello, world'
Received b'Hello, world'
In the server window, you should see:
在服务器窗口中,您应该看到:
In the output above, the server printed the addr tuple returned from s.accept(). This is the client’s IP address and TCP port number. The port number, 64623, will most likely be different when you run it on your machine.
在上面的输出中,服务器打印了从s.accept()返回的addr元组。 这是客户端的IP地址和TCP端口号。 在计算机上运行时,端口号64623可能会有所不同。
查看套接字状态 (Viewing Socket State)
To see the current state of sockets on your host, use netstat. It’s available by default on macOS, Linux, and Windows.
要查看主机上套接字的当前状态,请使用netstat 。 在macOS,Linux和Windows上默认情况下可用。
Here’s the netstat output from macOS after starting the server:
这是启动服务器后macOS的netstat输出:
 $ netstat -an
$ netstat -an
Active Internet connections (including servers)
Active Internet connections (including servers)
Proto Recv-Q Send-Q  Local Address          Foreign Address        (state)
Proto Recv-Q Send-Q  Local Address          Foreign Address        (state)
tcp4       0      0  127.0.0.1.65432        *.*                    LISTEN
tcp4       0      0  127.0.0.1.65432        *.*                    LISTEN
Notice that Local Address is 127.0.0.1.65432. If echo-server.py had used HOST = '' instead of HOST = '127.0.0.1', netstat would show this:
请注意, Local Address是127.0.0.1.65432 。 如果echo-server.py使用HOST = ''而不是HOST = '127.0.0.1' ,则netstat将显示以下内容:
Local Address is *.65432, which means all available host interfaces that support the address family will be used to accept incoming connections. In this example, in the call to socket(), socket.AF_INET was used (IPv4). You can see this in the Proto column: tcp4.
Local Address是*.65432 ,这意味着将使用支持地址族的所有可用主机接口来接受传入的连接。 在此示例中,在对socket() socket.AF_INET ,使用了socket.AF_INET (IPv4)。 您可以在Proto列中看到: tcp4 。
I’ve trimmed the output above to show the echo server only. You’ll likely see much more output, depending on the system you’re running it on. The things to notice are the columns Proto, Local Address, and (state). In the last example above, netstat shows the echo server is using an IPv4 TCP socket (tcp4), on port 65432 on all interfaces (*.65432), and it’s in the listening state (LISTEN).
我已经整理了上面的输出以仅显示回显服务器。 您可能会看到更多的输出,具体取决于运行它的系统。 需要注意的是Proto , Local Address和(state) 。 在上面,netstat显示的回波服务器使用IPv4的TCP套接字(最后一个例子tcp4上的所有接口(),在端口65432 *.65432 ),它是处于监听状态( LISTEN )。
Another way to see this, along with additional helpful information, is to use lsof (list open files). It’s available by default on macOS and can be installed on Linux using your package manager, if it’s not already:
另一种有用的查看方法以及其他有用的信息是使用lsof (列出打开的文件)。 它默认在macOS上可用,如果尚未安装,则可以使用包管理器在Linux上安装:
 $ lsof -i -n
$ lsof -i -n
COMMAND     PID   USER   FD   TYPE   DEVICE SIZE/OFF NODE NAME
COMMAND     PID   USER   FD   TYPE   DEVICE SIZE/OFF NODE NAME
Python    67982 nathan    3u  IPv4 0xecf272      0t0  TCP *:65432 (LISTEN)
Python    67982 nathan    3u  IPv4 0xecf272      0t0  TCP *:65432 (LISTEN)
lsof gives you the COMMAND, PID (process id), and USER (user id) of open Internet sockets when used with the -i option. Above is the echo server process.
当与-i选项一起使用时, lsof会为您提供打开的Internet套接字的COMMAND , PID (进程ID)和USER (用户ID)。 上面是回显服务器进程。
netstat and lsof have a lot of options available and differ depending on the OS you’re running them on. Check the man page or documentation for both. They’re definitely worth spending a little time with and getting to know. You’ll be rewarded. On macOS and Linux, use man netstat and man lsof. For Windows, use netstat /?.
netstat和lsof有很多可用的选项,并且取决于运行它们的操作系统。 检查man页或说明文件。 他们绝对值得花一点时间来了解。 您会得到奖励的。 在macOS和Linux上,使用man netstat和man lsof 。 对于Windows,请使用netstat /? 。
Here’s a common error you’ll see when a connection attempt is made to a port with no listening socket:
在没有监听套接字的端口上进行连接尝试时,会看到一个常见错误:
Either the specified port number is wrong or the server isn’t running. Or maybe there’s a firewall in the path that’s blocking the connection, which can be easy to forget about. You may also see the error Connection timed out. Get a firewall rule added that allows the client to connect to the TCP port!
指定的端口号错误或服务器未运行。 也许在路径上有防火墙阻止了连接,这很容易忘记。 您可能还会看到错误Connection timed out 。 获取添加的防火墙规则,该规则允许客户端连接到TCP端口!
There’s a list of common errors in the reference section.
参考部分中列出了一些常见错误 。
通讯细目 (Communication Breakdown)
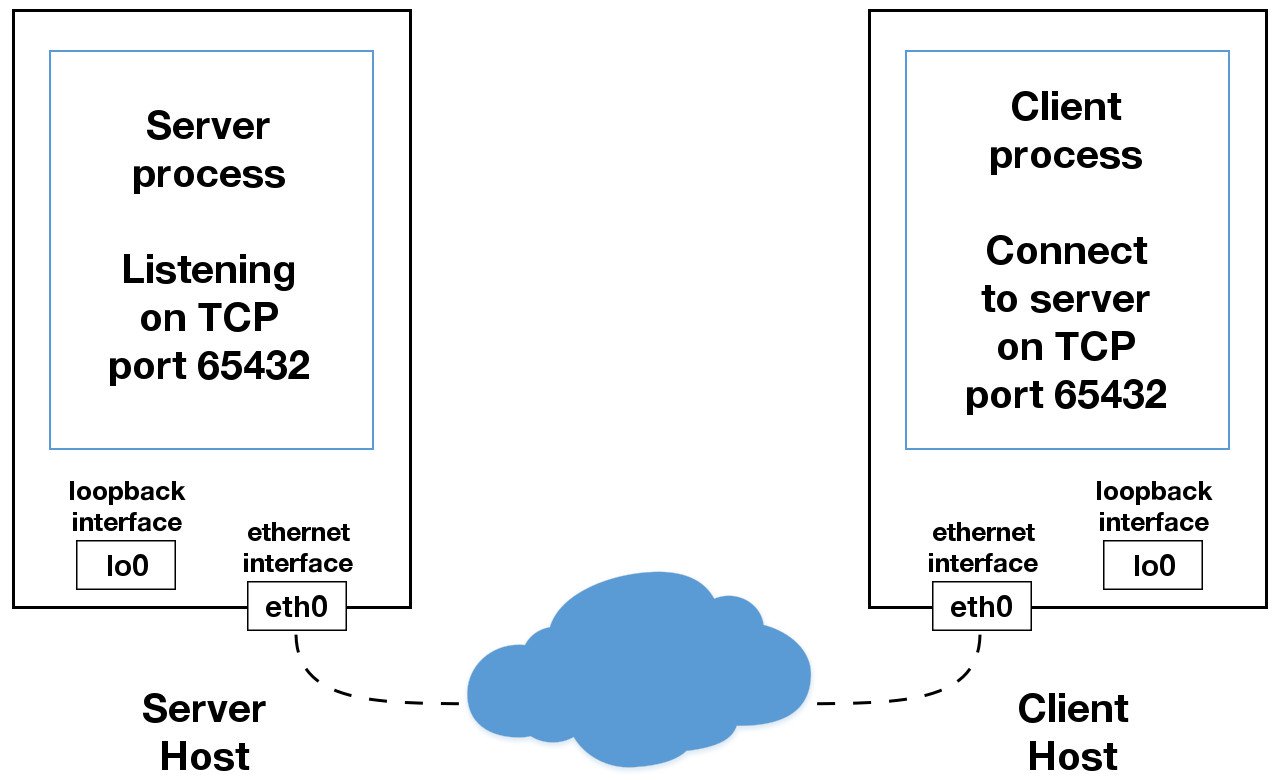
Let’s take a closer look at how the client and server communicated with each other:
让我们仔细看看客户端和服务器之间如何通信:

When using the loopback interface (IPv4 address 127.0.0.1 or IPv6 address ::1), data never leaves the host or touches the external network. In the diagram above, the loopback interface is contained inside the host. This represents the internal nature of the loopback interface and that connections and data that transit it are local to the host. This is why you’ll also hear the loopback interface and IP address 127.0.0.1 or ::1 referred to as “localhost.”
使用回送接口(IPv4地址127.0.0.1或IPv6地址::1 )时,数据永远不会离开主机或接触外部网络。 在上图中,环回接口包含在主机内部。 这表示环回接口的内部性质,并且传递该接口的连接和数据对于主机而言是本地的。 这就是为什么您还会听到回送接口和IP地址127.0.0.1或::1称为“ localhost”)的原因。
Applications use the loopback interface to communicate with other processes running on the host and for security and isolation from the external network. Since it’s internal and accessible only from within the host, it’s not exposed.
应用程序使用环回接口与主机上运行的其他进程进行通信,并实现安全性和与外部网络的隔离。 由于它是内部的,只能从主机内部访问,因此不会公开。
You can see this in action if you have an application server that uses its own private database. If it’s not a database used by other servers, it’s probably configured to listen for connections on the loopback interface only. If this is the case, other hosts on the network can’t connect to it.
如果您有一个使用其自己的私有数据库的应用程序服务器,则可以看到它的作用。 如果不是其他服务器使用的数据库,则可能已配置为仅侦听回送接口上的连接。 在这种情况下,网络上的其他主机将无法连接到它。
When you use an IP address other than 127.0.0.1 or ::1 in your applications, it’s probably bound to an Ethernet interface that’s connected to an external network. This is your gateway to other hosts outside of your “localhost” kingdom:
当您在应用程序中使用127.0.0.1或::1以外的IP地址时,它可能绑定到连接到外部网络的以太网接口。 这是您通往“本地主机”王国以外的其他主机的网关:
 最低0.47元/天 解锁文章


 734
734


 被折叠的 条评论
为什么被折叠?
被折叠的 条评论
为什么被折叠?
 到【灌水乐园】发言


