


vue 自定义指令 实例
Welcome back. With Angular set up along with a loading spinner and our refactored Angular controller, let’s move on to the final part and create a custom Angular Directive to display a frequency distribution chart with JavaScript and the D3 library.
欢迎回来。 在设置了Angular,加载微调器和重构的Angular控制器之后,让我们继续进行最后一部分,并创建一个自定义Angular Directive,以使用JavaScript和D3库显示频率分布图。

Remember: Here’s what we’re building – A Flask app that calculates word-frequency pairs based on the text from a given URL.
切记:这就是我们正在构建的– Flask应用程序,该应用程序根据给定URL中的文本计算词频对。
- Part One: Set up a local development environment and then deploy both a staging and a production environment on Heroku.
- Part Two: Set up a PostgreSQL database along with SQLAlchemy and Alembic to handle migrations.
- Part Three: Add in the back-end logic to scrape and then process the word counts from a webpage using the requests, BeautifulSoup, and Natural Language Toolkit (NLTK) libraries.
- Part Four: Implement a Redis task queue to handle the text processing.
- Part Five: Set up Angular on the front-end to continuously poll the back-end to see if the request is done processing.
- Part Six: Push to the staging server on Heroku – setting up Redis and detailing how to run two processes (web and worker) on a single Dyno.
- Part Seven: Update the front-end to make it more user-friendly.
- Part Eight: Create a custom Angular Directive to display a frequency distribution chart using JavaScript and D3. (current)
- 第一部分 :设置本地开发环境,然后在Heroku上部署临时环境和生产环境。
- 第二部分 :设置PostgreSQL数据库以及SQLAlchemy和Alembic来处理迁移。
- 第三部分 :添加后端逻辑以进行抓取,然后使用请求,BeautifulSoup和自然语言工具包(NLTK)库处理网页中的字数统计。
- 第四部分 :实现Redis任务队列以处理文本处理。
- 第五部分 :在前端设置Angular以连续轮询后端以查看请求是否已完成处理。
- 第六部分 :推送到Heroku上的登台服务器–设置Redis并详细说明如何在单个Dyno上运行两个进程(Web和worker)。
- 第七部分 :更新前端以使其更加用户友好。
- 第八部分:使用JavaScript和D3创建自定义角度指令以显示频率分布图。 (当前)
Need the code? Grab it from the repo.
需要代码吗? 从抓住它回购 。
Let’s look at what we currently have…
让我们看看我们目前拥有的...
当前用户界面 (Current User Interface)
Start Redis in a terminal window:
在终端窗口中启动Redis:
|
Then get your process worker going in another window:
然后让您的流程工作者进入另一个窗口:
|
Finally, in a third window, fire up the app:
最后,在第三个窗口中,启动应用程序:
|
You should see your word counter working. Now we can add in a custom Angular Directive to display the results in a D3 chart.
您应该看到您的文字计数器正常工作。 现在,我们可以添加自定义角度指令以在D3图表中显示结果。
角度指令 (Angular Directive)
Start by adding the D3 library (v3) to the index.html file:
首先将D3库( v3 )添加到index.html文件:
|
Now let’s set up a new custom Directive.
现在,让我们设置一个新的自定义指令。
Angular Directives are markers on a DOM element, which allow us to insert sections of HTML with specific events and attributes attached to it. Let’s build out the first part of our Directive by adding the following code just below the controller in main.js:
Angular Directives是DOM元素上的标记,它使我们可以插入带有特定事件和属性HTML部分。 让我们通过在main.js中的控制器下方添加以下代码来构建指令的第一部分:
|
restrict: 'E' creates a Directive that is restricted to an HTML element. replace: true simply replaces the HTML Directive with the HTML in the template. The link function gives us access to variables in the scope defined in the controller.
restrict: 'E'创建仅限于HTML元素的指令。 replace: true只是将HTML指令替换为templateHTML。 link功能使我们可以访问控制器中定义的范围内的变量。
Next, add a watch function to “watch” for any changes to the variables and respond appropriately. Add this to the link function like so:
接下来,添加watch功能以“监视”变量的任何更改并适当响应。 像这样将其添加到link函数中:
|
Finally, add the Directive just below the closing divider to <div class="row">:
最后,将指令添加到分隔符正下方的<div class="row"> :
|
With the Directive set up, let’s turn our attention to the D3 library…
通过设置指令,让我们将注意力转向D3库...
D3条形图 (D3 Bar Chart)
D3 is a powerful library that utilizes HTML, CSS, and SVG to display data on the DOM and JavaScript to make it interactive. We will use it to create a basic bar chart.
D3是一个功能强大的库,它利用HTML,CSS和SVG在DOM和JavaScript上显示数据以使其具有交互性。 我们将使用它来创建基本的条形图。
步骤1:功能逻辑 (Step 1: Functional Logic)
Add the following to the watch function within the Angular Directive:
在Angular Directive中的watch函数中添加以下内容:
|
Now, whenever scope.wordcounts changes, this function is fired, which updates the DOM. Since an object is returned from the AJAX request, we iterate through it to add the specific data to the chart. Essentially, every word is appended to a new div via a data join.
现在,每当scope.wordcounts更改时,都会scope.wordcounts此函数,从而更新DOM。 由于对象是从AJAX请求返回的,因此我们对其进行迭代以将特定数据添加到图表中。 本质上,每个单词都通过数据连接附加到新的div上。
Try running the code.
尝试运行代码。
What happens? Nothing shows up, right? Check out the DOM in Chrome’s Developer Tools, after you submit a new site. You should see a number of nested divs. We just need to add styles…
怎么了? 什么都没出现,对不对? 提交新网站后,请在Chrome的开发人员工具中查看DOM。 您应该看到许多嵌套的divs 。 我们只需要添加样式...
步骤2:设定条形图的样式 (Step 2: Styling the Bar Chart)
Start with some simple CSS:
从一些简单CSS开始:
|
Make sure to include this at the top of HTML page, after the Bootstrap stylesheet:
确保在Bootstrap样式表之后将其包括在HTML页面的顶部:
|
Fire up the app in our browser. What’s happening now?
在我们的浏览器中启动该应用。 现在发生了什么?
When you search for a website, you should now see a grey area with some thin blue bars on the left hand side. So you can see that we are generating a bar for each data element we’re getting back – 10 in total. However, we need to modify our D3 code in order to increase the width of each bar so they are readable.
现在,当您搜索网站时,您应该会在左侧看到灰色区域,上面带有一些蓝色细条。 因此,您可以看到我们正在为返回的每个数据元素生成一个条形图-总共10个。 但是,我们需要修改D3代码以增加每个小节的宽度,以便于阅读。
步骤3:使条形图更具互动性 (Step 3: Making the Bar Chart more Interactive)
We can chain this on to our existing code and use the D3 style function:
我们可以将其链接到我们现有的代码上,并使用D3 样式函数:
|
Now we are dynamically creating a width based on the numeric value of how often a word shows up on a webpage:
现在,我们根据单词在网页上出现的频率的数值动态创建宽度:
|
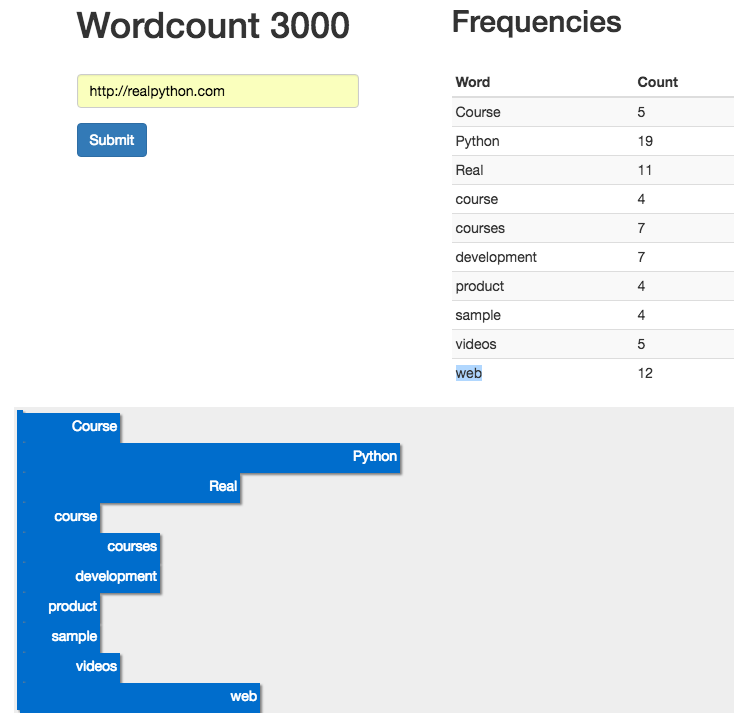
The style is calculated by returning the value associated with each word, multiplying that number by 20, and then converting it into pixels. We can also add text to each bar element by inserting the string value of the word along with how often it shows up on the page.
通过返回与每个单词关联的值,将该数字乘以20,然后将其转换为像素来计算样式。 我们还可以通过插入单词的字符串值及其在页面上显示的频率,来向每个bar元素添加文本。
Try this out. You should see something like:
试试看 您应该看到类似以下内容:
There’s still one thing missing though. What happens when you search for a new website? Try it. The new chart is appended beneath the previous one. We need to clear out our chart div before a new one is created.
仍然缺少一件事。 搜索新网站时会发生什么? 试试吧。 新图表将附在上一个图表的下方。 我们需要在创建新图表之前清除图表div。
步骤4:清理下一个URL搜索 (Step 4: Clean Up for the Next URL Search)
Update the link function in the Directive:
更新指令中的link功能:
|
d3.select('#chart').selectAll('*').remove(); simply clears out the chart each time the $scope.watch function is fired. Now we have a chart that is cleared before each new use, and we have a fully functional word count application!!
d3.select('#chart').selectAll('*').remove(); 只需在每次触发$scope.watch函数时清除图表。 现在,我们有了一张图表,在每次使用新功能之前都已将其清除,并且我们拥有功能齐全的字数统计应用程序!
Test it out!
测试一下!
结论和后续步骤 (Conclusion and Next Steps)
That’s it. Push your changes to the staging and production servers. Let’s review what we tackled:
而已。 将您的更改推送到登台服务器和生产服务器。 让我们回顾一下我们解决的问题:
- We started with the configuration and workflow, setting up staging and production servers
- From there, we added the basic functionality – web scraping, data analsyis – and set up a task queue with Redis
- With the back-end functionality set up, attention turned to the front-end where we added Angular, built a custom Directive, and added D3 into the mix
- 我们从配置和工作流程开始,设置临时服务器和生产服务器
- 从那里,我们添加了基本功能-Web抓取,数据分析-并使用Redis设置了任务队列
- 通过设置后端功能,我们将注意力转移到了前端,我们在其中添加了Angular,构建了自定义指令并将D3添加到了混合中
We have an MVP, but there’s still much to be done:
我们有一个MVP,但仍有许多工作要做:
- Refactor, refactor, refactor!
- Write tests
- Handle errors and exceptions
- Abstract out state in the Angular app to a Service
- Work on the UI and UX
- 重构,重构,重构!
- 编写测试
- 处理错误和异常
- 将Angular应用中的状态抽象为服务
- 在UI和UX上工作
Want to help? Add a feature, write part 9, get paid, and become Internet famous!
想帮忙? 添加功能,编写第9部分,获得报酬 ,并在互联网上成名!
翻译自: https://www.pybloggers.com/2016/08/flask-by-example-custom-angular-directive-with-d3/
vue 自定义指令 实例


 807
807

 被折叠的 条评论
为什么被折叠?
被折叠的 条评论
为什么被折叠?
 到【灌水乐园】发言


