


 本文详细介绍了如何将使用Python 3和PostgreSQL的Django应用程序部署到AWS Elastic Beanstalk的全过程,包括设置、配置数据库、处理迁移、使用S3存储媒体文件以及解决故障的方法。通过本文,读者可以了解到如何在AWS环境中管理和扩展Django应用。
aws部署django
The following is a soup to nuts walkthrough of how to set up and deploy a Django application, powered by Python 3, and PostgreSQL to Amazon Web Services (AWS) all while remaining sane.
以下是对如何设置并部署由Python 3和PostgreSQL支持的Django应用程序以及将PostgreSQL部署到Amazon Web Services (AWS)的所有内容的全面介绍,同时保持了所有的理智。

Tools/technologies used:
使用的工具/技术:
Check out the Python 2 version of this article here.
在此处查看本文的Python 2版本。
Elastic Beanstalk与EC2 (Elastic Beanstalk vs EC2)
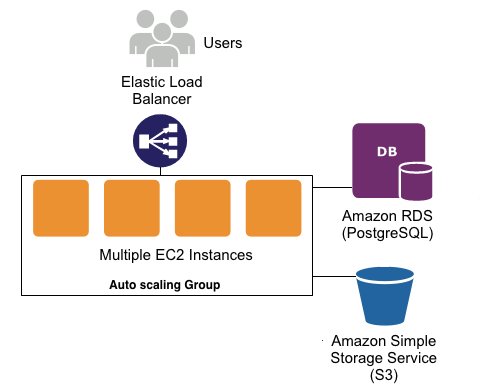
Elastic Beanstalk is a Platform As A Service (PaaS) that streamlines the setup, deployment, and maintenance of your app on Amazon AWS. It’s a managed service, coupling the server (EC2), database (RDS), and your static files (S3). You can quickly deploy and manage your application, which automatically scales as your site grows. Check out the official documentation for more information.
Elastic Beanstalk是一种平台即服务(PaaS),可简化Amazon AWS上应用程序的设置,部署和维护。 这是一项托管服务,将服务器(EC2),数据库(RDS)和您的静态文件(S3)耦合在一起。 您可以快速部署和管理您的应用程序,该应用程序会随着站点的增长而自动扩展。 请查阅官方文档以获取更多信息。
入门 (Getting Started)
We’ll be using a simple “Image of the Day” app, which you can grab from this repository:
我们将使用一个简单的“每日图片”应用,您可以从此存储库中获取该图片:
|
After you download the code, create a virtualenv and install the requirements via pip:
下载代码后,创建一个virtualenv并通过pip安装要求:
|
Next, with PostgreSQL running locally, set up a new database named iotd. Also, depending upon your local Postgres configuration, you may need to update the DATABASES configuration in settings.py. For example, I updated the config to:
接下来,在本地运行PostgreSQL情况下,建立一个名为iotd的新数据库。 另外,根据您本地的Postgres配置,您可能需要在settings.py中更新DATABASES配置。 例如,我将配置更新为:
|
Now you can set up the database schema, create a superuser, and run the app:
现在,您可以设置数据库架构,创建超级用户并运行该应用程序:
|
Navigate to the admin page in your browser at http://localhost:8000/admin and add a new image, which will then be displayed on the main page.
在浏览器中的http:// localhost:8000 / admin上导航到管理页面,并添加一个新图像,该图像将显示在主页上。
The application isn’t meant to be very exciting; we’re just using it for demo purposes. All it does is let you upload an image via the admin interface and display that image full screen on the main page. That said, although this is a relatively basic app, it will still allow us to explore a number of “gotchas” that exist when deploying to Amazon Beanstalk and RDS.
该应用程序并不意味着非常令人兴奋。 我们只是将其用于演示目的。 它所要做的就是让您通过管理界面上传图片,并在主页上全屏显示该图片。 就是说,尽管这是一个相对基本的应用程序,但是它仍然允许我们探索部署到Amazon Beanstalk和RDS时存在的许多“陷阱”。
Now that we have the site up and running on our local machine, let’s start the Amazon deployment process.
现在我们已经在本地计算机上启动并运行了站点,让我们开始Amazon部署过程。
适用于AWS Elastic Beanstalk的CLI (CLI for AWS Elastic Beanstalk)
To work with a Amazon Elastic Beanstalk, we can use a package called awsebcli. As of this writing the latest version of is 3.7.4 and the recommended way to install it is with pip:
要使用Amazon Elastic Beanstalk,我们可以使用一个名为awsebcli的软件包。 撰写本文时,最新版本是3.7.4,建议的安装方式是pip:
|
Now test the installation to make sure it’s working:
现在测试安装以确保它可以正常工作:
|
This should give you a nice 3.x version number:
这应该为您提供一个不错的3.x版本号:
|
To actually start using Elastic Beanstalk you will need an account with AWS (surprise!). Sign up (or log in).
要真正开始使用Elastic Beanstalk,您将需要一个AWS 账户 (惊喜!)。 注册或登录)。

配置EB –初始化您的应用 (Configure EB – initialize your app)
With the AWS Elastic Beanstalk CLI working, the first thing we want to do is create a Beanstalk environment to host the application on. Run this from the project directory (“image-of-the-day”):
在使用AWS Elastic Beanstalk CLI的情况下,我们要做的第一件事是创建一个Beanstalk环境来托管应用程序。 从项目目录(“今日图像”)运行此命令:
|
This will prompt you with a number of questions to help you configure your environment.
这将提示您一些问题,以帮助您配置环境。
Default region
默认区域
Choosing the region closest to your end users will generally provide the best performance. Check out this map if you’re unsure which to choose.
选择最接近最终用户的区域通常可以提供最佳性能。 如果不确定要选择哪个,请查看此地图 。
Credentials
证书
Next, it’s going to ask for your AWS credentials.
接下来,将要求您提供AWS凭证。
Here, you will most likely want to set up an IAM User. See this guide for how to set one up. If you do set up a new user you will need to ensure the user has the appropriate permissions. The simplest way to do this is to just add “Administrator Access” to the User. (This is probably not a great choice for security reasons, though.) For the specific policies/roles that a user needs in order to create/manage an Elastic Beanstalk application, see the link here.
在这里,您很可能希望设置一个IAM用户。 有关如何设置的信息,请参见本指南 。 如果您确实设置了新用户,则需要确保该用户具有适当的权限。 最简单的方法是向用户添加“管理员访问权限”。 (但是,出于安全原因,这可能不是一个好选择。)有关用户创建/管理Elastic Beanstalk应用程序所需的特定策略/角色,请参见此处的链接。
Application name
应用名称
This will default to the directory name. Just go with that.
这将默认为目录名称。 随便去吧。
Python version
Python版本
Next, the CLI should automagically detect that you are using Python and just ask for confirmation. Say yes. Then you need to select a platform version. You have 2 different options here for Python 3:
接下来,CLI应该自动检测到您正在使用Python,并仅要求确认。 说是。 然后,您需要选择一个平台版本。 对于Python 3,您有2种不同的选择:
- Python 3.4
- Python 3.4 (Preconfigured – Docker)
- Python 3.4
- Python 3.4(预配置-Docker)
If you’re a hipster, choose the ‘Preconfigured – Docker’ choice, otherwise go with the normal ‘Python 3.4’. No, only teasing; the basic difference is this:
如果您是时髦人士,请选择“预配置-Docker”选项,否则请使用常规的“ Python 3.4”。 不,只有戏弄; 基本区别是:
Python 3.4 (Python 3.4)
This gives you an EC2 image running 64bit Amazon Linux with Python 3.4 pre-installed. The front end web server is apache, with mod_wsgi installed. This is the “standard” or “traditional” way that Beanstalk works. In other words, with this option Beanstalk will create EC2 images for you, and you can use the ebextension files we will talk about later to customize the EC2 image.
这为您提供了一个运行64位Amazon Linux且预安装了Python 3.4的EC2映像。 前端Web服务器是apache,安装了mod_wsgi。 这是Beanstalk工作的“标准”或“传统”方式。 换句话说,使用此选项,Beanstalk将为您创建EC2映像,并且您可以使用稍后将讨论的ebextension文件来自定义EC2映像。
Python 3.4(预配置-Docker) (Python 3.4 (Preconfigured – Docker))
This gives you an EC2 image running Docker, with a Docker image already setup for you. The Docker image runs 64bit Debian Jessie with Python 3.4, nginx 1.8 and uWSGI 2.0.8. Because you’re basically interacting with the Docker image directly, if you choose this route you would use standard Docker configuration techniques (i.e., a ‘Dockerfile’), and then you don’t have to do much that is AWS Beanstalk specific, as Beanstalk knows how to manage the Docker image for you.
这为您提供了一个运行Docker的EC2映像,并且已经为您设置了Docker映像。 Docker镜像运行带有Python 3.4,nginx 1.8和uWSGI 2.0.8的64位Debian Jessie。 因为您基本上是在直接与Docker映像进行交互,所以如果选择此路由,则可以使用标准的Docker配置技术(即“ Dockerfile”),那么您不必做很多特定于AWS Beanstalk的事情,例如Beanstalk知道如何为您管理Docker映像。
For this article we will focus on the “standard” or “traditional” way of using an EC2 image, so choose the ‘Python 3.4’ option and let’s move on.
在本文中,我们将重点介绍使用EC2映像的“标准”或“传统”方式,因此选择“ Python 3.4”选项,让我们继续。
SSH
SSH协议
Say yes to setting up SSH for your instances.
同意为您的实例设置SSH。
RSA Keypair
RSA密钥对
Next, you need to generate an RSA keypair, which will be added to your ~/.ssh folder. This keypair will also be uploaded to the EC2 public key for the region you specified in step one. This will allow you to SSH into your EC2 instance later in this tutorial.
接下来,您需要生成一个RSA密钥对,它将被添加到您的〜/ .ssh文件夹中。 该密钥对还将上传到您在第一步中指定的区域的EC2公钥。 这将允许您在本教程的后面部分中通过SSH进入EC2实例。
我们完成了什么? (What did we accomplish?)
Once eb init is finished, you will see a new hidden folder called .elasticbeanstalk in your project directory:
eb init完成后,您将在项目目录中看到一个名为.elasticbeanstalk的新隐藏文件夹:
|
Inside that directory is a config.yml file, which is a configuration file that is used to define certain parameters for your newly minted Beanstalk application.
该目录中有一个config.yml文件,该文件是一个配置文件,用于为新创建的Beanstalk应用程序定义某些参数。
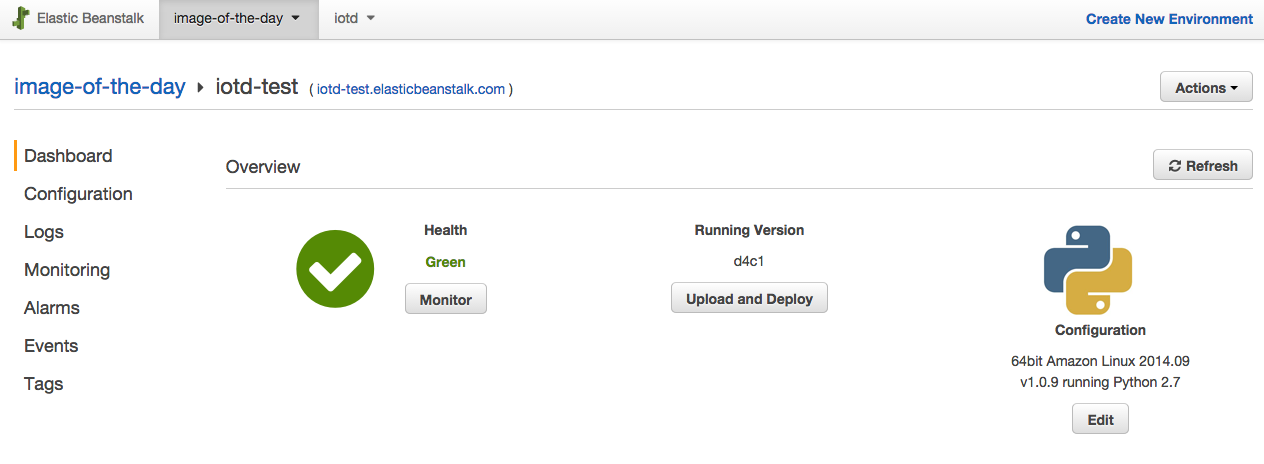
At this point, if you type eb console it will open up your default browser and navigate to the Elastic Beanstalk console. On the page, you should see one application (called image-of-the-day if you’re following along exactly), but no environments.
此时,如果您键入eb console ,它将打开您的默认浏览器并导航到Elastic Beanstalk控制台。 在页面上,您应该看到一个应用程序(如果您完全遵循的话,称为image-of-the-day ),但是没有环境。

An application represents your code application and is what eb init created for us. With Elastic Beanstalk, an application can have multiple environments (i.e., development, testing, staging, production). It is completely up to you how you want to configure/manage these environments. For simple Django applications I like to have the development environment on my laptop, then create a test and a production environment on Beanstalk.
应用程序代表您的代码应用程序,这是eb init为我们创建的。 使用Elastic Beanstalk,应用程序可以具有多个环境(即开发,测试,分段,生产)。 如何配置/管理这些环境完全取决于您。 对于简单的Django应用程序,我希望在笔记本电脑上安装开发环境,然后在Beanstalk上创建测试和生产环境。
Let’s get a test environment set up…
让我们建立一个测试环境...
配置EB –创建环境 (Configure EB – create an environment)
Coming back to the terminal, in your project directory type:
回到终端,在您的项目目录中输入:
|
Just like eb init, this command will prompt you with a series of questions.
就像eb init ,此命令将提示您一系列问题。
Environment Name
环境名称
You should use a similar naming convention to what Amazon suggests – e.g., application_name-env_name – especially when/if you start hosting multiple applications with AWS. I used – iod-test.
您应该使用与Amazon建议的命名约定类似的命名约定-例如application_name-env_name-尤其是当/如果您开始使用AWS托管多个应用程序。 我用过– iod-test 。
DNS CNAME prefix
DNS CNAME前缀
When you deploy an app to Elastic Beanstalk you will automatically get a domain name like xxx.elasticbeanstalk.com. DNS CNAME prefix is what you want to be used in place of xxx. The default probably won’t work if you’re following along because somebody else has already used it (the names are global to AWS), so pick something unique and keep on going.
将应用程序部署到Elastic Beanstalk时,您将自动获得一个域名,例如xxx.elasticbeanstalk.com。 DNS CNAME prefix是您要代替xxx使用的DNS CNAME prefix 。 如果您遵循默认设置,则该默认设置可能无效,因为其他人已经使用过它(名称是AWS的全局名称),因此请选择一些独特的内容并继续进行下去。
现在会发生什么? (What happens now?)
At this point eb will actually create your environment for you. Be patient as this can take some time.
在这一点上, eb会为您创建您的环境。 请耐心等待,因为这可能需要一些时间。
If you do get an error creating the environment, like –
aws.auth.client.error.ARCInstanceIdentityProfileNotFoundException– check that the credentials you are using have appropriate permissions to create the Beanstalk environment, as discussed earlier in this post.如果在创建环境时确实遇到错误,例如
aws.auth.client.error.ARCInstanceIdentityProfileNotFoundException–请检查所使用的凭据是否具有创建Beanstalk环境的适当权限,如本文章前面所述。Also, it may prompt you with a message about
Platform requires a service role. If it does, just say yes and let it create the role for you.另外,它可能会提示您有关“
Platform requires a service role的消息。 如果是这样,只需说“是”,然后让它为您创建角色即可。
Immediately after the environment is created, eb will attempt to deploy your application, by copying all the code in your project directory to the new EC2 instance, running pip install -r requirements.txt in the process.
创建环境后, eb将立即尝试通过将项目目录中的所有代码复制到新的EC2实例,并在此过程中运行pip install -r requirements.txt来部署您的应用程序。
You should see a bunch of information about the environment being set up displayed to your screen, as well as information about eb trying to deploy. You will also see some errors. In particular you should see these lines buried somewhere in the output:
您应该在屏幕上看到一堆有关正在设置的环境的信息,以及有关eb尝试部署的信息。 您还将看到一些错误。 特别是,您应该看到这些行埋在输出中的某个位置:
|
Don’t worry – It’s not really invalid. Check the logs for details:
不用担心-这并不是真的无效。 检查日志以获取详细信息:
|
This will grab all the recent log files from the EC2 instance and output them to your terminal. It’s a lot of information, so you may want to redirect the output to a file (eb logs -z). Looking through the logs, you’ll see one log file named eb-activity.log:
这将从EC2实例中获取所有最近的日志文件,并将它们输出到您的终端。 其中包含很多信息,因此您可能需要将输出重定向到文件( eb logs -z )。 查看日志,您将看到一个名为eb-activity.log的日志文件:
|
The problem is that we tried to install psycopy2 (the Postgres Python bindings), but we need the Postgres client drivers to be installed as well. Since they are not installed by default, we need to install them first. Let’s fix that…
问题是我们试图安装psycopy2 (Postgres Python绑定),但是我们也需要安装Postgres客户端驱动程序。 由于默认情况下未安装它们,因此我们需要先安装它们。 让我们修复一下…
自定义部署过程 (Customizing the Deployment Process)
eb will read custom .config files from a folder called “.ebextensions” at the root level of your project (“image-of-the-day” directory). These .config files allow you to install packages, run arbitrary commands and/or set environment variables. Files in the “.ebextensions” directory should conform to either JSON or YAML syntax and are executed in alphabetical order.
eb将从项目根目录(“每日映像”目录)中名为“ .ebextensions”的文件夹中读取自定义.config文件。 这些.config文件允许您安装软件包,运行任意命令和/或设置环境变量。 “ .ebextensions”目录中的文件应符合JSON或YAML语法,并按字母顺序执行。
安装套件 (Installing packages)
The first thing we need to do is install some packages so that our pip install command will complete successfully. To do this, let’s first create a file called .ebextensions/01_packages.config:
我们需要做的第一件事是安装一些软件包,以便我们的pip install命令将成功完成。 为此,我们首先创建一个名为.ebextensions / 01_packages.config的文件:
|
EC2 instances run Amazon Linux, which is a Redhat flavor, so we can use yum to install the packages that we need. For now, we are just going to install three packages – git, the Postgres client, and libjpeg for Pillow.
EC2实例运行具有Redhat风格的Amazon Linux,因此我们可以使用yum安装所需的软件包。 现在,我们将只安装三个软件包– git,Postgres客户端和用于Pillow的libjpeg。
After creating that file to redeploy the application, we need to do the following:
创建该文件以重新部署应用程序后,我们需要执行以下操作:
|
We have to commit the changes because the deployment command eb deploy works off the latest commit, and will thus only be aware of our file changes after we commit them to git. (Do note though that we don’t have to push; we are working from our local copy…)
我们必须提交更改,因为部署命令eb deploy可以在最近一次提交后工作,因此只有在将文件提交给git后才知道文件更改。 (请注意,尽管我们不必推送;我们正在使用本地副本...)
As you probably guessed, the next command is:
您可能已经猜到了,下一个命令是:
|
You should now see only one error:
您现在应该只看到一个错误:
|
Let’s find out what’s happening…
让我们找出正在发生的事情……
配置我们的Python环境 (Configuring our Python environment)
EC2 instances in Beanstalk run Apache, and Apache will find our Python app according to the WSGIPATH that we have set. By default eb assumes our wsgi file is called application.py. There are two ways of correcting this-
Beanstalk中的EC2实例运行Apache,Apache将根据我们设置的WSGIPATH找到我们的Python应用程序。 缺省情况下, eb假设我们的wsgi文件名为application.py。 有两种方法可以纠正此问题-
Option 1: Using environment-specific configuration settings
选项1:使用特定于环境的配置设置
|
This command will open your default editor, editing a configuration file called .elasticbeanstalk/iod-test.env.yml. This file doesn’t actually exist locally; eb pulled it down from the AWS servers and presented it to you so that you can change settings in it. If you make any changes to this pseudo-file and then save and exit, eb will update the corresponding settings in your Beanstalk environment.
此命令将打开默认编辑器 ,编辑名为.elasticbeanstalk / iod-test.env.yml的配置文件。 该文件实际上在本地不存在。 eb从AWS服务器eb其下拉并提供给您,以便您可以更改其中的设置。 如果您对此伪文件进行了任何更改,然后保存并退出,则eb将更新Beanstalk环境中的相应设置。
If you search for the terms ‘WSGI’ in the file, and you should find a configuration section that looks like this:
如果您在文件中搜索术语“ WSGI”,则应该找到如下所示的配置部分:
|
Update the WSGIPath:
更新WSGIPath:
|
And then you will have you WSGIPath set up correctly. If you then save the file and exit, eb will update the environment configuration automatically:
然后,您将正确设置WSGIPath。 如果然后保存文件并退出,则eb将自动更新环境配置:
|
The advantage to using the eb config method to change settings is that you can specify different settings per environment. But you can also update settings using the same .config files that we were using before. This will use the same settings for each environment, as the .config files will be applied on deployment (after the settings from eb config have been applied).
使用eb config方法更改设置的优点是,您可以为每个环境指定不同的设置。 但是,您也可以使用之前使用的相同.config文件来更新设置。 这将对每个环境使用相同的设置,因为.config文件将在部署时应用(在应用eb config的设置之后)。
Option 2: Using global configuration settings
选项2:使用全局配置设置
To use the .config file option, let’s create a new file called /.ebextensions/02_python.config:
要使用.config文件选项,我们创建一个名为/.ebextensions/02_python.config的新文件:
|
What’s happening?
发生了什么?
DJANGO_SETTINGS_MODULE: "iotd.settings"– adds the path to the settings module."PYTHONPATH": "/opt/python/current/app/iotd:$PYTHONPATH"– updates ourPYTHONPATHso Python can find the modules in our application. (Note that the use of the full path is necessary.)WSGIPath: iotd/iotd/wsgi.pysets our WSGI Path.NumProcesses: 3andNumThreads: 20– updates the number of processes and threads used to run our WSGI application."/static/": "www/static/"sets our static files path.
-
DJANGO_SETTINGS_MODULE: "iotd.settings"–将路径添加到设置模块。 -
"PYTHONPATH": "/opt/python/current/app/iotd:$PYTHONPATH"–更新我们的PYTHONPATH以便Python可以在我们的应用程序中找到模块。 (请注意,必须使用完整路径。) -
WSGIPath: iotd/iotd/wsgi.py设置我们的WSGI路径。 -
NumProcesses: 3和NumThreads: 20–更新用于运行WSGI应用程序的进程和线程的数量。 -
"/static/": "www/static/"设置我们的静态文件路径。
Again, we can do a git commit then an eb deploy to update these settings.
同样,我们可以执行git commit然后进行eb deploy来更新这些设置。
Next let’s add a database.
接下来,我们添加一个数据库。
配置数据库 (Configuring a Database)
Try to view the deployed website:
尝试查看已部署的网站:
|
This command will show the deployed application in your default browser. You should see a connection refused error:
此命令将在您的默认浏览器中显示已部署的应用程序。 您应该看到连接被拒绝的错误:
|
This is because we haven’t set up a database yet. At this point eb will set up your Beanstalk environment, but it doesn’t set up RDS (the database tier). We have to set that up manually.
这是因为我们尚未建立数据库。 此时, eb将设置您的Beanstalk环境,但尚未设置RDS(数据库层)。 我们必须手动设置。
数据库设置 (Database setup)
Again, use eb console to open up the Beanstalk configuration page.
再次使用eb console打开Beanstalk配置页面。
From there, do the following:
从那里执行以下操作:
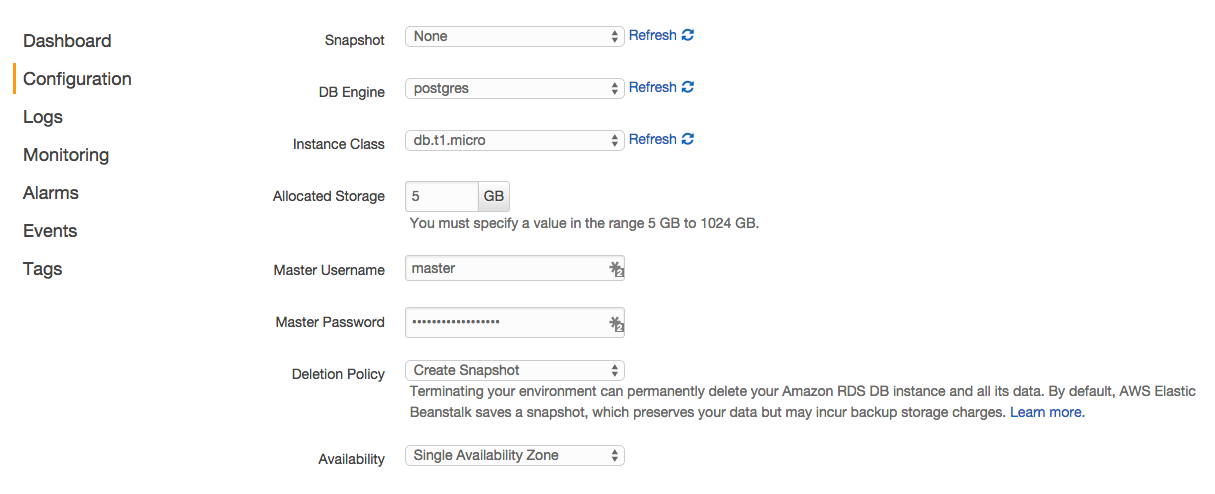
- Click the “Configuration” link.
- Scroll all the way to the bottom of the page, and then under the “Data Tier” section, click the link “create a new RDS database”.
- On the RDS setup page change the “DB Engine” to “postgres”.
- Add a “Master Username” and “Master Password”.
- Save the changes.
- 单击“配置”链接。
- 一直滚动到页面底部,然后在“数据层”部分下,单击链接“创建新的RDS数据库”。
- 在“ RDS设置”页面上,将“数据库引擎”更改为“ postgres”。
- 添加“主用户名”和“主密码”。
- 保存更改。
Beanstalk will create the RDS for you. Now we need to get our Django app to connect to the RDS. Beanstalk will help us out here by exposing a number of environment variables on the EC2 instances for us that detail how to connect to the Postgres server. So all we need to do is update our settings.py file to take advantage of those environment variables. Confirm that the DATABASES configuration parameter reflects the following in settings.py:
Beanstalk将为您创建RDS。 现在,我们需要获取Django应用程序以连接到RDS。 Beanstalk将通过在EC2实例上为我们提供许多环境变量来帮助我们,这些变量详细说明了如何连接到Postgres服务器。 因此,我们要做的就是更新我们的settings.py文件,以利用这些环境变量。 确认DATABASES配置参数在settings.py中反映以下内容:
|
This simply says, “use the environment variable settings if present, otherwise use our default development settings.” Simple.
这只是说:“使用环境变量设置(如果存在),否则使用我们的默认开发设置。” 简单。
处理数据库迁移 (Handling database migrations)
With our database setup, we still need to make sure that migrations run so that the database table structure is correct. We can do that by modifying .ebextensions/02_python.config and adding the following lines at the top of the file:
使用我们的数据库设置,我们仍然需要确保运行迁移,以便数据库表结构正确。 我们可以通过修改.ebextensions / 02_python.config并在文件顶部添加以下几行来做到这一点:
|
container_commands allow you to run arbitrary commands after the application has been deployed on the EC2 instance. Because the EC2 instance is set up using a virtual environment, we must first activate that virtual environment before running our migrate command. Also the leader_only: true setting means, “only run this command on the first instance when deploying to multiple instances.”
container_commands允许您在EC2实例上部署应用程序后运行任意命令。 由于EC2实例是使用虚拟环境设置的,因此我们必须先激活该虚拟环境,然后再运行migration命令。 leader_only: true设置的意思是,“仅在部署到多个实例时在第一个实例上运行此命令。”
Don’t forget that our application makes use of Django’s admin, so we are going to need a superuser…
不要忘记我们的应用程序使用了Django的admin,因此我们将需要一个超级用户…
创建管理员用户 (Create the Admin User)
Unfortunately createsuperuser doesn’t allow you to specify a password when using the --noinput option, so we will have to write our own command. Fortunately, Django makes it very easy to create custom commands.
不幸的是createsuperuser不允许你使用时指定一个密码--noinput选项,所以我们必须写我们自己的命令。 幸运的是,Django使创建自定义命令变得非常容易。
Create the file iotd/images/management/commands/createsu.py:
创建文件iodd / images / management / commands / createsu.py:
|
Make sure you add the appropriate __init__.py files as well:
确保还添加了适当的__init__.py文件:
|
This file will allow you to run python manage.py createsu, and it will create a superuser without prompting for a password. Feel free to expand the command to use environment variables or another means to allow you to change the password.
该文件将允许您运行python manage.py createsu ,它将创建一个超级用户而不提示您输入密码。 随意扩展该命令以使用环境变量或其他允许您更改密码的方法。
Once you have the command created, we can just add another command to our container_commands section in .ebextensions/02_python.config:
创建命令后,我们只需向.ebextensions / 02_python.config中的container_commands部分添加另一个命令即可:
|
Before you test this out, let’s make sure our static files are all put in the correct place…
在测试之前,让我们确保所有静态文件都放置在正确的位置……
静态文件 (Static Files)
Add one more command under container_commands:
在container_commands下再添加一个命令:
|
So the entire file looks like this:
因此,整个文件如下所示:
|
We now need to ensure that the STATIC_ROOT is set correctly in the settings.py file:
现在,我们需要确保在settings.py文件中正确设置了STATIC_ROOT :
|
Make sure you commit the www directory to git so the static dir can be created. Then run eb deploy again, and you should now be in business:
确保将www目录提交到git,以便可以创建静态目录。 然后再次运行eb deploy ,您现在应该可以从事业务了:
|
At this point you should be able to go to http://your_app_url/admin, log in, add an image, and then see that image displayed on the main page of your application.
此时,您应该可以转到http:// your_app_url / admin ,登录并添加图像,然后查看该图像显示在应用程序的主页上。
Success!
成功!
使用S3进行媒体存储 (Using S3 for Media Storage)
With this setup, each time we deploy again, we will lose all of our uploaded images. Why? Well, when you run eb deploy, a fresh instance is spun up for you. This is not what we want since we will then have entries in the database for the images, but no associated images. The solution is to store the media files in Amazon Simple Storage Service (Amazon S3) instead of on the EC2 instance itself.
使用此设置,每次我们再次部署时,我们都会丢失所有上传的图像。 为什么? 好了,当您运行eb deploy ,会为您旋转一个新实例。 这不是我们想要的,因为我们将在数据库中为图像添加条目,但没有关联的图像。 解决方案是将媒体文件存储在Amazon Simple Storage Service(Amazon S3)中,而不是存储在EC2实例本身上。
You will need to:
您将需要:
- Create a bucket
- Grab your user’s ARN (Amazon Resource Name)
- Add bucket permissions
- Configure your Django app to use S3 to serve your static files
Since there are good write ups on this already, I’ll just point you to my favorite: Using Amazon S3 to store you Django Static and Media Files
由于已经对此进行了很好的编写,因此,我将向您指出我的最爱: 使用Amazon S3为您存储Django静态文件和媒体文件
Apache配置 (Apache Config)
Since we are using Apache with Beanstalk, we probably want to set up Apache to (among other things) enable gzip compression so files are downloaded faster by the clients. That can be done with container_commands. Create a new file .ebextensions/03_apache.config and add the following:
由于我们将Apache与Beanstalk一起使用,我们可能希望将Apache设置为(启用其他功能)启用gzip压缩,以便客户端更快地下载文件。 这可以通过container_commands完成。 创建一个新文件.ebextensions / 03_apache.config并添加以下内容:
|
Then you need to create the file .ebextensions/enable_mod_deflate.conf:
然后,您需要创建文件.ebextensions/enable_mod_deflate.conf :
|
Doing this will enable gzip compression, which should help with the size of the files you’re downloading. You could also use the same strategy to automatically minify and combine your CSS/JS and do any other preprocessing you need to do.
这样做将启用gzip压缩,这应该有助于您下载文件的大小。 您还可以使用相同的策略来自动最小化和组合CSS / JS并进行所需的任何其他预处理。
故障排除 (Troubleshooting)
Don’t forget the very helpful eb ssh command, which will get you into the EC2 instance so you can poke around and see what’s going on. When troubleshooting, there are a few directories you should be aware of:
不要忘了非常有用的eb ssh命令,它将带您进入EC2实例,因此您可以四处看看并查看发生了什么。 在进行故障排除时,应注意一些目录:
/opt/python– Root of where you application will end up./opt/python/current/app– The current application that is hosted in the environment./opt/python/on-deck/app– The app is initially put in on-deck and then, after all the deployment is complete, it will be moved tocurrent. If you are getting failures in yourcontainer_commands, check out out theon-deckfolder and not thecurrentfolder./opt/python/current/env– All the env variables thatebwill set up for you. If you are trying to reproduce an error, you may first need tosource /opt/python/current/envto get things set up as they would be when eb deploy is running.opt/python/run/venv– The virtual env used by your application; you will also need to runsource /opt/python/run/venv/bin/activateif you are trying to reproduce an error.
-
/opt/python您的应用程序将在何处结束的根。 -
/opt/python/current/app环境中托管的当前应用程序。 -
/opt/python/on-deck/app–该应用程序最初放在甲板上,然后在所有部署完成后将其移至current。 如果您在container_commands中遇到故障,请检出on-deck文件夹,而不是current文件夹。 -
/opt/python/current/env–eb将为您设置的所有env变量。 如果您尝试重现错误,则可能首先需要获取source /opt/python/current/env来进行设置,就像eb deploy运行时一样。 -
opt/python/run/venv–应用程序使用的虚拟环境; 如果您尝试重现错误,则还需要运行source /opt/python/run/venv/bin/activate。
结论 (Conclusion)
翻译自: https://www.pybloggers.com/2016/05/deploying-django-python-3-postgresql-to-aws-elastic-beanstalk/
aws部署django


 2375
2375

 被折叠的 条评论
为什么被折叠?
被折叠的 条评论
为什么被折叠?
 到【灌水乐园】发言


