


hexo 加快访问速度
This post is originally from my blog on www.jaredwolff.com.
这篇文章最初来自我在www.jaredwolff.com上的博客。
Web rankings are dictated by how fast you serve your content.
Web排名由您提供内容的速度决定。
You need to optimize to get that top spot. As an added benefit your visitors will thank you. (or not even notice — a good thing!)
您需要进行优化以获得最高排名。 此外,您的访客还会感谢您。 (或什至没有注意到-一件好事!)
In this article, I show you how to optimize your site for speed.
在本文中,我向您展示了如何优化网站以提高速度。
Let's get started.
让我们开始吧。
获取基准 (Get the Baseline)
First, let's sample your site.
首先,让我们对您的网站进行示例。
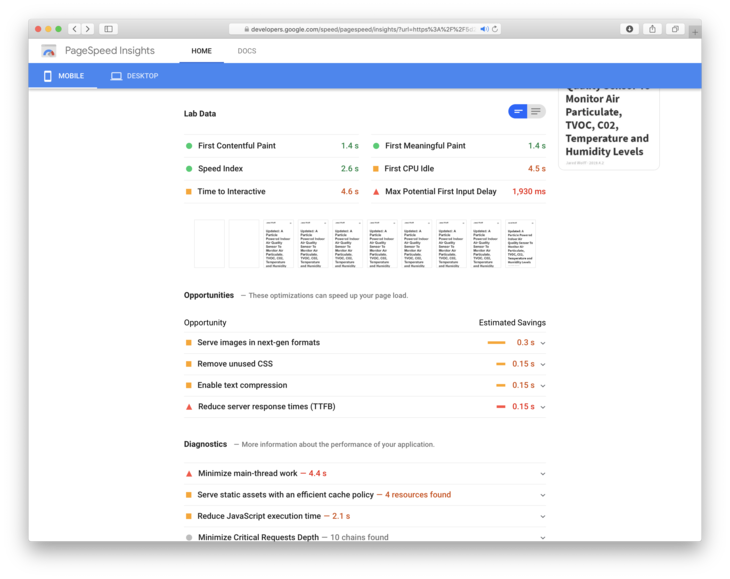
Google's PageSpeed insights tool should be your first stop. After using it you'll know if your site is optimized for both mobile and desktop.
Google的PageSpeed见解工具应该是您的第一站。 使用它后,您将知道您的网站是否针对移动和桌面进行了优化。
Google bases their speed tests on how fast your page renders content. i.e. They measure how long it takes until your website hits your visitors eyeballs. The longer the wait, the lower the score.
Google的速度测试基于页面呈现内容的速度。 即,他们测量您的网站吸引访问者的眼球之前需要多长时间。 等待时间越长,分数越低。
Here's a screenshot from this page on my blog.
这是我博客上此页面的截图。
This screenshot was taken after optimizing a few big issues. I ditched Disqus, inlined my CSS and Javascript. Performance went from being in the 50/100 range to being in the 90/100 on mobile. Not bad!
此屏幕快照是在优化了一些大问题之后拍摄的。 我放弃了Disqus ,并插入了CSS和Javascript。 在移动设备上,性能从50/100变为90/100。 不错!
One of my main complaints about Pagespeed Insights is how slow it is.
我对Pagespeed Insights的主要抱怨之一是它的运行速度很慢 。
Like.. unbearably slow.
像.. 难以忍受的缓慢。
The solution?
解决方案?
Lighthouse.
灯塔。
使用灯塔 (Using Lighthouse)
Lighthouse is an npm package that you can install on your computer. It's basically Pagespeed Insights but on steroids. (Pagespeed Insights is based on Lighthouse)
Lighthouse是一个npm软件包,您可以在计算机上安装。 它基本上是Pagespeed Insights,但使用类固醇。 (Pagespeed Insights基于Lighthouse)
When you run it locally, you'll keep any information that get's generated from the tests. (Though, i'm sure Chrome phones home about the things you're doing.. ?)
在本地运行时,您将保留测试生成的所有信息。 (不过,我敢肯定Chrome手机会把您正在做的事情带回家。
Here's how to get started:
入门方法如下:
To install you can run:
要安装,您可以运行:
npm install -g lighthouseAlso make sure you have some version of Google Chrome installed. I'm using Chrome Canary.
另外,请确保您已安装某些版本的Google Chrome浏览器。 我正在使用Chrome Canary。
Then you can run it and get a report like this
然后您可以运行它并获得这样的报告
lighthouse https://www.jaredwolff.com --view--viewwill cause the report to be opened in your default web browser. Here is a report from the same page as earlier:--view将使报告在默认的Web浏览器中打开。 这是与先前页面相同的报告: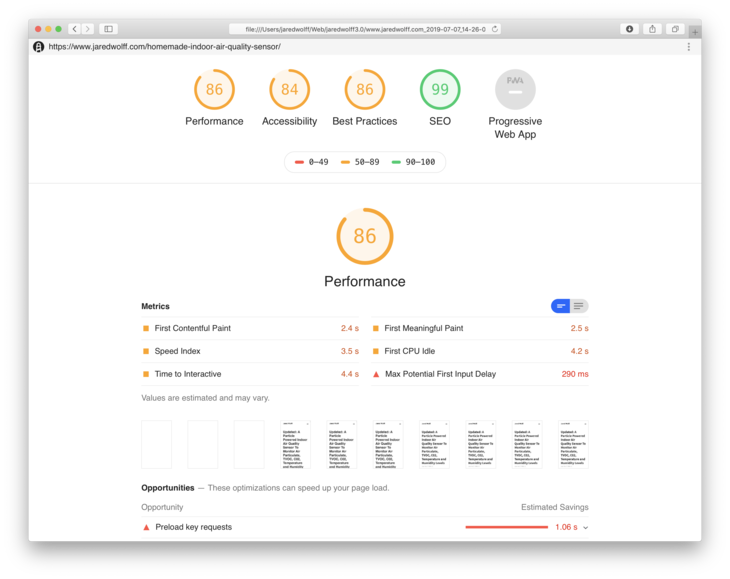
It not only includes Performance but Accessibility, Best practices and SEO suggestions.
它不仅包括性能,还包括可访问性,最佳实践和SEO建议。
The downside is you'll have to run this test on a page-by-page basis. I suggest you sample pages that have lots of content. That way you're testing the worst of your site. Once you fix the worst, your whole site will see a performance boost!
缺点是您必须逐页运行此测试。 我建议您对包含大量内容的页面进行采样。 这样,您就可以测试最糟糕的网站。 解决最糟糕的问题后,整个网站的性能都会得到提高!
静止 (Go Static)

Remember when websites were 100% HTML & CSS?
还记得网站是100%使用HTML和CSS的时候吗?
Over the past years we went from pure HTML, to Ruby On Rails and slowly we're making our way back.
在过去的几年中,我们从纯HTML转向了Ruby On Rails,然后慢慢地我们又回到了自己的道路上。
The reason?
原因?
Speed.
速度。
Every time you visit a website running Flask, Ruby on Rails or similar it goes something like this:
每次您访问运行Flask,Ruby on Rails或类似网站的网站时,都会显示以下内容:
- Make a request for a page 要求页面
- Server pieces your site together 服务器将您的网站组合在一起
- Server minifies and gzip 服务器缩小并压缩
- Sever sends content back to the browser 服务器将内容发送回浏览器
This itself, doesn't take long. When you multiply that by 1000's or 10's of 1000's you start running into problems.
这本身并不需要很长时间。 当您将其乘以1000或1000的10时,就会遇到问题。
What if you do all the piecing together once?
如果一次都将所有接头拼接在一起怎么办?
That's the advantage of a statically generated website.
这就是静态生成的网站的优势。
Let's take a look at how it works:
让我们看一下它是如何工作的:
静态网站生成器如何工作? (How does a static site generator work?)
A static site generator is a collection of templates and styles. They can be assembled together to generate different content.
静态网站生成器是模板和样式的集合。 它们可以组装在一起以生成不同的内容。
As a backend, static site generators use markdown and (sometimes) JSON.
作为后端,静态网站生成器使用markdown和(有时)JSON。
When it's time to compile, templates are assembled. The Markdown is converted to HTML and then injected into the templates. The result? An output directory of rich "dynamic looking" pages. (Much like the one you're reading right now if you're on my site!)
在编译时,将组装模板。 Markdown转换为HTML,然后注入到模板中。 结果? 丰富的“动态外观”页面的输出目录。 (就像您现在在我的网站上一样,现在正在阅读的内容!)
Personally, my blog is Hugo powered. I've also dabbled with Middleman and Jekyll. No matter what you're looking for, you'll likely find a static site generator that will fit your needs! Netlify has a nice list of Static Site Generators sorted by popularity. Check it out here.
就个人而言,我的博客由Hugo提供支持。 我还涉猎了Middleman和Jekyll 。 无论您要寻找的是什么,您都可能会找到适合您需求的静态网站生成器! Netlify有一个按受欢迎程度排序的静态站点生成器列表。 在这里查看。
插件丰富 (Plugins Galore)
Static site generators no longer only compile sites. They optimize, minify and resize images. This built in functionality is another reason why to consider a statically generated site. Tap into these resources, and your site will be notably faster.
静态站点生成器不再仅编译站点。 它们优化,缩小和调整图像大小。 内置功能是考虑静态生成网站的另一个原因。 充分利用这些资源,您的站点将明显更快。
For example, originally I was using highlight.min.js for highlighting code. Since discovering the built in syntax highlighting in Hugo, I ditched highlight.min.js. Hugo injects the CSS into the HTML for the code blocks. Leaving nicely formatted (and static) page!
例如,最初我是使用highlight.min.js来突出显示代码。 自从在Hugo中发现内置语法高亮显示以来,我放弃了highlight.min.js 。 Hugo将CSS注入代码块HTML中。 留下格式正确(和静态)的页面!
嵌入Javascript和CSS (Embedding Javascript and CSS)

As I alluded to in the earlier section, you'll take a performance hit when you have to load anything extra.
正如我在前面的部分中提到的那样,当您必须加载任何额外的内容时,会对性能造成影响。
Recently, Hugo got the ability to copy content from file into the final HTML code. This is fantastic for things like CSS and Javascript. This way, everything is built into your HTML file. There's no extra fetches required!
最近,Hugo能够将文件中的内容复制到最终HTML代码中。 对于CSS和Javascript之类的东西来说,这太棒了。 这样,所有内容都内置在HTML文件中。 不需要额外的获取!
For example, I place my full stye.css file in the header of the site. That way all the styles get applied immediately.
例如,我将完整的stye.css文件放在网站的标题中。 这样,所有样式都会立即应用。
<!-- Css -->
{{- $style := resources.Get "/css/style.css" -}}
<style>
  {{ ( $style | minify ).Content | safeCSS }}
</style>
In the footer, i'm exporting the minified lazysizes.min.js into a <script> tag. It's important that this is loaded asap because it dictates how the rest of the site will load.
在页脚中,我将缩小的lazysizes.min.js导出到<script>标记中。 尽快加载很重要,因为它决定了网站其余部分的加载方式。
<!-- Lazy Load Script -->
{{- $lazysizes := resources.Get "/js/lazysizes.min.js" -}}
<script>
  {{ ( $lazysizes | minify ).Content | safeJS }}
</script>
Side Note: both style.css and lazysizes.min.js are located in my main theme folder under assets. Hugo uses the assets folder to look for these files. If you have a Hugo site and you want to embed your css and javascript I recommend you check out this resource.
lazysizes.min.js : style.css和lazysizes.min.js都位于我的主主题文件夹中assets下。 Hugo使用assets文件夹查找这些文件。 如果您有Hugo网站,并且想要嵌入CSS和javascript,建议您查看此资源。
Side Note Numero Dos: As you can see above, i'm using Hugo's built in minify function for the embedded items. The javascript is already minified but style.css isn't. There's also another programatic way to minify all your assets. I'll go into more on that in the Optimizing using Gulp section.
旁注Numero Dos:如上所示,我正在使用Hugo内置的minify函数来嵌入项目。 javascript已经缩小,而style.css尚未缩小。 还有另一种程序化的方式来最小化您的所有资产。 我将在“ 使用Gulp优化”部分中对此进行详细介绍。
使用内置的 (Use what's built in)
You may be noticing by now that importing javascript can take a toll. Using it for every feature on a website could lead to crap performance!
您可能现在已经注意到,导入javascript可能会付出巨大的代价。 将其用于网站上的每个功能都可能导致垃圾效果!
For example, we could use a javascript library for form validation. But is there a better way?
例如,我们可以使用javascript库进行表单验证。 但是有更好的方法吗?
(yup)
(对)
You can use the HTML5 tags like required and use pattern to validate in browser. If you want an example, check out the contact form on my website.
您可以使用requiredHTML5标签,并使用pattern在浏览器中进行验证。 如果您想举个例子,请查看我网站上的联系表 。

All the validation you see, is done in browser. No extra javascript. No delay in loading. ?
您看到的所有验证都是在浏览器中完成的。 没有多余JavaScript。 加载没有延迟。 ?
A great resource for all of this is here: https://css-tricks.com/form-validation-part-1-constraint-validation-html/ Chris also has a detailed step-by-step portion on vanilla javascript validation. You can take it further if you so choose.
此处提供了很多有用的资源: https : //css-tricks.com/form-validation-part-1-constraint-validation-html/ Chris还提供了有关香草javascript验证的详细分步说明。 如果您愿意的话,可以将其更进一步。
组织代码 (Organizing Code)
Where you put your javascript and css will affect performance. For instance, I place my javascript and CSS in strategic locations. The main stylesheet in the <head> otherwise the rest are in the footer or inline with the HTML. Similarly, the javascript mostly lives at the bottom of the page. That way, all the important stuff gets loaded first.
您将JavaScript和CSS放在哪里会影响性能。 例如,我将javascript和CSS放在重要位置。 <head>的主要样式表,否则其余样式在页脚中或与HTML内联。 同样,javascript大部分位于页面底部。 这样,所有重要的东西都将首先加载。
Here is an example of how I organize my javascript:
这是我如何组织JavaScript的示例:
...
</footer>
...

<script src="https://code.jquery.com/jquery-3.4.1.min.js"   integrity="sha256-CSXorXvZcTkaix6Yvo6HppcZGetbYMGWSFlBw8HfCJo="   crossorigin="anonymous"></script>
<script src="https://cdn.jsdelivr.net/npm/js-cookie@2/src/js.cookie.min.js"></script>
I encourage you to experiment to see what improves your site performance. If you can go without certain javascript libraries, I highly encourage you nix em!
我鼓励您尝试一下,看看能改善您网站的性能。 如果您可以不用某些JavaScript库,则强烈建议您使用nix em!
延迟加载 (Lazy Loading)

Lazy loading is an effective way to defer loading of assets not in view. This improves, what Google calls, the "time to interactive" experience. An added bonus is if the visitor doesn't scroll down, the images aren't loaded. Thus saving bandwidth and money for high traffic sites.
延迟加载是一种有效的方法,可以延迟不可见的资产的加载。 Google称之为“互动时间”的体验,从而改善了这种体验。 另外一个好处是,如果访客不向下滚动,则不会加载图像。 从而为高流量站点节省带宽和金钱。
Lazy loading comes in the form of javascript. There are a few libraries out there:
延迟加载以javascript的形式出现。 有一些库:
Lazysizes (⭐️ 11k) - seems to be the most popular in this department. It is larger than some of the alternatives. I've been testing it's usefulness around lazy loading iframes and javascript content that isn't immediately necessary. For instance, I embed an iframe for the Google Docs chart on this post. On the same post I also lazy load the Youtube video towards the end of the article.
Lazysizes (⭐️11k)-在这个部门中似乎是最受欢迎的。 它比某些替代方案要大。 我一直在测试围绕懒惰加载iframe和javascript内容(不是立即需要的)的有用性。 例如,我在这篇文章中为Google文档图表嵌入了一个iframe。 在同一篇文章中,我还懒洋洋地在文章结尾处加载了YouTube视频。
Layzr.js (⭐️ 5.5k) - for images only
Layzr.js (⭐️5.5k)-仅用于图像
lozad (⭐️ 5.4k) - does everything that lazysizes does. This library is focused on using the Intersection Observer API. Whereas Lazysizes uses both the Intersection Observer API and
lozad (⭐️5.4k)-做lazysizes做的所有事情。 该库专注于使用Intersection Observer API。 Lazysizes同时使用Intersection Observer API和
yall (⭐️ 800) - This library is also focused on using the Intersection Observer API.
yall (⭐️800)-该库还专注于使用Intersection Observer API。
设置延迟加载 (Setting up Lazy Loading)
It's extremely simple to set up. I'll show you how to use lazysizes
设置非常简单。 我会告诉你如何使用lazysizes
Include the file in your HTML
在HTML中包含文件
<script src="lazysizes.min.js" async=""></script>(Or if you're using Hugo, inject it directly into your HTML like I did in Embedding Javascript and CSS)
(或者,如果您使用的是Hugo,则将其直接注入HTML中,就像我在嵌入Javascript和CSS中所做的那样)
Add the
lazyloadclass to whatever you're lazy loading将
lazyload类添加到您要延迟加载的任何内容中Change the
srctag todata-src将
src标记更改为data-src
观看魔术 (Watch the Magic)
When someone visits your site, the lazy loader starts monitoring where the user is. When the visitor scrolls, it loads soon to be viewed content marked with the lazyloadclass.
当有人访问您的站点时,惰性加载器将开始监视用户所在的位置。 访客滚动时,它将很快加载以查看带有lazyload类标记的内容。
Here is an example for a Youtube video embedded on this page:
这是此页面上嵌入的YouTube视频的示例:
<iframe class="lazyload" width="700px" height="400px" data-src="https://www.youtube.com/embed/IR2W0GmRKk8" frameborder="0" allow="accelerometer; autoplay; encrypted-media; gyroscope; picture-in-picture" allowfullscreen></iframe>This prevents the iframe from loading until the user has scrolled close by. Nice!
这样可以防止iframe加载,直到用户滚动到附近为止。 真好!
使用Gulp进行优化 (Optimizing using Gulp)
Not everything can be optimized by Jekyll or Hugo. So what can you do?
Jekyll或Hugo并不能优化所有内容。 所以,你可以做什么?
Enter gulp
输入gulp
gulp is my tool of choice for optimizing my Hugo site. There are a wide array of well supported plugins for gulp. They can do everything from optimize images to minify HTML.
gulp是优化我的Hugo网站的首选工具。 有一个广泛的很好的支持插件的阵列gulp 。 他们可以做所有事情,从优化图像到缩小HTML。
Here are some of my favorites:
这是我的最爱:
gulp-uglify - minifies and compresses javascript. I only have one javascript library i'm using right now which this applies to. If you're project is Javascript heavy though, definitely look into gulp-uglify
gulp gulp-uglify uglify-缩小并压缩javascript。 我现在只有一个正在使用的javascript库,这适用于该库。 如果您的项目是JavaScript繁重的项目,则一定要研究gulp-uglify
gulp-htmlmin - minifies HTML. You can also use it to minify inline Javascript and CSS.
gulp-htmlmin缩小HTML。 您也可以使用它来缩小内联Javascript和CSS。
gulp-imagemin - probably the most useful gulp plugin for my purposes. Right now i'm having it resize, convert to jpg and then convert to a progressive jpeg. It's relatively fast and when combined with gulp-cache it only has to be done once! It may seem complicated but the output produces image sizes that Lighthouse loves.
gulp-imagemin可能对我而言是最有用gulp-imagemin插件。 现在,我正在调整它的大小,将其转换为jpg,然后转换为渐进式jpeg。 它相对较快,当与gulp-cache结合使用时,只需要做一次! 看起来似乎很复杂,但是输出产生了Lighthouse喜欢的图像大小。
例 (Example)
If you're curious, here's a snippet from my gupfile.js for imagemin
如果您很好奇,这是我的gupfile.js中的imagemin片段
gulp.task("resize", function() {
  return gulp
    .src(["content/**/**/*.+(png|jpg|jpeg|gif)"])
    .pipe(cache(imagemin([
      imagemingm.resize({width: 720}),
      imagemingm.convert('jpg'),
      imageminmozjpeg({quality: 80})
    ],{
    verbose: true
    }), {
      fileCache: new Cache({ tmpDir: path.join(process.env.PWD, 'node_modules'), cacheDirName: '.cache' })
    }))
    .pipe(gulp.dest("public/"));
});
Some important things to notice
一些重要的注意事项
I've used
**to denote a wildcard value for a directory name. Depending on the depth of your images you may need to add more**/to your path. This works well for my path which is typically/contents/post-name/images/image-file.jpg我用
**表示目录名的通配符值。 根据图像的深度,您可能需要在路径中添加更多**/。 这对于我的路径通常是/contents/post-name/images/image-file.jpg很/contents/post-name/images/image-file.jpgSetting up other plugins that don't come with
gulp-imagemincan be confusing.imageminmozjpegfor example, is imported separately. I set it up at the top of my file like so:var imageminmozjpeg = require('imagemin-mozjpeg');设置其他不附带
gulp-imagemin可能会造成混淆。 例如,imageminmozjpeg是单独导入的。 我将其设置在文件的顶部,如下所示:var imageminmozjpeg = require('imagemin-mozjpeg');Finally, you can see that i'm using
gulp-cachehere. Depending on where you're building your site, you may not have to define any options. I use Netlify for my site. The only way forgulp-cacheto work is to definetmpDirandcacheDirNameto thenode_modulesfolder. That way, when your site is built, your cache is re-loaded. No resizing images if we don't have to!最后,您可以看到我在这里使用
gulp-cache。 根据构建网站的位置,您可能不必定义任何选项。 我将Netlify用于我的网站。tmpDirgulp-cache起作用的唯一方法是在node_modules文件夹中定义tmpDir和cacheDirName。 这样,在构建站点时,将重新加载缓存。 无需调整图像大小!
By using gulp-cache, my build + deploy times went from 10 minutes to ~60 seconds. ? Trading the minor increase in cache size for compute time is definitely worth it. Plus, I'm sure Netlify is happy about that!
通过使用gulp-cache ,我的构建和部署时间从10分钟缩短到60秒左右。 ? 将缓存大小的微小增加用于计算时间无疑是值得的。 另外,我确信Netlify对此感到高兴!
清除残留物 (Remove the Cruft)
When there's convenience, there's always a tradeoff.
如果有方便,总会有一个权衡。
That's what I was finding as I continued to use Google Analytics and services like Disqus. Disqus in particular, had a tendency to drive me up the wall. (Ever look at your Javascript Debug console on a site using Disqus? You'll see why..)
这就是我继续使用Google Analytics(分析)和类似Disqus的服务时发现的。 特别是,Disqus倾向于将我推向高潮。 (您是否曾经使用Disqus在站点上查看您的Javascript调试控制台?您将明白原因。)
I recently wrote a tutorial on how to switch from Disqus to self-hosted Commento. There are two benefits to make the switch:
我最近写了一个有关如何从Disqus切换到自托管Commento的教程。 进行切换有两个好处:
You get control of your site content. There's no 3rd party service that could go poof tomorrow. (It is up to you to make sure your content is backed up! One advantage of paying for a service instead of hosting).
您可以控制自己的网站内容。 明天没有第三方服务可以闹鬼。 (由您来确保您的内容得到备份! 为服务付费而不是托管的优势之一)。
You'll get a performance boost!
您将获得性能上的提升!
I've tested the before and after and the results are in. Disqus was a major drag on network and CPU usage.
我之前和之后都进行了测试,结果是正确的。Disqus是网络和CPU使用率的主要障碍。
Commento, is light and resource usage is minimal. Perfect companion for a statically generated site!
Commento,比较轻巧,资源使用最少。 静态生成网站的完美伴侣!
As a site owner, the quality and speed is completely dependent on your site features. Remember, there may be better alternatives out there. No need to sell your soul to Google, Disqus, or anyone if you don't need to!
作为网站所有者,质量和速度完全取决于您的网站功能。 记住,那里可能还有更好的选择。 无需将您的灵魂出售给Google,Disqus或任何其他人!
现场审核 (Site Audit)
As I wrap up this post, I do want to leave you with one more handy tool.
当我结束这篇文章时,我确实想给您一个方便的工具。
Serpstat's Site Audit tool.
Serpstat的 站点审核工具。
I used it to crawl my site on a regular interval. It's extremely useful for catching all types of errors. For instance, just recently it caught a few images that were broken. I made a few edits and everything was back up and running!
我用它定期爬网。 捕获所有类型的错误非常有用。 例如,最近它捕获了一些损坏的图像。 我进行了一些编辑,一切都已备份并运行!
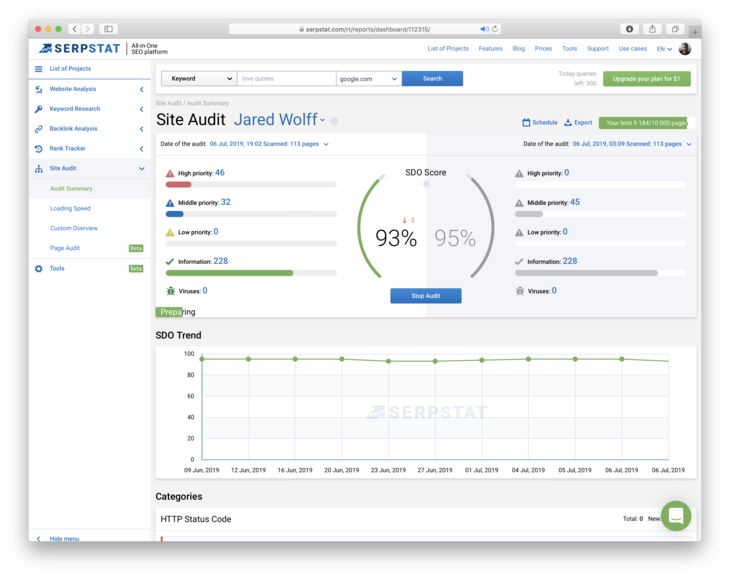
If you want to keep your site error free, nothing beats a site audit tool like Serpstat's!
如果您想保持站点无错误,没有什么比Serpstat的站点审计工具更胜一筹了!
你永远都做不完 (You're never done)
You read right. You'll never be done.
您没看错。 您将永远无法完成。
Improving performance for an actively developed site is never ending. Despite your best efforts you could spend days on the minute of optimizing images and lazy loading. When it comes down to it, how much of it is worth it? That's a question i'm still trying to answer myself!
积极开发网站的性能提升永无止境。 尽管尽了最大的努力,您还是可以花几天时间优化图像和延迟加载。 归结为它,其中有多少值得? 这是我仍在试图回答自己的问题!
I hope you've found this article useful. What was your biggest takeaway? Have a optimization tip that I didn't mention? Sound off in the comments below!
希望本文对您有所帮助。 您最大的收获是什么? 有我没有提到的优化技巧吗? 请在下面的评论中留言!
翻译自: https://www.freecodecamp.org/news/seven-ways-to-optimize-your-site-for-speed/
hexo 加快访问速度


 4218
4218


 被折叠的 条评论
为什么被折叠?
被折叠的 条评论
为什么被折叠?
 到【灌水乐园】发言


