


This article mostly covers the aspect of JavaScript in this web application. We used HTML, CSS (optional) and JavaScript.
本文主要介绍此Web应用程序中JavaScript的方面。 我们使用了HTML,CSS(可选)和JavaScript。
Our basic idea for this Web application is to create and delete our task/job as per our choice. We will use HTML to structure it and CSS (again it is totally optional), and javascript to provide functionality like adding or removing tasks from the list. We created 3 files: index.html, style.css, todo.js
该Web应用程序的基本思想是根据我们的选择创建和删除任务/作业 。 我们将使用HTML来构造它和CSS(同样完全是可选的),并使用javascript提供诸如添加或删除列表中的任务之类的功能。 我们创建了3个文件: index.html , style.css和todo.js
Let's start with index.html:
让我们从index.html开始:
<html lang="en">
<head>
    <meta charset="UTF-8">
    <meta name="viewport" content="width=device-width, initial-scale=1.0">
    <meta http-equiv="X-UA-Compatible" content="ie=edge">
    <link rel="stylesheet" href="style.css">
    <title>IncludeHelp is Awesome</title>
</head>
<body>
    <div id="container">
        <div class="controls">
            <h1>My Awesome To-do</h1>
            <input type="text" name="" id="input"><br>
            <button type="button" id="add">Add Task</button>
            <button type="button" id="remove">Remove Task</button>
        </div>
        <ul id="list">
            <li class="mycheck"><input type="checkbox" id="check"><label >
				Go to Gym</label></li>
            <li class="mycheck"><input type="checkbox" id="check"><label >
				Read Articles on IncludeHelp</label></li>
            <li class="mycheck"><input type="checkbox" id="check"><label >
				Learn JavaScript</label></li>
        </ul>
    </div>
    <script src="todo.js"></script>
</body>
</html>
Explanation:
说明:
We created this HTML document, with the title "IncludeHelp is Awesome" which will be shown on our tab. Now come to the body of the HTML, we created a container (id) division which has two children another division which holds the input textBox, add and remove buttons andofcourse, our applications Name "My Awesome Todo" and second child of the container is <ul> that is unordered List. Inside unordered list, we predefined three Tasks as "Go to Gym", "Read a Articles on IncludeHelp" and "Learn JavaScript".
我们创建了这个HTML文档,标题为“ IncludeHelp is Awesome” ,该标题将显示在我们的标签上。 现在来看看HTML的身上,我们创建了有两个孩子,另一个部门持有的输入文本框中添加和删除按钮andofcourse,我们的应用程序名称“我真棒TODO”和容器的第二个孩子是一个容器(ID)师<ul>是无序列表。 在无序列表中,我们预定义了三个任务: “去健身房” , “在IncludeHelp上阅读文章”和“学习JavaScript” 。
In each list under unordered list, we have an input type checkbox and a label. And in the last line, we linked our JavaScript file with HTML document.
在无序列表下的每个列表中,我们都有一个输入类型复选框和一个标签。 在最后一行中,我们将JavaScript文件与HTML文档链接在一起。
Now let's see CSS part, [again guys... this is totally optional and we can do without it too]:
现在让我们看一下CSS部分,[再次……这是完全可选的,我们也可以不用它]:
style.css:
style.css:
What we did in this Style Sheet that is we set attributes for hover and focus on buttons and strike-though the label text open checking them and rest you can see.
在此样式表中,我们所做的是设置悬停属性并集中在按钮上,并敲击标签文本打开以检查它们并让您看到其余的内容。
body{
    background-color: #34495e
}
#container {
    width: 350px;
    height: auto;
    margin: 0 auto;
    text-align: center;
    background: white;
    height: 800px;
    overflow: auto;
    color: black;
    border: 10px solid #01a3a4;
    border-radius: 10px;
}
#container h1 {
    margin-top: 50px;
    margin-bottom: 50px;
    text-transform: uppercase;

}
#container ul{
    margin-top: 50px;
    padding-left: 0;
}
#container ul li{
    list-style: none;
    border: 2px solid #b5c5dd;
    width: 80%;
    opacity: 0;
    transition: opacity 0.5s ease-in-out;
    height: 40px;
    margin: 5px auto;
    text-align: left;
}
#container ul li label{
    margin: 0 auto;
    vertical-align: middle;
    height: 100%;
    line-height: 40px;
    font-size: 18px;

}

#container ul li #check{
    float: left;
    width: 30px;
    height: 30px;
    margin: 5px;
    -webkit-appearance: none;
    border: 2px solid #b5c5dd;
    position: relative;
    outline: 0;
}

#container ul li #check:checked::after {
    content: '\2714';
    font-size: 20px;
    position: absolute;
    top: 0px;
    left: 7px;
    color: black;
}

#container ul li input[type='checkbox']:checked+label{
    text-decoration: line-through;
    color: rgba(0, 0, 0, 0.3);
}
#container .controls {
    width: 60%;
    margin: auto;
}

#container .controls #input{
    width: 100%;
    height: 30px;
    font-size: 20px;
    padding-left: 5px;
    box-sizing: border-box;
    margin-bottom: 20px;
    border: 2px solid #b5c5dd;
    border-radius: 10px;
}
#container .controls #input:focus {
    outline: 0;

}

#container .controls button{
    width: 100%;
    background: white;
    border: none;
    height: 30px;
    margin-top: 2px;
    cursor: pointer;
    color: white;

}
#container .controls button:focus{
    outline: 0;
}

#container .controls button:hover{
    transform: scale(1.05);
}
#container .controls #add{
    background-color: #2980b9;
    border-radius: 10px;
}
#container .controls #remove {
    background-color: #c0392b;
    border-radius: 10px;

}
#container .mycheck {
    opacity: 1;
    border-radius: 10px;
}
.visual {
    opacity: 1 !important;
    border-radius: 10px;
}
Now we will cover the JavaScript part.
现在,我们将介绍JavaScript部分。
todo.js:
todo.js:
var ul = document.getElementById('list')    //line 1
var li;
var addButton = document.getElementById('add')  //line 2
addButton.addEventListener("click",addItem)

function addItem(){                         //line 3
    var input = document.getElementById('input')        //line 4
    var item = input.value;             //line 5
    var textNode = document.createTextNode(item)    //line 6
    if (item == '') {       //line 7
        msg= "Enter your Task"
        alert(msg)
        return false

    } else {                //line 8
        li = document.createElement('li')       //line 9
        let checkbox = document.createElement('input')         //line 10
        checkbox.type = 'checkbox'              //line 11
        checkbox.setAttribute('id','check')         //line 12

        let label = document.createElement('label')         //line 13

        ul.appendChild(label)                       //line 14
        li.appendChild(checkbox)
        label.appendChild(textNode)
        li.appendChild(label)
        ul.insertBefore(li, ul.childNodes[0])
        setTimeout(()=>{
            li.className = 'visual'
        },5)
        input.value = " "               //line 15
    }
}

var removeButton = document.getElementById('remove')        //line 16
removeButton.addEventListener("click",removeItem)       //line 17

function removeItem(){              //line 18
    li=ul.children
    for (let index = 0; index < li.length; index++) {   //line 19
        const element = li[index];              //line 20
        while(li[index] && li[index].children[0].checked){      //line 21
            ul.removeChild(li[index])
        }

    }
}
Explanation:
说明:
In line 1, 2 and 16 we just simply created two objects for our unordered list, add button and remove the button by getElementById() method. After line 2 we linked addButton with an eventListener.
在第1、2和16行中,我们只是为无序列表创建了两个对象,添加按钮,并通过getElementById()方法删除按钮。 在第2行之后,我们将addButton与eventListener链接在一起。
In line 3, we created an addItem function which we used with the Event listener earlier. Where we created an object for input and stored whatever value inside it in another variable name item, also we stored the text content of the item into textNode using createTextNode() method.
在第3行中,我们创建了一个addItem函数,该函数先前已与事件侦听器一起使用。 在创建用于输入的对象并将其中的任何值存储在另一个变量名称项目中的地方,我们还使用createTextNode()方法将项目的文本内容存储在textNode中 。
In line 7, we simply checked if the value of the input (textbox) is empty, if it will be empty it will pop an alert saying "enter your Task" otherwise it will run the else part where it will add a new task in the list.
在第7行中,我们只是简单地检查了input( textbox )的值是否为空,如果为空,它将弹出一个警报,提示“输入您的任务”,否则将运行else部分,在其中添加新任务名单。
From line 8 to 13 we created elements like li (list), label, checkbox input, in line 11 we used the setAttribute method to set the input as a checkbox. So far our new element is created but it is not been added to the list so far, in line 14 onwards we append child in ul, li,and label.
从第8行到第13行,我们创建了li (列表), label , 复选框输入之类的元素,在第11行中,我们使用setAttribute方法将输入设置为复选框。 到目前为止,我们已经创建了新元素,但到目前为止尚未将其添加到列表中,从第14行开始,我们在ul , li和label中追加child。
Since, we wanted to add a new task on the top of the existing list, we used insertBefore() method. If you have skipped the CSS part then you don't need the setTimeout() function, but if you added it then we used setTimeout() function slow transition which will turn the opacity of the new list to 1 (visible). In line 18, we created a removeItem function which was called in the linked eventListener of removeButton. What we did inside this function is we simply stored the children of ul (unordered list) into li which is in the form of an array. In that array we access it with for loop for each index and then we used nest loop to check the insideof the element of array whether it is checked or not also we checked whether the index is valid or not with li[index], it satisfies the above condition it simply remove it.
由于我们想在现有列表的顶部添加一个新任务,因此我们使用了insertBefore()方法。 如果您跳过了CSS部分,则不需要setTimeout()函数,但是如果添加了它,则可以使用setTimeout()函数缓慢过渡,它将新列表的不透明度变为1( 可见 )。 在第18行中,我们创建了removeItem函数,该函数在removeButton的链接eventListener中调用。 我们在此函数中所做的只是简单地将ul (无序列表)的子级以数组的形式存储到li中。 在该数组中,我们使用for循环为每个索引访问它,然后使用nest循环检查数组元素的内部是否被检查,还使用li [index]检查索引是否有效,它满足以上条件只需将其删除即可。
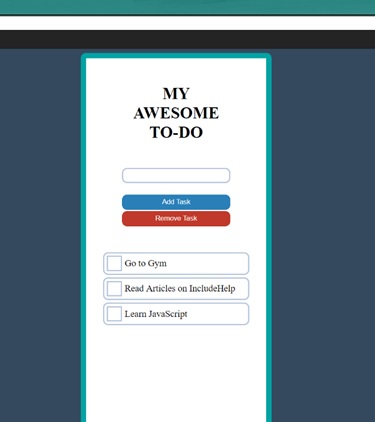
Screenshots (Output):
屏幕截图(输出):
We have done a marvelous job here, which look like this:
我们在这里做了出色的工作,看起来像这样:
翻译自: https://www.includehelp.com/code-snippets/web-application-a-to-do-list-using-javascript.aspx


 375
375


 被折叠的 条评论
为什么被折叠?
被折叠的 条评论
为什么被折叠?
 到【灌水乐园】发言


