


在本周的博客中,我认为我会做一些事情来帮助我学习更多有关算法的知识,并为编写采访编程做准备。 但是,以我的典型方式,我认为我会尝试使其形象化以做一些不同的事情,以使此有趣的内容读起来并对其进行尝试。 因此,让我们开始吧。
Partitioning the image
起初,我认为使用P5将图像划分为不同的像素,然后将这些图像随机排列以放置在图像的不同区域会很有趣。 但是,事实证明,JavaScript中的P5库和Java中的处理是通过两种不同的方式处理像素的。 Java,当使用loadPixels()函数时,将返回一个数组,该数组包含所有像素作为该数组中的单个元素,其中每个像素在整个图像上从左到右逐行读取。
现在在javascript中不是这种情况。 P5实际上会给您一个像素数组,其中每个像素实际上会分成该数组中的三个不同元素。 数组的元素实际上是第一个图像像素中的红色量,第二个元素是绿色的量,第三个元素是蓝色的量。
因此,与其将一个像素精确地映射到像素阵列的单个元素中,不如将每个单个像素拆分为阵列上的三个元素,每个元素代表各自的rgb值。
这使得交换像素和遍历像素数组比处理对象复杂得多。 同样,考虑到像素数量通常在数百或数千中,对该数组进行排序实际上会增加计算负担,并且观看时没有那么大的指导意义。
因此,我决定根据图像的任意块进行分区更适合该任务。 这里的问题是图像必须在x和y方向上根据指定的量进行分割。 在P5中看起来像:
const sketch = (p) => {
    let img, loc, array = [], amountX = 30, amountY = 30;
    let blockWidth, blockHeight;

...

p.setup = () => {
        img.resize(img.width - img.width % amountX, img.height - img.height % amountY)
        blockWidth = img.width / amountX
        blockHeight = img.height / amountY

        ...

    }

p.partition = (img) => {
        let array = []
        let newBlock
        for (let j = 0; j < amountY; j++) {
            for (let i = 0; i < amountX; i++) {
                newBlock = img.get(i * blockWidth, j * blockHeight, blockWidth, blockHeight)
                array.push({img: newBlock, index: i + j * amountX})
            }
        }
        return array
    }
}
如果标记有点令人困惑,那么它就是实例模式下的P5,因为我必须运行服务器才能将其用于图像处理. 不幸的是,除非代码在服务器上,否则P5无法使用图片. 而且,我想做一些可以部署的事情,并展示不同的排序算法如何相互竞争,从而使React得以使用。. I have a post about using React and P5 together if you're curious.
无论如何,上面的代码包含了我的素描函数中的所有内容,除了draw函数(几秒钟内即可完成)。 分区函数使用草图函数中的作用域变量获取img,并使用amountX和amountY将图像分解为网格。 将图像宽度除以数量X并将图像高度除以数量Y(分别称为blockWidth和blockHeight)也很有用,以了解每一列和每一行的宽度。
重要提示:我在设置功能中调整了图像的大小,因此没有百分比宽度或高度值,以后会引起问题。
因此,网格创建发生在嵌套的for循环中
p.partition = (img) => {
        let array = []
        let newBlock
        for (let j = 0; j < amountY; j++) {
            for (let i = 0; i < amountX; i++) {
                newBlock = img.get(i * blockWidth, j * blockHeight, blockWidth, blockHeight)
                array.push({img: newBlock, index: i + j * amountX})
            }
        }
        return array
    }
我们知道,在垂直方向上将有amountY块,在水平方向上将有数量X的块,因此在垂直和水平方向上计数两个变量是关键。 一旦在任意i和j的某个块处,我们在P5中使用get()将复制图像的某些指定部分。
get()函数仅获取所需图像的起始x和y值以及宽度和高度。 这会雕刻出一个很好的矩形或图像块。 起始的x和y将仅是块的宽度的i倍和块的高度的j倍。 然后,最终值将是我们的blockWidth和blockHeight。 然后,您只需将此值放入数组中并返回即可。 但是,我想到以后再进行排序,因此将每个图像及其在图像中的适当位置一起推入,以便以后对其进行正确排序。
Now Do the Shuffle
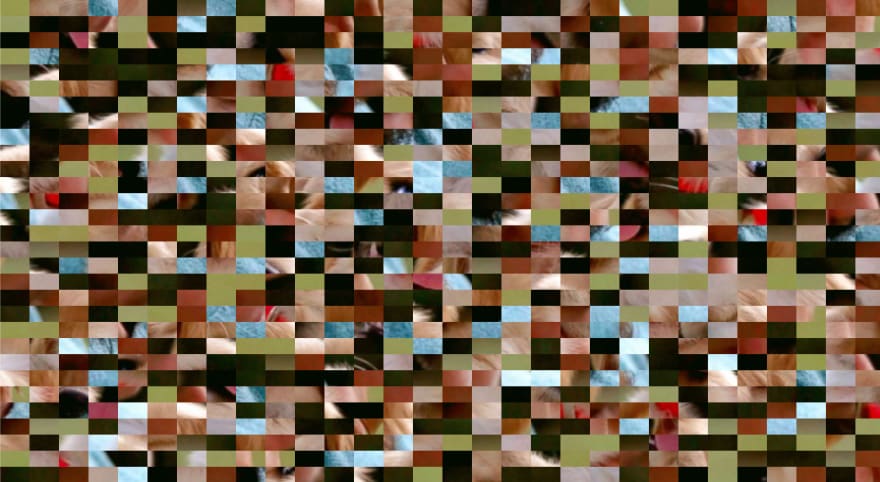
有了图像块阵列后,在进行排序之前,重要的事情是适当地对阵列进行洗牌。 为此,我读到了这段代码足以随机地对数组进行随机排序。
array.sort((a,b) => Math.random() - 0.5)
However I read an article by the creator of D3 that this algorithm is no good at all. 原因似乎是数学.random constantly returns a random value and thus doesn't obey transitivity for comparing things (a < b and b < c implies a < c). Mike Bostock, the author of the article, does a good job visualizing the bias in this algorithm when a random algorithm should have absolutely no bias for any point whatsoever. 相反,他建议使用此算法:
function shuffle(array) {
  var n = array.length, t, i;
  while (n) {
    i = Math.random() * n-- | 0; // 0 ≤ i < n
    t = array[n];
    array[n] = array[i];
    array[i] = t;
  }
  return array;
}
实际上,这确实做得更好,没有表现出对某些点的偏见,实现了我们真正随机的想法。 这只是循环遍历数组,并且在每个索引处随机选择一个元素与之交换。 当然,您可能会多次交换元素,但是它可以完成工作,如下所示:
Now the Sorting
这是对图像进行分区并添加正确的索引属性的第一步很重要的地方。 可视化正在执行的排序的棘手事情是,您将使用draw函数作为外部for循环迭代器。 由于此函数被反复调用,因此我们必须在草图范围中初始化iterator变量,以便其持久存在。 我的整个草图如下所示:
const sketch = (p) => {
    let img, loc, array = [], amountX = 50, amountY = 50;
    let i = 0;
    let blockWidth, blockHeight;
    const path = './puppy.jpg'

    p.preload = () => {
        img = p.loadImage(path)
    }

    p.setup = () => {
        img.resize(img.width - img.width % amountX, img.height - img.height % amountY)
        blockWidth = img.width / amountX
        blockHeight = img.height / amountY
        p.createCanvas(img.width * 2,img.height);
        array = p.partition(img);
        p.background(255);
        p.image(img, img.width, 0);
        shuffle(array)
    }

    p.draw = () => {
        if (i < array.length) {
            for (let j = 0; j < array.length - i - 1; j++) {
                if (array[j + 1].index < array[j].index) {
                    let t = array[j];
                    array[j] = array[j + 1];
                    array[j + 1] = t;
                }
            }
            i++;
        } else {
            p.noLoop()
        }
        for (let i = 0; i < amountX; i++) {
            for (let j = 0; j < amountY; j++) {
                p.image(array[i + j * amountX].img, i * blockWidth, j * blockHeight)
            }
        }
    }

    p.partition = (img) => {
        ...
    }
}
重要的是在草图和draw函数的前几行中声明的i变量。 我只是我们的迭代器,然后一行:
if (i < array.length) {
            for (let j = 0; j < array.length - i - 1; j++) {
                if (array[j + 1].index < array[j].index) {
                    let t = array[j];
                    array[j] = array[j + 1];
                    array[j + 1] = t;
                }
            }
            i++;
        } else {
            p.noLoop()
        }
是冒泡排序的非常标准的实现。 我还没有实现其他排序算法,但是我绝对会计划在上面。 我在这里不打算讨论冒泡排序,因为我认为关于该算法的信息非常丰富,因为它最容易实现。
然后,对于每次我们进行的迭代,我都会循环遍历图像数组,并将其输出到画布上的正确位置,此处是这样:
for (let i = 0; i < amountX; i++) {
            for (let j = 0; j < amountY; j++) {
                p.image(array[i + j * amountX].img, i * blockWidth, j * blockHeight)
            }
        }
这是制作分区的相同的double for循环,但用于显示每个图像。
这几乎就是基础. 稍后再检查以添加可视化工具. You can see it in action here and the repository for the code can be found here.


 4004
4004


 被折叠的 条评论
为什么被折叠?
被折叠的 条评论
为什么被折叠?
 到【灌水乐园】发言


