


 这个Tkinter教程的第三部分详细介绍了如何利用Tkinter构建更复杂的GUI功能,包括文本框配置、下拉框、复选按钮、单选按钮、消息框、Spinbox、进度条和菜单栏小部件的创建,帮助用户更好地实现交互和反馈。
tkinter教程
介绍 (Introduction)
In the first and the second part of Tkinter tutorial, we discussed how to create simple GUI with basic GUI building blocks of Tkinter module. In this tutorial, we’ll go through how to build complex, yet very useful GUI features using Tkinter.
在第一和第二的Tkinter教程中,我们讨论了如何创建的Tkinter模块的基本GUI积木简单的GUI。 在本教程中,我们将介绍如何使用Tkinter构建复杂但非常有用的GUI功能。
添加文本框小部件并对其进行配置 (Adding Textbox widget and configuring it)
We have seen how to add basic widgets to our Window. Let’s now try to configure our GUI based on user’s input. The most common way to get input from the user is textbox. The `tkinter` module supports a class named `Entry` to create a text box. Consider the below example:
我们已经看到了如何向窗口添加基本的小部件。 现在,让我们尝试根据用户的输入来配置GUI。 从用户获取输入的最常见方法是文本框。 tkinter模块支持名为Entry的类来创建文本框。 考虑以下示例:
import tkinter
root_window = tkinter.Tk()
root_window.geometry('300x200')
root_window.title("Tkinter tutorial")
def clicked():
    res = "Hi " + txt_box.get()
    label_widget.configure(text=res)
label_widget = tkinter.Label(root_window, text="Hi", font=("Arial Italic", 10))
label_widget.grid(column=0, row=0)
txt_box = tkinter.Entry(root_window,width=10)
txt_box.grid(column=1, row=0)
fn_btn = tkinter.Button(root_window, text="Click", bg="grey", fg="black", font=("Arial Bold", 10), command=clicked)
fn_btn.grid(column=2, row=0)
root_window.mainloop()
In the above example, we have created a text box along with a few other widgets. The output is as follows:
在上面的示例中,我们创建了一个文本框以及其他一些小部件。 输出如下:
Output:
输出:
If you enter a text on the text box and click the “Click” button, the program will display the string “Hi” concatenated along with the text got as input.
如果在文本框中输入文本,然后单击“单击”按钮,则程序将显示字符串“ Hi”和输入的文本串联在一起。
Output:
输出:
创建一个下拉框小部件 (Creating a Dropdown box widget)
There may occur situations where we need to get input from the user by making the user select from a list of options displayed in a dropdown/combo box. The ttk library provides a class named `Combobox` to create a dropdown/combo box widget. So, we need to import the ttk library to use this function. Let’s create a sample dropdown box widget to get the Gender from the user.
在某些情况下,我们需要通过使用户从下拉列表/组合框中显示的选项列表中进行选择来从用户那里获取输入。 ttk库提供了一个名为“ Combobox”的类,用于创建下拉列表/组合框小部件。 因此,我们需要导入ttk库才能使用此功能。 让我们创建一个示例下拉框小部件以从用户那里获取性别。
import tkinter
from tkinter .ttk import *
root_window = tkinter.Tk()
root_window.geometry('300x200')
root_window.title("Tkinter tutorial")
label_widget = tkinter.Label(root_window, text="Gender", font=("Arial Italic", 10))
label_widget.grid(column=0, row=0)
combo = Combobox(root_window)
combo['values']= ("Male", "Female")
combo.grid(column=1, row=0)
root_window.mainloop()
This code creates a combo box widget as shown below.
此代码创建一个组合框窗口小部件,如下所示。
Output:
输出:
添加一个Checkbutton小部件 ()
The ttk library supports a class named `Checkbutton` to create checkbox widget. Let’s consider the below example:
ttk库支持一个名为“ Checkbutton”的类来创建复选框小部件。 让我们考虑以下示例:
from tkinter import *
from tkinter.ttk import *
main_window = Tk()
main_window.geometry('300x200')
chk_state = BooleanVar()
chk_state.set(True)
chk = Checkbutton(main_window, text='I agree to the terms and conditions of this site', var=chk_state)
chk.grid(column=0, row=0)
main_window.mainloop()
As you see, we have used `Checkbutton` class to create a check button. We can set the check box’s state by passing the check value to be enabled by default by using the `set` argument.
如您所见,我们已经使用`Checkbutton`类来创建一个检查按钮。 我们可以通过使用set参数传递要默认启用的检查值来设置复选框的状态。
chk_state = BooleanVar()
chk_state.set(True)
Output:
输出:
If you see, the check value is set to the checked state.
如果看到,则将检查值设置为已检查状态。
创建单选按钮小部件 ()
The ttk library provides `Radiobutton` class to add radio button widgets. Let’s create a basic restaurant order app that allows the user to select the size of pizza they want to order by clicking at the desired radio button.
ttk库提供“ Radiobutton”类以添加单选按钮小部件。 让我们创建一个基本的餐厅订购应用程序,该应用程序允许用户通过单击所需的单选按钮来选择要订购的比萨饼的大小。
from tkinter import *
from tkinter.ttk import *
main_window = Tk()
main_window.geometry('600x200')
label_widget = Label(main_window, text="Please select the size of pizza you like to order:", font=("Arial Italic", 10))
label_widget.grid(column=0, row=0)
s1 = Spinbox(main_window, from_=0, to=100, width=5)
main_window.mainloop()
Output:
输出:
Note: You must remember to set different values for each radio button.
注意:您必须记住为每个单选按钮设置不同的值。
创建消息框 (Creating Message boxes)
The reason why many users prefer the GUI interface is because it is user-friendly and makes the user know if an error/warning occurs. This is achieved through message boxes.
许多用户偏爱GUI界面的原因是因为它易于使用,并且使用户知道是否发生错误/警告。 这是通过消息框实现的。
Tkinter module allows us to create Message Boxes, which are simple, yet widely used widgets. Message boxes can be used to display a message to the user to understand better what went wrong by either giving a warning or an error message.
Tkinter模块允许我们创建消息框,它们是简单但使用广泛的窗口小部件。 消息框可用于向用户显示消息,以通过发出警告或错误消息来更好地了解出了什么问题。
Message boxes can also be used to allow the user to take a simple yes/no decision. The following example demonstrates the use of different types of message boxes.
消息框还可以用于允许用户做出简单的是/否决定。 下面的示例演示了不同类型的消息框的用法。
from tkinter import messagebox
main_window = Tk()
main_window.geometry('600x200')
def msgbox_demo():
    messagebox.showinfo("Info", "This is a sample Message box")
    messagebox.showwarning("Warning", "Save before exiting")
    messagebox.showerror("Error", "File not found")

    okcancel = messagebox.askokcancel("Exit without saving?")
    print(okcancel)

    yesno = messagebox.askyesno("Continue?")
    print(yesno)
b1 = Button(main_window, text='Display message boxes', command=msgbox_demo)
b1.pack(fill='x')
main_window.mainloop()
The above code displays the following output.
上面的代码显示以下输出。
Output:
输出:
You can see the message boxes one after the other, by selecting the options displayed. The function `msgbox_demo` lets 5 message boxes pop up one after the other – each is displayed after the user interaction with the previous one. These message boxes return values based on the decisions, in sequence. We can choose the required message style according to our needs.
We can check the status of which button was clicked, by using the result variable. If the user clicks OK or yes or retry button, the function will return a True value. In case the user chooses no or cancel button, the function will return a False value.
通过选择显示的选项,您可以一个接一个地看到消息框。 msgbox_demo函数使5个消息框一个接一个地弹出–在用户与前一个交互后显示。 这些消息框将根据决策顺序返回值。 我们可以根据需要选择所需的消息样式。
我们可以使用结果变量来检查单击哪个按钮的状态。 如果用户单击“确定”,“是”或“重试”按钮,则该函数将返回True值。 如果用户选择否或取消按钮,则该函数将返回False值。
创建Spinbox小部件 (Creating Spinbox widget)
The Spinbox widget is similar to the Entry widget. The difference is that the entry widget allows the user to enter a value in any range. Whereas, the Spinbox widget provides the range of values for the user to choose from, from which, the user selects a value. It is used to give the user is a range of values to choose from. Below is a sample to create a Spinbox using Tkinter.
Spinbox小部件类似于Entry小部件。 区别在于输入小部件允许用户输入任何范围内的值。 而Spinbox小部件提供值范围供用户选择,用户从中选择一个值。 它用于为用户提供一系列值可供选择。 以下是使用Tkinter创建Spinbox的示例。
from tkinter import *
main_window = Tk()
main_window.geometry('600x200')
label_widget = Label(main_window, text="Please select number of pizzas you would like to order:", font=("Arial Italic", 10))
label_widget.grid(column=0, row=0)
s1 = Spinbox(main_window, from_=0, to=10, width=5)
s1.grid(column=1, row=0)
main_window.mainloop()
The output is as shown below.
输出如下所示。
Output:
输出:
创建进度栏小部件 (Creating a Progress bar widget)
Progress bar is a useful element of advanced GUI features. This is because the progress bar gives a clue to the user to know how long it takes to download, time taken to upload etc. by showing the progress of the task happening at the background, visually. This feature is a part of the `ttk` module. Hence, we need to import the ttk module for the feature to work. The following example shows a sample implementation of the progress bar feature using Tkinter:
进度栏是高级GUI功能的有用元素。 这是因为进度条通过直观地显示在后台发生的任务的进度,为用户提供了一条线索,让他们知道下载需要多长时间,上传需要花费时间等。 该功能是“ ttk”模块的一部分。 因此,我们需要导入ttk模块才能使用该功能。 以下示例显示了使用Tkinter的进度条功能的示例实现:
from tkinter import *
from tkinter.ttk import *
main_window = Tk()
main_window.geometry('300x200')
style = Style()
style.configure("black.Horizontal.TProgressbar", background='grey')
pbar = Progressbar(main_window, length=200, style='black.Horizontal.TProgressbar')
pbar['value'] = 40
pbar.grid(column=0, row=0)
main_window.mainloop()
Here, we have created a Progressbar by first choosing the background color and then by applying the created style to the Progressbar.
在这里,我们通过先选择背景色,然后将创建的样式应用于进度栏来创建了进度栏。
Output:
输出:
创建菜单栏小部件 ()
Allowing the user to select an option from a menu is a common feature of graphical user interface. The Menubar widget combines at least many functional buttons (like Cut, Copy, or Paste). Creating even complicated GUIs can be done in a jiffy using Tkinter. Let’s look at the following example of creating a Menubar widget:
允许用户从菜单中选择选项是图形用户界面的常见功能。 菜单栏小部件至少结合了许多功能按钮(例如“剪切”,“复制”或“粘贴”)。 使用Tkinter可以轻松创建甚至复杂的GUI。 让我们看一下创建菜单栏小部件的以下示例:
from tkinter import *
from tkinter import Menu
root = Tk()
menu = Menu(root)
list_option = Menu(menu)
list_option.add_command(label='Cut')
list_option.add_command(label='Copy')
list_option.add_command(label='Paste')
menu.add_cascade(label='Edit', menu=list_option)
root.config(menu=menu)
root.mainloop()
We have created a Menubar using `menu.add_cascade` function. We can create multiple menu items we need in the same way.
我们使用`menu.add_cascade`函数创建了一个菜单栏。 我们可以用相同的方式创建我们需要的多个菜单项。
Output:
输出:
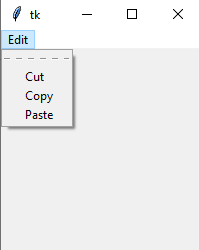
Create-Menu-Tk
创建菜单Tk
结论 (Conclusion)
We have covered the significant aspects of Python GUI development by using Tkinter. Hope this tutorial would help you to quickly build GUIs in your Python projects.
我们已经介绍了使用Tkinter开发Python GUI的重要方面。 希望本教程可以帮助您在Python项目中快速构建GUI。
翻译自: https://www.journaldev.com/33423/tkinter-tutorial-part-3
tkinter教程


 719
719

 被折叠的 条评论
为什么被折叠?
被折叠的 条评论
为什么被折叠?
 到【灌水乐园】发言


