


 Linux rsync是一个用于在Linux系统间复制和同步文件的命令,支持本地和远程同步。本文介绍了rsync的基本语法、常用选项,包括-z、-v、-r、-h、-a等,并给出了本地和远程复制文件、目录的实例,还涉及通过SSH的同步,显示进度,以及使用--include和--exclude选项进行选择性同步。
linux rsync
Rsync, short for remote sync, is a Linux command used for copying and synchronizing files, between 2 Linux systems. It works in such a way that any additional changes made to a file or directory are replicated on another Linux system.
Rsync( 远程同步的缩写)是一个Linux命令,用于在2个Linux系统之间复制和同步文件。 它的工作方式是,在另一个Linux系统上复制对文件或目录所做的任何其他更改。
With Linux rsync command, you can seamlessly copy and synchronize backups locally and remotely between Linux systems & servers. In this article, we will examine various command options that you can use alongside rsync command.
使用Linux rsync命令,您可以在Linux系统和服务器之间本地和远程无缝复制和同步备份。 在本文中,我们将研究可与rsync命令一起使用的各种命令选项。
Linux rsync命令的基本语法 (Basic syntax for Linux rsync command)
The syntax for rsync is briefly summed up below.
下面简要总结了rsync的语法。
$ rsync options source destination与rsync命令一起使用的选项 (Options used with rsync command)
- -z: This compresses data. -z :压缩数据。
- -v: This displays the process in verbose mode. -v :以详细模式显示进程。
- -r: The option copies data recursively (However, the option doesn’t preserve timestamps and file permission during data transfer). -r :该选项以递归方式复制数据(但是,该选项在数据传输期间不保留时间戳和文件许可权)。
- -h: This outputs information in a human-readable format. -h :以人类可读的格式输出信息。
- -a: This not only allows copying of files recursively but also preserves symbolic links, timestamps, file permissions as well as user and groups ownerships. -a :这不仅允许递归复制文件,而且还保留符号链接,时间戳,文件权限以及用户和组的所有权。
在本地复制文件和目录 (Copy files and directories locally)
You can sync file locally from one location to another in a Linux machine using the example provided below.
您可以使用下面提供的示例在Linux机器中将文件从一个位置本地同步到另一个位置。
$ rsync -zvh backup.tar /opt/backup_dirIn the example above, the tarball backup.tar is copied and synchronized to the /opt/backup_dir directory.
在上面的示例中,将tarball backup.tar复制并同步到/opt/backup_dir目录。
Sample output
样品输出
To copy a directory locally from one location to another:
要将目录从一个位置本地复制到另一位置 :
The syntax will be similar to copying files, only that in this case, we use the -a flag for recursive copying.
语法将类似于复制文件,只是在这种情况下,我们使用-a标志进行递归复制。
In the example below, we are copying and synching the deb_packages directory to the /opt/backup_dir directory.
在下面的示例中,我们将deb_packages目录复制并同步到/opt/backup_dir目录。
$ rsync -azvh deb_packages /opt/backup_dirSample output
样品输出
在远程服务器之间复制/同步文件或目录 (Copy/Sync files or directories to and from a remote server)
To copy a directory to a remote server, the username and IP address of the server has to be specified alongside the destination folder.
要将目录复制到远程服务器,必须在目标文件夹旁边指定服务器的用户名和IP地址。
In the example below, the deb_packages directory is copied to a remote server with an IP 66.152.163.19 using root user credentials and saved in the root home directory.
在下面的示例中,使用根用户凭据将deb_packages目录复制到IP 66.152.163.19的远程服务器上,并保存在根主目录中。
$ rsync -avz deb_packages root@66.152.163.19:Sample output
样品输出
To copy and sync a directory from a remote server to a local PC:
要将目录从远程服务器复制并同步到本地PC :
To copy and sync files from a remote system to a Local Linux system, use the example below
要将文件从远程系统复制并同步到本地Linux系统,请使用以下示例
$ rsync -avzh root@66.152.163.19:documents /opt/backup_dirIn the above example, the directory documents is copied recursively from the remote system with an IP 66.152.163.19 to the local system in the /opt/backup_dir directory.
在上面的示例中,目录documents以IP 66.152.163.19从远程系统递归复制到/opt/backup_dir目录中的本地系统。
通过SSH的Rsync命令 (Rsync command over SSH)
Rsync can be used alongside SSH protocol to secure or encrypt the files being sent to and from a Linux system. this ensures that no one can eavesdrop the data that you are transferring over the network.
Rsync可以与SSH协议一起使用,以保护或加密从Linux系统发送或从Linux系统发送的文件。 这样可以确保没有人能够窃听您通过网络传输的数据。
To copy a file from a local server to a remote server using rsync over SSH:
要通过SSH使用rsync将文件从本地服务器复制到远程服务器:
In this example, we will use the -e option with rsync to specify a protocol, in this case, SSH.
在此示例中,我们将-e选项与rsync一起使用以指定协议,在本例中为SSH。
$ rsync -avhze ssh backup.tar root@66.152.163.19:/backup_dirSample output
样品输出
To copy a file from a remote server to a local system using rsync over SSH:
要通过SSH使用rsync将文件从远程服务器复制到本地系统,请执行以下操作:
Just like in the previous example, the rsync command is used together with the -e option.
就像前面的示例一样,rsync命令与-e选项一起使用。
$ rsync -avzhe ssh root@66.152.163.19:/backup_dir /tmp/Sample output
样品输出
使用rsync命令传输数据时显示进度 (Display progress while transferring data with rsync command)
If you want to view progress during transfer of data, use the --progress option. This displays the file and estimated time to completion of data transfer.
如果要在数据传输过程中查看进度,请使用--progress选项。 这将显示文件和完成数据传输所需的估计时间。
Sample output
样品输出
带有–include和–exclude选项的Linux rsync命令 (Linux rsync command with –include and –exclude Options)
These options above help users to include and exclude files that they may want to be included or excluded in the syncing process.
上面的这些选项可帮助用户include和exclude他们可能希望在同步过程中包括或exclude文件。
In the example below, rsync command will include those files in /var/lib directory which starts with ‘p’ and excludes all other files and directory.
在下面的示例中,rsync命令将在/var/lib目录中包含以'p'开头的那些文件,并排除所有其他文件和目录。
$ rsync -avz --include 'p*' --exclude '*' /var/lib root@66.152.163.19:/opt/backup_dirSample output
样品输出
设置要传输的文件的最大大小 (Set maximum size of files to be transferred)
You can define the maximum file size that is to be transferred and synced using the “–max-size” option.
您可以使用“ –max-size”选项定义要传输和同步的最大文件大小。
$ rsync -avzh --max-size='50M' deb_packages root@66.152.163.19:/opt/backup-dirThe command above limits transfer of file in deb_packages directory to 50 Megabytes. This implies that only files equal to or less than 50 MB will be transferred and synched.
上面的命令将deb_packages目录中的文件传输限制为50 MB。 这意味着仅等于或小于50 MB的文件将被传输和同步。
Sample output
样品输出
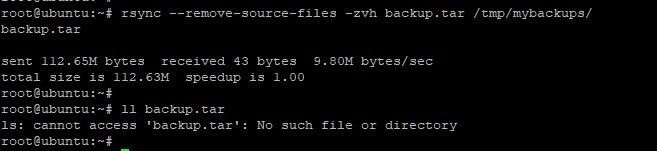
成功传输后删除源文件 (Delete source Files after successful Transfer)
If you are making a backup copy of your files toa remote target but you wish not to keep a local copy, use the –remove-source-files option as shown.
如果要将文件的备份副本复制到远程目标,但又不想保留本地副本,请使用–remove-source-files选项,如图所示。
$ rsync --remove-source-files -zvh backup.tar /tmp/mybackups/Sample output
样品输出
We hope this article has been beneficial to you. If you have any query, do get back to us with your feedback.
希望本文对您有所帮助。 如果您有任何疑问,请与我们联系并提供反馈。
翻译自: https://www.journaldev.com/31397/linux-rsync-command-examples
linux rsync


 2938
2938

 被折叠的 条评论
为什么被折叠?
被折叠的 条评论
为什么被折叠?
 到【灌水乐园】发言


