


Jenkins is an open-source automation server based on Java that automates repetitive technical tasks involved in the continuous integration and delivery of software.
Jenkins是基于Java的开源自动化服务器,可自动执行与软件的持续集成和交付有关的重复性技术任务。
In this tutorial, we will show you how you can install the latest version of Jenkins on your Ubuntu 18.04 system. Let’s get started!
在本教程中,我们将向您展示如何在Ubuntu 18.04系统上安装最新版本的Jenkins 。 让我们开始吧!
步骤1:安装先决条件 (Step 1: Install Prerequisites)
Jenkins, being an open-souce Java application, requires OpenJDK 8 installed on your system. We can get OpenJDK 8 directly from the apt repositories.
Jenkins是开放源代码的Java应用程序,需要在系统上安装OpenJDK 8 。 我们可以直接从apt信息库获得OpenJDK 8 。
But before that, as always, update any system-critical packages first.
但在此之前,与往常一样,请先更新所有系统关键软件包。
sudo apt update
sudo apt install openjdk-8-jdk
This will install OpenJDK 8 on your system. Now that we have our prerequisites ready, we are ready to download the Jenkins package!
这将在您的系统上安装OpenJDK 8 。 现在我们已经准备好先决条件,现在可以下载Jenkins软件包了!
步骤2:检索并添加GPG公钥 (Step 2: Retrieve and add the GPG Public Keys)
The latest version of jenkins for Debian based systems is available on this repository.
该存储库中提供了用于基于Debian的系统的最新版本的jenkins。
We can install the necessary packages from this link. But before we download anything, we must verify the public GPG key for this package.
我们可以从此链接安装必要的软件包。 但是在下载任何内容之前,我们必须验证此软件包的公共GPG密钥。
We always need to get the public key for that package so that we know that it is valid. We can then download the required data and install the package securely.
我们总是需要获取该程序包的公钥,以便我们知道它是有效的。 然后,我们可以下载所需的数据并安全地安装软件包。
So let’s get the GPG public key for Jenkins, which is available at the link:
因此,让我们获取Jenkins的GPG公钥,该公钥可通过以下链接获得:
https://pkg.jenkins.io/debian/jenkins.io.key
https://pkg.jenkins.io/debian/jenkins.io.key
To download the key, we will use the wget command from the Terminal.
要下载密钥,我们将在终端上使用wget命令。
wget https://pkg.jenkins.io/debian/jenkins.io.key
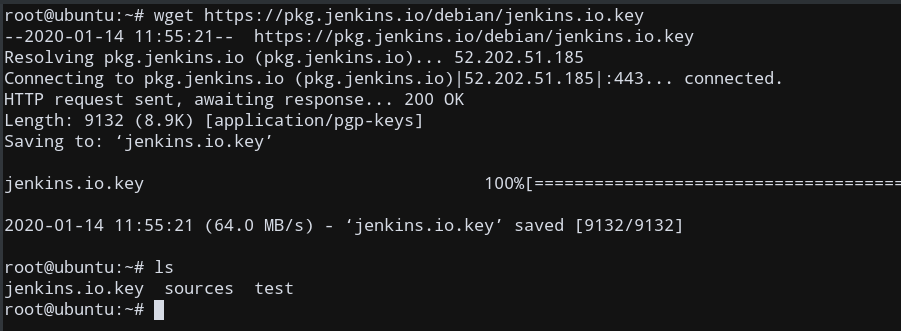
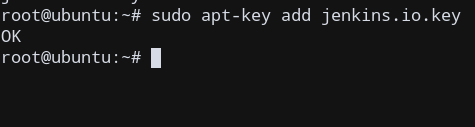
The downloaded key in my case is called jenkins.io.key. After the public key is downloaded, add it to the system keys using apt-key.
在我的情况下,下载的密钥称为jenkins.io.key 。 下载公钥后,使用apt-key将其添加到系统密钥中。
sudo apt-key add jenkins.io.key
We will get an OK response as the output, if this command was successful.
如果此命令成功,我们将获得OK响应作为输出。
Now that we have the necessary requirements and the public key is also added, we can now add the Jenkins repository to our list of sources.
现在我们有了必要的要求,并且还添加了公钥,我们现在可以将Jenkins存储库添加到我们的源列表中。
步骤3:将Jenkins储存库添加到“来源”列表 (Step 3: Add the Jenkins Repository to the Sources List)
We need to add the Jenkins source to our list of sources in the system so that any future updates can occur using that source URL when using apt update.
我们需要将Jenkins源添加到系统中的源列表中,以便在使用apt update时可以使用该源URL进行任何将来的apt update 。
We need to modify /etc/apt/sources.list.
我们需要修改/etc/apt/sources.list 。
Use any text editor (like nano, vi, etc) and open /etc/apt/sources.list. I will be using vi editor to edit the file.
使用任何文本编辑器(例如nano,vi等),然后打开/etc/apt/sources.list 。 我将使用vi编辑器来编辑文件。
Go to the end of the file, and add this line to ensure that we add the repository source link.
转到文件末尾,并添加此行,以确保我们添加了存储库源链接。
deb https://pkg.jenkins.io/debian-stable binary/

Exit the editor, after saving your changes.
保存更改后,退出编辑器。
Now, we are ready to update the system and install our package!
现在,我们准备更新系统并安装我们的软件包!
步骤4:在Ubuntu上安装Jenkins (Step 4: Install Jenkins on Ubuntu)
Now that we have our sources with us, we are ready to install Jenkins!
现在我们有了我们的资源,就可以开始安装Jenkins了!
It’s simple. First, we update our system and other critical packages. Then, we fetch and install the latest version of Jenkins from the source link. The package name is jenkins, so we shall install that using apt.
这很简单。 首先,我们更新系统和其他关键软件包。 然后,我们从源链接中获取并安装最新版本的Jenkins。 软件包名称是jenkins ,因此我们将使用apt安装它。
sudo apt update
sudo apt install jenkins
Now, if there aren’t any errors, we will return to our shell prompt, and our install has completed successfully!
现在,如果没有任何错误,我们将返回到shell提示符,并且我们的安装已成功完成!
步骤5:验证Jenkins安装 (Step 5: Verify Jenkins Installation)
If Jenkins was installed correctly, it would have then automatically started a Jenkins daemon process. So, we need to use the systemctl command and check if the jenkins service has started or not.
如果Jenkins安装正确,则它将自动启动Jenkins守护进程。 因此,我们需要使用systemctl命令并检查jenkins服务是否已启动。
sudo systemctl status jenkins

If the command works as expected, then you will see an output similar to mine, indicating that the jenkins service is active, which means that our installation was indeed successful!
如果该命令按预期工作,那么您将看到类似于我的输出,表明jenkins服务处于活动状态,这意味着我们的安装确实成功!
Now, by default, the installation of Jenkins only allows local access to the server. We therefore need to configure the ufw firewall to allow incoming connections to the port of the Jenkins server.
现在,默认情况下,安装Jenkins仅允许本地访问服务器。 因此,我们需要配置ufw防火墙以允许传入连接到Jenkins服务器的端口。
步骤6:允许传入的连接进入Jenkins (Step 6: Allow incoming connections into Jenkins)
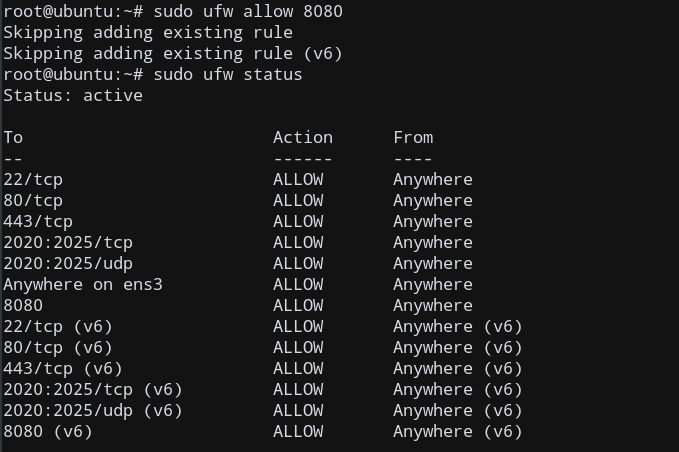
Jenkins, by default, runs on port 8080. We must allow the ufw firewall access to this port.
Jenkins默认情况下在端口8080上运行。 我们必须允许ufw防火墙访问此端口。
sudo ufw allow 8080
To check whether incoming traffic is allowed on port 8080, we can examine the ufw rules on the corresponding port. using:
要检查端口8080是否允许传入流量,我们可以检查相应端口上的ufw规则。 使用:
sudo ufw status
Your output will look something like this, indicating that incoming connections to 8080 are allowed.
您的输出将类似于以下内容,表明允许到8080传入连接。
Now, we are now ready to access the server using the IP Address of the Ubuntu host machine remotely.
现在,我们准备使用Ubuntu主机的IP地址远程访问服务器。
步骤7:在浏览器上访问Jenkins服务器 (Step 7: Visit the Jenkins Server on the Browser)
To set up your installation, visit Jenkins on its default port, 8080, using your server domain name or IP address.
要设置安装,请使用服务器域名或IP地址访问Jenkins的默认端口8080 。
Simply access it remotely using a web browser on any of your machines (client). Type:
只需使用任何计算机(客户端)上的Web浏览器远程访问它。 类型:
https://HOST_IP_OR_DOMAIN:8080
https://HOST_IP_OR_DOMAIN:8080
where HOST_IP_OR_DOMAIN represents the public IP Address / name of the current Ubuntu machine running Jenkins server.
其中HOST_IP_OR_DOMAIN表示运行Jenkins服务器的当前Ubuntu计算机的公共IP地址/名称。
You will get the below output, indicating that the server is indeed allowing remote access from a non-local client!
您将获得以下输出,指示服务器确实允许来自非本地客户端的远程访问!

To get the password, we need to display the below file on our Ubuntu server:
要获取密码,我们需要在Ubuntu服务器上显示以下文件:
sudo cat /var/lib/jenkins/secrets/initialAdminPassword
Copy the 32-bit password onto the Administrator password field. Now, we are ready to go!
将32位密码复制到管理员密码字段。 现在,我们准备出发了!

结论 (Conclusion)
In this tutorial, we saw how we can install and setup Jenkins on Ubuntu 18.04 system to be accessed from any remote client machine in just a few simple steps.
在本教程中,我们看到了如何在Ubuntu 18.04系统上安装和设置Jenkins ,只需几个简单的步骤就可以从任何远程客户端计算机上对其进行访问。
翻译自: https://www.journaldev.com/33965/install-jenkins-on-ubuntu


 1192
1192

 被折叠的 条评论
为什么被折叠?
被折叠的 条评论
为什么被折叠?
 到【灌水乐园】发言


